1995 JEEP YJ manual transmission
[x] Cancel search: manual transmissionPage 1623 of 2158
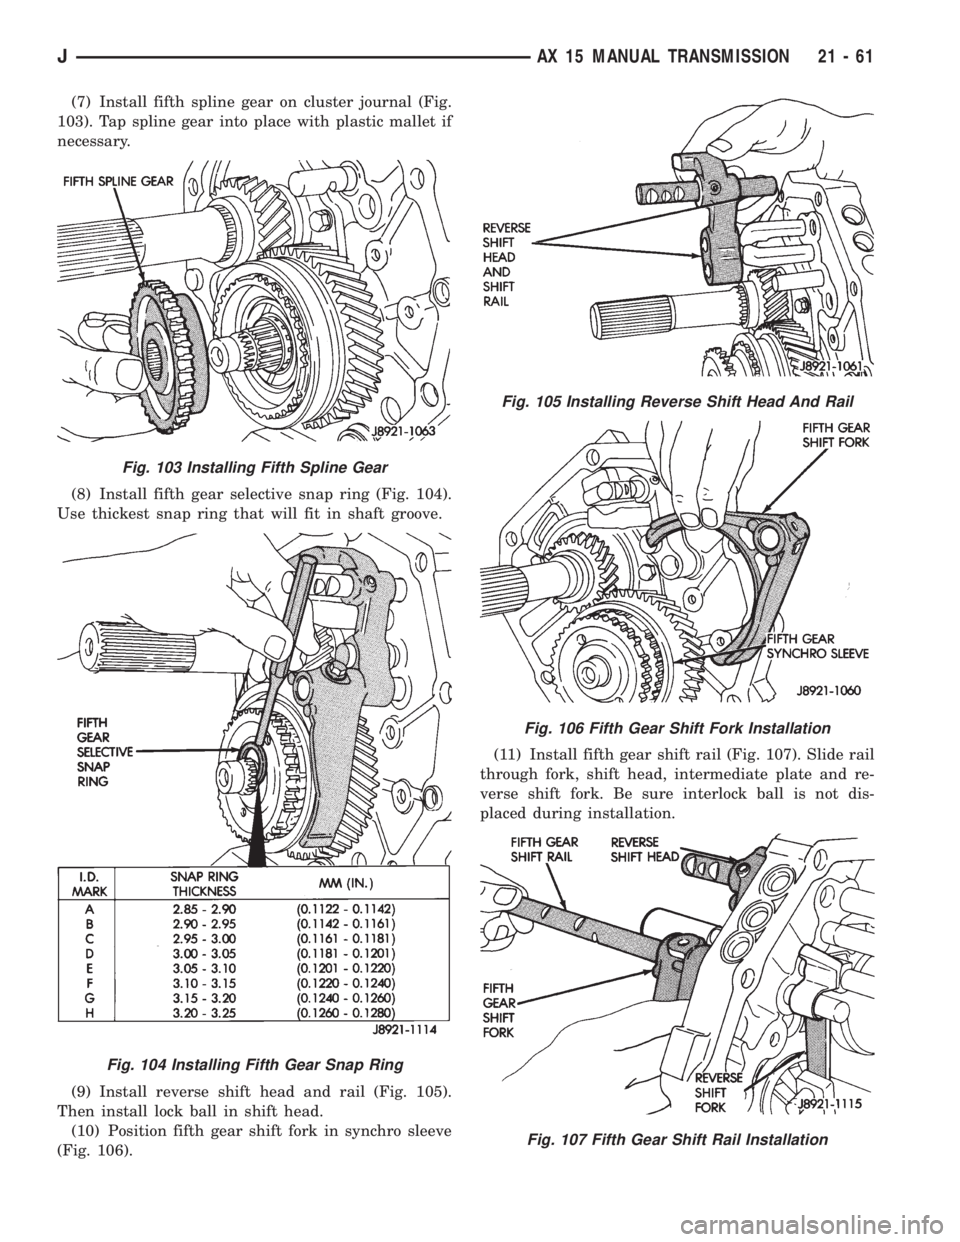
(7) Install fifth spline gear on cluster journal (Fig.
103). Tap spline gear into place with plastic mallet if
necessary.
(8) Install fifth gear selective snap ring (Fig. 104).
Use thickest snap ring that will fit in shaft groove.
(9) Install reverse shift head and rail (Fig. 105).
Then install lock ball in shift head.
(10) Position fifth gear shift fork in synchro sleeve
(Fig. 106).(11) Install fifth gear shift rail (Fig. 107). Slide rail
through fork, shift head, intermediate plate and re-
verse shift fork. Be sure interlock ball is not dis-
placed during installation.
Fig. 103 Installing Fifth Spline Gear
Fig. 104 Installing Fifth Gear Snap Ring
Fig. 105 Installing Reverse Shift Head And Rail
Fig. 106 Fifth Gear Shift Fork Installation
Fig. 107 Fifth Gear Shift Rail Installation
JAX 15 MANUAL TRANSMISSION 21 - 61
Page 1624 of 2158
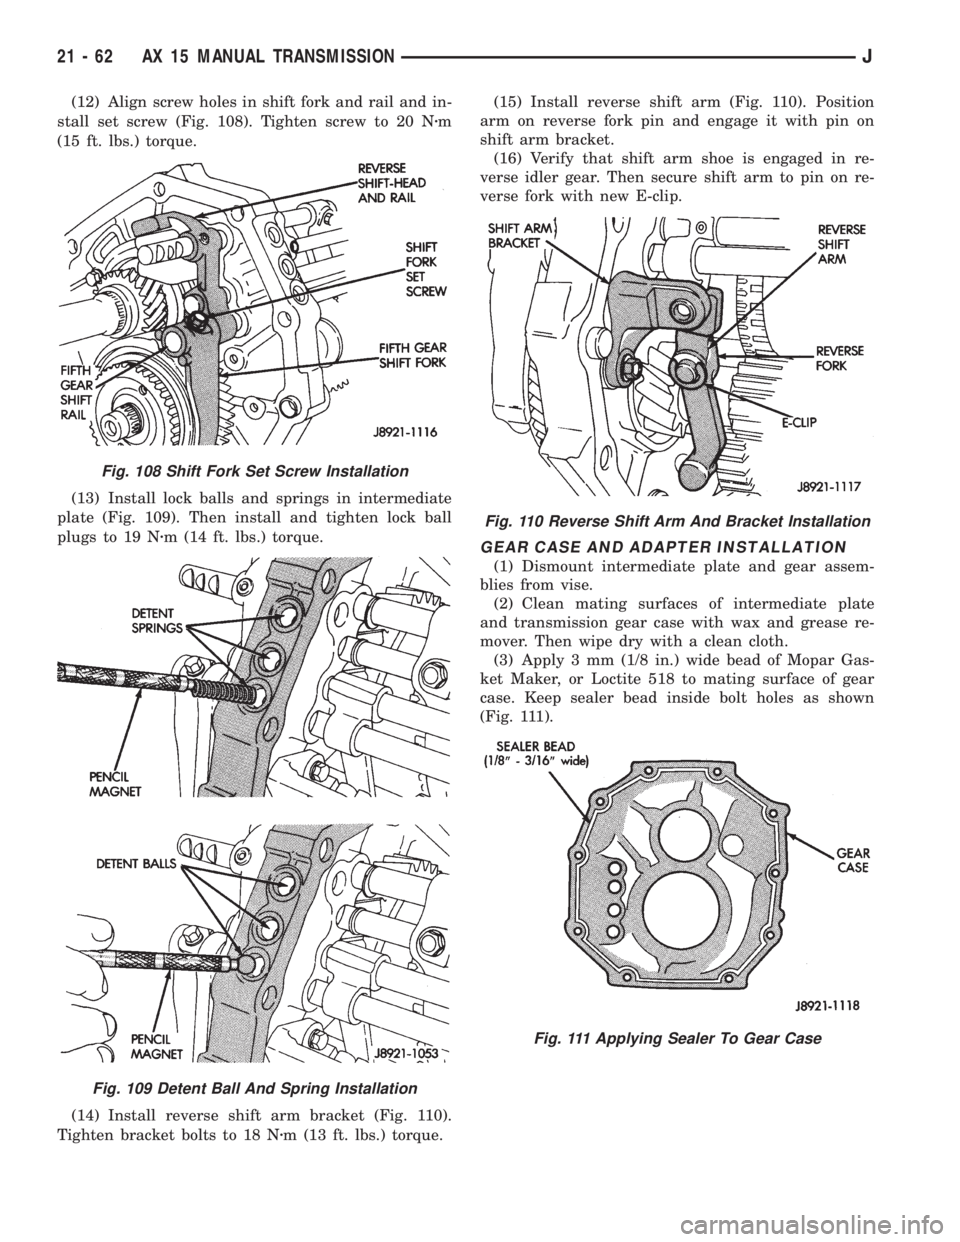
(12) Align screw holes in shift fork and rail and in-
stall set screw (Fig. 108). Tighten screw to 20 Nzm
(15 ft. lbs.) torque.
(13) Install lock balls and springs in intermediate
plate (Fig. 109). Then install and tighten lock ball
plugs to 19 Nzm (14 ft. lbs.) torque.
(14) Install reverse shift arm bracket (Fig. 110).
Tighten bracket bolts to 18 Nzm (13 ft. lbs.) torque.(15) Install reverse shift arm (Fig. 110). Position
arm on reverse fork pin and engage it with pin on
shift arm bracket.
(16) Verify that shift arm shoe is engaged in re-
verse idler gear. Then secure shift arm to pin on re-
verse fork with new E-clip.
GEAR CASE AND ADAPTER INSTALLATION
(1) Dismount intermediate plate and gear assem-
blies from vise.
(2) Clean mating surfaces of intermediate plate
and transmission gear case with wax and grease re-
mover. Then wipe dry with a clean cloth.
(3) Apply 3 mm (1/8 in.) wide bead of Mopar Gas-
ket Maker, or Loctite 518 to mating surface of gear
case. Keep sealer bead inside bolt holes as shown
(Fig. 111).
Fig. 108 Shift Fork Set Screw Installation
Fig. 109 Detent Ball And Spring Installation
Fig. 110 Reverse Shift Arm And Bracket Installation
Fig. 111 Applying Sealer To Gear Case
21 - 62 AX 15 MANUAL TRANSMISSIONJ
Page 1625 of 2158
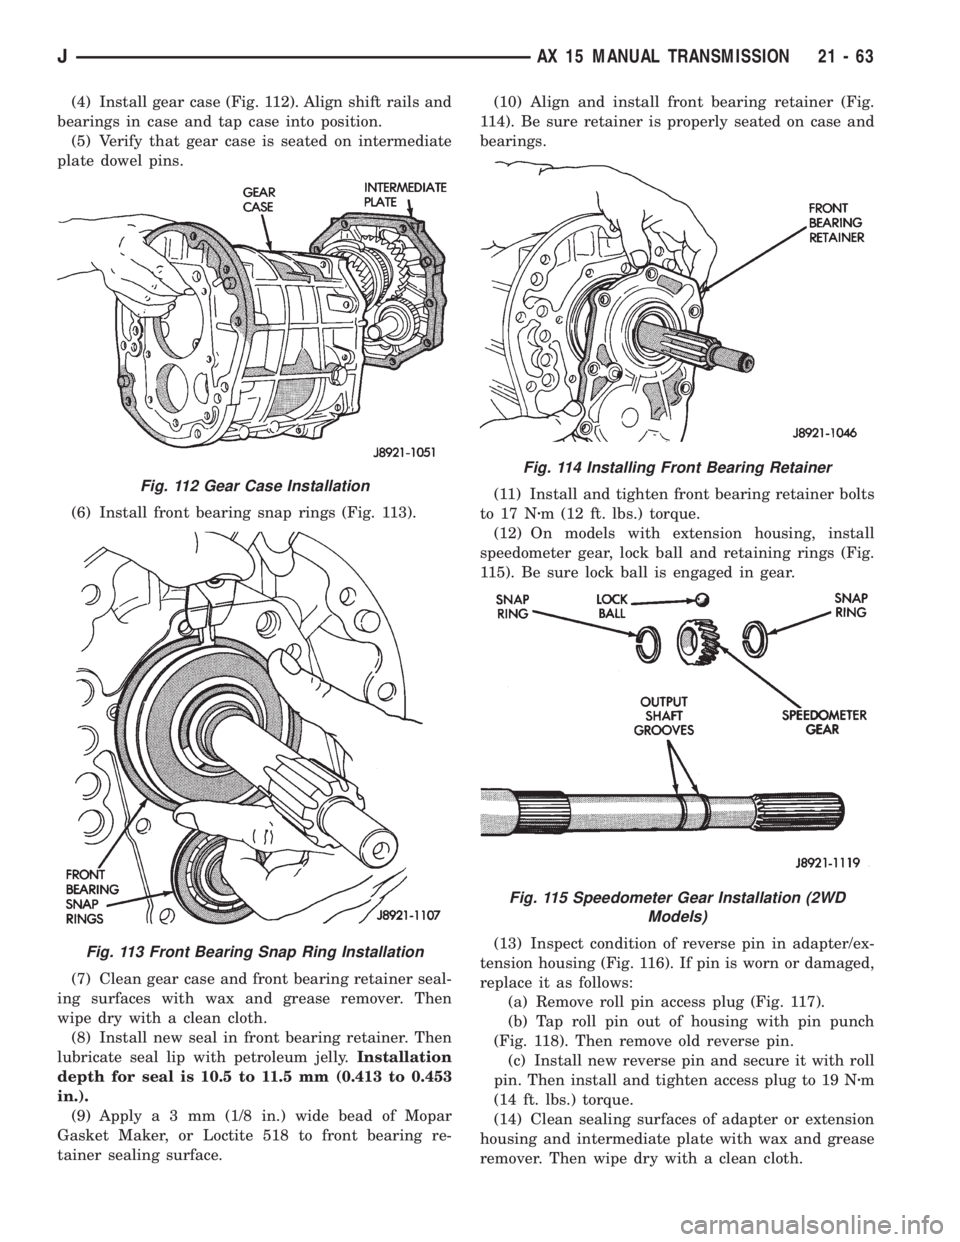
(4) Install gear case (Fig. 112). Align shift rails and
bearings in case and tap case into position.
(5) Verify that gear case is seated on intermediate
plate dowel pins.
(6) Install front bearing snap rings (Fig. 113).
(7) Clean gear case and front bearing retainer seal-
ing surfaces with wax and grease remover. Then
wipe dry with a clean cloth.
(8) Install new seal in front bearing retainer. Then
lubricate seal lip with petroleum jelly.Installation
depth for seal is 10.5 to 11.5 mm (0.413 to 0.453
in.).
(9) Applya3mm(1/8 in.) wide bead of Mopar
Gasket Maker, or Loctite 518 to front bearing re-
tainer sealing surface.(10) Align and install front bearing retainer (Fig.
114). Be sure retainer is properly seated on case and
bearings.
(11) Install and tighten front bearing retainer bolts
to 17 Nzm (12 ft. lbs.) torque.
(12) On models with extension housing, install
speedometer gear, lock ball and retaining rings (Fig.
115). Be sure lock ball is engaged in gear.
(13) Inspect condition of reverse pin in adapter/ex-
tension housing (Fig. 116). If pin is worn or damaged,
replace it as follows:
(a) Remove roll pin access plug (Fig. 117).
(b) Tap roll pin out of housing with pin punch
(Fig. 118). Then remove old reverse pin.
(c) Install new reverse pin and secure it with roll
pin. Then install and tighten access plug to 19 Nzm
(14 ft. lbs.) torque.
(14) Clean sealing surfaces of adapter or extension
housing and intermediate plate with wax and grease
remover. Then wipe dry with a clean cloth.
Fig. 112 Gear Case Installation
Fig. 113 Front Bearing Snap Ring Installation
Fig. 114 Installing Front Bearing Retainer
Fig. 115 Speedometer Gear Installation (2WD
Models)
JAX 15 MANUAL TRANSMISSION 21 - 63
Page 1626 of 2158
(15) Apply 3 mm (1/8 in.) wide bead of Mopar Gas-
ket Maker, or Loctite 518 to sealing surface of
adapter or extension housing. Keep sealer bead in-
side bolt holes as shown in Figure 111.
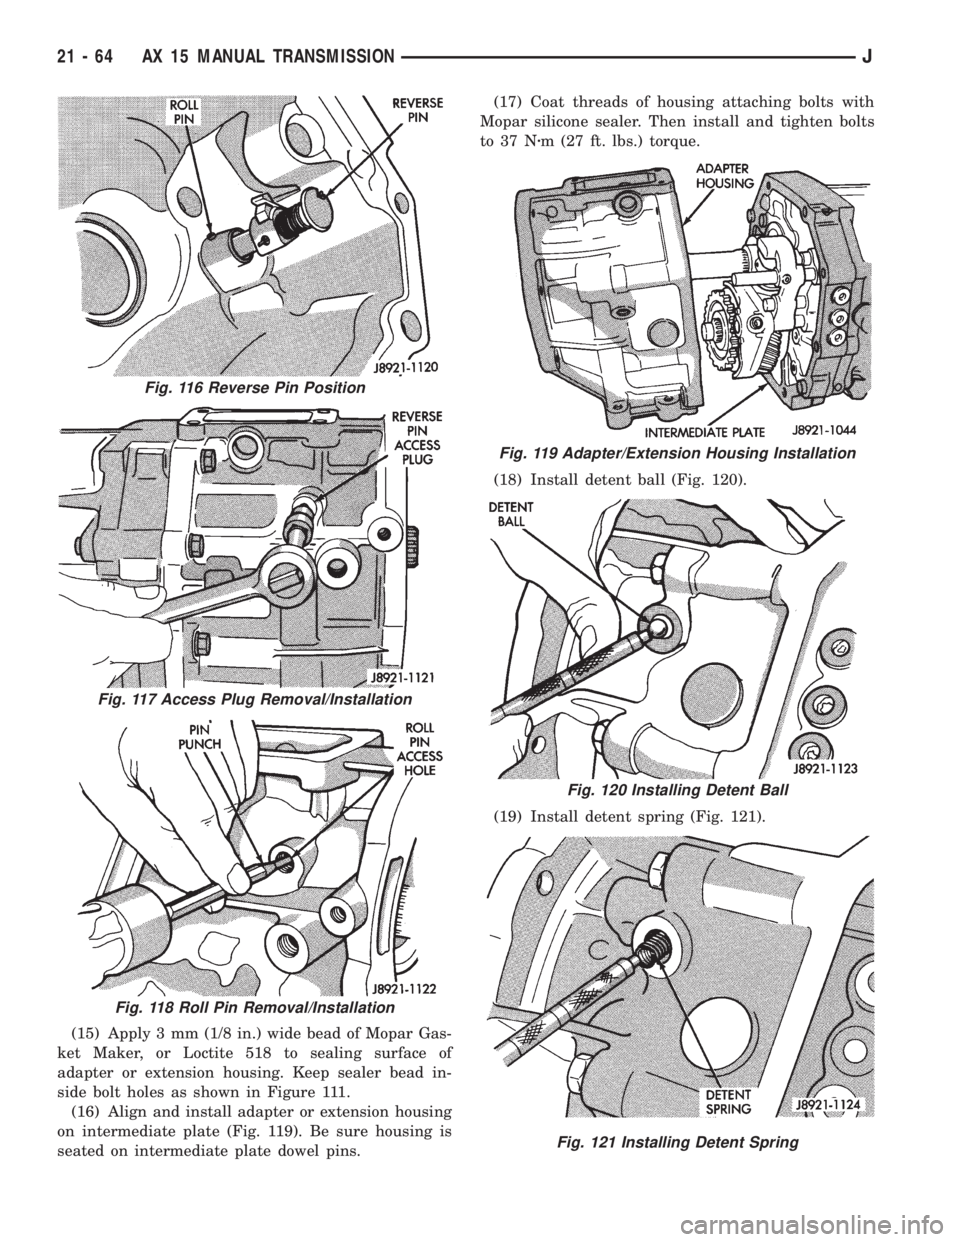
(16) Align and install adapter or extension housing
on intermediate plate (Fig. 119). Be sure housing is
seated on intermediate plate dowel pins.(17) Coat threads of housing attaching bolts with
Mopar silicone sealer. Then install and tighten bolts
to 37 Nzm (27 ft. lbs.) torque.
(18) Install detent ball (Fig. 120).
(19) Install detent spring (Fig. 121).
Fig. 116 Reverse Pin Position
Fig. 117 Access Plug Removal/Installation
Fig. 118 Roll Pin Removal/Installation
Fig. 119 Adapter/Extension Housing Installation
Fig. 120 Installing Detent Ball
Fig. 121 Installing Detent Spring
21 - 64 AX 15 MANUAL TRANSMISSIONJ
Page 1627 of 2158
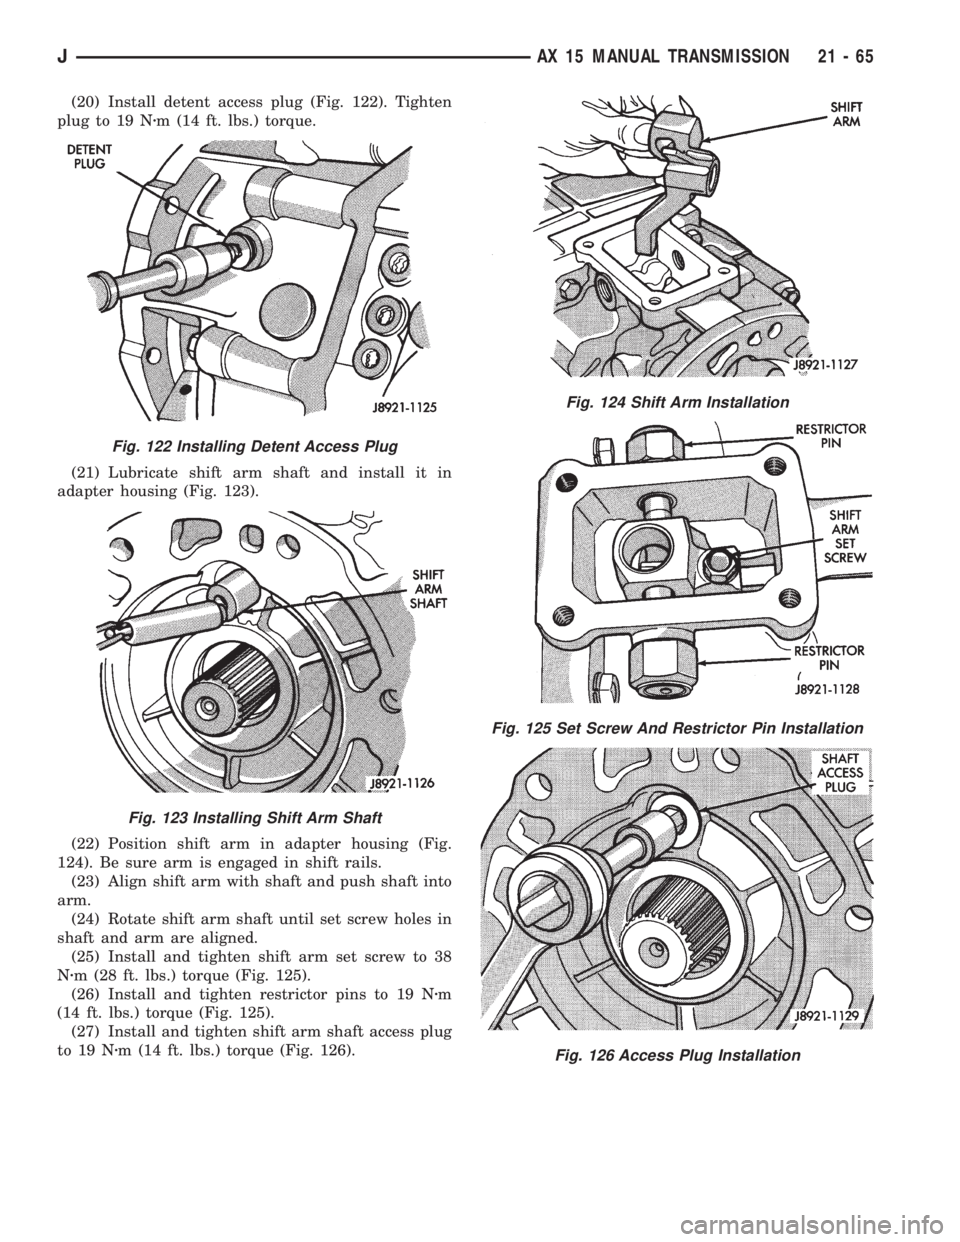
(20) Install detent access plug (Fig. 122). Tighten
plug to 19 Nzm (14 ft. lbs.) torque.
(21) Lubricate shift arm shaft and install it in
adapter housing (Fig. 123).
(22) Position shift arm in adapter housing (Fig.
124). Be sure arm is engaged in shift rails.
(23) Align shift arm with shaft and push shaft into
arm.
(24) Rotate shift arm shaft until set screw holes in
shaft and arm are aligned.
(25) Install and tighten shift arm set screw to 38
Nzm (28 ft. lbs.) torque (Fig. 125).
(26) Install and tighten restrictor pins to 19 Nzm
(14 ft. lbs.) torque (Fig. 125).
(27) Install and tighten shift arm shaft access plug
to 19 Nzm (14 ft. lbs.) torque (Fig. 126).
Fig. 122 Installing Detent Access Plug
Fig. 123 Installing Shift Arm Shaft
Fig. 124 Shift Arm Installation
Fig. 125 Set Screw And Restrictor Pin Installation
Fig. 126 Access Plug Installation
JAX 15 MANUAL TRANSMISSION 21 - 65
Page 1628 of 2158
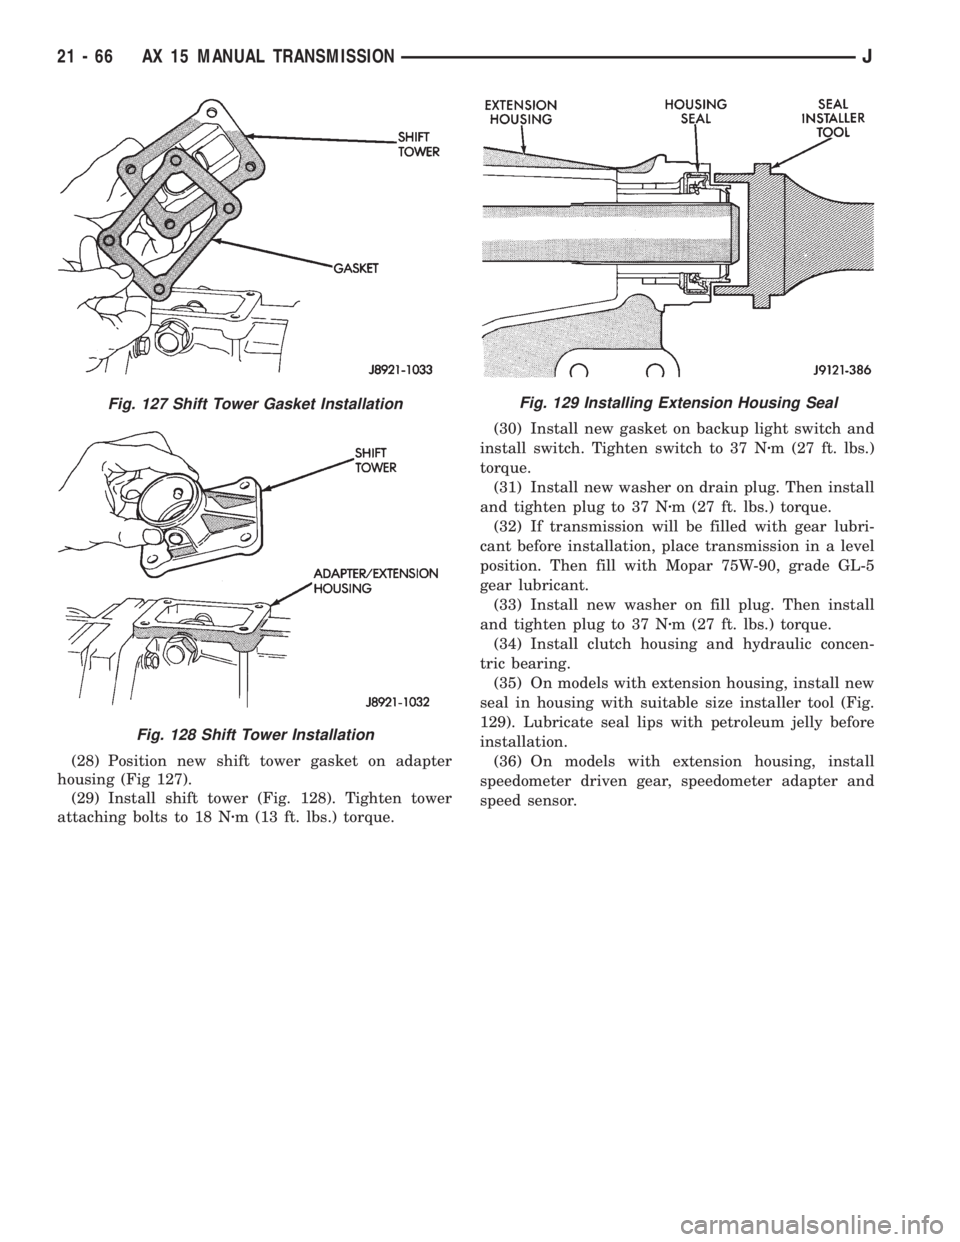
(28) Position new shift tower gasket on adapter
housing (Fig 127).
(29) Install shift tower (Fig. 128). Tighten tower
attaching bolts to 18 Nzm (13 ft. lbs.) torque.(30) Install new gasket on backup light switch and
install switch. Tighten switch to 37 Nzm (27 ft. lbs.)
torque.
(31) Install new washer on drain plug. Then install
and tighten plug to 37 Nzm (27 ft. lbs.) torque.
(32) If transmission will be filled with gear lubri-
cant before installation, place transmission in a level
position. Then fill with Mopar 75W-90, grade GL-5
gear lubricant.
(33) Install new washer on fill plug. Then install
and tighten plug to 37 Nzm (27 ft. lbs.) torque.
(34) Install clutch housing and hydraulic concen-
tric bearing.
(35) On models with extension housing, install new
seal in housing with suitable size installer tool (Fig.
129). Lubricate seal lips with petroleum jelly before
installation.
(36) On models with extension housing, install
speedometer driven gear, speedometer adapter and
speed sensor.
Fig. 127 Shift Tower Gasket Installation
Fig. 128 Shift Tower Installation
Fig. 129 Installing Extension Housing Seal
21 - 66 AX 15 MANUAL TRANSMISSIONJ
Page 1631 of 2158
driven by the torque converter. The converter is con-
nected to the engine crankshaft through the drive-
plate.
The pressure regulator valve maintains line pres-
sure. The regulator valve is located in the valve body.
The amount of line pressure developed is controlled
by throttle pressure, which is dependent on the de-
gree of throttle opening.
The governor valve is operated by the transmission
output shaft. Governor pressure increases approxi-
mately in proportion to vehicle speed.
The throttle valve determines line pressure and
shift speed. The throttle valve also controls upshift
and downshift speeds by regulating pressure in con-
junction with throttle position.
Shift Valves
The manual valve is operated by the gearshift link-
age and provides the operating range selected by the
driver.
The 1-2 shift valve provides automatic 1-2 or 2-1
shifts and the 2-3 shift valve provides automatic 2-3
or 3-2 shifts. The kickdown valve provides forced 3-2
or 3-1 downshifts depending on vehicle speed. Down-
shifts occur when the throttle is opened beyond
downshift detent position which is just before wide
open throttle.
The 2-3 valve throttle pressure plug provides 3-2
downshifts with varying throttle openings and de-
pending on vehicle speed. The 1-2 shift control valve
transmits 1-2 shift pressure to the accumulator pis-
ton to control kickdown band capacity on 1-2 upshifts
and 3-2 downshifts.The shuttle valve has two functions. First is fast
front band release and smooth engagement during
lift-foot 2-3 upshifts. The second is to regulate front
clutch and band application during 3-2 downshifts.
Clutches-Bands-Servos-Accumulator
The front/rear clutch pistons and servo pistons are
actuated by line pressure. When line pressure is re-
moved, the pistons are released by spring tension.
On 2-3 upshifts, the front servo piston is released
by spring tension and hydraulic pressure. The accu-
mulator controls hydraulic pressure on the apply side
of the front servo during 1-2 upshifts and at all
throttle openings.
Converter Clutch Controls
Converter clutch operation is controlled by the
power train control module, and by the solenoid and
clutch module on the valve body. The solenoid is op-
erated by a relay on the engine compartment side of
the dash panel.
Activating the solenoid opens a vent allowing fluid
to flow into the clutch module. When line pressure
exceeds tension of the module valve springs, the
module valves open. This allows fluid to be chan-
neled to the converter clutch through the reaction
shaft support and transmission shaft.
Gearshift And Park Lock Controls
The gearshift lever provides six operating positions:
Park (P), Reverse (R), Neutral (N), and the D, 2 and
1 forward drive ranges.
Manual 1 position provides first gear only. Overrun
braking occurs in 1 range when the throttle is re-
leased. Upshifts are not provided in 1 range.
Manual 2 range provides first and second gear. A
1-2 upshift will take place but a 2-3 upshift will not
occur.
D position provides 1-2, 2-3 upshifts and 3-2 and
3-1 downshifts.
Park position allows the park rod to move the park
pawl into engagement with the park gear. This pre-
vents rotation of the transmission output shaft. The
park lock mechanism is only engaged when the shift
lever is in the Park detent.
A park/neutral position switch controls engine
starting. The switch is designed to allow engine
starts only in park or neutral positions.
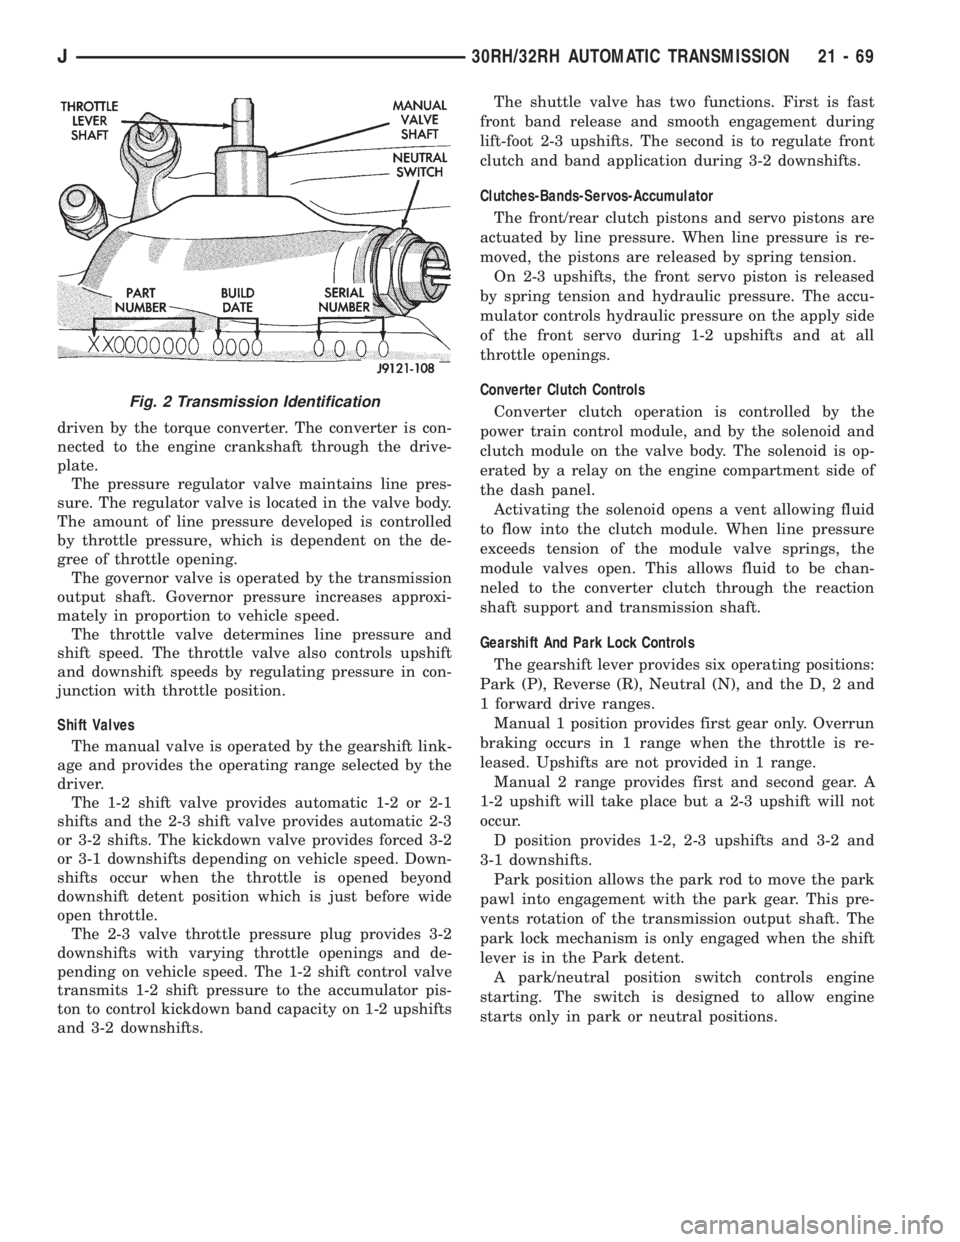
Fig. 2 Transmission Identification
J30RH/32RH AUTOMATIC TRANSMISSION 21 - 69
Page 1633 of 2158
(4) Apply parking brakes.
(5) Shift transmission momentarily into all gear
ranges. Then shift transmission back to Neutral.
(6) Clean top of filler tube and dipstick to keep dirt
from entering tube.
(7) Remove dipstick and check fluid level as fol-
lows:
(a) Dipstick has three fluid level indicator levels
(Fig. 1) which are: a MIN dot, an OK crosshatch
area, and a MAX fill arrow.
(b) Correct maximum level is to MAX arrow
mark. Correct acceptable level is to OK mark in
crosshatch area.
(c) Incorrect level is at or below MIN dot.
(d) If fluid is low, add only enough Mopar ATF
Plus to restore correct level. Do not overfill.
CAUTION: Do not overfill the transmission. Overfill-
ing may cause leakage out the pump vent which
can be mistaken for a pump seal leak. Overfilling
will also cause fluid aeration and foaming as the ex-
cess fluid is picked up and churned by the gear
train. This will significantly reduce fluid life.
EFFECTS OF INCORRECT FLUID LEVEL
A low fluid level allows the pump to take in air
along with the fluid. Air in the fluid will cause fluid
pressures to be low and develop slower than normal.
If the transmission is overfilled, the gears churn
the fluid into foam. This aerates the fluid causing the
same conditions that occur with a low level.
In either case, air bubbles cause fluid overheating,
oxidation and varnish buildup which interferes with
valve, clutch and servo operation. Foaming also
causes fluid expansion which can result in fluid over-
flow from the transmission vent or fill tube. Fluid
overflow can easily be mistaken for a leak if inspec-
tion is not careful.
TRANSMISSION THROTTLE VALVE CABLE
ADJUSTMENT
Throttle cable adjustment is important to proper
operation. This adjustment positions the throttle
valve which controls shift speed, quality and part
throttle downshift sensitivity.
If cable adjustment setting is too short, early shifts
and slippage between shifts may occur. If the setting
is too long, shifts may be delayed and part throttle
downshifts may be very sensitive. Refer to the In-Ve-
hicle Service section for adjustment procedure.
GEARSHIFT CABLE/LINKAGE ADJUSTMENT
Gearshift cable/linkage adjustment is important be-
cause it positions the valve body manual valve. Incor-
rect adjustment will cause creeping in Neutral,
premature clutch wear, delayed engagement in any
gear, or a no-start in Park or Neutral position.Proper operation of the neutral start switch will
provide a quick check on adjustment. Refer to the In-
Vehicle Service section for adjustment procedure.
ROAD TEST
Before road testing, be sure the fluid level and all
cable/linkage adjustments have been checked and ad-
justed if necessary.
Observe engine performance during the road test. A
poorly tuned engine will not allow an accurate anal-
ysis of transmission operation.
Operate the transmission in all gear ranges. Check
for slippage and shift variations. Note whether the
shifts are harsh, spongy, delayed, early, or if part
throttle downshifts are sensitive.
Watch closely for slippage or engine flare which
usually indicates clutch, band or overrunning clutch
problems. If the condition is advanced, an overhaul
may be necessary to restore normal operation.
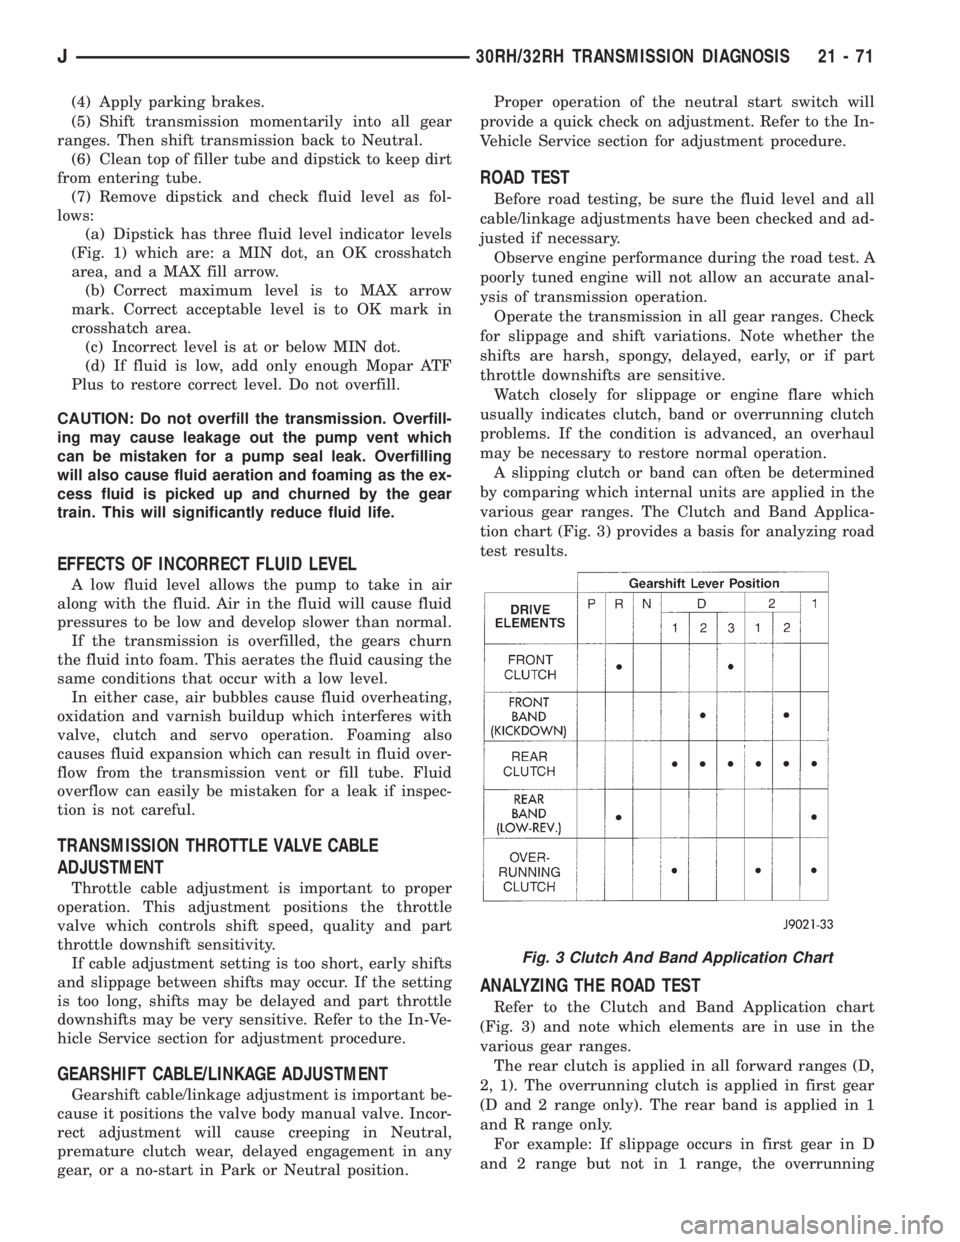
A slipping clutch or band can often be determined
by comparing which internal units are applied in the
various gear ranges. The Clutch and Band Applica-
tion chart (Fig. 3) provides a basis for analyzing road
test results.
ANALYZING THE ROAD TEST
Refer to the Clutch and Band Application chart
(Fig. 3) and note which elements are in use in the
various gear ranges.
The rear clutch is applied in all forward ranges (D,
2, 1). The overrunning clutch is applied in first gear
(D and 2 range only). The rear band is applied in 1
and R range only.
For example: If slippage occurs in first gear in D
and 2 range but not in 1 range, the overrunning
Fig. 3 Clutch And Band Application Chart
J30RH/32RH TRANSMISSION DIAGNOSIS 21 - 71