1995 JEEP CHEROKEE lock
[x] Cancel search: lockPage 107 of 2198
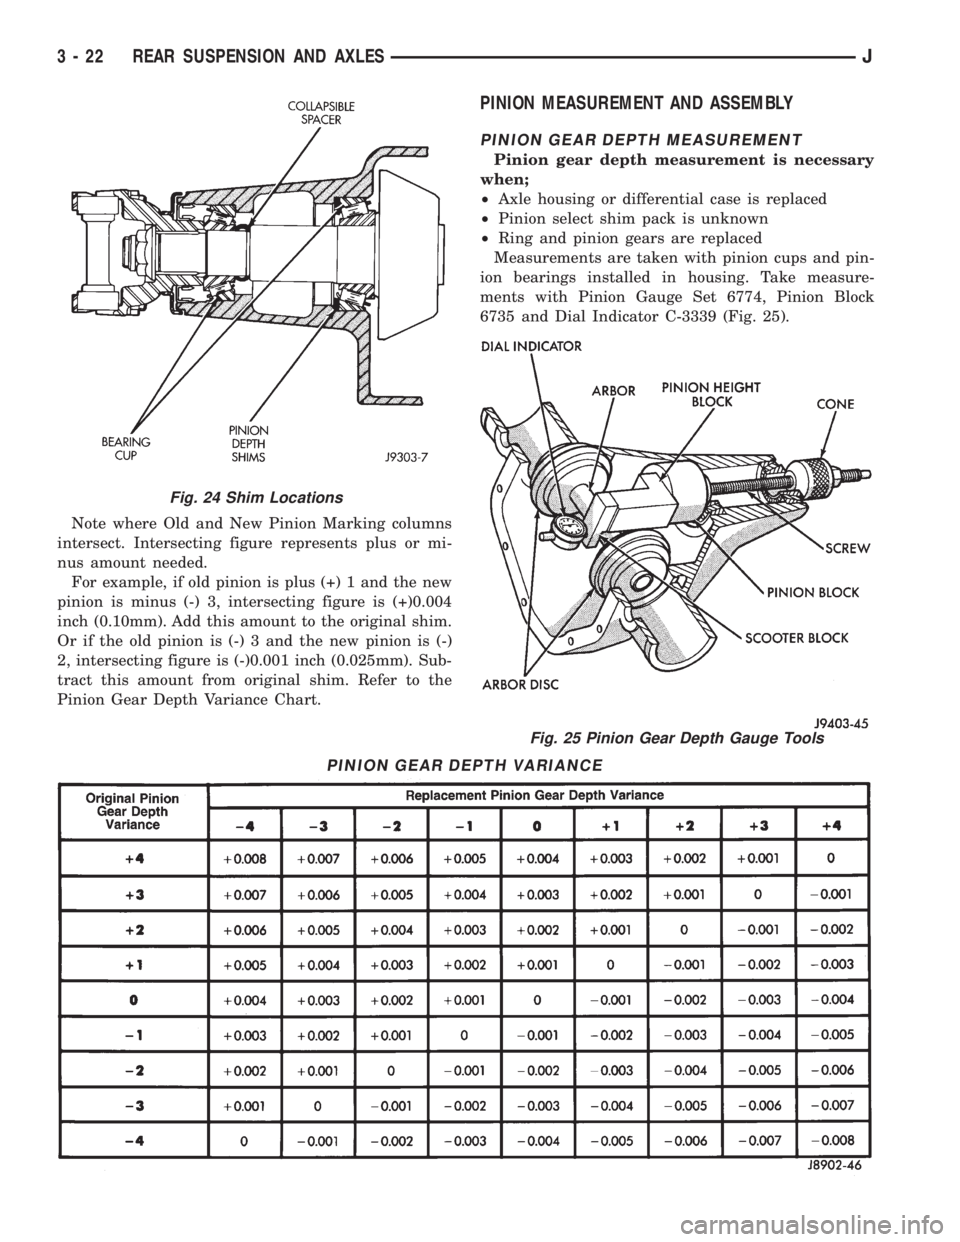
Note where Old and New Pinion Marking columns
intersect. Intersecting figure represents plus or mi-
nus amount needed.
For example, if old pinion is plus (+) 1 and the new
pinion is minus (-) 3, intersecting figure is (+)0.004
inch (0.10mm). Add this amount to the original shim.
Or if the old pinion is (-) 3 and the new pinion is (-)
2, intersecting figure is (-)0.001 inch (0.025mm). Sub-
tract this amount from original shim. Refer to the
Pinion Gear Depth Variance Chart.
PINION MEASUREMENT AND ASSEMBLY
PINION GEAR DEPTH MEASUREMENT
Pinion gear depth measurement is necessary
when;
²Axle housing or differential case is replaced
²Pinion select shim pack is unknown
²Ring and pinion gears are replaced
Measurements are taken with pinion cups and pin-
ion bearings installed in housing. Take measure-
ments with Pinion Gauge Set 6774, Pinion Block
6735 and Dial Indicator C-3339 (Fig. 25).
Fig. 24 Shim Locations
PINION GEAR DEPTH VARIANCE
Fig. 25 Pinion Gear Depth Gauge Tools
3 - 22 REAR SUSPENSION AND AXLESJ
Page 108 of 2198
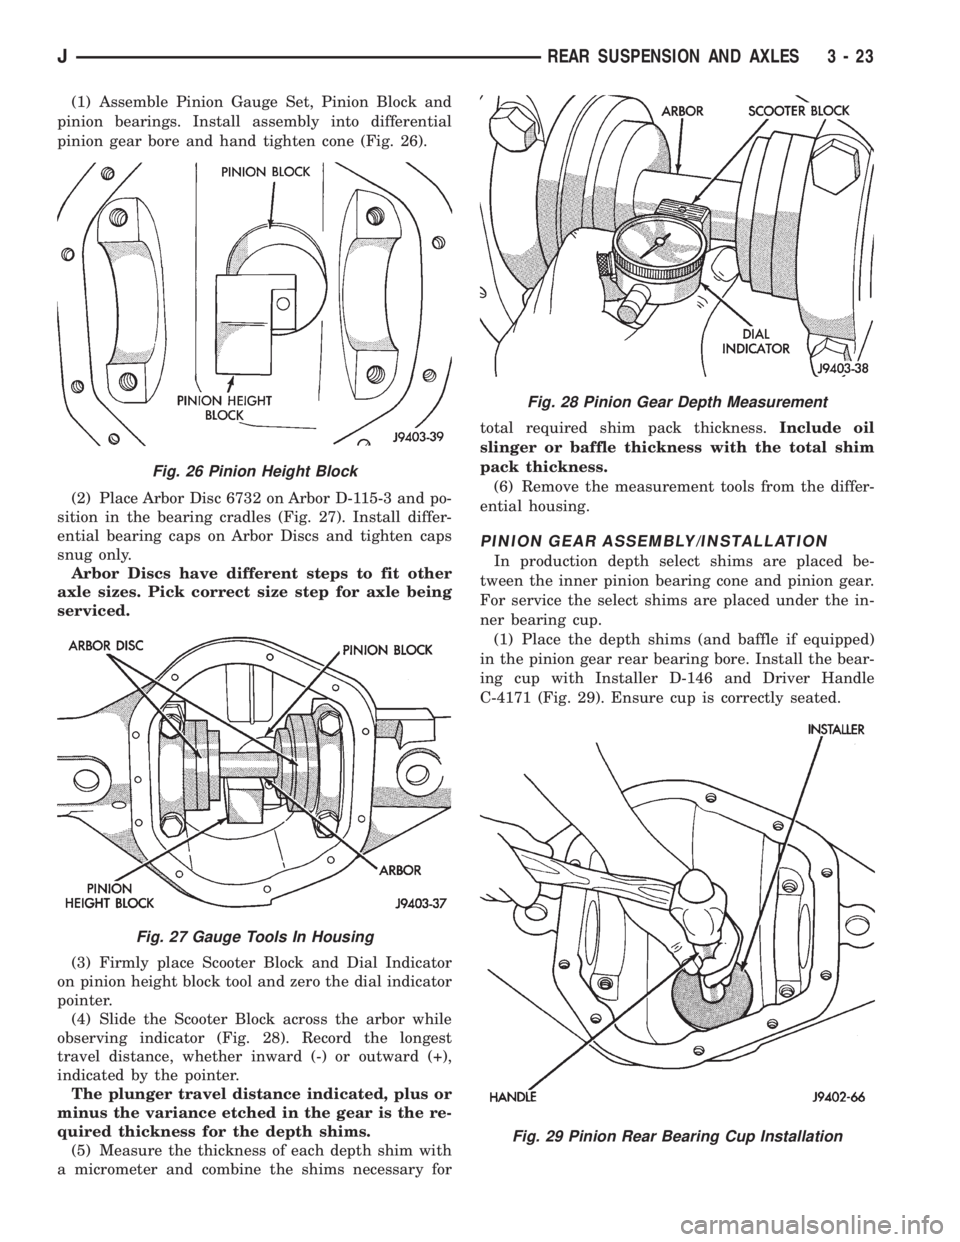
(1) Assemble Pinion Gauge Set, Pinion Block and
pinion bearings. Install assembly into differential
pinion gear bore and hand tighten cone (Fig. 26).
(2) Place Arbor Disc 6732 on Arbor D-115-3 and po-
sition in the bearing cradles (Fig. 27). Install differ-
ential bearing caps on Arbor Discs and tighten caps
snug only.
Arbor Discs have different steps to fit other
axle sizes. Pick correct size step for axle being
serviced.
(3) Firmly place Scooter Block and Dial Indicator
on pinion height block tool and zero the dial indicator
pointer.
(4) Slide the Scooter Block across the arbor while
observing indicator (Fig. 28). Record the longest
travel distance, whether inward (-) or outward (+),
indicated by the pointer.
The plunger travel distance indicated, plus or
minus the variance etched in the gear is the re-
quired thickness for the depth shims.
(5) Measure the thickness of each depth shim with
a micrometer and combine the shims necessary fortotal required shim pack thickness.Include oil
slinger or baffle thickness with the total shim
pack thickness.
(6) Remove the measurement tools from the differ-
ential housing.
PINION GEAR ASSEMBLY/INSTALLATION
In production depth select shims are placed be-
tween the inner pinion bearing cone and pinion gear.
For service the select shims are placed under the in-
ner bearing cup.
(1) Place the depth shims (and baffle if equipped)
in the pinion gear rear bearing bore. Install the bear-
ing cup with Installer D-146 and Driver Handle
C-4171 (Fig. 29). Ensure cup is correctly seated.
Fig. 26 Pinion Height Block
Fig. 27 Gauge Tools In Housing
Fig. 28 Pinion Gear Depth Measurement
Fig. 29 Pinion Rear Bearing Cup Installation
JREAR SUSPENSION AND AXLES 3 - 23
Page 116 of 2198

LUBRICANT SPECIFICATIONS
Multi-purpose, hypoid gear lubricant should be
used in the 8 1/4 inch axle. The lubricant should
have MIL-L-2105C and API GL 5 quality specifica-
tions. MOPARtHypoid Gear Lubricant conforms to
both of these specifications.
²The factory installed lubricant for the 8 1/4 inch
rear axle is SAE 80W 90 gear lubricant.
²The factory installed lubricant quantity is 6762
fluid oz.
CAUTION: Overfilling the differential can result in
lubricant foaming and overheating.
Refer to Group 0, Lubrication and Maintenance for
additional information.
CAUTION: If axle is submerged in water, lubricant
must be replaced immediately to avoid possible
premature axle failure.
DRIVE AXLE ASSEMBLY REPLACEMENTÐXJ
VEHICLES
REMOVAL
(1) Raise the vehicle. Position support stands un-
der the frame rails slightly in front the springs.
(2) Remove the rear wheels.
(3) Mark the drive shaft yoke and axle pinion yoke
for alignment reference. Disconnect the drive shaft
from the axle.
(4) Disconnect the axle vent hose.
(5) Disconnect the parking brake cables at the
equalizer or backing plate.
(6) Disconnect the shock absorbers from the axle
brackets.
(7) Disconnect the brake hose at the axle junction
block.Do not disconnect the wheel cylinder tub-
ing fittings.
(8) If equipped, disconnect ABS wiring connections
at the axle.
(9) Support the axle with a hydraulic jack under
the differential.
(10) Remove the spring U-bolts from the plate
brackets.
(11) Lower the jack enough to remove the axle.
INSTALLATION
CAUTION: Suspension components with rubber
bushings should be tightened with the vehicle at
normal height. It is important to have the springs
supporting the weight of the vehicle when the fas-
teners are torqued. If springs are not at their normal
ride position, vehicle ride comfort could be affected
and premature bushing wear may occur. Rubber
bushings must never be lubricated.(1) Support the axle on a hydraulic jack under the
differential. Position the axle under the vehicle.
(2) Raise the axle and align the spring center bolts
with the locating holes in the axle pads and plate
brackets.
(3) Install the spring U-bolts through the plate
brackets and tighten to 70 Nzm (52 ft. lbs.) torque.
(4) Install ABS wiring connections (if equipped) at
the axle.
(5) Connect the brake hose at the axle junction
block.
(6) Install the shock absorbers to the axle brackets
and tighten to 62 Nzm (46 ft. lbs.) torque.
(7) Connect the parking brake cables at the equal-
izer or backing plate.
(8) Connect the vent hose to the tube fitting.
(9) Align the reference marks and connect the
drive shaft to the axle yoke. Tighten the U-joint
clamp bolts to 19 Nzm (14 ft. lbs.) torque.
(10) Check differential lubricant and add if neces-
sary.
(11) Install the wheel and tire.
(12) Bleed the brakes.
(13) Remove the supports and lower the vehicle.
LUBRICANT CHANGE
The gear lubricant will drain quicker if the vehicle
has been recently driven.
(1) Raise and support the vehicle.
(2) Remove the lubricant fill hole plug from the dif-
ferential housing cover.
(3) Remove the differential housing cover and
drain the lubricant from the housing.
(4) Clean the housing cavity with a flushing oil,
light engine oil or lint free cloth.Do not use water,
steam, kerosene or gasoline for cleaning.
(5) Remove the sealant from the housing and cover
surfaces. Use solvent to clean the mating surfaces.
(6) Apply a bead of MOPARtSilicone Rubber Seal-
ant to the housing cover (Fig. 2). Allow the sealant to
cure for a few minutes.
Install the housing cover within 5 minutes after
applying the sealant. If not installed the sealant
must be removed and another bead applied.
(7) Install the cover and any identification tag.
Tighten the cover bolts in a criss-cross pattern to 47
Nzm (35 ft. lbs.) torque.
(8) Refill the differential with Mopar Hypoid Gear
Lubricant 13 mm (1/2 in.) below the fill plug hole.
With Trac-Lok differentials, add a container of Mopar
Hypoid Gear Lubricant Additive.
CAUTION: Overfilling the differential can result in
lubricant foaming and overheating.
(9) Install the fill hole plug and lower the vehicle.
JREAR SUSPENSION AND AXLES 3 - 31
Page 117 of 2198

AXLE SHAFT, SEAL AND BEARING SERVICE
CAUTION: When rear axle service is necessary,
both rear wheels must be raised off the surface so
that they are free to rotate. Be cautious when the
tires are being rotated by the engine or by other
means.
AXLE SHAFT REMOVAL
(1) Raise and support the vehicle.
(2) Remove the wheel and tire.
(3) Remove the brake drum.
(4) Clean all the foreign material from housing
cover area.
(5) Loosen the housing cover bolts and drain the
lubricant from the housing. Remove the housing
cover.
(6) Rotate the differential case so that the pinion
mate gear shaft lock screw is accessible. Remove the
lock screw and the pinion mate gear shaft from the
case (Fig. 3).
(7) Push the axle shaft in toward the center of the
vehicle. Remove the axle shaft C-clip lock from the
axle shaft (Fig. 4).
(8) Remove the axle shaft. Use care to prevent
damage to the axle shaft bearing, which will remain
in the axle shaft tube.
(9) Inspect the axle shaft bearing contact surface
area for indications of brinelling, spalling, and pit-
ting.
If any of these conditions exist, the axle shaft
and bearing should be replaced. Normal bear-ing contact on the shaft will be a dull gray and
it could appear to be lightly dented.
(10) If any of these conditions exist, the axle shaft
and bearing must be replaced.
The normal appearance (from roller bearing
contact) will be a dull gray surface area that
could appear slightly dented.
AXLE SHAFT SEAL AND BEARING REMOVAL
(1) Remove the axle shaft seal with a small pry
bar.
(2) Remove the bearing if it appears damaged or
the axle shaft shows any of the conditions described
above.
(3) Remove the bearing with Remover C-4167 (Fig.
5). Attach Slide Hammer 7420 and Adapter 7420-8 to
the end of the removal tool.
(4) Inspect the axle shaft seal surface and tube
bore for roughness and burrs.Polish each axle
shaft with No. 600 crocus cloth. This can re-
move slight surface damage. Do not reduce the
diameter of the axle shaft seal contact surface.
When polishing, the crocus cloth should be
moved around the circumference of the shaft
(not in-line with the shaft).
Fig. 2 Typical Housing Cover With Sealant
Fig. 3 Pinion Mate Shaft Lock Screw
Fig. 4 Axle Shaft C-Clip Lock
3 - 32 REAR SUSPENSION AND AXLESJ
Page 118 of 2198
BEARING AND SEAL INSTALLATION
Do not install the original axle shaft seal. Al-
ways install a new seal.
(1) Wipe the bore in the axle shaft tube clean.
(2) If the original bearing is not reusable, install a
new bearing. Place the axle shaft bearing on the pilot
of Bearing Installer C-4198 and Handle C-4171.
CAUTION: DO NOT use the new axle shaft seal to
position or seat the bearing in the axle shaft bore.
(3) Insert the bearing into the tube. Ensure that
the bearing is not cocked and is seated firmly against
the tube shoulder.
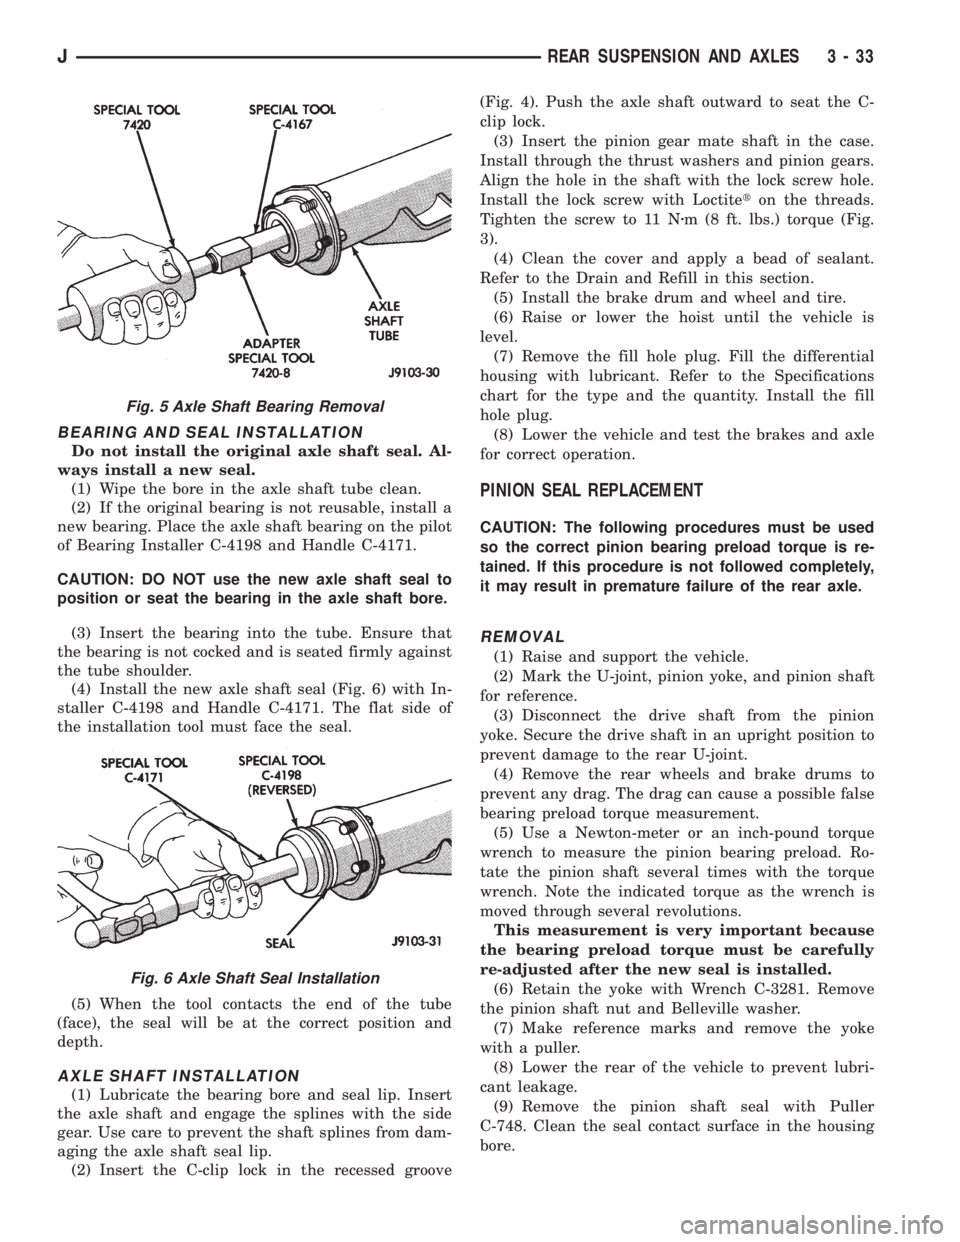
(4) Install the new axle shaft seal (Fig. 6) with In-
staller C-4198 and Handle C-4171. The flat side of
the installation tool must face the seal.
(5) When the tool contacts the end of the tube
(face), the seal will be at the correct position and
depth.
AXLE SHAFT INSTALLATION
(1) Lubricate the bearing bore and seal lip. Insert
the axle shaft and engage the splines with the side
gear. Use care to prevent the shaft splines from dam-
aging the axle shaft seal lip.
(2) Insert the C-clip lock in the recessed groove(Fig. 4). Push the axle shaft outward to seat the C-
clip lock.
(3) Insert the pinion gear mate shaft in the case.
Install through the thrust washers and pinion gears.
Align the hole in the shaft with the lock screw hole.
Install the lock screw with Loctiteton the threads.
Tighten the screw to 11 Nzm (8 ft. lbs.) torque (Fig.
3).
(4) Clean the cover and apply a bead of sealant.
Refer to the Drain and Refill in this section.
(5) Install the brake drum and wheel and tire.
(6) Raise or lower the hoist until the vehicle is
level.
(7) Remove the fill hole plug. Fill the differential
housing with lubricant. Refer to the Specifications
chart for the type and the quantity. Install the fill
hole plug.
(8) Lower the vehicle and test the brakes and axle
for correct operation.
PINION SEAL REPLACEMENT
CAUTION: The following procedures must be used
so the correct pinion bearing preload torque is re-
tained. If this procedure is not followed completely,
it may result in premature failure of the rear axle.
REMOVAL
(1) Raise and support the vehicle.
(2) Mark the U-joint, pinion yoke, and pinion shaft
for reference.
(3) Disconnect the drive shaft from the pinion
yoke. Secure the drive shaft in an upright position to
prevent damage to the rear U-joint.
(4) Remove the rear wheels and brake drums to
prevent any drag. The drag can cause a possible false
bearing preload torque measurement.
(5) Use a Newton-meter or an inch-pound torque
wrench to measure the pinion bearing preload. Ro-
tate the pinion shaft several times with the torque
wrench. Note the indicated torque as the wrench is
moved through several revolutions.
This measurement is very important because
the bearing preload torque must be carefully
re-adjusted after the new seal is installed.
(6) Retain the yoke with Wrench C-3281. Remove
the pinion shaft nut and Belleville washer.
(7) Make reference marks and remove the yoke
with a puller.
(8) Lower the rear of the vehicle to prevent lubri-
cant leakage.
(9) Remove the pinion shaft seal with Puller
C-748. Clean the seal contact surface in the housing
bore.
Fig. 5 Axle Shaft Bearing Removal
Fig. 6 Axle Shaft Seal Installation
JREAR SUSPENSION AND AXLES 3 - 33
Page 120 of 2198
CAUTION: Do not subject the bearings, cups, bores
or journals to heat from a torch or other abuse. Per-
manent damage could result. Special tools are
available and recommended when servicing axle.
DIFFERENTIAL CASE REMOVAL
(1) Remove the axle shafts, refer to Axle Shaft Re-
moval.
Side play and runout checks taken during
disassembly will be very useful in reassembly.
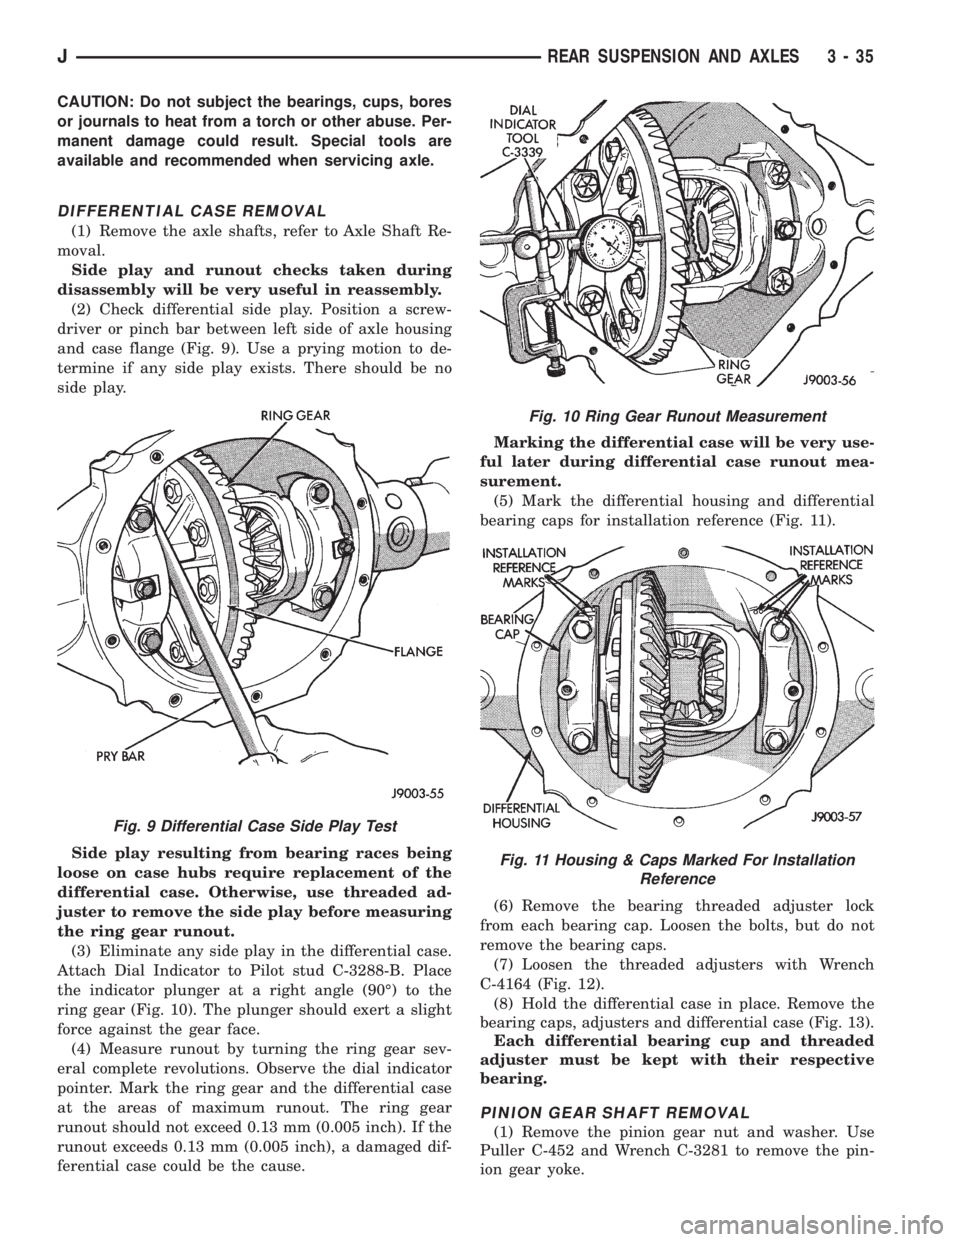
(2) Check differential side play. Position a screw-
driver or pinch bar between left side of axle housing
and case flange (Fig. 9). Use a prying motion to de-
termine if any side play exists. There should be no
side play.
Side play resulting from bearing races being
loose on case hubs require replacement of the
differential case. Otherwise, use threaded ad-
juster to remove the side play before measuring
the ring gear runout.
(3) Eliminate any side play in the differential case.
Attach Dial Indicator to Pilot stud C-3288-B. Place
the indicator plunger at a right angle (90É) to the
ring gear (Fig. 10). The plunger should exert a slight
force against the gear face.
(4) Measure runout by turning the ring gear sev-
eral complete revolutions. Observe the dial indicator
pointer. Mark the ring gear and the differential case
at the areas of maximum runout. The ring gear
runout should not exceed 0.13 mm (0.005 inch). If the
runout exceeds 0.13 mm (0.005 inch), a damaged dif-
ferential case could be the cause.Marking the differential case will be very use-
ful later during differential case runout mea-
surement.
(5) Mark the differential housing and differential
bearing caps for installation reference (Fig. 11).
(6) Remove the bearing threaded adjuster lock
from each bearing cap. Loosen the bolts, but do not
remove the bearing caps.
(7) Loosen the threaded adjusters with Wrench
C-4164 (Fig. 12).
(8) Hold the differential case in place. Remove the
bearing caps, adjusters and differential case (Fig. 13).
Each differential bearing cup and threaded
adjuster must be kept with their respective
bearing.
PINION GEAR SHAFT REMOVAL
(1) Remove the pinion gear nut and washer. Use
Puller C-452 and Wrench C-3281 to remove the pin-
ion gear yoke.
Fig. 9 Differential Case Side Play Test
Fig. 10 Ring Gear Runout Measurement
Fig. 11 Housing & Caps Marked For Installation
Reference
JREAR SUSPENSION AND AXLES 3 - 35
Page 122 of 2198
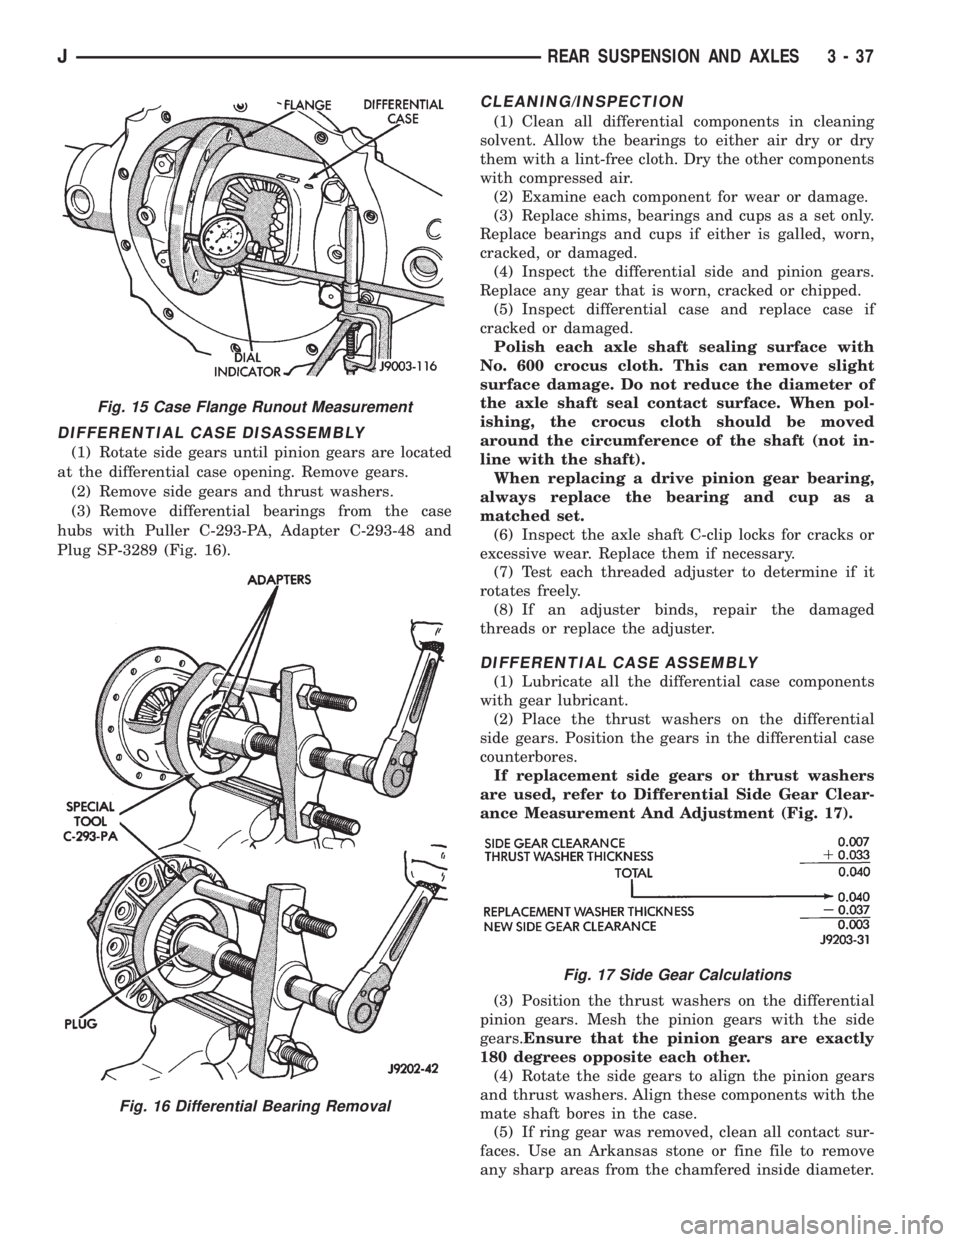
DIFFERENTIAL CASE DISASSEMBLY
(1) Rotate side gears until pinion gears are located
at the differential case opening. Remove gears.
(2) Remove side gears and thrust washers.
(3) Remove differential bearings from the case
hubs with Puller C-293-PA, Adapter C-293-48 and
Plug SP-3289 (Fig. 16).
CLEANING/INSPECTION
(1) Clean all differential components in cleaning
solvent. Allow the bearings to either air dry or dry
them with a lint-free cloth. Dry the other components
with compressed air.
(2) Examine each component for wear or damage.
(3) Replace shims, bearings and cups as a set only.
Replace bearings and cups if either is galled, worn,
cracked, or damaged.
(4) Inspect the differential side and pinion gears.
Replace any gear that is worn, cracked or chipped.
(5) Inspect differential case and replace case if
cracked or damaged.
Polish each axle shaft sealing surface with
No. 600 crocus cloth. This can remove slight
surface damage. Do not reduce the diameter of
the axle shaft seal contact surface. When pol-
ishing, the crocus cloth should be moved
around the circumference of the shaft (not in-
line with the shaft).
When replacing a drive pinion gear bearing,
always replace the bearing and cup as a
matched set.
(6) Inspect the axle shaft C-clip locks for cracks or
excessive wear. Replace them if necessary.
(7) Test each threaded adjuster to determine if it
rotates freely.
(8) If an adjuster binds, repair the damaged
threads or replace the adjuster.
DIFFERENTIAL CASE ASSEMBLY
(1) Lubricate all the differential case components
with gear lubricant.
(2) Place the thrust washers on the differential
side gears. Position the gears in the differential case
counterbores.
If replacement side gears or thrust washers
are used, refer to Differential Side Gear Clear-
ance Measurement And Adjustment (Fig. 17).
(3) Position the thrust washers on the differential
pinion gears. Mesh the pinion gears with the side
gears.Ensure that the pinion gears are exactly
180 degrees opposite each other.
(4) Rotate the side gears to align the pinion gears
and thrust washers. Align these components with the
mate shaft bores in the case.
(5) If ring gear was removed, clean all contact sur-
faces. Use an Arkansas stone or fine file to remove
any sharp areas from the chamfered inside diameter.
Fig. 15 Case Flange Runout Measurement
Fig. 16 Differential Bearing Removal
Fig. 17 Side Gear Calculations
JREAR SUSPENSION AND AXLES 3 - 37
Page 123 of 2198
(6) If removed, heat ring gear with a heat lamp or
by immersing in a hot fluid. The temperature should
not exceed 149ÉC (300ÉF).Do not use a torch to
heat the ring gear.
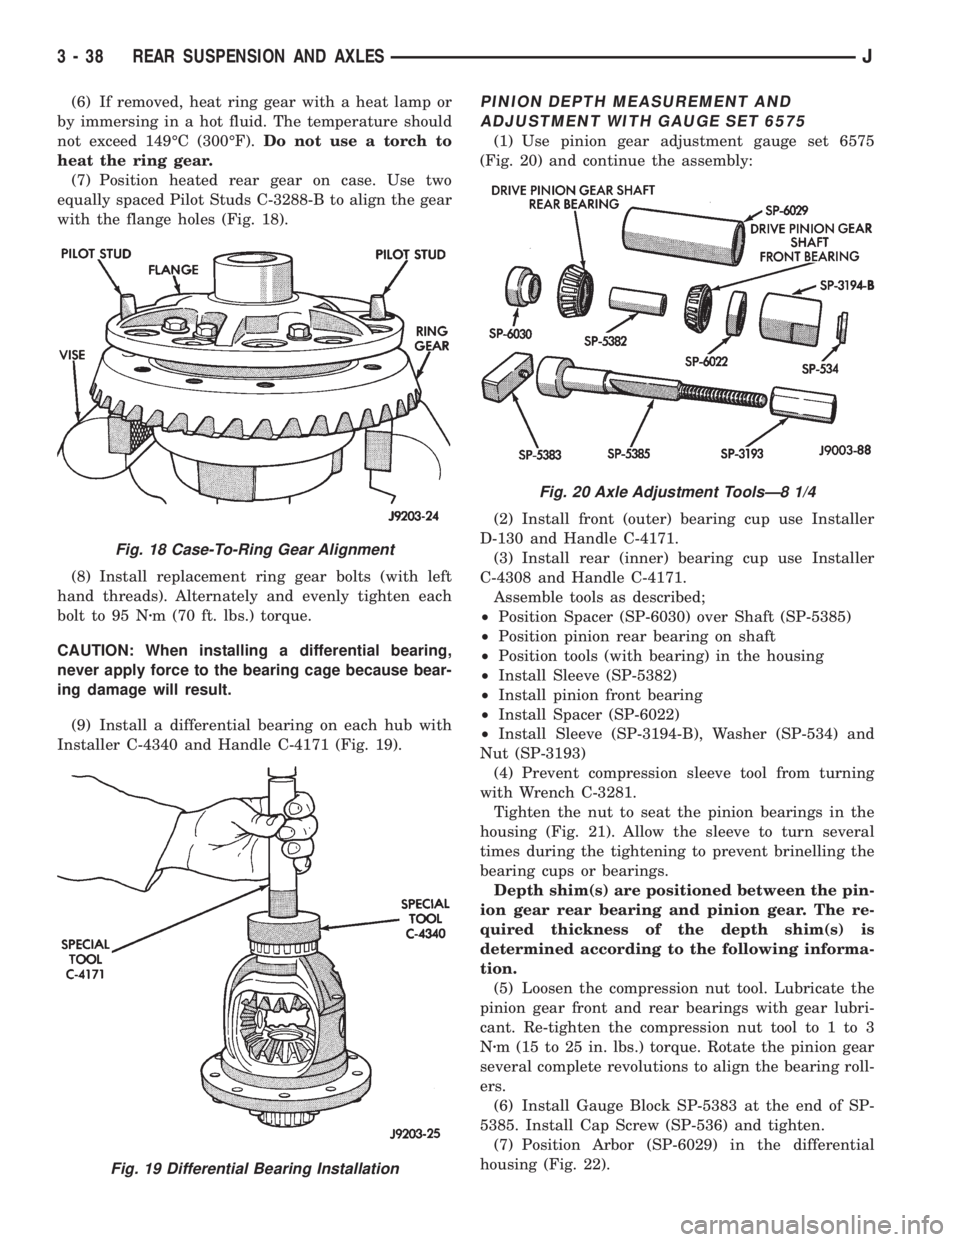
(7) Position heated rear gear on case. Use two
equally spaced Pilot Studs C-3288-B to align the gear
with the flange holes (Fig. 18).
(8) Install replacement ring gear bolts (with left
hand threads). Alternately and evenly tighten each
bolt to 95 Nzm (70 ft. lbs.) torque.
CAUTION: When installing a differential bearing,
never apply force to the bearing cage because bear-
ing damage will result.
(9) Install a differential bearing on each hub with
Installer C-4340 and Handle C-4171 (Fig. 19).PINION DEPTH MEASUREMENT AND
ADJUSTMENT WITH GAUGE SET 6575
(1) Use pinion gear adjustment gauge set 6575
(Fig. 20) and continue the assembly:
(2) Install front (outer) bearing cup use Installer
D-130 and Handle C-4171.
(3) Install rear (inner) bearing cup use Installer
C-4308 and Handle C-4171.
Assemble tools as described;
²Position Spacer (SP-6030) over Shaft (SP-5385)
²Position pinion rear bearing on shaft
²Position tools (with bearing) in the housing
²Install Sleeve (SP-5382)
²Install pinion front bearing
²Install Spacer (SP-6022)
²Install Sleeve (SP-3194-B), Washer (SP-534) and
Nut (SP-3193)
(4) Prevent compression sleeve tool from turning
with Wrench C-3281.
Tighten the nut to seat the pinion bearings in the
housing (Fig. 21). Allow the sleeve to turn several
times during the tightening to prevent brinelling the
bearing cups or bearings.
Depth shim(s) are positioned between the pin-
ion gear rear bearing and pinion gear. The re-
quired thickness of the depth shim(s) is
determined according to the following informa-
tion.
(5) Loosen the compression nut tool. Lubricate the
pinion gear front and rear bearings with gear lubri-
cant. Re-tighten the compression nut tool to 1 to 3
Nzm (15 to 25 in. lbs.) torque. Rotate the pinion gear
several complete revolutions to align the bearing roll-
ers.
(6) Install Gauge Block SP-5383 at the end of SP-
5385. Install Cap Screw (SP-536) and tighten.
(7) Position Arbor (SP-6029) in the differential
housing (Fig. 22).
Fig. 18 Case-To-Ring Gear Alignment
Fig. 19 Differential Bearing Installation
Fig. 20 Axle Adjustment ToolsÐ8 1/4
3 - 38 REAR SUSPENSION AND AXLESJ