1995 CHEVROLET CAMARO check engine
[x] Cancel search: check enginePage 30 of 388

Downloaded from www.Manualslib.com manuals search engine AIR
BAG
There is an air bag readiness light on the instrument
panel, which shows “AIR
BAG’ on it. The system
checks the air bag’s electrical
system for malfunctions.
The light tells
you if there is an electrical problem. See
“Air Bag Readiness Light” in
the Index for more
information.
How the Air Bag System Works
I
I
1-20
Page 51 of 388

Downloaded from www.Manualslib.com manuals search engine Safety Belt Extender
If the vehicle’s safety belt will fasten around you, you
should use it.
But if a safety belt isn’t long enough to fasten, your
dealer will order
you an extender. It’s free. When you go
in to order it, take the heaviest coat you will wear,
so the
extender will be long enough for you. The extender will
be just for you, and just for the seat in your vehicle that
you choose. Don’t let someone else use it, and use it
only for the seat it is made to fit.
To wear it, just attach it
to the regular safety belt.
Checking Your Restraint Systems
Now and then, make sure all your belts, buckles, latch
plates, retractors, anchorages and reminder systems are
working properly.
Look for any other loose or damaged
restraint system parts.
If you see anything that might
keep a restraint system from doing its job, have it
repaired.
Torn or frayed belts may not protect you in a crash.
They can rip apart under impact forces. If a belt
is torn
or frayed, get a new one right away.
Replacing Seat and Restraint System
Parts After a Crash
If you’ve had a crash, do you need new belts?
After a very minor collision, nothing may be necessary.
But if the belts were stretched, as they would be
if worn
during a more severe crash, then you need new belts.
If belts are cut or damaged, replace them. Collision
damage also may mean you will need to have safety belt
or seat parts repaired or replaced. New parts and repairs
may be necessary even if the belt wasn’t being used at
the time of the collision.
1-41
Page 58 of 388

Downloaded from www.Manualslib.com manuals search engine Should interference to this system occur, try this:
0
0
0
0
Check to determine if battery replacement is
necessary. See the instructions on battery
replacement.
Check the distance. You may be too far from your
vehicle. This product has a maximum range.
Check the location. Other vehicles or objects may be
blocking the signal.
See your Chevrolet dealer or a qualified technician
for service.
Changes or modifications to this system
by other than an
authorized service facility could void authorization to
use this equipment.
Operation
The driver’s door will unlock automatically when
UNLOCK is pressed. If UNLOCK is pressed again
within five seconds, the passenger door will also unlock.
All doors will lock when
DOOR is pressed. The hatch
will unlock when
the opened trunk symbol is pressed,
but only when the ignition switch
is not in RUN, and the
transmission is in
PARK (P) if you have an automatic
transmission. If you have a manual transmission, the
parking brake must be set.
The system will turn on the interior lights for about
40 seconds, or until the ignition switch is turned to
RUN, when you unlock the doors or hatch. The interior
lamps
will come on for about two seconds when you
lock the doors.
2-6
Page 60 of 388

Downloaded from www.Manualslib.com manuals search engine 4 8
1
c
c
-w
I
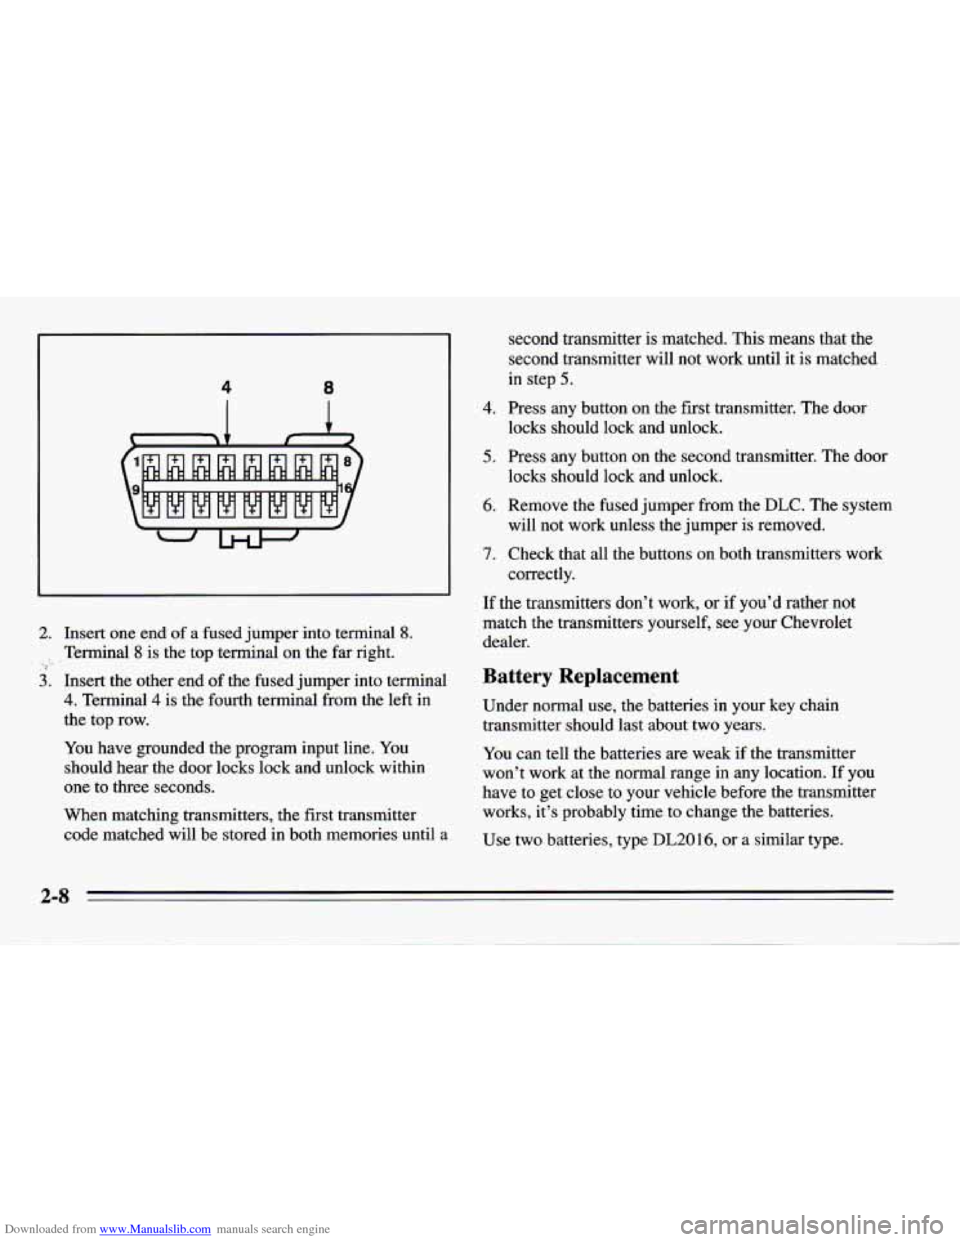
2. Insert one end of a fused jumper into terminal 8.
, Terminal 8 is the top terminal on the far right. ,> ,_ .
3. Insert the other end of the fused jumper into terminal
4. Terminal 4 is the fourth terminal from the left in
the top row.
You have grounded the program input line. You
should hear the door locks lock and unlock within
one to three seconds.
When matching transmitters, the first transmitter
code matched will be stored in both memories until a second
transmitter is matched.
This means that the
second transmitter will not work until it is matched
in step
5.
4. Press any button on the first transmitter. The door
locks should lock and unlock.
5. Press any button on the second transmitter. The door
locks should lock and unlock.
6. Remove the fused jumper from the
DLC. The system
7. Check that all the buttons on both transmitters work
will not work unless the
jumper is removed.
correctly.
If the transmitters don’t work,
or if you’d rather not
match the transmitters yourself, see your Chevrolet
dealer.
Battery Replacement
Under normal use, the batteries in your key chain
transmitter should last about two years.
You can tell the batteries are weak if the transmitter
won’t work at the normal range
in any location. If you
have to get close to your vehicle before the transmitter
works, it’s probably time to change the batteries.
Use two batteries, type
DL20 16, or a similar type.
Page 61 of 388

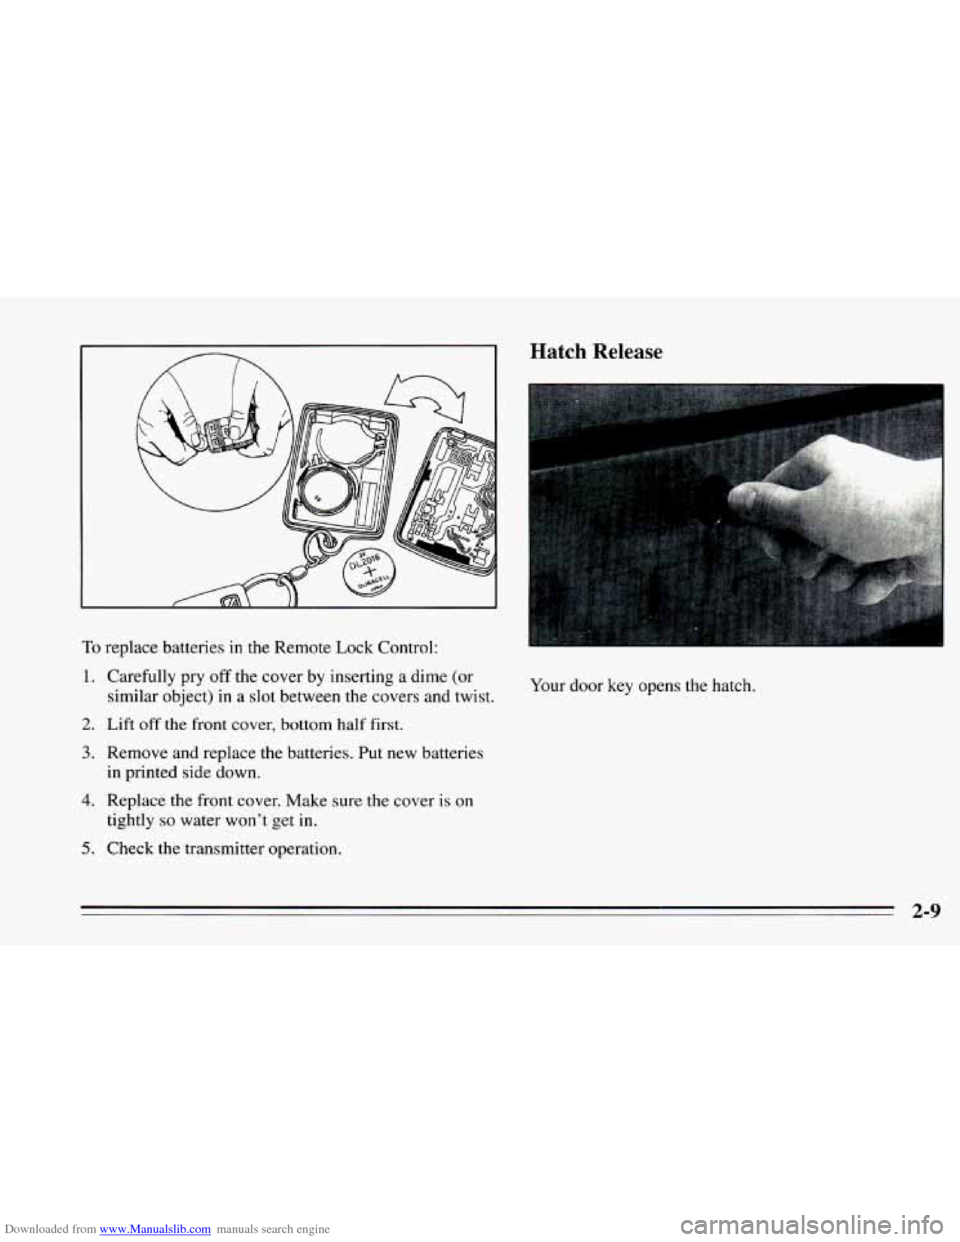
Downloaded from www.Manualslib.com manuals search engine To replace batteries in the Remote Lock Control:
1. Carefully pry off the cover by inserting a dime (or
2. Lift off the front cover, bottom half first.
similar object)
in a
slot between the covers and twist.
3. Remove and replace the batteries. Put new batteries
in printed side down.
4. Replace the front cover. Make sure the cover is on
tightly
so water won’t get in.
5. Check the transmitter operation.
Hatch Release
Your door key opens the hatch.
2-9
Page 65 of 388

Downloaded from www.Manualslib.com manuals search engine When the PASS-Key@II system senses that someone is using the wrong key, it shuts down the vehicle’s starter
and fuel systems. For about three minutes, the starter
won’t work and fuel won’t
go to the engine. If someone
tries to start your vehicle again or uses another key
during this time, the vehicle will not start. This
discourages someone from randomly trying different
keys with different resistor pellets in an attempt to make
a match.
The ignition key must be clean and dry before it’s
inserted in the ignition or the engine may not start. If the
engine does not start and the SECURITY light stays on
when you try to start the vehicle, the key may be dirty or
wet. Turn the ignition
off.
Clean and dry the key. Wait about three minutes and try
again. The security light will remain on during this time.
If the starter still won’t work, and the key appears to be
clean and
dry, wait about three minutes and try another
ignition key.
At this time, you may also want to check
the fuses (see “Fuses and Circuit Breakers” in the
Index).
If the starter won’t work with the other key, your vehicle
needs service.
If your vehicle does start, the first
ignition key may be faulty. See your Chevrolet dealer or
a locksmith who can service the PASS-Key’II.
If you accidentally use
a key that has a damaged or
missing resistor pellet, the starter won’t work and the
security light will flash. But you don’t have to wait three
minutes before trying another ignition key.
See your Chevrolet dealer or a locksmith who can
service the PASS-Key’II to have a new key made.
If you’re ever driving
and the “SECURITY” light comes
on and stays on, you will be able to restart your engine if
you turn it
off. Your PASS-Key@II system, however, is
not working properly and must be serviced by your
Chevrolet dealer. Your vehicle
is not protected by the
PASS-Key@II system.
If you lose or damage a PASS-Key’II ignition key, see
your Chevrolet dealer or a locksmith who can service
PASS-Key’II
to have a new key made. In an
emergency, call the Chevrolet Roadside Assistance
Program at 1-800-CHEV-USA
(1-800-243-8872).
2-13
Page 70 of 388

Downloaded from www.Manualslib.com manuals search engine NOTICE:
Your engine is designed to work with the
electronics in your vehicle.
If you add electrical
parts or accessories, you could change the way
the fuel injection system operates. Before adding
electrical equipment, check with your dealer.
If
you don’t, your engine might not perform
properly.
If you ever have to have your vehicle towed, see
the part of this manual that tells how to do
it
without damaging your vehicle. See “Towing
Your Car” in the Index.
To start your 5.7 Liter LT1 engine:
1. Without pushing the accelerator pedal, turn the
ignition key to START. When the engine starts, let
go
of the key. The idle speed will go down as your
engine gets warm.
NOTICE:
Holding your key in START for longer than
15 seconds at a time will cause your battery to be
drained much sooner. And the excessive heat can
damage your starter motor.
2. If it doesn’t start within 10 seconds, push the
accelerator pedal all the way to the
floor, while you
hold the ignition key in
START. When the engine
starts, let
go of the key and let up on the accelerator
pedal. Wait about 15 seconds between each
try to
help avoid draining your battery.
When starting your engine in very
cold weather (below
0°F or -18”C), do this:
1. With your foot
off the accelerator pedal, turn the
ignition key to
START and hold it there. When the
engine starts, let
go of the key. Use the accelerator
pedal
to maintain engine speed, if you have to, until
your engine has run for a while.
2-1s
Page 71 of 388

Downloaded from www.Manualslib.com manuals search engine 2. If your engine still won’t start (or starts but then
stops), it could be flooded with too much gasoline.
Try pushing your accelerator pedal all the way to the
floor and holding it there as
you hold the key in
START
for about three seconds. If the car starts
briefly but then stops again,
do the same thing, but
this time keep the pedal down
for five or six seconds.
This clears the extra gasoline from the engine.
NOTICE:
Your engine is designed to work with the
electronics in your vehicle. If you add electrical
parts or accessories, you could change the
way
the fuel injection system operates. Before adding
electrical equipment, check with your dealer.
If
you don’t, your engine might not perform
properly.
If you ever have to have your vehicle towed, see
the part of this manual that tells how to do it
without damaging your vehicle. See “Towing
Your Car” in the Index.
Driving Through Deep Standing
Water
NOTICE:
If you drive too quickly through deep puddles or
standing water, water can come in through your
engine’s
air intake and badly damage your
engine. Never drive through water that
is slightly
lower than the underbody of your vehicle.
If you
can’t avoid deep puddles or standing water, drive
through them very slowly.
2-19