1994 PONTIAC GRAND-AM power steering
[x] Cancel search: power steeringPage 56 of 274

LOCK
ACCESSORY
I Ignition Switch-
Vith the ignition key in the ignition
witch, you can
turn the switch ‘to five
ositions:
,CCESSORE An “on” position in
lhich you can operate some of your
lectrical power accessories. Press
in the
;nition switch as you turn the top of
it
)ward you.
,OCK: The only position in which you
!n remove the key. This locks your
:cering wheel, ignition and transaxle
~n automatic models).
IFF: Unlocks the steering wheel,
;nition, and transaxle (on’ automatic
todels), but.does not send electrical
power to any accessories. Use this
position if your vehicle must be pushed or
towed, but never try
to push-start your
vehicle.
A warning’chime will sound if
you open the driver’s door when the
ignition is off and the key is in the
ignition.
RUN: An “on” position to which the
switch returns after you start your engine
and release the switch. The switch stays
in the RUN position when the engine is
running. But ‘even when the engine is not
running, you can use RUN io operate
your electrical power accessories,
and to
display
some instrument panel warning
lights.
START: Starts the engine. When the
engine starts, release the key. The ignition
switch
will return to RUN for normal
driving.
Note that even if the engine is not
running, ‘the positions
ACCESSORY and
RUN are “on” positions that allow you to
operate your electrical accessories, such
as the radio.
,.
Key Release Button
‘MANUAL TRANSAXLE)
The ignition key cannot be removed from
he ignition unless.the key release button
s used.
ro Remwe the Key:
rum the key to the OFF position. Press
he key release button while turning
the
Ley from OFF to LOCK. Keeping your
inger on
the button, pull the key straight
)Ut.
sa...
ProCarManuals.com
Page 126 of 274
To Use Anti-Lock:
Don’t pump the brakes. Just hold the
brake pedal down and let anti-lock work
.for you. You may feel the system
working, or you may notice some noise,
but this is normal.
Braking in Emergencies
Use your anti-lock braking system when
you need to. With anti-lock, you can steer
and brake at the same time. In many
emergencies, steering can help you more
than even the very best braking.
Steering
Power Steering
If you lose power steering assist because
the engine stops or the system is not
functioning, you can steer but it will take
much more effort.
Variable Effort Steering
(OPTION)
This steering system provides lighter
steering effort for parking and at low
vehicle speeds. Steering effort will
increase at higher speeds for improved
road feel.
Steering Tips
Driving on Curves
It’s important to take curves at a
reasonable speed.
A lot of the “driver lost control” accidents
mentioned on the news happen on curves.
Here’s why:
Experienced driver or beginner, each of
us is subject to the same laws of physics
when driving on curves. The traction of
the tires against the road surface makes it
possible
for the vehicle to change its path
when you
turn the front wheels. If there’s
no traction, inertia will keep the vehicle
going in the same direction. If you’ve
ever tried to steer a vehicle on wet ice,
you’ll understand this.
The traction you can get in a curve
depends on the condition of your tires and
the road ,surface, the angle at which the
curve is banked, and your speed. While
you’re in a curve, speed isthe one factor
you can control.
Suppose you’re steering through a sharp
curve. Then you suddenly accelerate.
Both control systems
-- steering and
acceleration
-- have to do their work
where the tires meet the road. Adding the
sudden acceleration can demand too
much of those places. You can lose
control.
What should you do if this ever happens?
Ease up on the accelerator pedal, steer the
vehicle the way you want it to go, and
slow down.
Speed limit signs near curves warn that
you should adjust your speed. Of course,
the posted speeds are based on good
weather and road conditions. Under less
favorable conditions you’ll want
to go
slower.
I
125...
ProCarManuals.com
Page 178 of 274
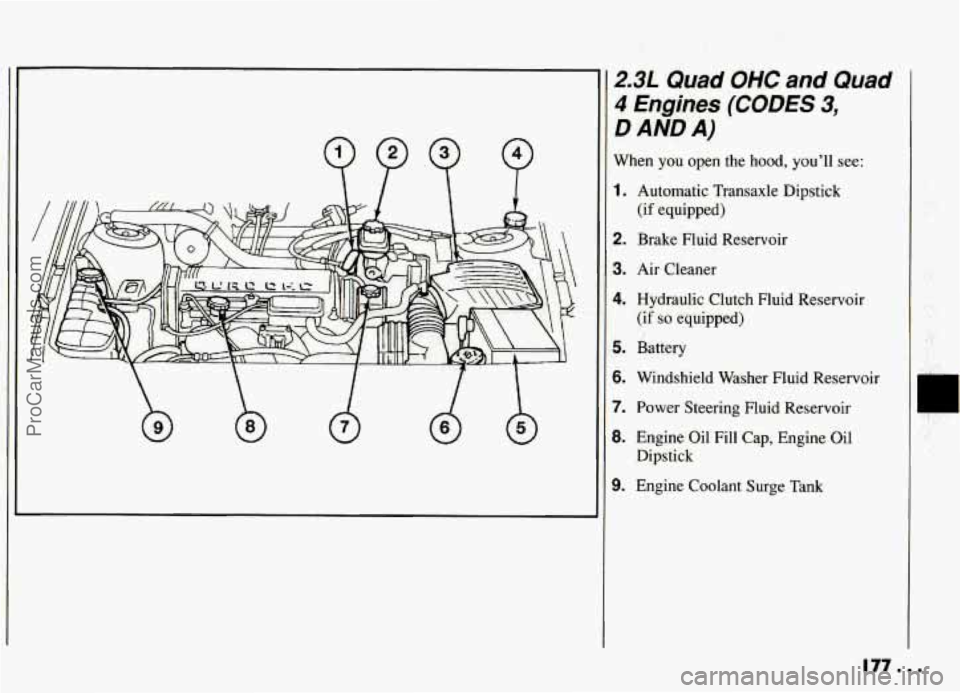
2.3L Quad OHC and Quad
4 Engines (CODES 3,
D AND A)
When you open the hood, you'll see:
1. Automatic Transaxle Dipstick
(if'equipped)
2. Brake Fluid Reservoir
3. Air Cleaner
4. Hydraulic Clutch Fluid Reservoir
(if so equipped)
5. Battery
6. Windshield Washer Fluid Reservoir
7. Power Steering Fluid Reservoir
B. Engine Oil Fill Cap, Engine Oil
Dipstick
3. Engine Coolant Surge Tank
ProCarManuals.com
Page 179 of 274
Service & Appearance Care
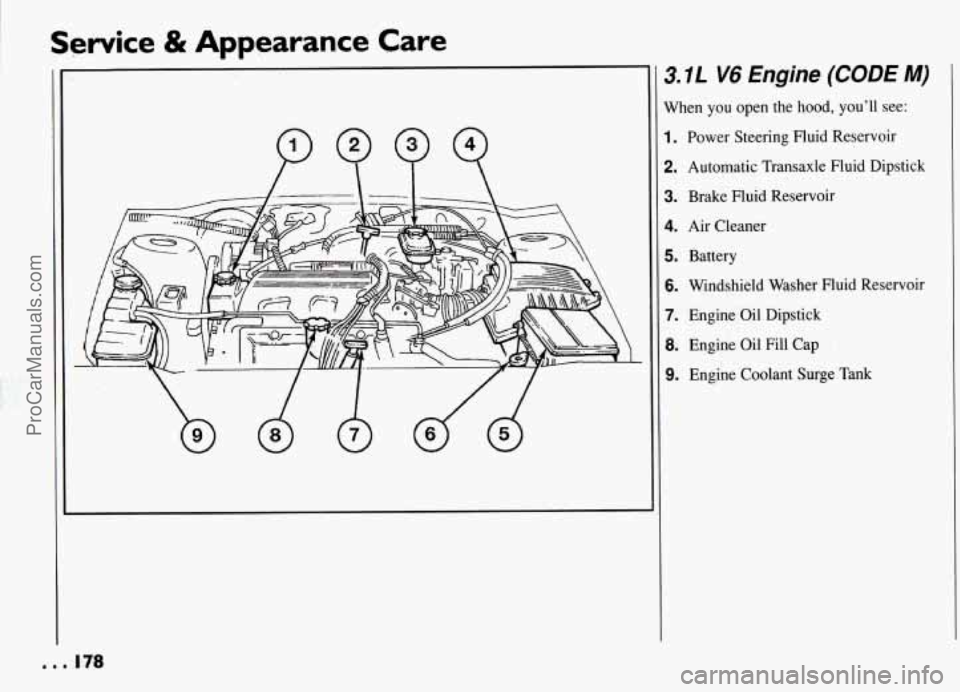
3.IL V6 Engine (CODE M)
When you open the hood, you’ll see:
1. Power Steering Fluid Reservoir
2. Automatic Transaxle Fluid Dipstick
3. Brake Fluid Reservoir
4. Air Cleaner
5. Battery
6. Windshield Washer Fluid Reservoir
7. Engine Oil Dipstick
8. Engine Oil Fill Cap
9. Engine Coolant Surge Tank
ProCarManuals.com
Page 191 of 274
Service & Appearance Care
V
P
I
E
b
S’
C
C.
P
A
I Surge Tank Pressure
Cap
NOTICE:
Your pressure cap is an 18 psi
( 124 kPa) pressure-type cap and
must be tightly installed to prevent
coolant
loss and possible engine
damage from overheating.
irhen you replace your surge tank
ressure cap, a GM cap is recommended.
I Thermostat
lngine coolant temperature is controlled
y a thermostat in the engine coolant
ystem. The thermostat stops the flow
of
oolant through the radiator until the
oolant reaches a preset temperature.
Jhen you replace your thermostat, an
.C@ thermostat is recommended.
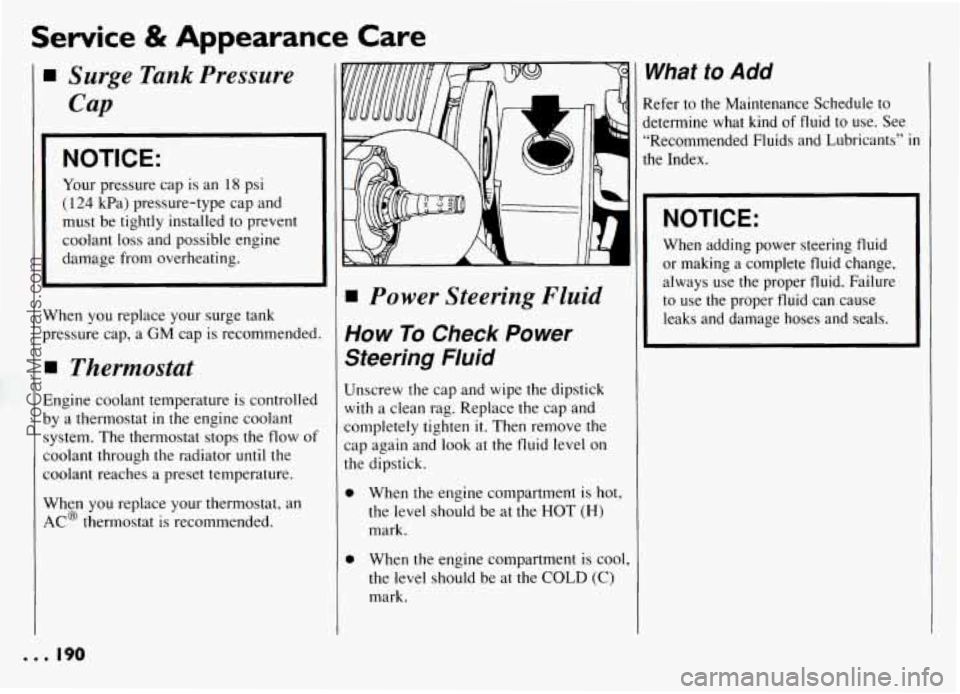
Power Steering Fluid
How To Check Power
Steering Fluid
Unscrew the cap and wipe the dipstick
with a clean rag. Replace the cap and
completely tighten
it. Then remove the
cap again and
look at the fluid level on
the dipstick.
0
0
When the engine compartment is hot,
the level should be at the HOT
(H)
mark.
When the engine compartment is cool,
the level should be at the
COLD (C)
mark.
1
I
1
What to Add
Refer to the Maintenance Schedule to
jetermine what kind
of fluid to use. See
“Recommended Fluids and Lubricants”
in
the Index.
NOTICE:
When adding power steering fluid
or making a complete fluid change,
always use the proper fluid. Failure
to use the proper fluid can cause
leaks and damage hoses and seals.
... 190
ProCarManuals.com
Page 217 of 274
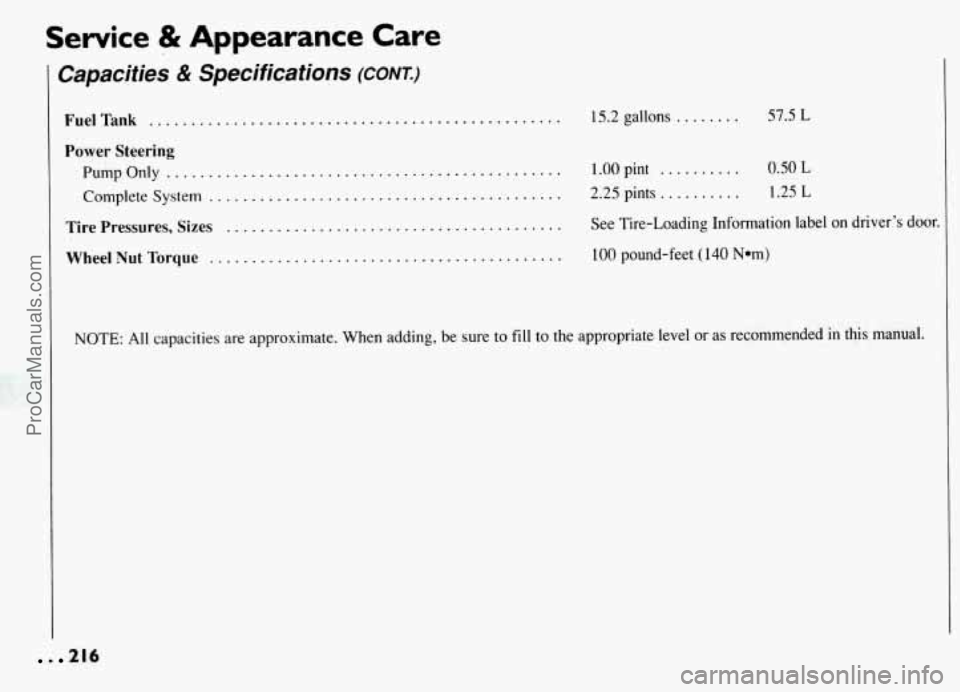
Service & Appearance Care
Capacities & Specifications (CONT.)
Complete System . .
Tire Pressures, Sizes
Wheel
Nut Torque . .
FuelTank .................................................
Power Steering
PumpOnly ...............................................
......................................
........................................
........................................
15.2 gallons ........ 57.5 L
1.00 pint .......... 0.50 L
2.25 pints .......... 1.25 L
See Tire-Loading Information label on driver’s door.
100 pound-feet ( 140 N*m)
NOTE: All capacities are approximate. When adding, be sure to fill to the appropriate level or as recommended in this manual.
. 216
ProCarManuals.com
Page 237 of 274

Maintenance Schedule
CHECK OR SERVICE
Underbody Flushing
WHAT TO DO
At least every spring, use plain water to
flush any corrosive materials from the
underbody. Take care to clean
thoroughly any areas where mud and
other debris can collect.
Section C: Periodic Maintenance
Inspections
hted below are inspections and services which should be
Ierformed at least twice a year (for instance, each spring and
all). You should let your
GM dealer’s service department or
Ither qualified service center do these jobs. Make sure any
lecessary repairs are completed at once.
INSPECTION
OR SERVICE
testraint Systems
Steering,
Suspension and
?ront-Wheel-Drive
4xle Boot and Seal
[nspection
Exhaust System
[nspection
WHAT SHOULD BE DONE
Now and then, make sure all your belts,
buckles, latch plates, retractors,
anchorages and reminder systems are
working properly. Look for any loose
parts or damage. If you see anything that
might keep a restraint system from doing
its job, have it repaired.
Inspect the front and rear suspension and
steering system for damaged, loose or
missing parts, signs of wear, or lack of
lubrication. Inspect the power steering
lines and hoses for proper hookup,
binding, leaks, cracks, chafing, etc.
Clean and then inspect the drive axle
boot seals for damage, tears or leakage.
Replace seals
if necessary.
Inspect the complete exhaust system.
Inspect the body near the exhaust
system.
Look for broken, damaged,
missing or out-of-position parts as well
as open seams, holes, loose connections,
or other conditions which could cause a
heat build-up
in the floor pan or could let
exhaust fumes into the vehicle. See “Engine Exhaust”
in the Index.
236
ProCarManuals.com
Page 239 of 274
Maintenance Schedule
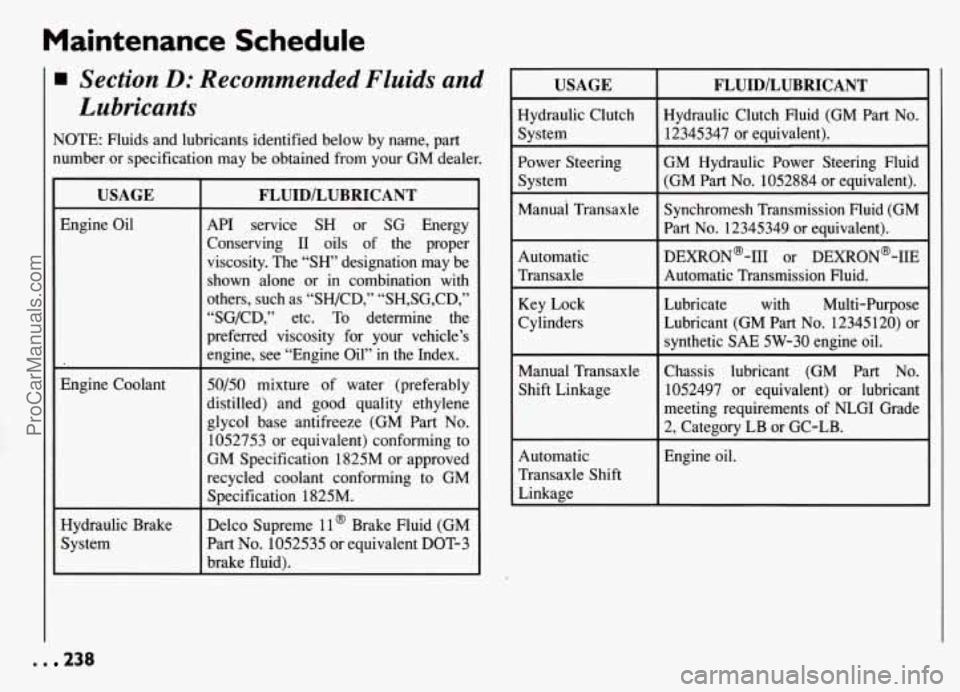
Section D: Recommended Fluids and
Lubricants
NOTE: Fluids and lubricants identified below by name, part
number or specification may be obtained from your GM dealer.
USAGE
Engine Oil
Engine Coolant
Hydraulic Brake
System
FLUIDlLUBRICANT
API service SH or SG Energy
Conserving I1 oils of the proper
viscosity. The
“SH’ designation may be
shown alone or
in combination with
others, such as “SH/CD,” “SH,SG,CD,”
“SG/CD,” etc. To determine the
preferred viscosity for your vehicle’s engine, see “Engine Oil” in the Index.
50/50 mixture of water (preferably
distilled) and good quality ethylene
glycol base antifreeze (GM Part No.
1052753 or equivaleot) conforming to
GM Specification 1825M or approved
recycled coolant conforming to GM
Specification 1825M.
Delco Supreme 11’ Brake Fluid (GM
Part No. 1052535 or equivalent DOT-3
brake fluid).
USAGE
Hydraulic Clutch
System
Power Steering
System
Automatic
Transaxle
Key Lock
Cylinders
Manual Transaxle
Shift Linkage
Automatic
Transaxle Shift
Linkage
FLUIDlLUBRICANT
Hydraulic Clutch Fluid (GM Part No.
12345347 or equivalent).
GM Hydraulic Power Steering Fluid
(GM Part No. 1052884 or equivalent). Synchromesh Transmission Fluid (GM
Part
No. 12345349 or equivalent).
DEXRON@-111 or DEXRON@-IIE
Automatic Transmission Fluid.
Lubricate with Multi-Purpose
Lubricant (GM Part
No. 12345 120) or
synthetic SAE 5W-30 engine oil.
Chassis lubricant (GM Part No.
1052497 or equivalent) or lubricant
meeting requirements of NLGI Grade
2, Category LB or GC-LB.
Engine oil.
. . 238
ProCarManuals.com