1994 PONTIAC GRAND-AM display
[x] Cancel search: displayPage 56 of 274

LOCK
ACCESSORY
I Ignition Switch-
Vith the ignition key in the ignition
witch, you can
turn the switch ‘to five
ositions:
,CCESSORE An “on” position in
lhich you can operate some of your
lectrical power accessories. Press
in the
;nition switch as you turn the top of
it
)ward you.
,OCK: The only position in which you
!n remove the key. This locks your
:cering wheel, ignition and transaxle
~n automatic models).
IFF: Unlocks the steering wheel,
;nition, and transaxle (on’ automatic
todels), but.does not send electrical
power to any accessories. Use this
position if your vehicle must be pushed or
towed, but never try
to push-start your
vehicle.
A warning’chime will sound if
you open the driver’s door when the
ignition is off and the key is in the
ignition.
RUN: An “on” position to which the
switch returns after you start your engine
and release the switch. The switch stays
in the RUN position when the engine is
running. But ‘even when the engine is not
running, you can use RUN io operate
your electrical power accessories,
and to
display
some instrument panel warning
lights.
START: Starts the engine. When the
engine starts, release the key. The ignition
switch
will return to RUN for normal
driving.
Note that even if the engine is not
running, ‘the positions
ACCESSORY and
RUN are “on” positions that allow you to
operate your electrical accessories, such
as the radio.
,.
Key Release Button
‘MANUAL TRANSAXLE)
The ignition key cannot be removed from
he ignition unless.the key release button
s used.
ro Remwe the Key:
rum the key to the OFF position. Press
he key release button while turning
the
Ley from OFF to LOCK. Keeping your
inger on
the button, pull the key straight
)Ut.
sa...
ProCarManuals.com
Page 80 of 274

Instrument Panel Intensity Control
You can brighten or dim your instrument
cluster lights by rotating the instrument
panel intensity control switch. Rotate the switch all the way to the right to turn on
the interior courtesy lights. Rotate the
switch to the left to turn
off the instrument
cluster lights and displays.
Fog Lights
The switch for your fog lights is next to
the instrument panel intensity control.
Push the top of the switch to turn the fog
lights on.
When using fog lights, the parking lights
or low beam headlights must be on.
Fog lights will go off whenever the high
beam headlights come on. When the high
beams go off, the fog lights will come on
again.
Front Reading Lights
(OPTION)
These lights and the interior courtesy
lights will come on when
you open the
doors.
To turn on a reading light when the doors
are closed, press the button. Press it again
to turn the light off.
79.8.
ProCarManuals.com
Page 109 of 274
Comfort Controls & Audio Systems
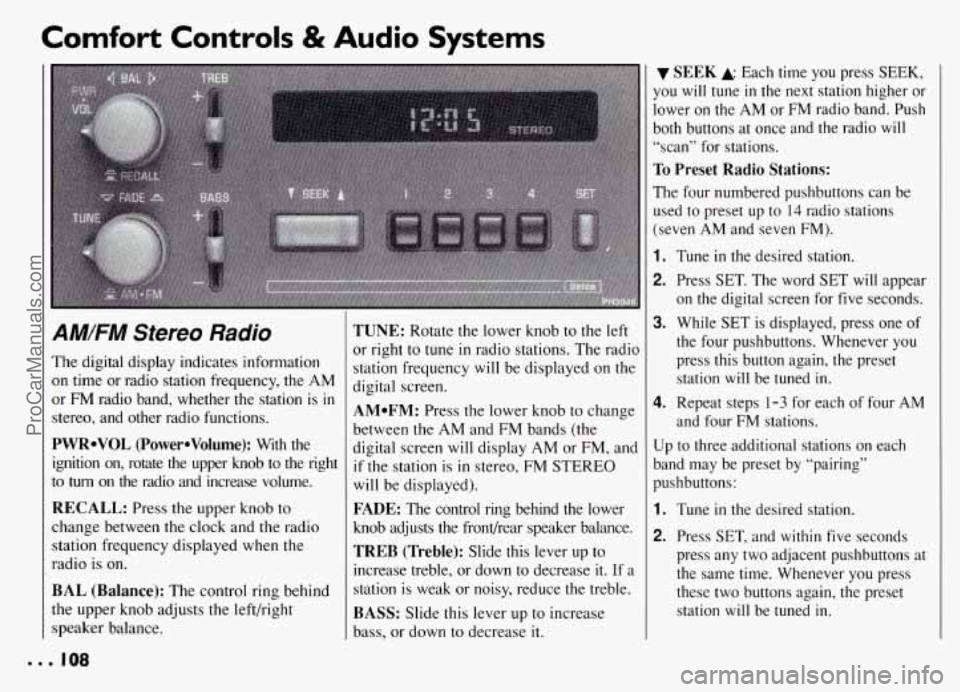
AM/FM Stereo Radio
The digital display indicates information
on time or radio station frequency, the AM
or FM radio band, whether the station is
in
stereo, and other radio functions.
PWRoVOL (PowerOVolume): With the
ignition on, rotate the upper knob to the right
to
turn on the radio and increase volume.
RECALL: Press the upper knob to
change between the clock and the radio
station frequency displayed when the
radio is on.
BAL (Balance): The control ring behind
the upper knob adjusts the left/right
speaker balance.
TUNE: Rotate the lower knob to the left
or right to
tune in radio stations. The radio
station frequency will be displayed
on the
digital screen.
AMoFM: Press the lower knob to change
between the AM and FM bands (the
digital screen will display AM or FM, and
if the station is in stereo, FM STEREO
will be displayed).
FADE: The control ring behind the lower
knob adjusts the frondrear speaker balance.
TREB (Treble): Slide this lever up to
increase treble, or down to decrease it. If a
station is weak or noisy, reduce the treble.
BASS: Slide this lever up to increase
bass, or down to decrease it.
SEEK A Each time you press SEEK,
you
will tune in the next station higher or
lower on the AM or
FM radio band. Push
both buttons at once and the radio
will
“scan” for stations.
To Preset Radio Stations:
The four numbered pushbuttons can be
used to preset up to
14 radio stations
(seven AM and seven FM).
1.
2.
3.
4.
Tune in the desired station.
Press SET. The word SET will appear
on the digital screen for five seconds.
While
SET is displayed, press one of
the four pushbuttons. Whenever you press this button again, the preset station will be tuned in.
Repeat steps 1-3 for each of four AM
and four FM stations.
Up to three additional stations on each
band may be preset by “pairing”
pushbuttons:
1.
2.
Tune in the desired station.
Press SET, and within five seconds
press any two adjacent pushbuttons at
the same time. Whenever you press
these two buttons again, the preset station
will be tuned in.
ProCarManuals.com
Page 110 of 274
AM/FM Stereo Radio with
Cassette Tape Player
(OPTION)
The digital display indicates information
on time or radio station frequency, the AM
or FM radio band, whether the station is in
stereo, and other radio functions.
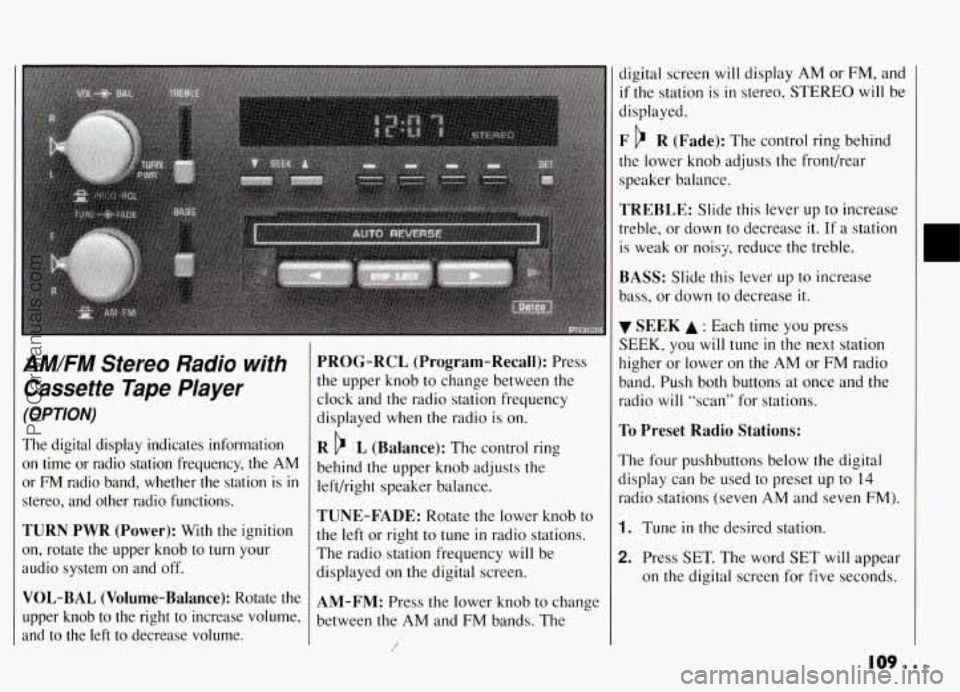
TURN PWR (Power): With the ignition
on, rotate the upper knob to
turn your
audio system on and off.
VOL-BAL (Volume-Balance): Rotate the
upper knob to the right to increase volume,
and to the left to decrease volume.
PROG-RCL (Program-Recall): Press
the upper knob to change between the
clock and the radio station frequency
displayed when the radio is on.
R b L (Balance): The control ring
behind the upper knob adjusts the
left/right speaker balance.
TUNE-FADE: Rotate the lower knob to
the left or right to tune
in radio stations.
The radio station frequency
will be
displayed on the digital screen.
AM-FM: Press the lower knob to change
between the AM and FM bands. The
/
digital screen will display AM or FM, and
if the station is in stereo, STEREO will be
displayed.
F b R (Fade): The control ring behind
the lower knob adjusts the fronthear
speaker balance.
TREBLE: Slide this lever up to increase
treble, or down to decrease
it. If a station
is weak or noisy, reduce the treble.
BASS: Slide this lever up to increase
bass, or down to decrease it.
SEEK A : Each time you press
SEEK, you will tune in the next station
higher or lower on the AM or FM radio
band. Push both buttons at once and the
radio
will “scan” for stations.
To Preset Radio Stations:
The four pushbuttons below the digital
display can be used to preset up to
14
radio stations (seven AM and seven FM).
1. Tune in the desired station.
2. Press SET. The word SET will appear
on the digital screen for five seconds.
109...
ProCarManuals.com
Page 111 of 274
Comfort Controls & Audio Systems
AM/FM Stereo Radio with
Cassette Tape Player
(OPTION) (CONT)
3. While SET is displayed, press one of
the four pushbuttons. Whenever you press this button again, the preset
station will be tuned in.
4. Repeat steps 1-3 for each of four AM
and four FM stations.
Up to three additional stations on each
band may be preset by “pairing”
pushbuttons:
1. Tune in the desired station.
2. Press SET, and within five seconds
press any two adjacent pushbuttons at
the same time. Whenever
you press
these two buttons again, the preset
station will be tuned
in.
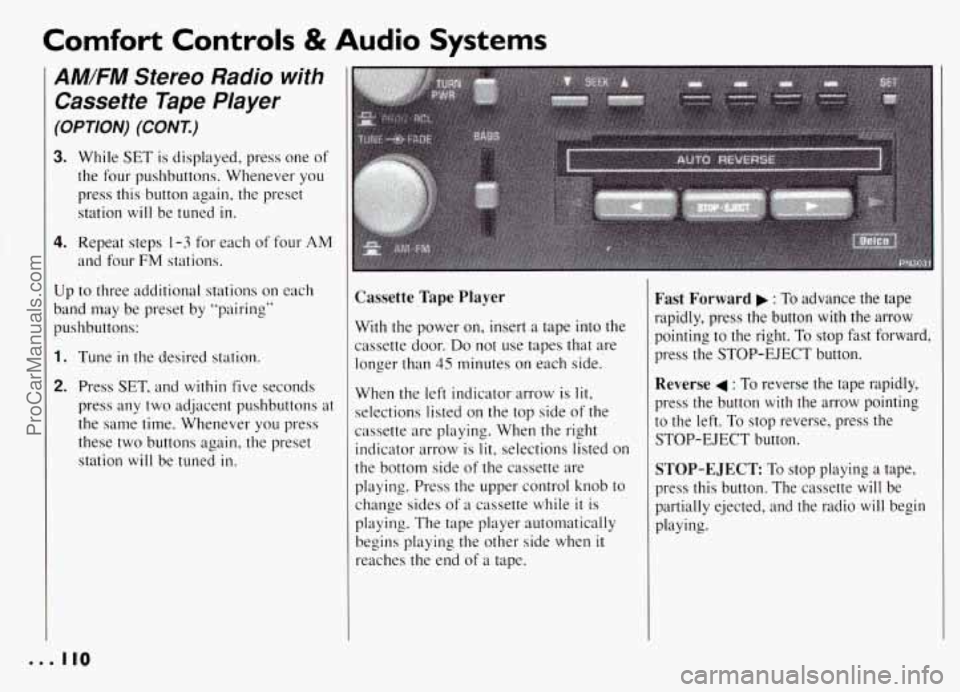
Cassette Tape Player
With the power on, insert a tape into the
cassette door.
Do not use tapes that are
longer than 45 minutes on each side.
When the left indicator arrow is lit,
selections listed on the top side of the
cassette are playing. When the right
indicator arrow is
lit, selections listed on
the bottom side
of the cassette are
playing. Press the upper control knob to
change sides
of a cassette while it is
playing. The tape player automatically
begins playing the other side when
it
reaches the end of a tape.
Fast Forward : To advance the tape
rapidly, press the button with the arrow
pointing to the right. To stop fast forward,
press the STOP-EJECT button.
Reverse 4 : To reverse the tape rapidly,
press the button with the arrow pointing
to the left. To stop reverse, press the
STOP-EJECT button.
STOP-EJECT: To stop playing a tape,
press this button. The cassette
will be
partially ejected, and the radio
will begin
playing.
0.. 110
ProCarManuals.com
Page 112 of 274
AM/FM Stereo Radio with
Cassette Tape Player and
Graphic Equalizer
(OPTION)
The digital display indicates information
on time or radio station frequency, the
AM
or FM radio band, whether the station is in
stereo, and other radio functions.
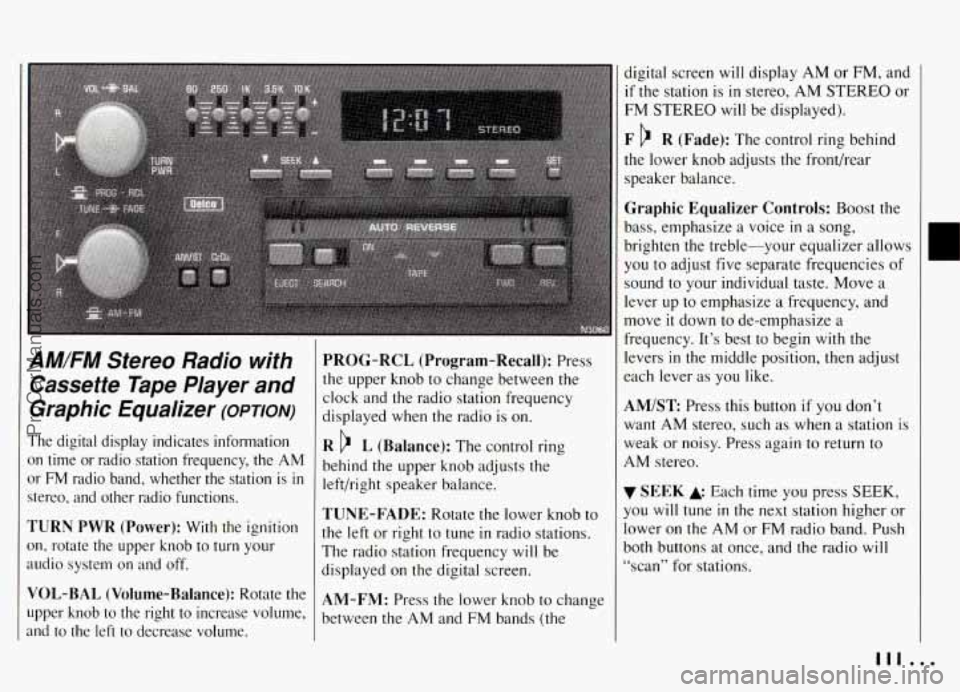
TURN PWR (Power): With the ignition
on, rotate the upper knob to turn your
audio system on
and off.
VOL-BAL (Volume-Balance): Rotate the
upper knob to the
right to increase volume,
and to the left to decrease volume.
PROG-RCL (Program-Recall): Press
the upper knob to change between the
clock and the radio station frequency
displayed when the radio is on.
R L (Balance): The control ring
behind the upper knob adjusts the
left/right speaker balance.
TUNE-FADE: Rotate the lower knob to
the left or right to tune
in radio stations.
The radio station frequency will be
displayed on the digital screen.
AM-FM: Press the lower knob to change
between the
AM and FM bands (the
digital screen will display AM or FM, and
if the station is in stereo, AM STEREO or
FM STEREO will be displayed).
F R (Fade): The control ring behind
the lower knob adjusts the front/rear
speaker balance.
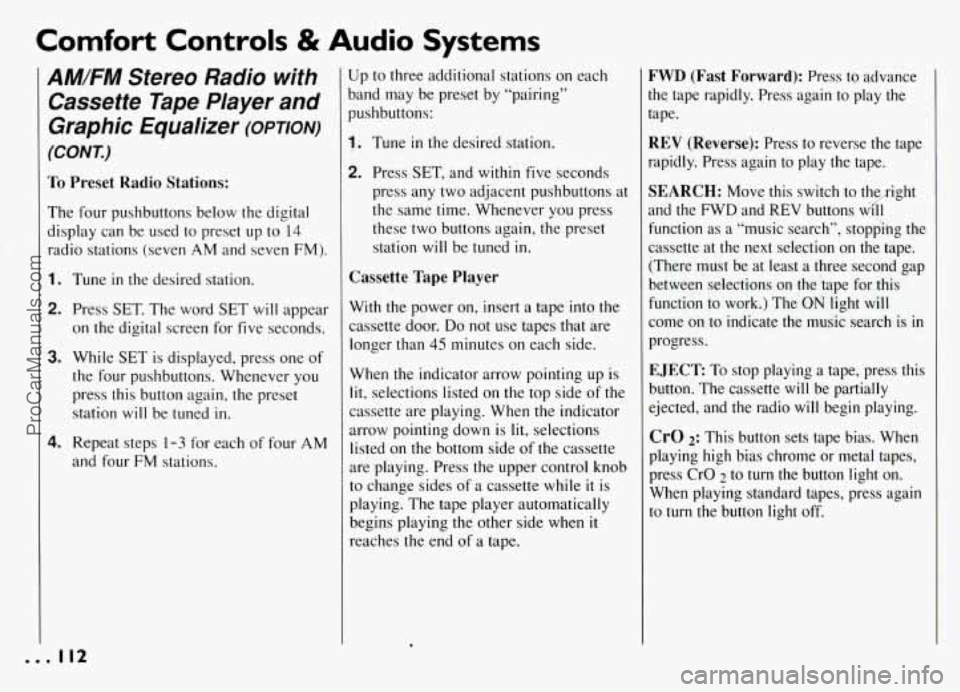
Graphic Equalizer Controls: Boost the
bass, emphasize a voice
in a song,
brighten the treble-your equalizer allows
you to adjust five separate frequencies
of
sound to your individual taste. Move a
lever up to emphasize a frequency, and
move
it down to de-emphasize a
frequency. It’s best to begin with the
levers
in the middle position, then adjust
each lever as you like.
AM/ST Press this button if you don’t
want
AM stereo, such as when a station is
weak or noisy. Press again to return to
AM stereo.
SEEK Each time you press SEEK,
you will tune in the next station higher or
lower on the
AM or FM radio band. Push
both buttons at once, and the radio will
“scan” for stations.
111 ...
ProCarManuals.com
Page 113 of 274
Comfort Controls & Audio Systems
AM/FM Stereo Radio with
Cassette Tape Player and
Graphic Equalizer
(OPTION)
(CONI)
To Preset Radio Stations:
The four pushbuttons below the digital
display can be used to preset up to 14
radio stations (seven AM and seven FM).
1. Tune in the desired station.
2. Press SET. The word SET will appear
on the digital screen for five seconds.
3. While SET is displayed, press one of
the four pushbuttons. Whenever you
press this button again, the preset
station will be tuned
in.
4. Repeat steps 1-3 for each of four AM
and four FM stations.
Up to three additional stations on each
band may be preset by “pairing”
pushbuttons:
1. Tune in the desired station.
2. Press SET, and within five seconds
press any two adjacent pushbuttons at
the same time. Whenever you press
these two buttons again, the preset
station will be tuned in.
Cassette Tape Player
With the power on, insert a tape into the
cassette door.
Do not use tapes that are
longer than
45 minutes on each side.
When the indicator arrow pointing up is
lit, selections listed on the top side of the
cassette are playing. When the indicator
arrow pointing down is
lit, selections
listed on the bottom side of the cassette
are playing. Press the upper control knob
to change sides of a cassette while it is
playing; The tape player automatically
begins playing the other side when
it
reaches the end of a tape.
FWD (Fast Forward): Press to advance
the tape rapidly. Press again to play the
tape.
REV (Reverse): Press to reverse the tape
rapidly. Press again
to play the tape.
SEARCH: Move this switch to the ight
and the FWD and
REV buttons w ir I1
function as a “music search”, stopping the
cassette at the next selection on the tape.
(There must be at least a three second gap
between selections on the tape for this
function to work.) The
ON light will
come on to indicate the music search is
in
progress.
EJECT To stop playing a tape, press this
button. The cassette
will be partially
ejected, and the radio will begin playing.
CrO 2: This button sets tape bias. When
playing high bias chrome or metal tapes,
press CrO
2 to turn the button light on.
When playing standard tapes, press again
to turn the button light off.
ProCarManuals.com
Page 114 of 274
AMFM Stereo with
Compact Disc Player
(OPTION)
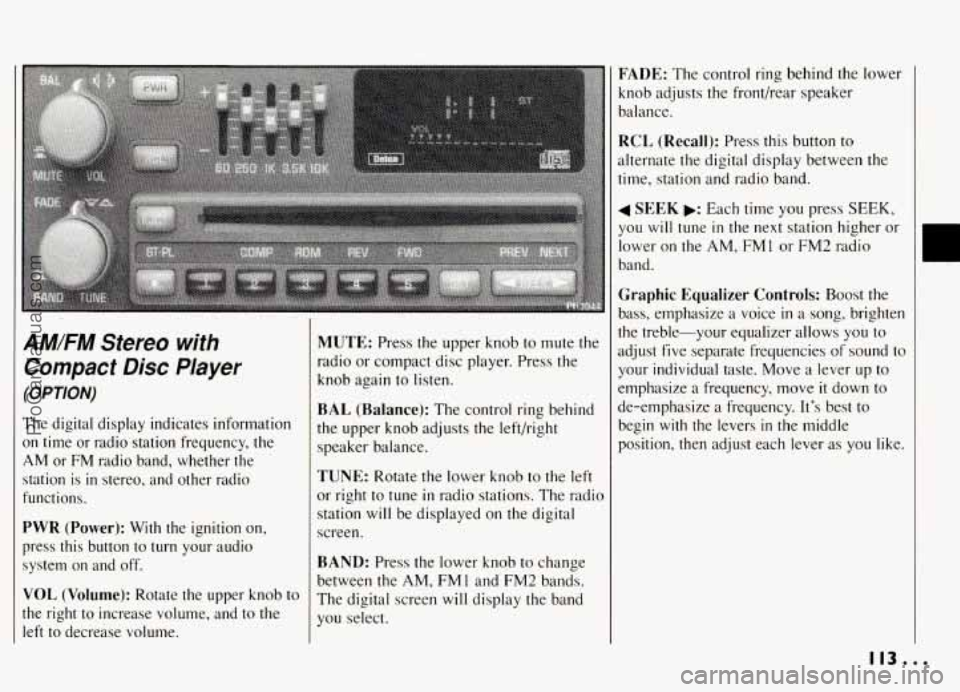
The digital display indicates information
on time or radio station frequency, the
AM or FM radio band, whether the
station is
in stereo, and other radio
functions.
PWR (Power): With the ignition on,
press this button
to turn your audio
system on and off.
VOL (Volume): Rotate the upper knob to
the right to increase volume, and to the
left to decrease volume.
I
MUTE: Press the upper knob to mute the
radio or compact disc player. Press the
knob again to listen.
BAL (Balance): The control ring behind
the upper knob adjusts the left/right
speaker balance.
TUNE: Rotate the lower knob to the left
or right to tune
in radio stations. The radio
station will be displayed on the digital
screen.
BAND: Press the lower knob to change
between the
AM, FMl and'FM2 bands.
The digital screen will display the band
you select.
FADE: The control ring behind the lower
knob adjusts the front/rear speaker
balance.
RCL (Recall): Press this button to
alternate the digital display between the
time, station and radio band.
4 SEEK b: Each time you press SEEK,
you will tune in the next station higher or
lower on the
AM, FMI or FM2 radio
band.
Graphic Equalizer Controls: Boost the
bass, emphasize a voice
in a song, brighten
the treble-your equalizer allows you to
adjust five separate frequencies
of sound to
your individual taste. Move a lever up to
emphasize a frequency, move
it down to
de-emphasize a frequency. It's best to
begin
with the levers in the middle
position, then adjust each lever
as you like.
E
113...
ProCarManuals.com