1994 OLDSMOBILE SILHOUETTE recommended oil
[x] Cancel search: recommended oilPage 148 of 276
Your Driving and the Road
146
flow. Try to merge into the gap at close
to the prevailing speed. Switch on your
turn signal, check your mirrors and
glance over your shoulder as often as
necessary. Try to blend smoothly with
the traffic flow.
Once
you are on the freeway, adjust
your speed to the posted limit or to the
prevailing rate
if it’s slower. Stay in the
right lane unless you want to pass.
Before changing lanes, check your
mirrors. Then use your turn signal.
Just before you leave the lane, glance
quickly over your shoulder to make sure
there isn’t another vehicle in your
“blind” spot.
Once you are moving
on the freeway,
make certain you allow a reasonable
following distance. Expect to move
slightly slower at night.
When you want to leave the freeway,
move to the proper lane well in
advance. If you
miss your exit do not,
under any circumstances, stop and back
up. Drive on to the next exit.
The exit ramp can be curved, sometimes quite sharply. The exit
speed
is usually posted.
Reduce your speed according to your
speedometer, not to your sense of
motion. After driving for any distance at
higher speeds, you may tend to think
you are going slower than you actually
are.
I Before Leaving on a Long
Trip
Make sure you’re ready. Try to be well
rested. If you must start when you‘re
not fresh
- such as after a day’s work
- don’t plan to make too many miles
that first part of the journey. Wear
comfortable clothing and shoes you can
easily drive in.
Is your vehicle ready for a long trip? If
you keep it serviced and maintained, it’s
ready to go. If
it needs service, have it
done before starting out. Of course,
you’ll find experienced and able service
experts in Oldsmobile dealerships all
across North America. They‘ll be ready
and willing to help
if you need it.
Here are some things you can check
before a trip:
Windshield Washer Fluid: Is the
reservoir full? Are
all windows clean
inside and outside?
shape?
you checked all levels?
lenses clean?
safe, trouble-free trip.
Is the tread
good enough for long-distance
driving? Are the tires all inflated to
the recommended pressure?
weather outlook along your route?
Should you delay your trip a short
time to avoid a major storm system?
Maps: Do you have up-to-date maps?
Wiper Blades: Are they in good
Fuel, Engine Oil, Other Fluids: Have
Lights: Are they all working? Are the
Tires: They are vitally important to a
Weather Forecasts: What’s the
Highway Hypnosis
Is tbere actually such a condition as
“highway hypnosis”? Or is it just plain
falling asleep at the wheel? Call it
highway hypnosis, lack of awareness, or
whatever.
ProCarManuals.com
Page 194 of 276
Service &Appearance Care
192
RECOMMENDED SAE VISCOSITY GRADE ENGINE OILS
FOR BEST FUEL ECONOMY AND COLD STARTING,
SELECT THE LOWEST SAE VISCOSITY GRADE OIL
FOR THE EXPECTED TEMPERATURE RANGE.
LOOK FOR
HOT ONE OF THESE
WEATHER LABELS
t100 .
+80 -
+60 -
+40 -
+20 -
0-
“C
+38
+27
+16
+4
-7
-18
COLD
SAE 1OW-30 PREFERRED above 0°F
SAE 5W-30 (-18°C)
1 IF NEITHER SAE 5W-30 NOR SAE 1OW-30 GRADE OILS ARE AVAILABLE, SAE 30 GRADE MAY BE USED AT TEMPERATURES WEATHER ABOVE 40 DEGREES F (4 DEGREES c).
DO NOT USE SAE 1OW-40, SAE 2OW-50 OR ANY OTHER GRADE OIL HOT RECOMMENDED.
2300 V6: Oil Viscosity Chart
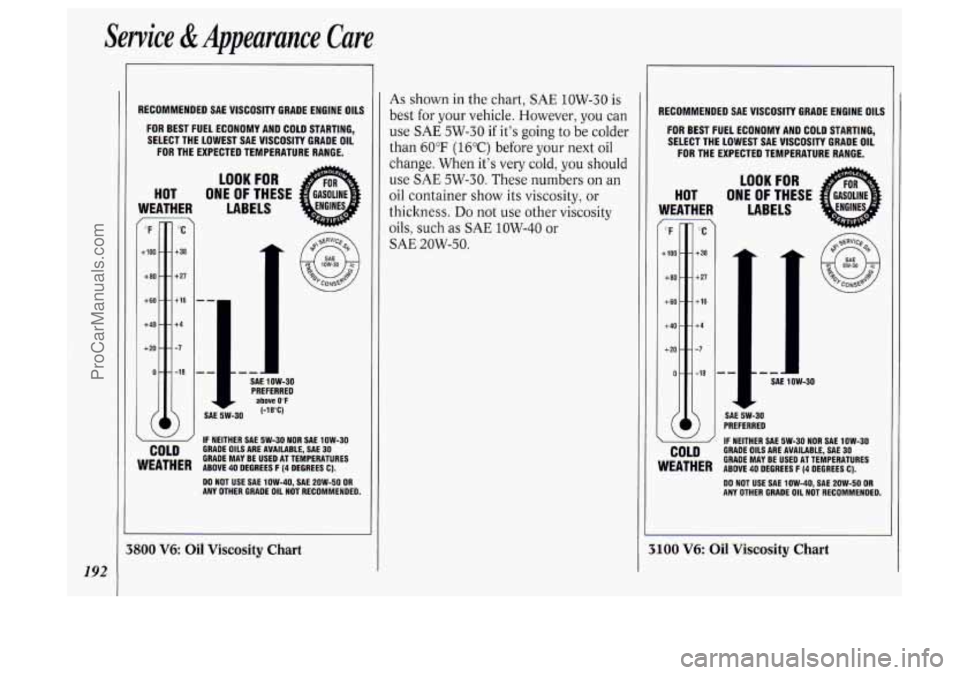
As shown in the chart, SAE 1OW-30 is
best for your vehicle. However, you can
use SAE 5W-30 if it’s going to be colder
than
60°F (16°C) before your next oil
change. When it’s very cold,
you should
use
SAE 5W-30. These numbers on an
oil container show its viscosity, or
thickness.
Do not use other viscosity
oils, such
as SAE 1OW-40 or
SAE 20W-50.
RECOMMENDED SAE VISCOSITY GRADE ENGINE OILS
FOR BEST FUEL ECONOMY AND COLD STARTING,
SELECT THE LOWEST SAE VISCOSITY GRADE OIL
FOR THE EXPECTED TEMPERATURE RANGE.
‘-’ F
+loo
+80
+ 60
+40
+20
0
“C
+38
+ 27
+16
+4
-7
-18
LOOK FOR
LABELS
HOT ONE
OF THESE
- SAE I 1
OW-30
SAE 5W-30 PREFERRED
IF NEITHER SAE
5W-30 NOR SAE 1OW-30 GRADE OILS ARE AVAILABLE. SAE 30 COLD
WEATHER ABOVE 40 DEGREES F (4 DEGREES c).
GRADE
MAY BE USED AT TEMPERATURES
DO NOT USE SAE
1OW-40, SAE 2OW-50 OR ANY OTHER GRADE OIL NOT RECOMMENDED.
3100 V6: Oil Viscosity Chart
ProCarManuals.com
Page 199 of 276
How to Add Fluid
Refer to the Maintenance Schedule to
determine what kind of transaxle fluid
to use. See
Recommended Fluids and
Lubricants
in the Index.
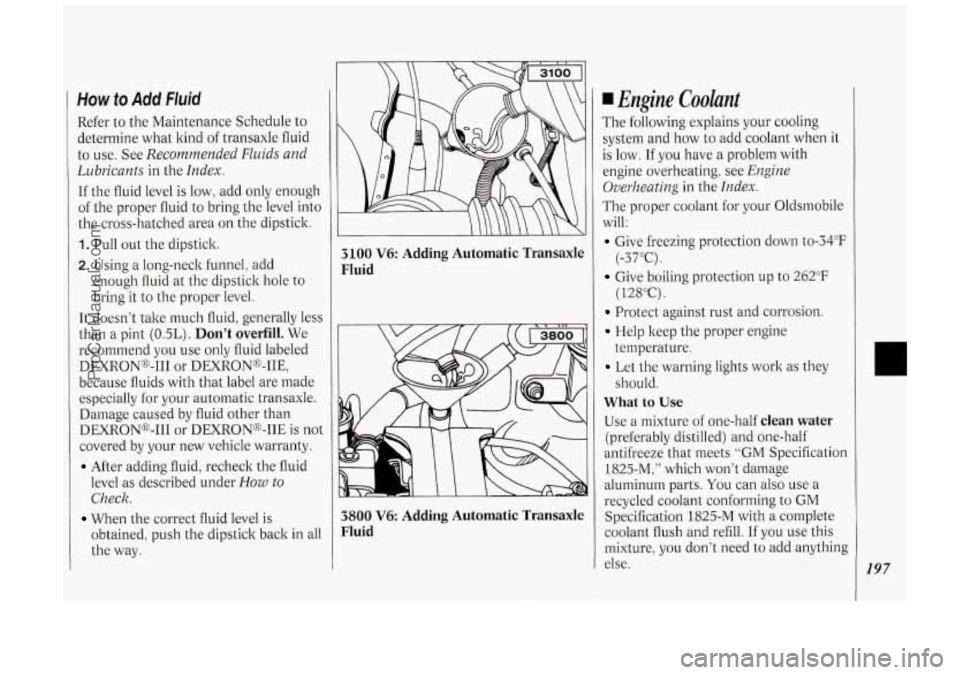
If the fluid level is low, add only enough
of the proper fluid to bring the level into
the cross-hatched area
on the dipstick.
1. Pull out the dipstick.
2. Using a long-neck funnel: add
enough fluid at the dipstick hole to
bring it to the proper level.
It doesn’t take much fluid, generally less
than a pint
(OSL). Don’t overfill. We
recommend you use only fluid labeled
DEXRONo-I11 or DEXRON@-IIE,
because fluids with that label are made
especially for your automatic transaxle.
Damage caused by fluid other than
DEXRONo-I11 or DEXRONB-IIE is not
covered by your new vehicle warranty.
After adding fluid, recheck the fluid
level as described under
How to
Check.
obtained, push the dipstick back in all
the way.
When the correct fluid level is
3100 V6: Adding Automatic Transaxle
Fluid
3800 V6: Adding Automatic Transaxle
Fluid
Engine Coolant
The following explains your cooling
system and how to add coolant when it
is
low. If you have a problem with
engine overheating, see
Engine
Overheating
in the Index.
The proper coolant for your Oldsmobile
will:
Give freezing protection down to-34”F
Give boiling protection up to 262°F
Protect against rust and corrosion.
Help keep the proper engine
Let the warning lights work as they
What to Use
Use a mixture of one-half clean water
(preferably distilled) and one-half
antifreeze that meets
“GM Specification
1825-M:” which won’t damage
aluminum parts.
You can also use a
recycled coolant conforming to
GM
Specification 1825-M with a complete
coolant flush and refill.
If you use this
mixture,
you don’t need to add anything
else.
(-37°C).
( 12SoC).
temperature. should.
197
ProCarManuals.com
Page 218 of 276
Service & Appearance Care
21 6
Finish Care
Occasional waxing or mild polishing of
your Oldsmobile may be necessary to
remove residue from the paint finish.
You can get GM approved cleaning
products from your dealer.
Your Oldsmobile has
a
“basecoat/clearcoat” paint finish. The
clearcoat gives more depth and gloss to
the colored basecoat. Always use waxes
and polishes that are non-abrasive and
made for
a basecoat/clearcoat paint
finish.
NOTICE:
Machine compounding or
aggressive polishing on a
basecoat/clearcoat paint finish may
dull the finish or leave swirl marks.
UAluminum Week
Your aluminum wheels have a
protective coating similar to the painted
surface of your vehicle. Don’t use
strong soaps, chemicals, chrome polish,
abrasive cleaners or abrasive cleaning
brushes on them because you could
damage this coating. After rinsing
thoroughly,
a wax may be applied.
NOTICE:
Don’t use an automatic vehicle
wash that has hard silicon carbide
cleaning brushes. These brushes
can take off the protective coating.
I Weatherstrips
Silicone grease on weatherstrips will
make them last longer, seal better, and
not stick or squeak. Apply silicone
grease with a clean cloth at least every
six months. During very cold, damp
weather more frequent application may
be required. (See
Recommended Fluids
G- Lubricants in the Index.)
Foreigpt Material
Calcium chloride and other salts, ice
melting agents, road oil and tar, tree
sap, bird droppings, chemicals from
industrial chimneys, and other foreign
matter can damage your vehicle’s finish
if they remain on painted surfaces. Use
cleaners that are marked safe for
painted surfaces to remove foreign
matter.
I Finish Damage
Any stone chips, fractures or deep
scratches in the finish should be
repaired right away.
Minor chips and scratches can be
repaired with touch-up materials
available from your dealer or other
service outlets. Larger areas of finish
damage can be corrected in your
dealer’s body and paint shop.
ProCarManuals.com
Page 226 of 276
Service & Appearance Care
224
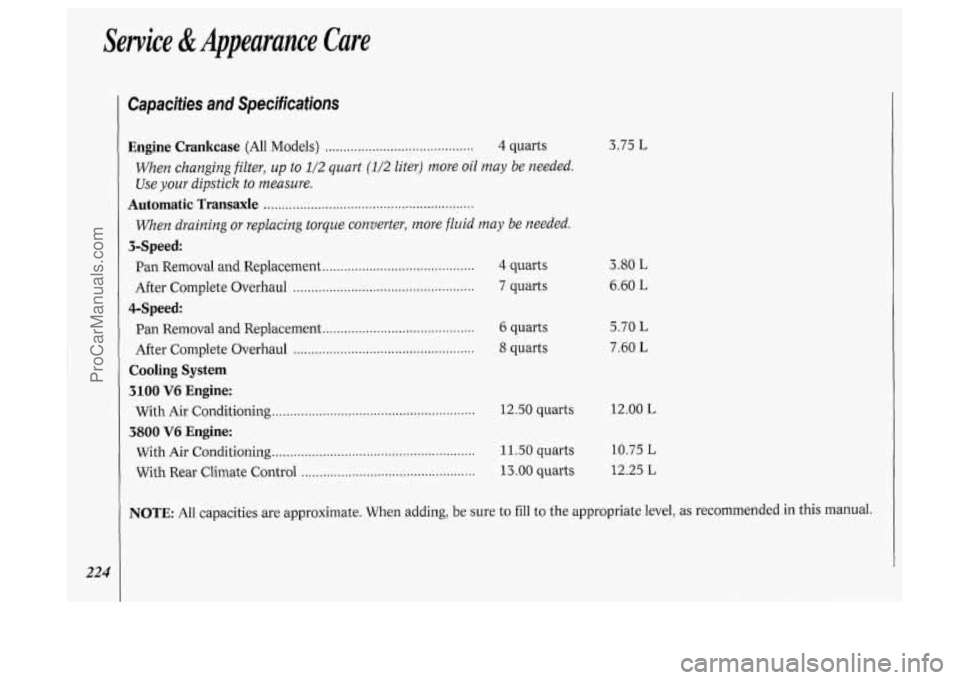
Capacities and Specifications
Engine Crankcase (All Models) ......................................... 4 quarts
When changing filter, up to 112 quart (1/2 liter) more oil may be needed.
Use
your dipstick to measure.
Automatic Transaxle ..........................................................
When draining or replacing torque converter, more fluid may be needed.
Pan Removal and Replacement .......................................... 4 quarts
After Complete Overhaul
.................................................. 7 quarts
3-Speed:
4-Speed:
Pan Removal and Replacement .......................................... 6 quarts
After Complete Overhaul
.................................................. 8 quarts
Cooling System
3100 V6 Engine:
3800 V6 Engine:
With Air Conditioning ........................................................ 12.50 quarts
With Air Conditioning ........................................................ 11.50 quarts
With Rear Climate Control
................................................ 13 .OO quarts
3.75 L
3.80 L
6.60 L
5.70 L
7.60 L
12.00 L
10.75
L
12.25 L
NOTE: All capacities are approximate. When adding, be sure to fill to the appropriate level, as recommended in this manual.
ProCarManuals.com
Page 236 of 276
Muintenunce Schedule
234
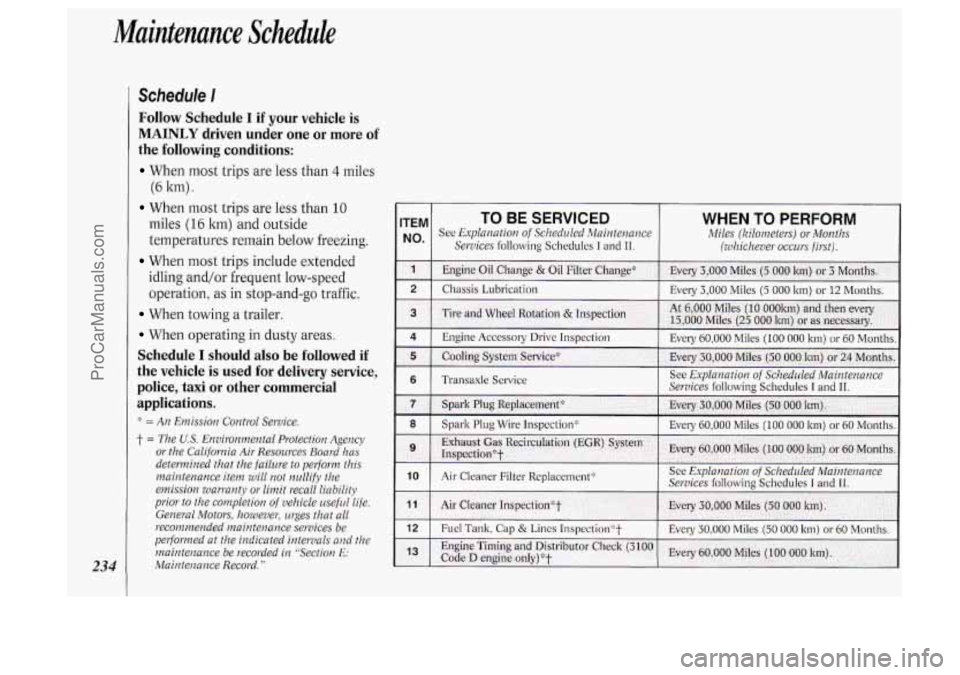
Schedule I
Follow Schedule I if your vehicle is
MAINLY driven under one or more of
the following conditions:
When most trips are less than 4 miles
When most trips are less than 10
(6
ltm)
.
miles (16 ltrn) and outside
temperatures remain below freezing.
When most trips include extended
idling and/or frequent low-speed
operation, as in stop-and-go traffic.
When towing a trailer.
When operating in dusty areas.
Schedule I should also be followed if
the vehicle is used for delivery service,
police, taxi
or other commercial
applications.
::: = An Emission Control Service.
j- = The U.S. Emiyonmental Protection Agency
or the California Air Resources Board has
determined that the failure
to pelform this
maintenance item will
not nullify the
emission warranty or limit recall liability
prior
to the completion of vehicle useful life.
General Motors, however, urges that all
recommended maintenance services be
pelformed at the indicated intervals and the
maintenance be recorded in “Section
E:
Maintenance Record.”
ITEM TO BE SERVICED WHEN TO PERFORM
No* See Explanation of Scheduled Maintenance Miles (Kilometers) or Months
Services
following Schedules I and 11. (whichever occurs firsl).
1 Engine Oil Change & Oil Filter Change* Every 3,000 Miles (5 000 km) or 3 Montl~s..
2 Chassis Lubrication Every 3,000 Miles (5 000 lm) or 12 Months.
ProCarManuals.com
Page 246 of 276
Maintenance Schedule
244
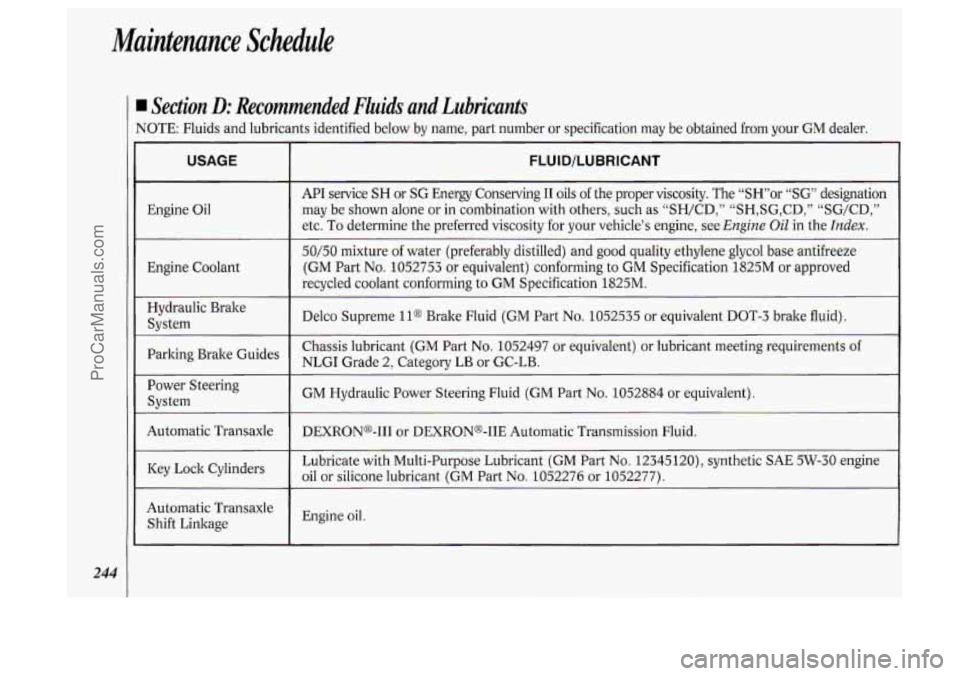
Section D: Recommended Fluids and Lubricants
NOTE: Fluids and lubricants identified below by name, part number or specification may be obtained from your GM
dealer.
USAGE FLUID/LUBRICANT
Engine Oil API service
SH or SG Energy Conserving I1
oils of the proper viscosity. The “SH”or “SG” designation
may be shown alone or in combination with others, such as “SH/CD,” “SH,SG,CD,” “SG/CD,”\
etc. To determine the preferred viscosity for your vehicle’s engine, see
Engine OiZ in the Index.
Engine Coolant
50/50 mixture of water (preferably distilled) and good quality ethylene glycol base antifreeze
(GM Part No. 1052753 or equivalent) conforming
to GM Specification 1825M or approved
recycled coolant conforming to GM Specification 1825M.
Hydraulic Brake Svstem
I Delco Supreme 1 lo Brake Fluid (GM Part No. 1052535 or equivalent DOT-3 brake fluid).
Chassis lubricant (GM Part
No. 1052497 or equivalent) or lubricant meeting requirements of
NLGI Grade 2, Category LB or GC-LB. Guides
Power Steering
System I
I GM Hydraulic Power Steering Fluid (GM Part No. 1052884 or equivalent)
Automatic Transaxle DEXRONo-I11 or DEXRONo-IIE Automatic Transmission Fluid.
ICey oil or silicone lubricant (GM Part No. 1052276 or 1052277).
Lubricate with Multi-Purpose Lubricant (GM Part No.
12345120), synthetic SAE 5W-30 engine
Automatic Transaxle
Shift Linkage
Engine oil.
ProCarManuals.com