1994 OLDSMOBILE SILHOUETTE radio
[x] Cancel search: radioPage 60 of 276

Features & Con&oli
58
U
I Ignition Switch
With the ignition key in the ignition
switch, you can turn the switch to five
positions:
Accessory: An “on” position in which
you can operate your electrical power
accessories. Press in the ignition switch
as you turn the top
of it toward you.
Lock: The only position in which you
can remove the ltey. This loclts your
steering wheel, ignition and transaxle.
Off Unlocks the steering wheel,
ignition, and transaxle, but does not
send electrical power to any accessories
Use this position
if your vehicle must be
pushed or towed, but never try to push-
start your vehicle.
A warning chime will
sound
if you open the driver’s door the
ignition.
Run: An “on” position to which the
switch returns after you start your
engine and release the switch. The
switch stays in the
Run position when
the engine is running. But even when
the engine is not running, you can use
Run to operate your electrical power
accessories, and to display some
instrument panel warning lights.
Start: Starts the engine. When the
engine starts, release the ltey. The
ignition switch will return to
Run for
normal driving.
Note that even if the engine is not
running, the positions
Accessory and
Run are “on” positions that allow you
to operate your electrical accessories,
such as the radio.
NOTICE:
If your key seems stuck in Lock
and you can’t turn it, be sure it is
all the way in. If it is, then turn the
steering wheel left and right while
you turn the key hard. But turn the
key only with your hand. Using a
tool
to force it could break the key
or the ignition switch. If none of
this works, then your vehicle needs
service.
I Starting Your Engine
Engines start differently. The 8th digit
of your Vehicle Identification Number
(VIN) shows the code letter or number
for your engine.
You will find the VIN
at the top left of your instrument panel.
(See
Vehicle Identification Number in
the
Index.) Follow the proper steps to
start the engine.
Move your shift lever
to P (Park) or N
(Neutral). Your engine won’t start in
any other position
- that’s a safety
feature.
To restart when you’re already
moving, use
N (Neutral) only.
ProCarManuals.com
Page 86 of 276
Features & Controls
84
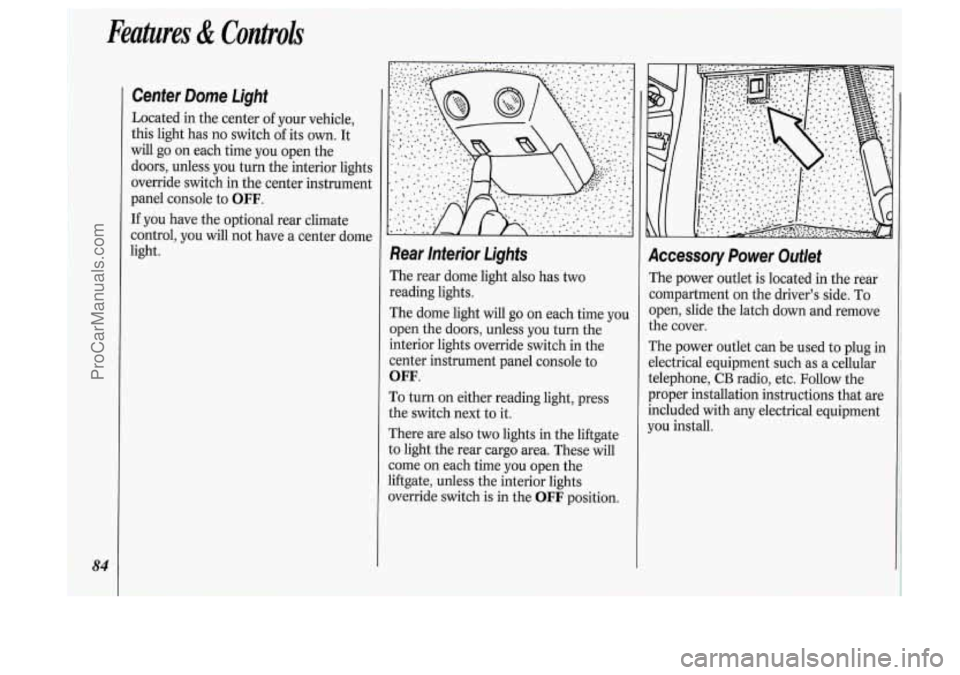
Center Dome Light
Located in the center of your vehicle,
this light has no switch of its
own. It
will go on each time you open the
doors, unless you turn the interior lights
override switch in the center instrument
panel console to
OFF.
If you have the optional rear climate
control, you will not have a center dome
light.
Rear lnterior Lights
The rear dome light also has two
reading lights.
The dome light will go
on each time you
open the doors, unless you turn the
interior lights override switch in the
center instrument panel console to
OFF.
To turn on either reading light, press
the switch next to it.
There are also
two lights in the liftgate
to light the rear cargo area. These will
come
on each time you open the
liftgate, unless the interior lights
override switch is in the
OFF position.
Accessory Power Outlet
The power outlet is located in the rear
compartment on the driver’s side. To
open, slide the latch down and remove
the cover.
The power outlet can be used to plug in
electrical equipment such as a cellular
telephone,
CB radio, etc. Follow the
proper installation instructions that are
included with any electrical equipment
you install.
ProCarManuals.com
Page 111 of 276
In this part you’ll find out how to
operate the comfort control systems
and audio systems offered with your
Oldsmobile
. Be sure to read about
the particular system supplied with
your vehicle
.
Part
Comfort Controls & Audio Systems
Climate Control System ........................................................................\
.................. 110
Rear Climate Control ........................................................................\
...................... 113
Defogging and Defrosting
........................................................................\
............... 115
Rear Window Defogger
........................................................................\
................... 115
AM/FM Stereo Radio
........................................................................\
..................... 119
Setting the
Clock
........................................................................\
............................. 117
AM/FM Stereo with Cassette Player
...................................................................... 120
AM/FM Stereo with Cassette Player with Dolby@
................................................ 122
AM/FM Stereo with Compact Disc Player ............................................................ 124
Compact Disc Player Anti-Theft Feature ............................................................... 126
Steering Wheel Touch Controls ........................................................................\
...... 127
Understanding Radio Reception ........................................................................\
..... 128
Care of Your Compact Discs
........................................................................\
.......... 129
Integrated Roof Antenna
........................................................................\
................ 129
Care
of Your Cassette Tape Player
........................................................................\
. 128
ProCarManuals.com
Page 119 of 276
4 Audio Systems
The following pages describe the audio
systems available for your Oldsmobile,
and how to get the best performance
from them. Please read about the
system in your vehicle.
Hearing damage from loud noise is
almost undetectable until it is too late.
Your hearing can adapt to higher
volumes of sound. Sound that seems
normal can be loud and harmful to your
hearing. Take precautions by adjusting
the volume control on your radio to a
safe sound level before your hearing
adapts
to it.
To help avoid hearing loss or damage:
1. Adjust the volume control to the
lowest setting.
2. Increase volume slowly until you
hear comfortably and clearly.
NOTICE:
Before you add any sound
equipment
to your vehicle - like a
tape player,
CB radio, mobile
telephone or two-way radio
- be
sure you can add what you want. If
you can, it’s very important to do it
properly. Added sound equipment
may interfere with the operation
of
your vehicle’s engine, Delco@ radio
or other systems, and even damage
them. And, your vehicle’s systems
may interfere with the operation of
sound equipment that has been
added improperly.
So, before
adding sound equipment, check
with your dealer and be sure to
check Federal rules covering mobile
radio and telephone units.
111 111 AUTO REVERSE
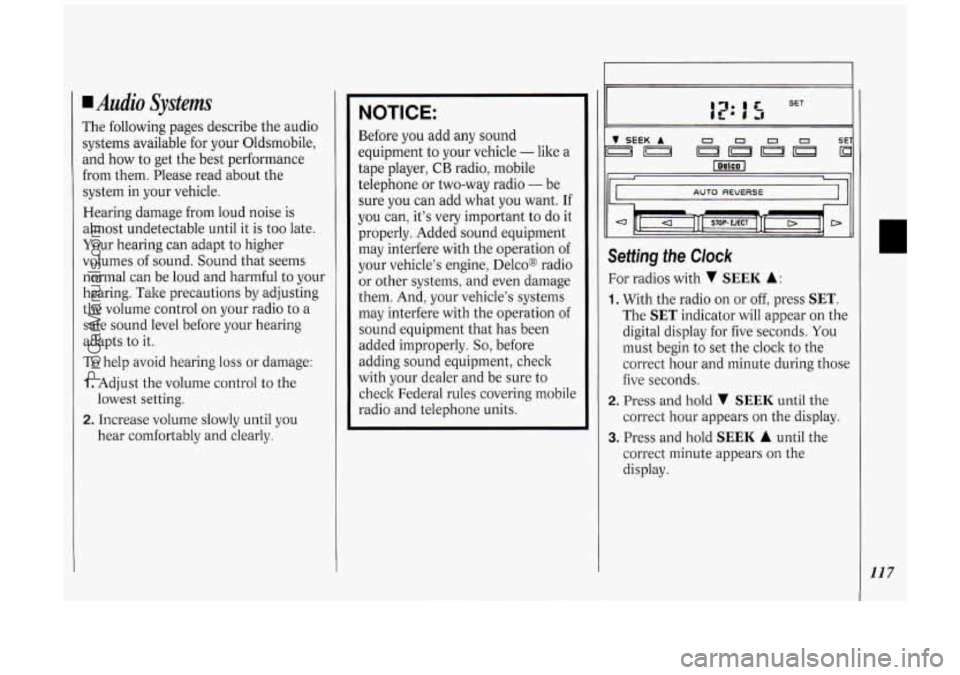
Setting the Clock
For radios with v SEEK A:
1. With the radio on or off, press SET.
The SET indicator will appear on the
digital display for five seconds. You
must begin to set the clock to the
correct hour and minute during those
five seconds.
correct hour appears on the display.
2. Press and hold v SEEK until the
3. Press and hold SEEK A until the
correct minute appears on the
display.
117
ProCarManuals.com
Page 120 of 276
Comfort Controli &Audio Systems
118
bc
1.
2.
3.
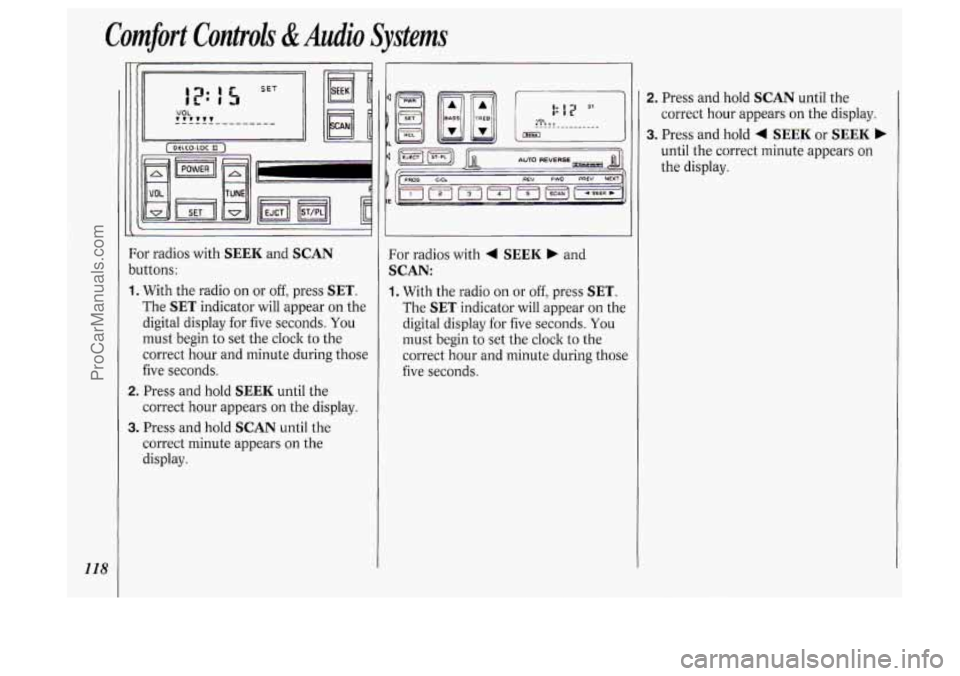
)r radios with SEEK and SCAN
Ittons:
With the radio on or
off, press SET.
The SET indicator will appear on the
digital display for five seconds. You
must begin to set the clock to the
correct hour and minute during those
five seconds.
Press and hold
SEEK until the
correct hour appears
on the display.
Press and hold
SCAN until the
correct minute appears on the
display. For radios with
4 SEEK b and
SCAN:
1. With
the radio on or off, press SET.
The SET indicator will appear on the
digital display
for five seconds. You
must begin to set the clock to the
correct hour and minute during those
five seconds.
1
2. Press and hold SCAN until the
correct hour appears
on the display.
3. Press and hold 4 SEEK or SEEK b
until the correct minute appears on
the display.
ProCarManuals.com
Page 121 of 276
2 RECALL
TUNE --@ FAOE --
5 AM-FM
~
BASS V SEEK A 1 234 SET
II I I II
II I I II
II I I II
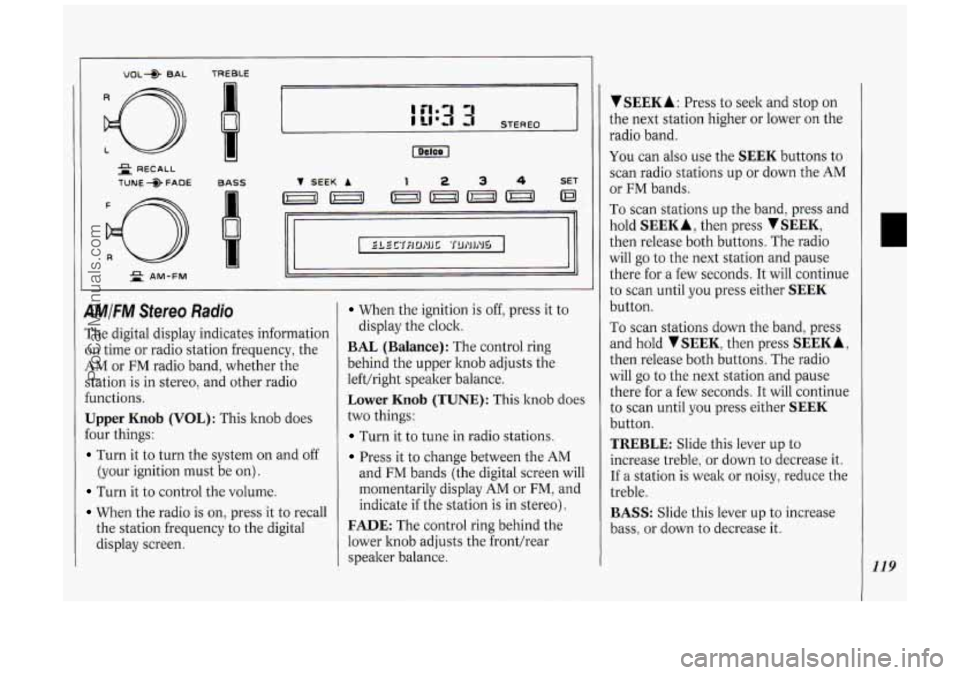
4MIFM Sfereo Radio
The digital display indicates information
on time or radio station frequency, the
AM or FM radio band, whether the
station is in stereo, and other radio
€unctions.
Upper Knob (VOL): This knob does
Four things:
Turn it to turn the system on and off
(your ignition must be on).
Turn it to control the volume.
When the radio is on, press it to recall
the station frequency to the digital
display screen.
When the ignition is off, press it to
BAL (Balance): The control ring
behind the upper knob adjusts the
lefthight speaker balance.
Lower Knob (TUNE): This knob does
two things:
Turn it to tune in radio stations.
Press it to change between the AM
display the clock.
and
FM bands (the digital screen will
momentarily display
AM or FM, and
indicate
if the station is in stereo).
FADE: The control ring behind the
lower hob adjusts the fronthear
speaker balance.
V SEEK A : Press to seek and stop on
the next station higher or lower on the
radio band.
You can also use the SEEK buttons to
scan radio stations up or down the
AM
or FM bands.
To scan stations up the band, press and
hold
SEEK A, then press SEEK,
then release both buttons. The radio
will
go to the next station and pause
there for a few seconds.
It will continue
to scan until you press either
SEEK
button.
To scan stations down the band, press
and hold
TSEEK, then press SEEKA,
then release both buttons. The radio
will
go to the next station and pause
there for a few seconds.
It will continue
to scan until you press either
SEEK
button.
TREBLE: Slide this lever up to
increase treble, or down to decrease it.
If a station is weak or noisy, reduce the
treble.
BASS: Slide this lever up to increase
bass, or down to decrease it.
119
ProCarManuals.com
Page 122 of 276
120
Comfort Controls &Audio Systems
To Preset Radio Stations:
1. Tune in the desired station.
2. Press SET. The word SET will
appear on the digital screen for five
seconds.
3. While SET is displayed, press one of
the four pushbuttons.
4. Repeat steps 1-3 for each of four AM
and four
FM stations.
Up to three additional stations
on each
band may be preset by “pairing”
pushbuttons:
1. Tune in the desired station.
2. Press SET, and within five seconds
press any two adjacent pushbuttons
at the same time.
3. The station can be tuned in when the
same two pushbuttons are pressed at
the same time.
VOL* BAL TREBLE I= - -
= PROG-RCL
TUNE +> FADE BASS
d
AUTO REVERSE
2 AM-FM
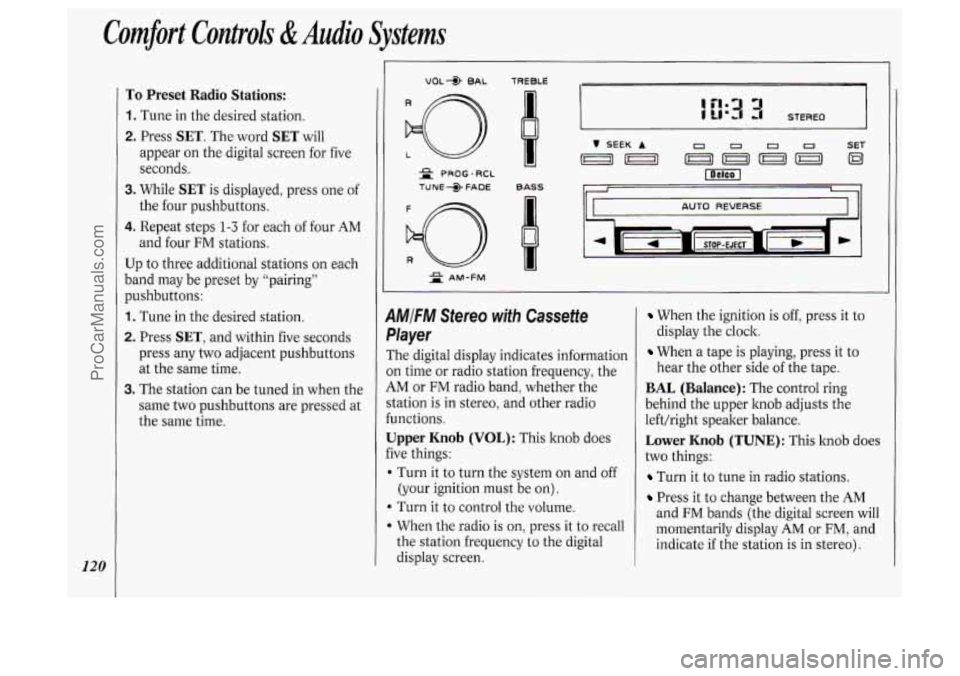
1MIFM Stereo with Cassette
,layer
The digital display indicates information
)n time or radio station frequency, the
iM or FM radio band, whether the
‘tation is in stereo, and other radio
unctions.
Jpper Knob (VOL): This knob does
ive things:
I Turn it to turn the system on and off
(your ignition must be on).
b Turn it to control the volume.
When the radio is on, press it to recall
the station frequency to the digital
display screen.
When the ignition is off, press it to
display the clock.
When a tape is playing, press it to
hear the other side
of the tape.
BAL (Balance): The control ring
behind the upper knob adjusts the
left/right speaker balance.
Lower Knob (TUNE): This knob does
two things:
Turn it to tune in radio stations.
Press it to change between the AM
and FM bands (the digital screen will
momentarily display
AM or FM, and
indicate if the station is in stereo).
ProCarManuals.com
Page 123 of 276
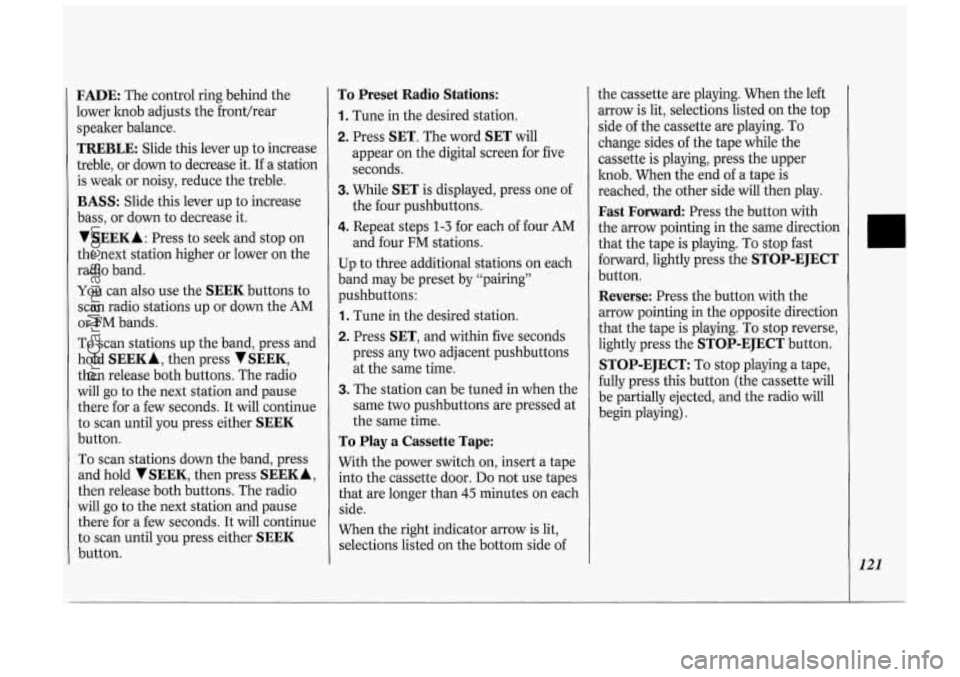
FADE: The control ring behind the
lower knob adjusts the fronthear
speaker balance.
TREBLE: Slide this lever up to increase
treble, or down to decrease it. If a station
is weak or noisy, reduce the treble.
BASS: Slide this lever up to increase
bass, or down to decrease it.
VSEEKA : Press to seek and stop on
the next station higher or lower on the
radio band.
You can also use the
SEEK buttons to
scan radio stations up or down the AM
or FM bands.
To scan stations up the band, press and
hold
SEEKA, then press VSEEK,
then release both buttons. The radio
will
go to the next station and pause
there for
a few seconds. It will continue
to scan until you press either
SEEK
button.
To scan stations down the band, press
and hold
V SEEK, then press SEEK A,
then release both buttons. The radio
will
go to the next station and pause
there for a few seconds. It will continue
to scan until you press either
SEEK
button.
To Preset Radio Stations:
1. Tune in the desired station.
2. Press SET. The word SET will
appear
on the digital screen for five
seconds.
3. While SET is displayed, press one of
the four pushbuttons.
4. Repeat steps 1-3 for each of four AM
and four FM stations.
Up to three additional stations
on each
band may be preset by “pairing”
pushbuttons:
1. Tune in the desired station.
2. Press SET, and within five seconds
press any two adjacent pushbuttons
at the same time.
3. The station can be tuned in when the
same two pushbuttons are pressed at
the same time.
To Play a Cassette Tape:
With the power switch on, insert a tape
into the cassette door.
Do not use tapes
that are longer than
45 minutes on each
side.
When the right indicator arrow is lit,
selections listed
on the bottom side of the cassette are
playing. When the left
arrow is lit, selections listed
on the top
side of the cassette are playing. To
change sides of the tape while the
cassette is playing, press the upper
knob. When the end of a tape is
reached, the other side will then play.
Fast Forward Press the button with
the arrow pointing in the same direction
that the tape is playing. To stop fast
forward, lightly press the
STOP-EJECT
button.
Reverse: Press the button with the
arrow pointing in the opposite direction
that the tape is playing. To stop reverse,
lightly press the
STOP-EJECT button.
STOP-EJECT: To stop playing a tape,
fully press this button (the cassette will
be partially ejected, and the radio will
begin playing).
121
ProCarManuals.com