Page 339 of 1708

H CLUTCH FLUID CLUTCH FLUID PREPARATION 49 0259 7708 For air bleeding Whench, flare nut REPLACEMENT Caution Clutch fluid will damage painted surfaces. If clutch fluid does get on a painted surface, wipe it off immediately. 1. Drain the fluid from the reservoir by using a suction pump. (Refer to section P.) 2. Remove the bleeder cap from the clutch release cylinder and attach a vinyl hose to the bleeder screw. 3. Insert the other end of the vinyl hose into a clear contain- er. 4. Loosen the bleeder screw by using the SST. 5. With another person slowly pumping the clutch pedal, drain the fluid from the clutch system. 6. Repeat step 5 until all the fluid is drained. 7. Modify the bleeder screw tightening torque to allow for ,-, a torque wrench-SST combination (Refer to section GI "Torque Formulas".) 8. Tighten the bleeder screw by using the SST. Tightening torque: 5.9--8.8 N.m (60-90 kgf.cm, 53-78 in4bf) 9. Fill the reservoir to MAX with new fluid of the specified type. 10. Bleed the air from the clutch. (Refer to page H-9.) 11. Check for correct clutch operation. 12. Verifv that there is no fluid leakaae. Gartner Banana
Page 340 of 1708

CLUTCHPEDAL H Minimum disengagement height: 68mm (2.68 in) (With carpet) CLUTCHPEDAL ADJUSTMENT Height lnspection 1. Measure the distance from the upper surface of the ped- al pad to the carpet. Pedal height: 175--185mm (6.89-7.28 in) (With carpet) 2. If necessary, adjust the height. Adjustment 1. Disconnect the clutch switch connector. 2. Loosen locknut @ and turn clutch switch @I until the height is correct. I 3. Tighten locknut @. Tightening torque: l3.Cl7.6 N-m (1 4Gl8O kgf-cm, 122-1 56 in-IM) 4. After adjustment, inspect the free play. Free Play lnspection 1. Depress the clutch pedal by hand until clutch resistance is felt. Free play: 0.6-3.lmm (0.02-0.12 in) Total free play: S13mm (0.20-0.51 in) 2. If necessary, adjust the free play. Adjustment 1. Loosen locknut 0 and turn push rod 03 until free play is correct. 2. Verify that the disengagement height as measured from the upper surface of the pedal pad to the carpet is correct when the pedal is fully depressed. 3. Tighten locknut 0. Tightening torque: 11 .&l6.6 N.m (120-1 70 kgtcm, 105--147 in.lbf} 4. After adjustment, inspect the height. Gartner Banana
Page 343 of 1708

H CLUTCH MASTER CYLINDER REMOVAL I INSTALLATION Caution Clutch fluid will damage painted surfaces. If clutch fluid does get on a painted surface, wipe -. - - - it off immediately. 1. Remove in the order shown in the figure, referring to Removal Note. 2. Install in the reverse order of removal, referring to Installation Note. 3. Refer to After-installation Procedure on page H-9. 1. Clutch pipe 3. Clutch master cylinder Removal Note .................. below Check for fluid leakaae from cvlinder bore 2. Nut " Installation Note ................ below Overhaul .................. page H-10 Air bleeding ............... page H- 9 4. Gasket Removal Note Clutch pipe Disconnect the clutch pipe by using the SST. Installation Note Clutch pipe 1. Modify the clutch pipe tightening torque to allow for use of a torque wrench-SST combination. (Refer to section GI "Torque Formulas".) 2. Tighten the clutch pipe by using the SST. Tightening torque: -1 12.8-21.5 N.m (1 30-220 kgf.cm, 11 %-I90 in.lbf) Gartner Banana
Page 344 of 1708

CLUTCH MASTER CYLINDER H After-installation Procedure 1. Bleed the clutch system. (Below) I 2. Add fluid to the reservoir MAX mark. ' 3. Inspect and adjust the clutch pedal height and free play. (Refer to page H-5.) AIR BLEEDING The clutch hydraulic system must be bled to remove air introduced whenever a hydraulic line is disconnected. Caution Clutch fluid will damage painted surfaces. If clutch fluid does get on a painted surface, wipe it off immediately. 1. Remove the bleeder cap from the clutch release cylinder and attach a vinyl hose to the bleeder plug. 2. Insert the other end of the vinyl hose into a fluid-filled clear container. 3. Working with another person, have the person depress the clutch pedal several times, then hold it down. 4. With the clutch pedal depressed, loosen the bleeder screw by using the SST to let fluid and air escape. Close the bleeder screw. 5. Repeat steps 3 and 4 until no air bubbles are seen in the fluid. Make sure the reservoir is always 314 full or more during this procedure. 6. Modify the bleeder screw tightening torque to allow for use of a torque wrench-SST combination. (Refer to sec- tion GI "Torque Formulas".) 7. Tighten the bleeder screw by using the SST. Tightening torque: 5.9-8.8 N.m (60-90 kgf.cm, 53-78 in4bf) 8. Fill the reservoir to MAX with new fluid of the specified type. 9. Check for correct clutch operation. 10. Verify that there is no fluid leakage. Gartner Banana
Page 348 of 1708

CLUTCH RELEASE CYLINDER H Installation Note Clutch pipe 1. Modify the clutch pipe tightening torque to allow for use of a torque wrench-SST combination. (Refer to section GI "Torque Formulas".) 2. Tighten the clutch pipe by using the SST. Tightening torque: 12.8-21.5 N-m (1 30-220 kgfam, 11%-190 in-lbf) Air Bleeding After installation, bleed the clutch system. (Refer to page H-9.) OVERHAUL 1. Disassemble in the order shown in the figure, referring to Disassembly Note. 2. lnspect all parts and repair or replace as necessary. Warning Using compressed air can cause dirt and other particles to fly out, causing injury to the eyes. Wear protective eye wear whenever using compressed air. 3. Wipe all parts, and clean all ports, passages, and inner parts with compressed air. 4. Assemble in the reverse order of disassembly. 1. Boot 5. Bleeder cap 2. Push rod 6. Bleeder screw 3. Piston and cup assembly 7. Steel ball Disassembly Note . . . . . . . . . . . . . . . below 8. Release cylinder body Inspect for wear, scoring, and cracks Inspect cylinder bore for scoring and corro- 4. Spring sion Disassembly Note Piston and cup assembly Warning Applying compressed air to the cylinder assem- bly can make the contents suddenly pop out, possibly causing injury. Hold a rag over the cylin- der opening when using compressed air. Remove the piston-and-cup assembly by applying com- pressed air through the clutch pipe installation hole. Gartner Banana
Page 351 of 1708

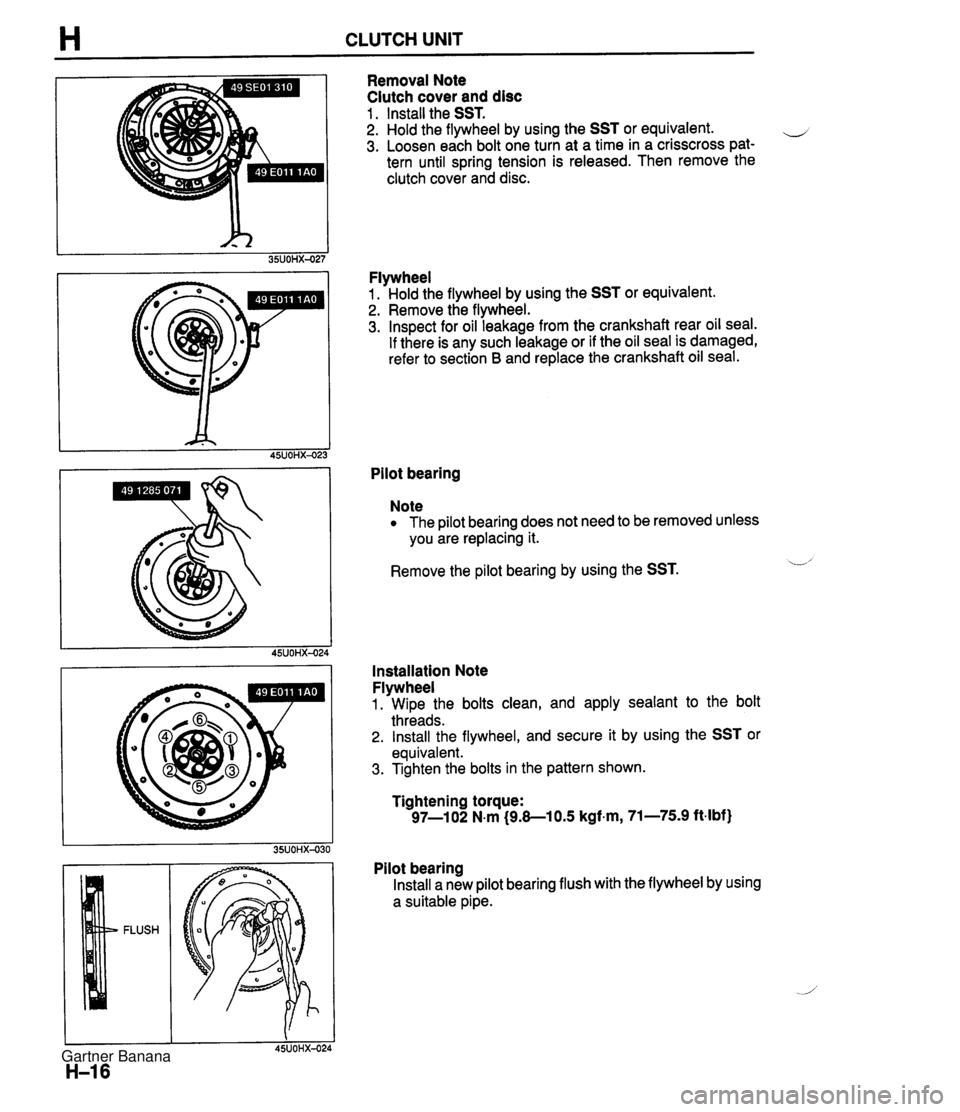
H CLUTCH UNIT Removal Note Clutch cover and disc 1 . Install the SST. 2. Hold the flywheel by using the SST or equivalent. e 3. Loosen each bolt one turn at a time in a crisscross pat- tern until spring tension is released. Then remove the clutch cover and disc. Flywheel 1. Hold the flywheel by using the SST or equivalent. 2. Remove the flywheel. 3. Inspect for oil leakage from the crankshaft rear oil seal. If there is any such leakage or if the oil seal is damaged, refer to section B and replace the crankshaft oil seal. Pilot bearing Note The pilot bearing does not need to be removed unless you are replacing it. Remove the pilot bearing by using the SST. L' Installation Note Flywheel 1. Wipe the bolts clean, and apply sealant to the bolt threads. 2. Install the flywheel, and secure it by using the SST or equivalent. 3. Tighten the bolts in the pattern shown. Tightening torque: 97-1 02 N.m (9.8-1 0.5 kgf.m, 71-75.9 ft-lbf) Pilot bearing Install a new pilot bearing flush with the flywheel by using a suitable pipe. Gartner Banana
Page 352 of 1708

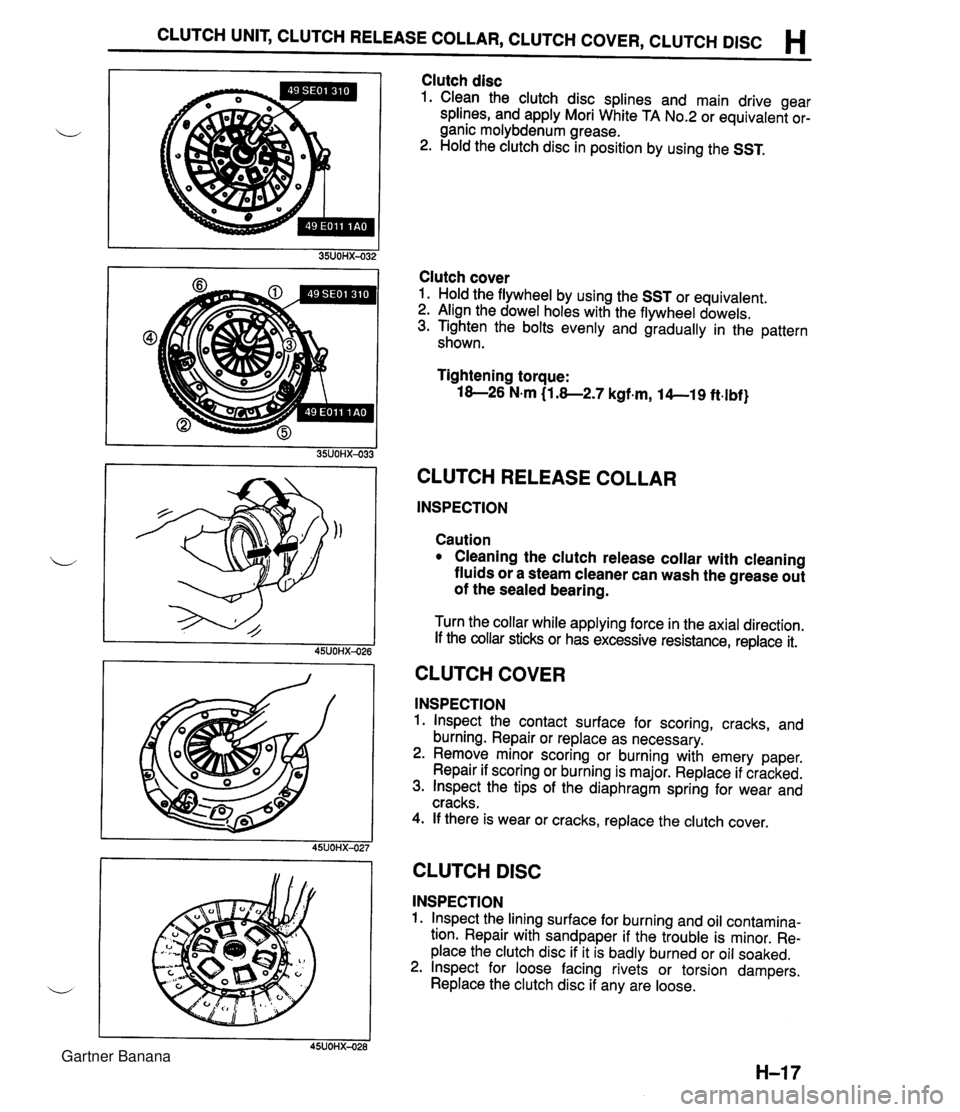
CLUTCH UNIT, CLUTCH RELEASE COLLAR, CLUTCH COVER, CLUTCH DlSC H Clutch disc 1. Clean the clutch disc splines and main drive gear splines, and apply Mori White TA No.2 or equivalent or- ganic molybdenum grease. 2. Hold the clutch disc in position by using the SST. Clutch cover 1. Hold the flywheel by using the SST or equivalent. 2. Align the dowel holes with the flywheel dowels. 3. Tighten the bolts evenly and gradually in the pattern shown. Tightening torque: 18-26 N.m (1.8-2.7 kgf.m, 14--19 ft.lbf} CLUTCH RELEASE COLLAR INSPECTION Caution Cleaning the clutch release collar with cleaning fluids or a steam cleaner can wash the grease out of the sealed bearing. Turn the collar while applying force in the axial direction. If the collar sticks or has excessive resistance, replace it. CLUTCH COVER INSPECTION 1. lnspect the contact surface for scoring, cracks, and burning. Repair or replace as necessary. 2. Remove minor scoring or burning with emery paper. Repair if scoring or burning is major. Replace if cracked. 3. lnspect the tips of the diaphragm spring for wear and cracks. 4. If there is wear or cracks, replace the clutch cover. I I 45UOHX-027 CLUTCH DlSC INSPECTION 1. lnspect the lining surface for burning and oil contamina- tion. Repair with sandpaper if the trouble is minor. Re- place the clutch disc if it is badly burned or oil soaked. 2. lnspect for loose facing rivets or torsion dampers. Replace the clutch disc if any are loose. Gartner Banana
Page 362 of 1708
J TRANSMISSION OIL TRANSMISSION OIL INSPECTION 1. Remove check plug 0. u 2. Verify that the oil is at the bottom of the check plug hole. If it is low, add the specified oil from check plug @. 3. Wipe the plug clean and apply sealant to the plug threads before installing. Tightening torque @: 25--39 N.m (2.5--4.0 kgf.m, 19-28 ft4bf) REPLACEMENT 1. Remove plugs @I (with washer) and @. 2. Drain the oil into a suitable container. 3. Wipe all plugs clean. 4. Install drain plug @I (with new washer). Tightening torque @: 40-58 N.m (4.0-4.0 kgf.m, 2943 ftlbf) 5. Add the specified oil from check plug 0 port until the level reaches the bottom of check plug hole. Specified oil: API service GL-4 or GL-5 All-season: SAE 75W-90 Above 10°C (50°F): SAE 80W-90 Capacity: 2.0 L (2.1 US qt, 1.8 Imp qt) 6. Apply sealant to threads of plug 0. 7. lnstall plug @. Tightening torque @: 25--39 N.m (2.54.0 kgf.m, 19-28 ft-lbf) Gartner Banana