Page 957 of 1708
T AUDIO TYPE 2 AM.FM RADIO UNIT AUTO MEMORY CD EJECT CD SLOT I DISC SET LIGHT- VOLUME CLOCK - / BLANCE BASS - VOLO BA D J I I I I TREBLE ILLUMINATION ONIOFF TAPE SLOT I TREBLE ILLUMINATION ONIOFF I TAPE SLOT DOLBY ALC (AUTO LEVEL CONTROLLER) ROOF MODE ALC ONIOFF BODYSONIC VOLUME ALC INDICATOR LIGHT MUTE 1 FADER MANUAUSEEK - TUNE FAST FOWARDI REWIND - TAPE EJECT PLAY/REVERSE STEREO WIDE I ALC ON + - PW AUTO LEVEL CONTROLLER ONlOFF Gartner Banana
Page 959 of 1708

AUDIO Cassette tape player Name Tape slot Playlreverse button Stopleject button APC (automatic program control) button Dolby noise reduction bunon*' Fast forwardlrewind button lllustration Operation Insert a tape into tape slot to begin tape operation When tape is inserted, system determines tape type by identification hole in cassette pack; if metal or chromium tape, METAL is shown on display Press button during tape playback to play reverse side of tape Press button during fast forwardlrewind mode to play tape Press button during modes other than tape playback or tape Player OFF to select tape mode and play tape Press button during fast forwardlrewind mode to cancel mode; select tape playback mode, if desired Press button during tape playback to stop play Press again to eject tape Press button during tape playback and APC appears on display In this condition, press FF button skip to beginning of next program Press REW button during tape playback to rewind tape to beginning of current tune APC detects silence of more than 15 seconds and skips forward to next recorded section Press button when playing tape encoded with Dolby NR Dolby alternately turns ONIOFF with each press Press REW button to rewind tape Press FF button to fast forward tape The Dolby noise reduction system is manufactured under license of the Dolby Laboratory Licensing Corporation. -,, DOLBY and 00 are registered trade marks of Dolby Laboratory Licensing Corporation. Compact disc (CD) player Caution Never use mini CDs (8 cm (3.1 in)) because they may dislodge from the adapter and damage the disc or player. Use only standard CDs (12 cm (4.7 in)). Name Illustration Disc slot Playlstop button Lightly push disc, label-side up, into slot; auto loading mechanism will take over to set disc and begin play During loading, DlSC SET flashes on display When loading completed, DlSC SET displayed Press this button while disc is being played and play will pause Press again and play will resume Press button during tape or radio mode to play loaded disc Press button to eject disc Disc SET flashes on display Press again and disc is reloaded Gartner Banana
Page 963 of 1708

T AUDIO Compact disc (CD) player CD slot P Disc set light Repeat button Random-play button I Upldown button (rewindtfast forward lllustration r AUTO M SCAN J Operation Insert CD, player automatically pulls in CD and begins play Set light turns on when CD is inserted, turns off when CD is ejected Press RPT button while tune is playing to play it again after it finishes Press button again to cancel repeat operation and resume normal play Press RAN button to play tunes on disc in random order; RANDOM ap- pears on display Press again to cancel random operation and resume normal play Press SCAN button to play beginning of tunes one by one (10 seconds each) Press button during play to start scanning from next tune Press button during scanning to play current tune Scanning is canceled automatically when all programs in disc have been scanned Press button to stop play; press again to start To start CD while in radio or tape mode, press button with CD inserted in player Press button to eject CD 1. Press button for more than 1.5 seconds to rewind or fast forward; play will begin at point where button is released 2. Press button for 1.5 seconds or less to advance or reverse song selec- tion before or during play Press ( A ) button to advance to beginning of next song and begin Play Repeat procedure to advance one song at a time Press ( V) button once to return to beginning of current song Press button again to move to beginning of previous song 35UOTX-05: Gartner Banana
Page 964 of 1708

AUDIO Clock The clock can be adjusted during radio, tape, or CD play. I Name I Illustration Clock button (clock display) ALC (Auto level controller) Name 1 Illustration ALCJbodysonic volume control knob I Mute button Roof mode button I Stereo-wide button Operation Press button to display present radio frequency or operation mode If power supply to unit is broken (burnt fuse or disconnected battery), clock setup will be canceled When clock button is pushed for 2 seconds, clock display flashes. At this point, press H button to advance hours and M button to advance minutes Press clock button again to return to normal display If clock button is pressed again while clock display is flashing and time has not been adjusted (that is, H and M buttons have not been pressed), min- utes will be set at :00. If time before adjustment showed 30-59 minutes, time will be set at next hour For example, Operation Press knob to turn ALC on or off 1. At ON, ALC adjusts sound corresponding to vehicle speed; ALC indica- tor light turns on 2. To adjust seat vibration, turn knob to right or left Right -t Seat vibration increases Left + Seat vibration decreases Turn knob right or left to transfer sound Right -+ Door speakers Left -t Headrest speakers Press button to lower overall volume by 10dB Press button to switch between roof-open mode and roof-closed mode; sound quality is adjusted depending on whether roof is opened or closed Press button to turn stereo-wide function on or off At ON, stereo-wide mode improves sound quality Gartner Banana
Page 999 of 1708

AUDIO CONNECTOR TERMINAL SPECIFICATIONS Type 1 Component I Connector audio unit Terminal A: Headrest speaker left F : Headrest speaker right $ B: Headrest speaker left H: Headrest speaker right C: NC I : NC D: NC J: NC 4: ACC H: NC B: NC J: NC C: B+ K: Door speaker left $ D: NC L : Door speaker left 0 E : TNS (for illumination M: Door speaker right $ light) N: Door speaker right 0 F: NC 1 : Left signal 8 : B+ 2 : Left signal 9 : Amp control signal 3 : Right signal 10: NC 4 : Right signal 11 : NC 5 : Signal ground 12: NC 6 : Illumination signal 13: NC 7 : ACC E : Shield earth 1 : Left signal 8: B+ 2 : Left signal 9 : Amp control signal 3 : Right signal 10: NC 4 : Right signal 11 : NC 5 : Signal ground 12: NC 6 : Illumination signal 13: NC 7: ACC E : Shield earth B+: Battery positive voltage - - - - - 45UOTX-277 Bt: Battery positive voltage .-I Component Audio unit Connector I Terminal A: ACC H: N.C. B: System mute J : N.C. C: B+ K : Door speaker left $ D: ANTSW L : Door speaker left 9 E: TNS M: Door speaker right @ F : Illumi (OUT) N: Door speaker right 9 A: Speaker left @ F : Speaker right $ B: Speaker left 9 H: Speaker right 9 C: N.C. I : N.C. D: N.C. J : N.C. 1 : Output right 5 : Output left 2 : +I 3.2V Control Power 6: GND 3 : Output left E : Shield earth 4 : Output right Gartner Banana
Page 1002 of 1708

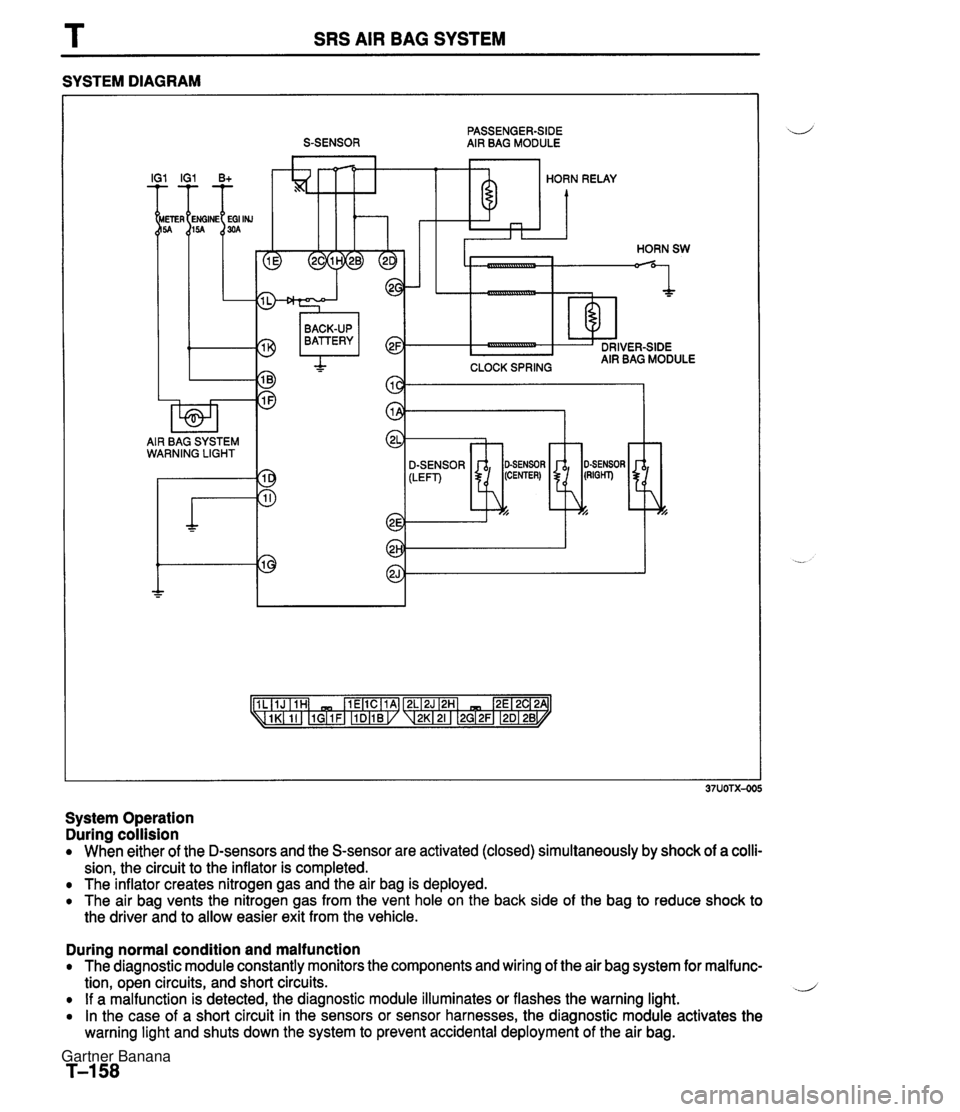
SRS AIR BAG SYSTEM T COMPONENT DESCRIPTION Component Air bag module Function Air bag system warning light Deploys air bag when current flows to integrated igniter Light illuminates or flashes if malfunction occurs in air bag system I EE with S-sensor, completes Circuit Clock spring I Ensures uninterrupted electrical connec- tion to air bag module while allowing turning of steering wheel Activated(closed) when crash impact de- Crash sensor Diagnostic module to infktor Activated(closed) when crash impact de- S-sensor 1 Monitors com~onents and harnesses in tected Acting with D-sensor, completes circuit to inflator Remark Located in instrument cluster Location: Driver side . . . . . . . . in steering wheel hub Passenger side . . . above the glove compartment Part of combination switch Located in front part of vehicle(left, right, and center) Located behind heater unit in passenger compartment Contains back-up battery air bag system Indicates system malfunction by flashing or illuminating air bag system warning light If warning light is bunt, sounds warning buzzer Detects short circuit between air bag module and ground or crash sensor rnal- function and melts system fuse to pre- vent unintended air bag deployment Gartner Banana
Page 1003 of 1708

SRS AIR BAG SYSTEM SYSTEM DIAGRAM PASSENGER-SIDE S-SENSOR AIR BAG MODULE I IG1 B+ HORN RELAY CLOCK SPRING BACK-UP BATTERY I AIR BAG SYSTEM WARNING LIGHT SENSOR -7 System Operation During collision When either of the D-sensors and the S-sensor are activated (closed) simultaneously by shock of a colli- sion, the circuit to the inflator is completed. The inflator creates nitrogen gas and the air bag is deployed. The air bag vents the nitrogen gas from the vent hole on the back side of the bag to reduce shock to the driver and to allow easier exit from the vehicle. During normal condition and malfunction The diagnostic module constantly monitors the components and wiring of the air bag system for malfunc- tion, open circuits, and short circuits. .J If a malfunction is detected, the diagnostic module illuminates or flashes the warning light. In the case of a short circuit in the sensors or sensor harnesses, the diagnostic module activates the warning light and shuts down the system to prevent accidental deployment of the air bag. Gartner Banana
Page 1005 of 1708

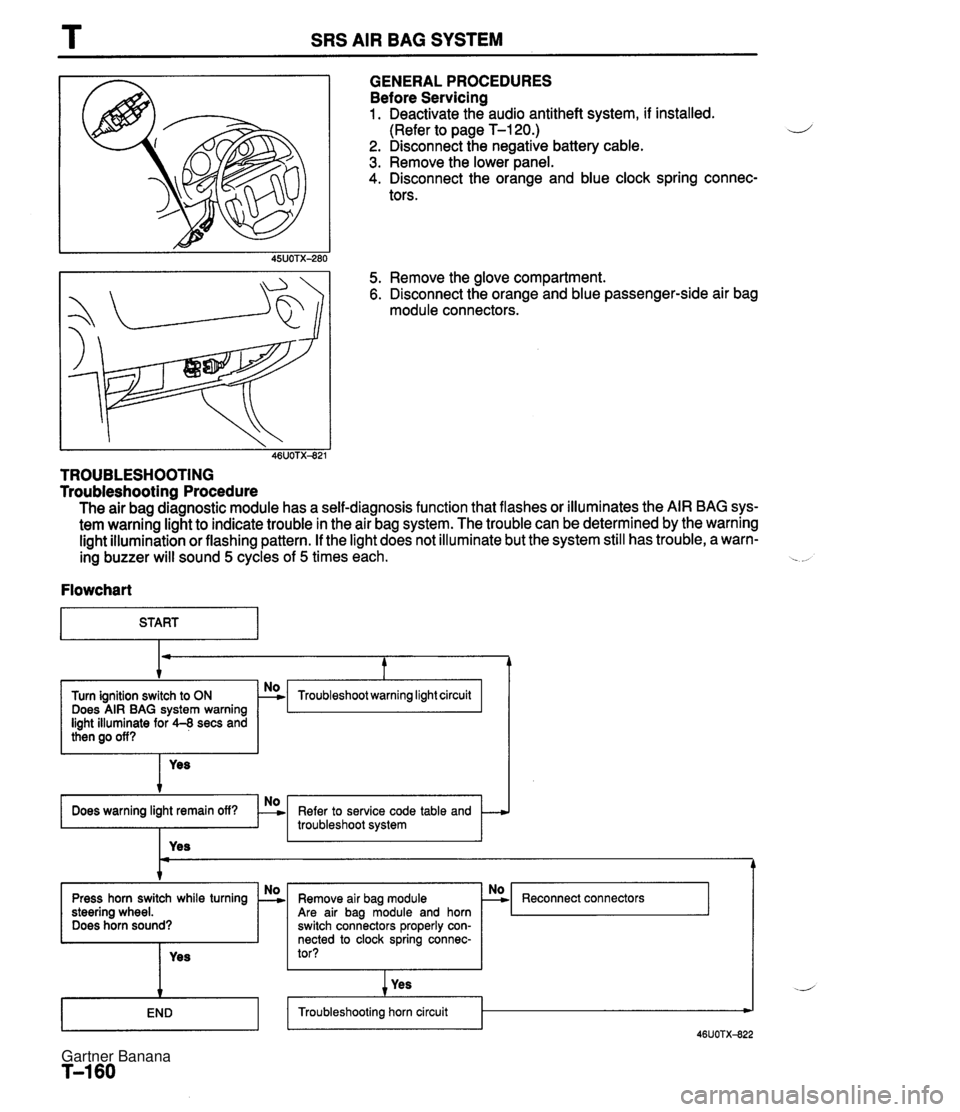
T SRS AIR BAG SYSTEM GENERALPROCEDURES Before Servicing 1. Deactivate the audio antitheft system, if installed. (Refer to page T-120.) 2. Disconnect the negative battery cable. 3. Remove the lower panel. 4. Disconnect the orange and blue clock spring connec- tors. 5. Remove the glove compartment. 6. Disconnect the orange and blue passenger-side air bag module connectors. I , 46UOTXd21 TROUBLESHOOTING Troubleshootinn Procedure The air bag diagnostic module has a self-diagnosis function that flashes or illuminates the AIR BAG sys- tem warning light to indicate trouble in the air bag system. The trouble can be determined by the warning light illumination or flashing pattern. If the light does not illuminate but the system still has trouble, a warn- ing buzzer will sound 5 cycles of 5 times each. . . Flowchart I START Troubleshoot warning light circuit Does AIR BAG system warning light illuminate for 4-8 secs and I I Yes t Refer to service code table and troubleshoot system Press horn switch while turning steering wheel. Does horn sound? I I I Yes Reconnect connectors Are air bag module and horn switch connectors properly con- nected to clock spring connec- tor? Yes I I I I Troubleshooting horn circuit - Gartner Banana