Page 989 of 1708
AUDIO Step 5 1. Disconnect the connector from the suspected faulty headrest speaker and bodysonic. 2. Measure the resistance between the terminals E(G) and w F(G/B) of the headrest speaker and bodysonic connec- tor. I Other I Replace bodysonic I Resistance Step 6 1. Check for continuity between the auto level controller connector (4-pin) and the headrest speaker and body- sonic connector (&pin). Action 1 !::gg 1 continuity I 'peaker I connector I 8!2 I GO to Ste~ 4 I -- ~~ B (RAW) 4-pin ++ F (LN) win Driver-side I A (WB) 4-pin ++ E (UB) 6-pin I Yes Passenger-side 2. If the wiring is OK, replace the auto level controller. 3. If not as specified, repair the wiring. I D (W) 4-pin ++ F (WW) win C (UB) 4-pin +t E (RIB) 6-pin Yes Gartner Banana
Page 996 of 1708
AUDIO Inspection c Fuse ness. ml JHFDB If the antenna fails to raise or lower, make the following checks: 1. Check the antenna fuse (10A). 2. Replace fuse after checking and repairing wiring har- Power antenna 1. Check for continuity between the terminals of the power antenna relay. If there is no continuity, replace the relay. Terminal I M: Continuity 2. If the antenna does not function even though there is continuity, the problem may be either in the wiring har- ness or in the audio component assembly. 3. Apply battery positive voltage to the terminals and check the operation. I I A 1 B 1 DOWN I Function of antenna UP Battery Pos. D Neg. A Gartner Banana
Page 998 of 1708

AUDIO T INSPECTION Type 1 Door Speakers 1. Disconnect the connector from the suspected faulty speaker. 2. Measure resistance between terminals of the speaker. Resistance: 4R 3. If not as specified, replace the speaker. Headrest Speakers 1. Disconnect the headrest speaker connector. 2. Measure resistance between the terminals of the head- rest speaker connector as shown. I Terminal I Resistance I 3. If not as specified, replace the speaker. A-B C-D Type 2 Door Speakers 1. Disconnect the connector from the suspected faulty door speaker. 2. Measure the resistance between the terminals of the speaker. 4R I I Woofer I 452 1 Speaker type 3. If not as specified, replace the door speaker. Resistance Headrest speakers 1. Disconnect the headrest speaker connector. 2. Measure the resistance between the terminals of the headrest speaker. Tweeter I 9~ Resistance: 851 3. If not as specified, replace the headrest speaker. Bodysonic 1. Disconnect the headrest speaker and bodysonic con- nector. 2. Measure the resistance between the terminals of the headrest speaker and bodysonic connector. Resistance: 8R 3. If not specified, replace the bodysonic or repair wiring harness. Gartner Banana
Page 1003 of 1708

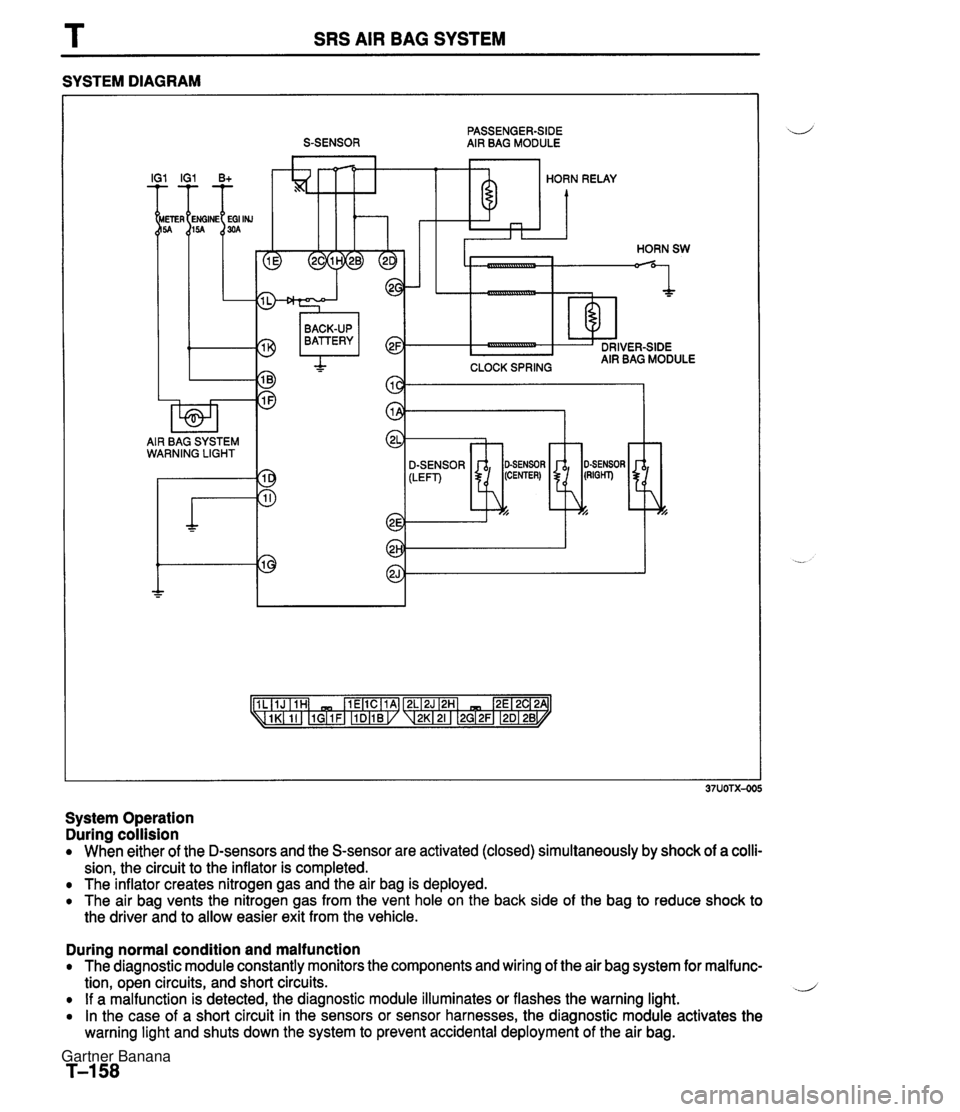
SRS AIR BAG SYSTEM SYSTEM DIAGRAM PASSENGER-SIDE S-SENSOR AIR BAG MODULE I IG1 B+ HORN RELAY CLOCK SPRING BACK-UP BATTERY I AIR BAG SYSTEM WARNING LIGHT SENSOR -7 System Operation During collision When either of the D-sensors and the S-sensor are activated (closed) simultaneously by shock of a colli- sion, the circuit to the inflator is completed. The inflator creates nitrogen gas and the air bag is deployed. The air bag vents the nitrogen gas from the vent hole on the back side of the bag to reduce shock to the driver and to allow easier exit from the vehicle. During normal condition and malfunction The diagnostic module constantly monitors the components and wiring of the air bag system for malfunc- tion, open circuits, and short circuits. .J If a malfunction is detected, the diagnostic module illuminates or flashes the warning light. In the case of a short circuit in the sensors or sensor harnesses, the diagnostic module activates the warning light and shuts down the system to prevent accidental deployment of the air bag. Gartner Banana
Page 1004 of 1708

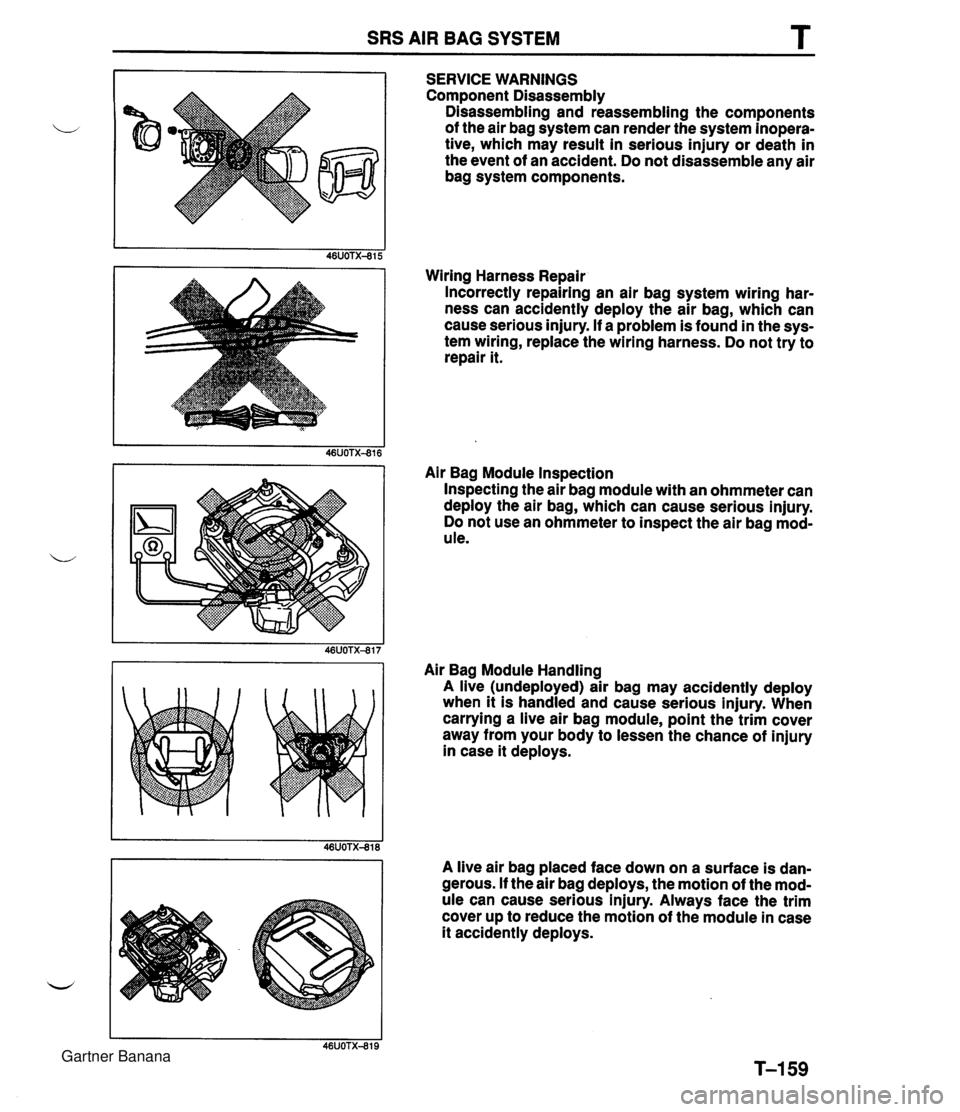
SRS AIR BAG SYSTEM SERVICE WARNINGS Component Disassembly Disassembling and reassembling the components of the air bag system can render the system inopera- tive, which may result in serious injury or death in the event of an accident. Do not disassemble any air bag system components. Wiring Harness Repair Incorrectly repairing an air bag system wiring har- ness can accidently deploy the air bag, which can cause serious injury. If a problem is found in the sys- tem wiring, replace the wiring harness. Do not try to repair it. Air Bag Module Inspection Inspecting the air bag module with an ohmmeter can deploy the air bag, which can cause serious injury. Do not use an ohmmeter to inspect the air bag mod- ule. Air Bag Module Handling A live (undeployed) air bag may accidently deploy when it is handled and cause serious injury. When carrying a live air bag module, point the trim cover away from your body to lessen the chance of injury in case it deploys. A live air bag placed face down on a surface is dan- gerous. If the air bag deploys, the motion of the mod- ule can cause serious injury. Always face the trim cover up to reduce the motion of the module in case it accidently deploys. Gartner Banana
Page 1009 of 1708
T SRS AIR BAG SYSTEM I Flowchart No1 I Symptom I Air bag warning light remains ON I Possible cause Poor connection of diagnostic module connector Defective diagnostic module 0 Defective wiring harness CONNECTOR Step 1 Carry out "Before Servicing" procedure under GENER- AL PROCEDURES, page T-160. Step 2 1. Verify that the diagnostic module connector is securely connected to the diagnostic module. 2. Verify that the shorting bar is in the fully retracted posi- tion. 3. If the connector and shorting bar are OK, go to step 3. Step 3 1. Disconnect the diagnostic module connector. 2. Remove the shorting bar from the diagnostic module connector. 3. Check the air bag system warning light. I Llght condltlon 1 Action I I I Illuminate I Repair wiring harness (Instrument cluster - Diagnostic module) I Not illuminate Replace diagnostic module (Refer to page T-208) Gartner Banana
Page 1010 of 1708

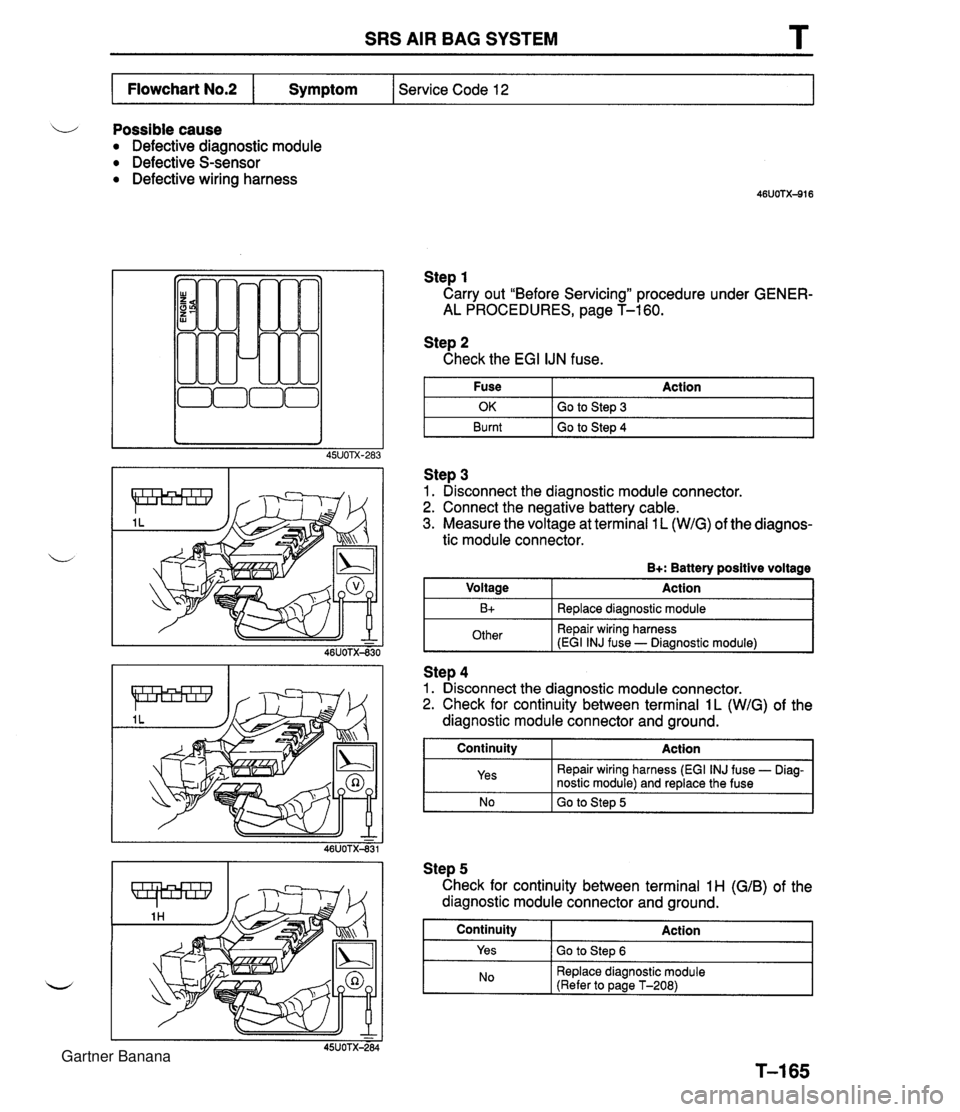
SRS AIR BAG SYSTEM T Possible cause Defective diagnostic module Defective S-sensor Defective wiring harness Step 1 Carry out "Before Servicing" procedure under GENER- AL PROCEDURES, page T-160. Service Code 12 Flowchart No.2 Step 2 Check the EGI IJN fuse. Symptom I Fuse I Action I Step 3 1. Disconnect the diagnostic module connector. 2. Connect the negative battery cable. 3. Measure the voltage at terminal 1 L (WIG) of the diagnos- tic module connector. OK Burnt B+: Battery positive voltage Voltage Action I Go to Step 3 Go to Step 4 Step 4 1. Disconnect the diagnostic module connector. 2. Check for continuity between terminal 1L (WIG) of the diagnostic module connector and ground. B+ Other Replace diagnostic module Repair wiring harness (EGI INJ fuse - Diagnostic module) I NO I GO to Step 5 I Continuity Yes Step 5 Check for continuity between terminal 1H (GIB) of the diagnostic module connector and ground. Continuity I Action Action Repair wiring harness (EGI INJ fuse - Diag- nostic module) and replace the fuse Yes ( Go to Step 6 No Replace diagnostic module (Refer to page T-208) Gartner Banana
Page 1011 of 1708
SRS AIR BAG SYSTEM Step 6 1. Disconnect the S-sensor connector. 2. Check for continuity between terminal 1 H (GIB) of the diagnostic module connector and ground. I No I Replace wiring harness I Continuity Yes Action Replace S-sensor (Refer to page T-213) Gartner Banana