Page 1047 of 1708
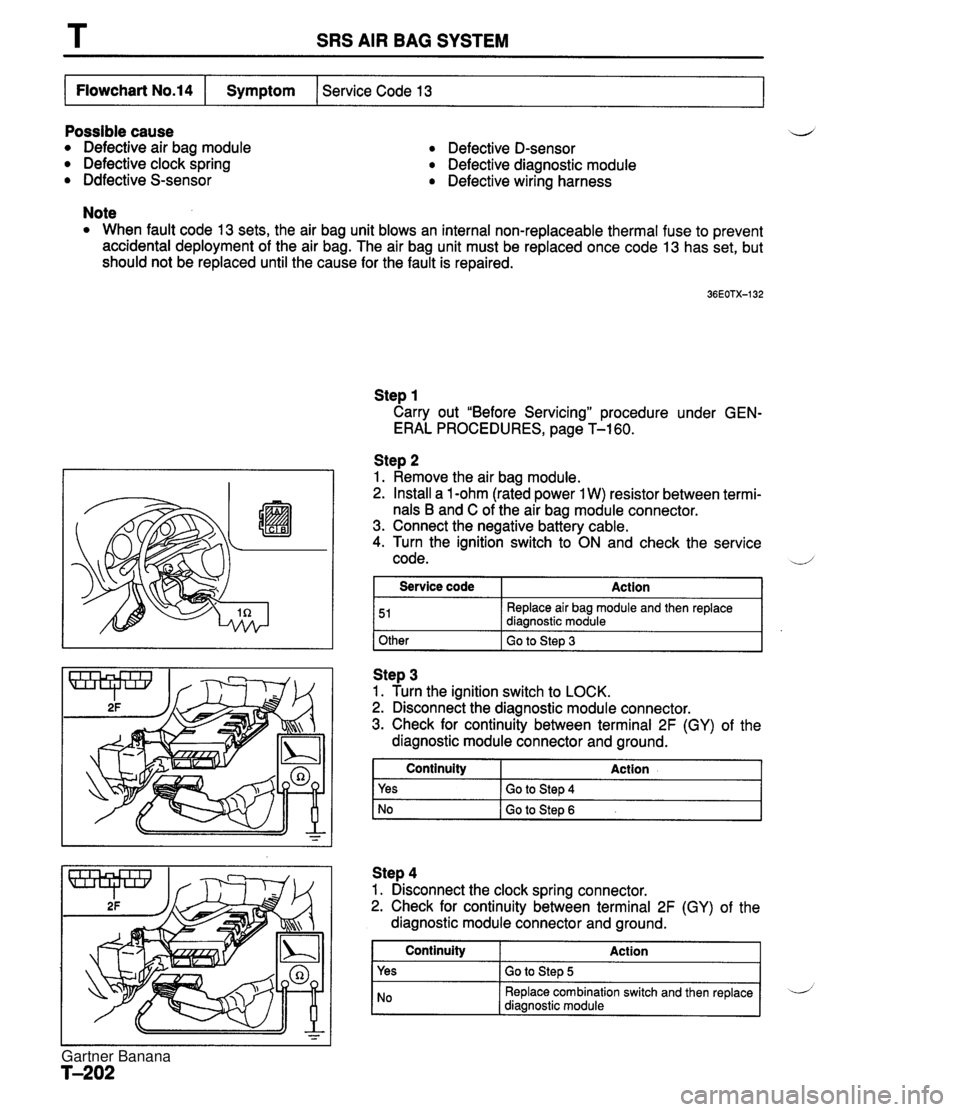
SRS AIR BAG SYSTEM Possible cause Defective air bag module Defective clock spring Ddfective S-sensor Defective D-sensor Defective diagnostic module Defective wiring harness Service Code 13 Flowchart No.14 Note When fault code 13 sets, the air bag unit blows an internal non-replaceable thermal fuse to prevent accidental deployment of the air bag. The air bag unit must be replaced once code 13 has set, but should not be replaced until the cause for the fault is repaired. Symptom Step 1 Carry out "Before Servicing" procedure under GEN- ERAL PROCEDURES, page T-1 60. Step 2 1. Remove the air bag module. 2. Install a 1 -ohm (rated power 1 W) resistor between termi- nals B and C of the air bag module connector. 3. Connect the negative battery cable. 4. Turn the ignition switch to ON and check the service d 1 code. 1 Other I Go to Step 3 Service code 51 Step 3 1. Turn the ianition switch to LOCK. Action Replace air bag module and then replace diagnostic module 2. ~isconnegt the diagnostic module connector. 3. Check for continuity between terminal 2F (GY) of the diagnostic module connector and ground. I Continuity Action 1 Step 4 1. Disconnect the clock spring connector. 2. Check for continuity between terminal 2F (GY) of the diagnostic module connector and ground. Yes No Continuity Yes Go to Step 4 Go to Step 6 Gartner Banana
Page 1049 of 1708
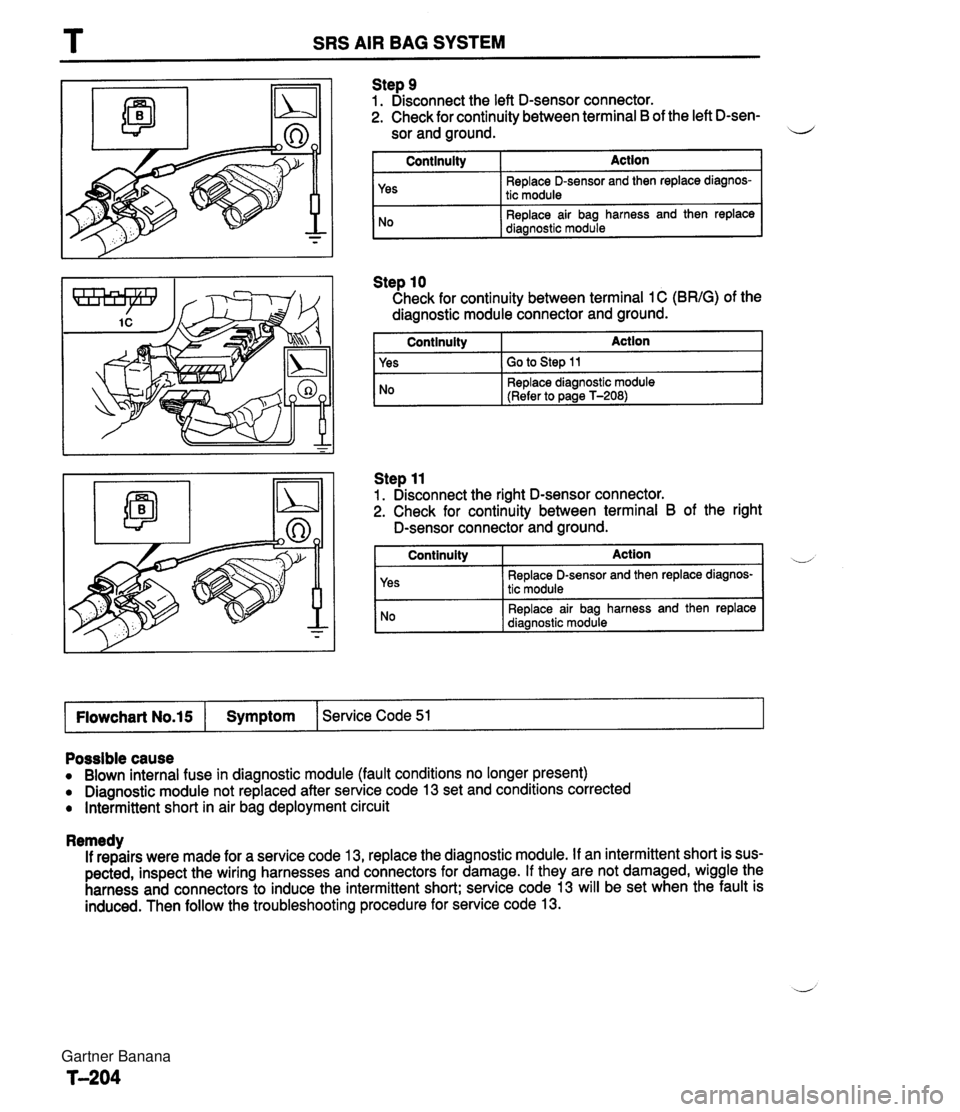
T SRS AIR BAG SYSTEM Step 9 1. Disconnect the left D-sensor connector. 2. Check for continuity between terminal B of the left D-sen- sor and ground. il I Continuity I Action I Step 10 Check for continuity between terminal 1 C (BRIG) of the diagnostic module connector and ground. I Continuity Action 1 Yes No I Yes I GO to step 11 Replace D-sensor and then replace diagnos- tic module Replace air bag harness and then replace diagnostic module Step 11 1. Disconnect the right D-sensor connector. 2. Check for continuity between terminal B of the right No D-sensor connectoiand ground. Replace diagnostic module (Refer to page T-208) Continuity Action Replace D-sensor and then replace diagnos- tic module Replace air bag harness and then replace I Flowchart No.15 I Symptom 1 Service Code 51 I Possible cause Blown internal fuse in diagnostic module (fault conditions no longer present) Diagnostic module not replaced after service code 13 set and conditions corrected Intermittent short in air bag deployment circuit Remedy If repairs were made for a service code 13, replace the diagnostic module. If an intermittent short is sus- pected, inspect the wiring harnesses and connectors for damage. If they are not damaged, wiggle the harness and connectors to induce the intermittent short; service code 13 will be set when the fault is induced. Then follow the troubleshooting procedure for service code 13. Gartner Banana
Page 1050 of 1708
SRS AIR BAG SYSTEM Possiblecause Defective wiring harness Defective S-sensor Defective diagnostic module Flowchart No.16 Step 1 Carry out "Before Servicing" procedure under GEN- ERAL PROCEDURES, page T-1 60. Step 2 1. Disconnect the diagnostic module connector. 2. Check for continuity between terminal 1 H (GIB) of the diagnostic module connector and ground. Continuity Action I Symptom Yes I Go to Step 3 I Service Code 52 Step 3 1. Disconnect the orange and blue S-sensor connectors. 2. Check for continuity between terminal B of the S-sensor and ground. No Replace diagnostic module (Refer to page T-208) I No 1 Re~lace wirina harness I Continuity Yes Action Replace S-sensor (Refer to page T-213) Possible cause Internal failure of diagnostic module Flowchart No.17 Remedy Replace the diagnostic module. (Refer to page T-208.) Symptom Service Code 53 Gartner Banana
Page 1051 of 1708
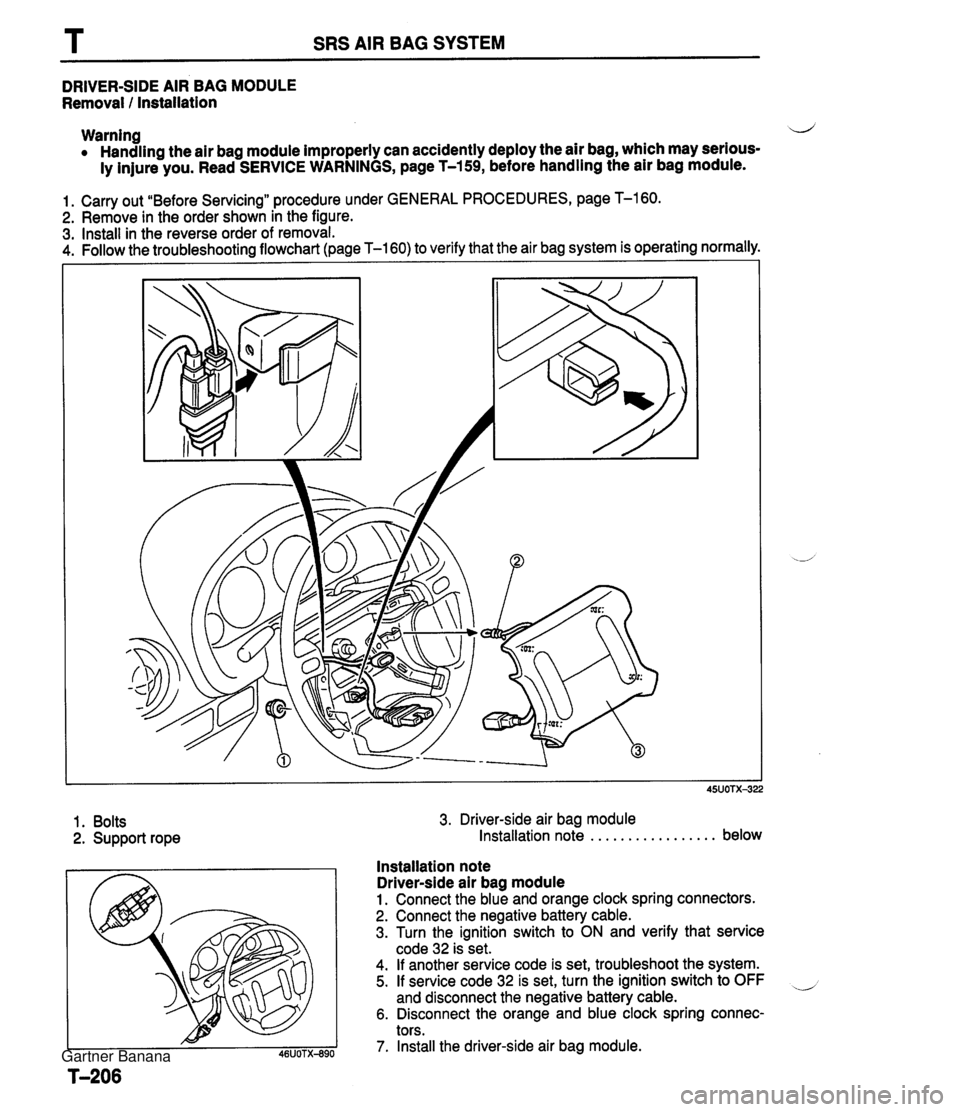
SRS AIR BAG SYSTEM DRIVER-SIDE AIR BAG MODULE Removal I Installation Warning 4 Handling the air bag module improperly can accidently deploy the air bag, which may serious- ly injure you. Read SERVICE WARNINGS, page T-159, before handling the air bag module. 1. Carry out "Before Servicing" procedure under GENERAL PROCEDURES, page T-160. 2. Remove in the order shown in the figure. 3. Install in the reverse order of removal. 4. Follow the troubleshootina flowchart (page T-160) to verify that the air bag system is operating normally. 1. Bolts 2. Support rope 3. Driver-side air bag module Installation note . . . . . . . . . . . . . . . . . below Installation note Driver-side air bag module 1. Connect the blue and orange clock spring connectors. 2. Connect the negative battery cable. 3. Turn the ignition switch to ON and verify that service code 32 is set. 4. If another service code is set, troubleshoot the system. 5. If service code 32 is set, turn the ignition switch to OFF and disconnect the negative battery cable. 6. Disconnect the orange and blue clock spring connec- tors. 7. Install the driver-side air bag module. Gartner Banana
Page 1052 of 1708
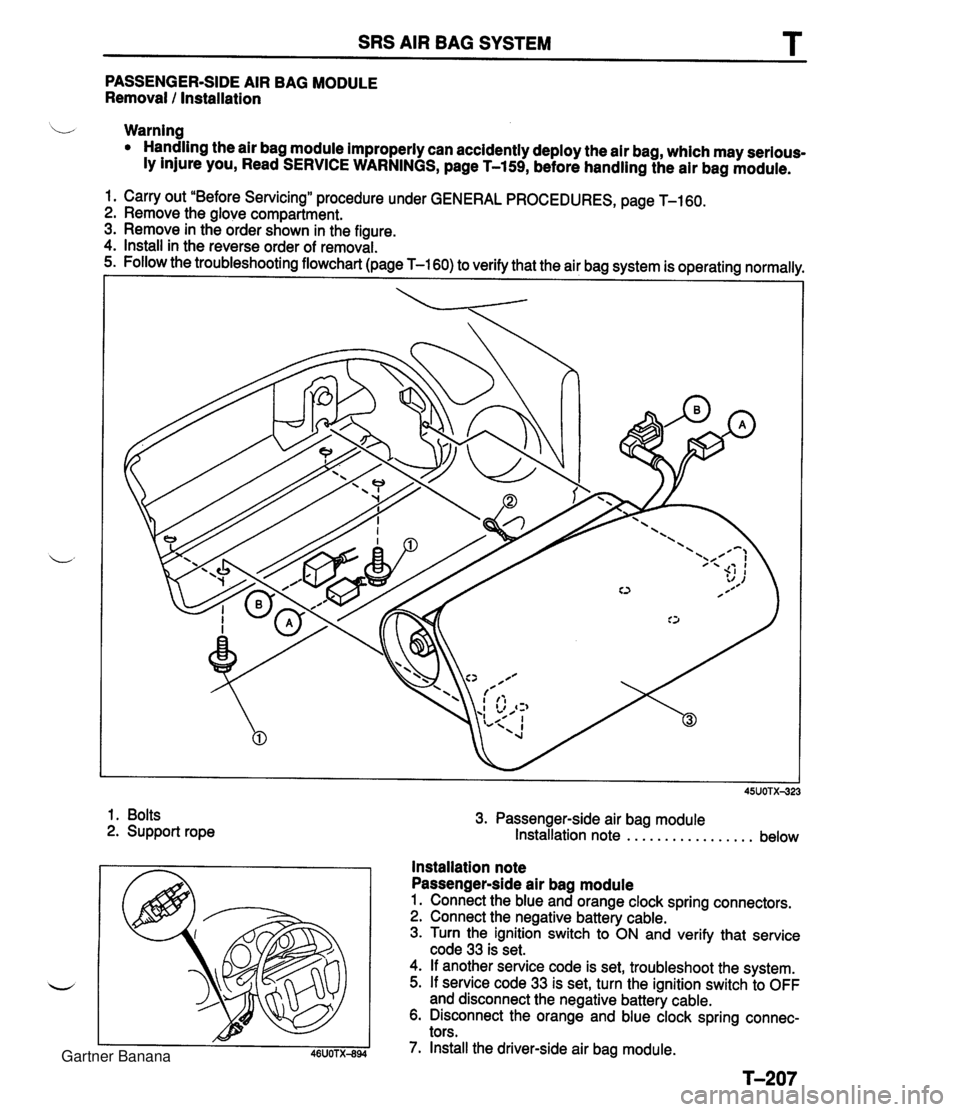
SRS AIR BAG SYSTEM T PASSENGER-SIDE AIR BAG MODULE Removal I Installation b Warning Handling the air bag module improperly can accidently deploy the air bag, which may serious- ly injure you, Read SERVICE WARNINGS, page T-159, before handling the air bag module. 1. Carry out "Before Servicing" procedure under GENERAL PROCEDURES, page T-160. 2. Remove the glove compartment. 3. Remove in the order shown in the figure. 4. Install in the reverse order of removal. 1. Bolts 2. Support rope 3. Passenger-side air bag module Installation note . . . . . . . . . . . . . . . . . below Installation note Passenger-side air bag module 1. Connect the blue and orange clock spring connectors. 2. Connect the negative battery cable. 3. Turn the ignition switch to ON and verify that service code 33 is set. 4. If another service code is set, troubleshoot the system. 5. If service code 33 is set, turn the ignition switch to OFF and disconnect the negative battery cable. 6. Disconnect the orange and blue clock spring connec- tors. 7. Install the driver-side air bag module. Gartner Banana
Page 1054 of 1708
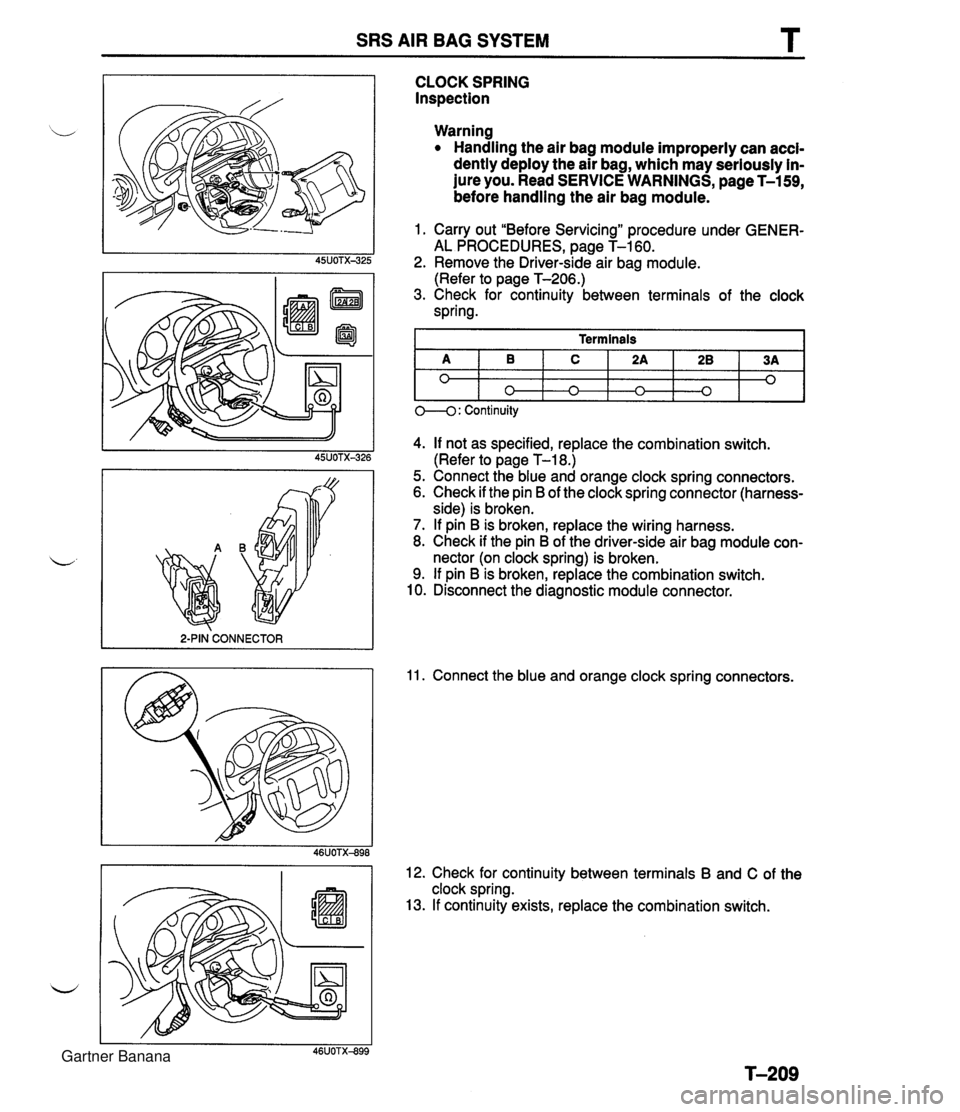
SRS AIR BAG SYSTEM T 2-PIN CONNECTOR I CLOCK SPRING Inspection Warning Handling the air bag module improperly can accl- dently deploy the air bag, which may seriously in- jure you. Read SERVICE WARNINGS, page T-159, before handling the air bag module. 1. Carry out "Before Servicing" procedure under GENER- AL PROCEDURES, page T-160. 2. Remove the Driver-side air bag module. (Refer to page T-206.) 3. Check for continuity between terminals of the clock spring. 4. If not as specified, replace the combination switch. (Refer to page T-18.) 5. Connect the blue and orange clock spring connectors. 6. Check if the pin B of the clock spring connector (harness- side) is broken. 7. If pin B is broken, replace the wiring harness. 8. Check if the pin B of the driver-side air bag module con- nector (on clock spring) is broken. 9. If pin B is broken, replace the combination switch. 10. Disconnect the diagnostic module connector. Terminals 11. Connect the blue and orange clock spring connectors. A 0 12. Check for continuity between terminals B and C of the clock spring. 13. If continuity exists, replace the combination switch. 1 0---0: Continuity B 0 C n 2A n 28 0 3A 0 Gartner Banana
Page 1063 of 1708
Before beginning any service procedure. refer to section T of this manual for I air bag system service warnings and audio antitheft system alarm conditions . HEATER AND AIR CONDITIONER SYSTEMS ....................................... INDEX U- 2 ................................... HEATER U- 2 AIR CONDITIONER ......................... U- 3 TROUBLESHOOTING ......................... U- 4 CIRCUIT DIAGRAM ......................... U- 4 TROUBLESHOOTING GUIDE ................ U- 5 ..................................... HEATER U-15 ........................ STRUCTURAL VIEW U-15 HEATER UNIT .............................. U-16 BLOWER UNIT ............................. U-18 HEATER CONTROL UNIT .................... U-20 AIR CONDITIONER ........................... U-23 PREPARATION ............................. U-23 STRUCTURAL Vl EW ........................ U-23 SERVICE WARNINGS ....................... U-24 SERVICE CAUTIONS ........................ U-24 REFRIGERANT SYSTEM SERVICE PROCEDURE .............................. U-25 COOLING UNIT ............................. U-30 CONDENSER AND RECEIVER DRIER ........ U-33 REFRIGERANT LINES ....................... U-35 CONDENSER FAN .......................... U-36 AIC RELAY ................................. U-37 ................... CONDENSER FAN RELAY U-37 REFRIGERANT PRESSURE SWITCH ......... U-37 NC COMPRESSOR ......................... U-38 45U0Ux-001 Gartner Banana
Page 1077 of 1708
HEATER u HEATER STRUCTURAL VIEW 1. Heater unit 45UOUX401 3. Heater control unit Removal 1 Installation ......... page U-16 Removal I lnstallation ......... page U-20 Disassembly / Assembly ...... page U-17 Disassembly l Assembly ...... page U-21 Inspection ................... page U-17 Inspection ................... page U-22 2. Blower unit Adjustment .................. page U-22 Removal 1 Installation ......... page U-18 4. Cooling unit Disassembly I Assembly ...... page U-19 Removal I Installation ......... page U-30 Inspection ................... page U-19 Disassembly / Assembly ...... page U-31 w Note Even in vehicles not equipped with NC, there is a cooling unit. If it is necessary to remove this unit to service the heater, then be sure to reinstall the cooling unit into its original position after servicing is complete. Gartner Banana