1994 JEEP CHEROKEE keyless
[x] Cancel search: keylessPage 306 of 1784

OVERHEAD CONSOLE
CONTENTS
page page
COMPASS REPAIR PROCEDURES.......... 4
CONSOLE REPAIR PROCEDURES........... 6
DESCRIPTION........................... 1DIAGNOSTIC PROCEDURES............... 1
THERMOMETER AND SENSOR SYSTEM REPAIR
PROCEDURES......................... 6
DESCRIPTION
The overhead console includes:
²a compass/temperature display
²reading and courtesy lights for the front and rear
seats
²the receiver for the keyless entry system
²storage compartment for remote garage door
opener
²storage compartment for sunglasses.
COMPASS
The compass will display the direction the vehicle
is pointed, using the eight major compass headings
(Examples: North is ``N'', Northeast is ``NE''). It does
not display the headings in actual degrees. The dis-
play is turned on/off using the TEMP/COMP button
on the left of the display.
The compass is a self calibrating unit that should
not require recalibration. The only calibration that
may prove necessary is to drive the vehicle in 3 com-
plete circles, on level ground, in not less than 48 sec-
onds. This will ``reorient'' the unit to its vehicle. The
unit also will compensate for magnetism the vehicle
may acquire during its life. Care should be used to
avoid putting anything magnetic on the roof of the
vehicle.
The unit can compensate for some magnetic fields
in the body. The use of magnetic attachments like
antenna mounts or repair order ``hats'' placed di-
rectly on the roof can exceed the compensation abil-
ity of the unit. Magnetic bit drivers used on the
fasteners to hold the assembly to the roof header can
also affect operation. If the vehicle roof should be-
come magnetized, then the degaussing and calibra-
tion procedures may be required to restore proper
operation.
If the compass functions but accuracy is suspect, it
may be necessary to perform a variation adjustment.
This procedure allows the unit to accommodate vari-
ations in the earth's magnetic field strength based on
geographic location.
If the compass has blanked out and only CAL
appears, degaussing may be necessary to re-
move residual magnetic fields.
THERMOMETER
The ambient temperature display can be changed
from Fahrenheit to Celsius using the U.S./METRIC
button on the right of the display. The temperature
reported is not an instant reading of conditions but
an average temperature. It may take the unit several
minutes to react to a major change such as driving
out of a heated garage into winter temperatures.
When the ignition switch is turned OFF, the last
displayed temperature reading stays in memory.
When the ignition switch is turned ON again the
thermometer will display the memory temperature
for one minute; then update the display to the actual
temperature within five minutes.
READING AND COURTESY LAMPS
All reading and courtesy lamps in the overhead
console are activated by the door courtesy circuit.
When all four doors and the liftgate are closed the
lamps can be activated by depressing the correspond-
ing lens. When any door or the liftgate is open, the
switches are disabled. They will not turn the lamps
off.
MAP AND COURTESY LAMPS
These lamps offer several unique features. Both the
map and courtesy lamps can be turned on with the
integral ``Soft Touch'' switch. Pushing this switch en-
ergizes an electrical circuit, which in turn directs
power to the light. The map lamps are unaffected by
the door switches, while the courtesy lamps are
turned on with the opening of any door. When any
door is open, the ``Soft Touch'' switches are disabled,
you cannot turn the lights off with these switches.
DIAGNOSTIC PROCEDURES
Follow the appropriate diagnostic flow chart:
²Chart 1 describes the procedures for compass and
display problems.
²Chart 2 describes the procedures for illumination
lamp problems.
²Chart 3 describes the procedures for outside tem-
perature measuring problems.
JOVERHEAD CONSOLE 8C - 1
Page 312 of 1784
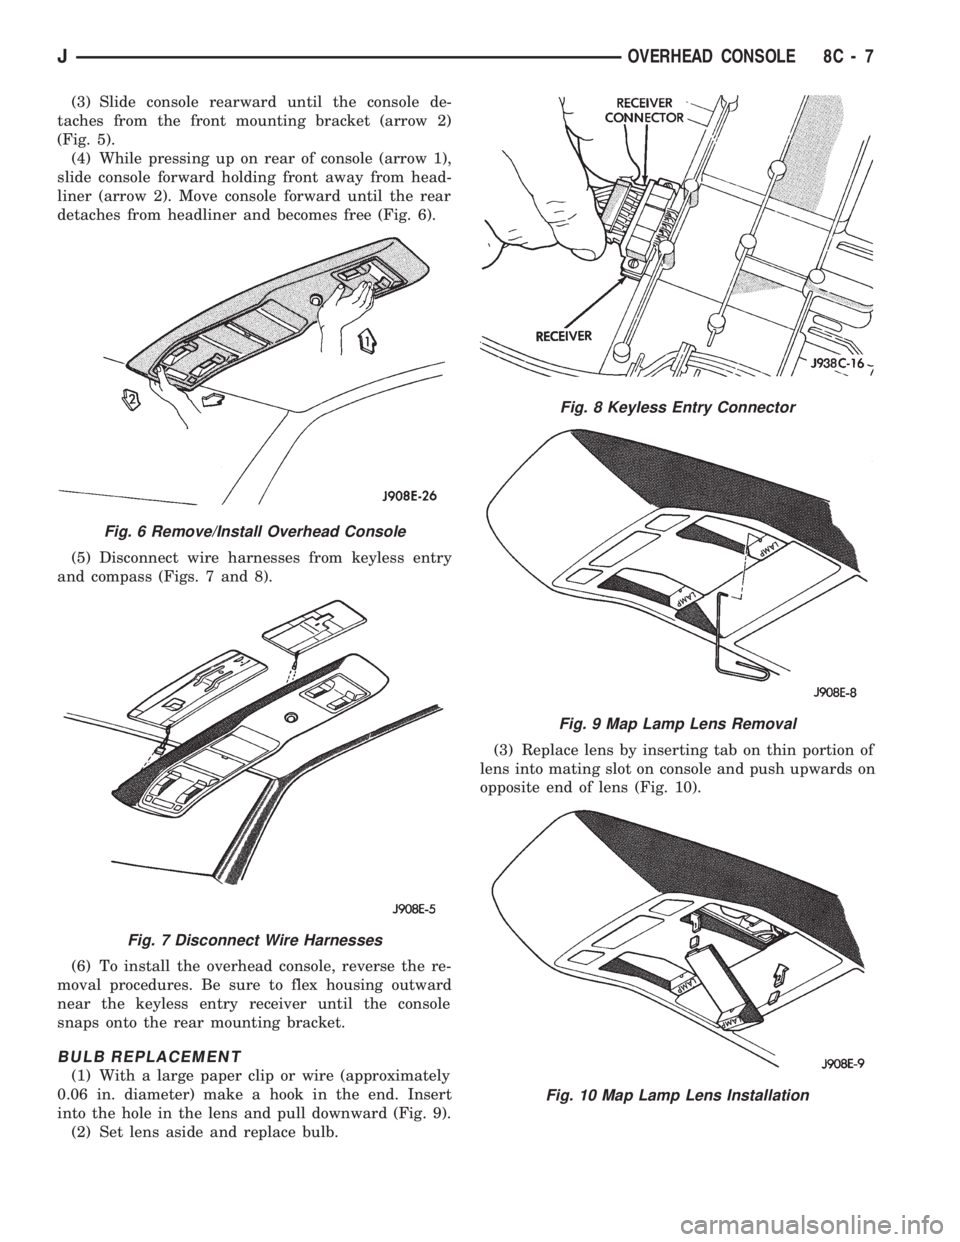
(3) Slide console rearward until the console de-
taches from the front mounting bracket (arrow 2)
(Fig. 5).
(4) While pressing up on rear of console (arrow 1),
slide console forward holding front away from head-
liner (arrow 2). Move console forward until the rear
detaches from headliner and becomes free (Fig. 6).
(5) Disconnect wire harnesses from keyless entry
and compass (Figs. 7 and 8).
(6) To install the overhead console, reverse the re-
moval procedures. Be sure to flex housing outward
near the keyless entry receiver until the console
snaps onto the rear mounting bracket.
BULB REPLACEMENT
(1) With a large paper clip or wire (approximately
0.06 in. diameter) make a hook in the end. Insert
into the hole in the lens and pull downward (Fig. 9).
(2) Set lens aside and replace bulb.(3) Replace lens by inserting tab on thin portion of
lens into mating slot on console and push upwards on
opposite end of lens (Fig. 10).
Fig. 6 Remove/Install Overhead Console
Fig. 7 Disconnect Wire Harnesses
Fig. 8 Keyless Entry Connector
Fig. 9 Map Lamp Lens Removal
Fig. 10 Map Lamp Lens Installation
JOVERHEAD CONSOLE 8C - 7
Page 448 of 1784
switches, the keyless entry system, and the ignition
switch (when in the RUN position). When correct in-
put is received, the entry module timer immediately
begins the timing-out process. The timing-out process
requires approximately 3066 seconds.
The illuminated entry system also operates
when a door is opened to exit the vehicle. When
the door is closed the interior illumination will
continue for the remaining portion of the 30 sec-
onds.
ILLUMINATED ENTRY SYSTEM TROUBLE
DIAGNOSIS
The Illuminated Entry System relay is located on a
bracket behind the instrument panel.
(1) Ensure that the ignition switch is in the Off po-
sition.
(2) Open and immediately close the driver-side
door. The interior courtesy lamps should immediately
illuminate.
(3) Open driver-side door, enter the vehicle, close
the door and turn the ignition switch to the RUN po-sition. The courtesy lamps should go out. Turn the
ignition switch to the OFF position before exiting ve-
hicle.
(4) When exiting the vehicle, the courtesy lamps
should remain illuminated after the door is closed.
(5) From outside the vehicle, open and close the
passenger-side door. The courtesy lamps should illu-
minate.
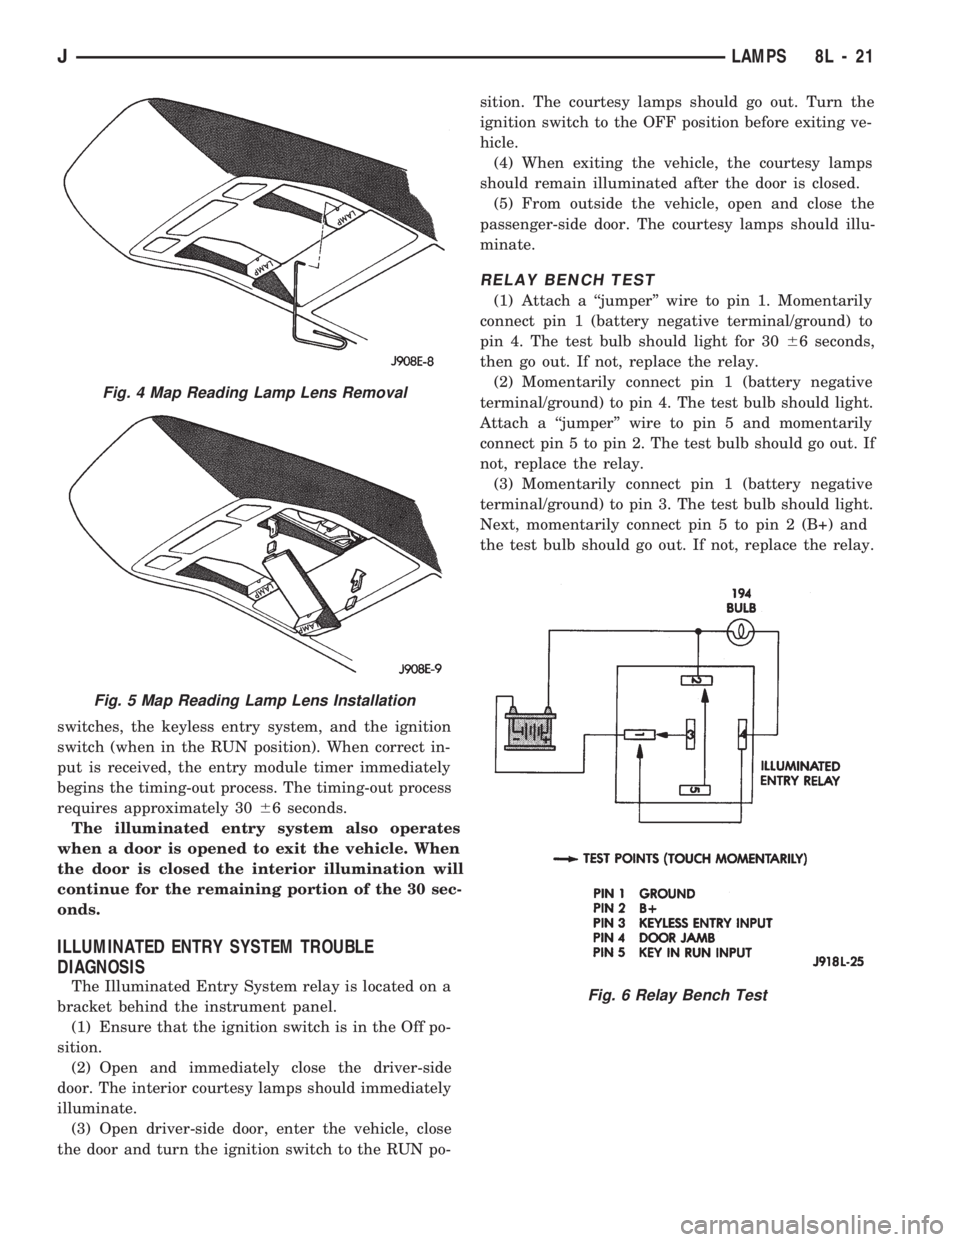
RELAY BENCH TEST
(1) Attach a ``jumper'' wire to pin 1. Momentarily
connect pin 1 (battery negative terminal/ground) to
pin 4. The test bulb should light for 3066 seconds,
then go out. If not, replace the relay.
(2) Momentarily connect pin 1 (battery negative
terminal/ground) to pin 4. The test bulb should light.
Attach a ``jumper'' wire to pin 5 and momentarily
connect pin 5 to pin 2. The test bulb should go out. If
not, replace the relay.
(3) Momentarily connect pin 1 (battery negative
terminal/ground) to pin 3. The test bulb should light.
Next, momentarily connect pin 5 to pin 2 (B+) and
the test bulb should go out. If not, replace the relay.
Fig. 4 Map Reading Lamp Lens Removal
Fig. 5 Map Reading Lamp Lens Installation
Fig. 6 Relay Bench Test
JLAMPS 8L - 21
Page 456 of 1784
POWER DOOR LOCKS
CONTENTS
page page
KEYLESS ENTRY........................ 8POWER LOCKS......................... 1
POWER LOCKS
INDEX
page page
Actuator Motor Stall Test.................... 6
Description.............................. 1
Diagnosing Power Door Locks............... 1
General................................. 1Liftgate Lock Cylinder Replacement............ 7
Solenoid and Latch Assembly Replacement..... 6
Switch Replacement....................... 6
GENERAL
The door lock actuators, including liftgate, are con-
trolled by two-way switches. To lock the doors, push
down on either switch. To unlock doors from inside
the vehicle push upward on either switch.
The power door locks do not lock or unlock the
doors from outside the vehicle. Insert the key into
the lock cylinder to lock or unlock each individual
door.
DESCRIPTION
The door locks are operated by reversible motors
that receive voltage from fuse #13 in the fuse panel.
Voltage is applied to the driver's side door lock
switch and the passenger's side door lock switch
through the #9 fuse. With the driver's side door lock
switch in LOCK, voltage is applied through the
switch to the door lock relay coil. The relay coil is
energized which closes the circuit from the circuit
breaker to the lock motor. The motor is grounded by
the unlock relay.
The passenger's side door lock window switch oper-
ates the same as the driver's door switch. The volt-
age and ground paths are reversed to unlock the
doors.
The power door lock operates with battery power
and, therefore, is independent of the ignition switch.
DIAGNOSING POWER DOOR LOCKS
If vehicle has Keyless Entry and the door locks op-
erate properly using door switches but do not work
with transmitter, refer to Keyless Entry in this
group.
NO DOOR LOCKS OPERATE USING DOOR
LOCK SWITCHES
(1) Inspect fuse #13. Replace if necessary. If OK,
measure voltage at battery side of fuse. There should
be 12 volts. If not, repair open from Power Distribu-
tion Center.
(2) Remove door switch and measure voltage at
terminal 1. Meter should read battery voltage. If not,
repair open to #9 fuse.
(3) The power window relays are in the relay cen-
ter. The relay center is located on the lower instru-
ment panel trim cover just right of the steering
column (Fig. 1). Remove both relays.
(4) Measure resistance between lock and unlock re-
lay terminal 4 (87A) and ground. Meter should read
zero ohms. If not, repair open to ground.
(5) Measure voltage at terminal 5 (87) of both the
lock and unlock relays. Meter should read battery
voltage. If OK, next step. If not, repair open to cir-
cuit breaker.
(6) Measure resistance at terminal 2 (85) of both
the lock and unlock relays. Meter should read zero
ohms. If not, repair open to ground.
(7) Hold driver's side switch in LOCK position.
Measure voltage at lock relay terminal 1 (86). Meter
should read battery voltage. If OK, next step. If not,
repair open to driver's side switch.
(8) Hold driver's side switch in UNLOCK position.
Measure voltage at unlock relay terminal 1 (86).
Meter should read battery voltage. If OK, next step.
If not, repair open to driver's side switch.
JPOWER DOOR LOCKS 8P - 1
Page 463 of 1784

(5) Remove latch.
(6) Drill out 2 rivets and remove solenoid.
(7) To install solenoid, reverse the removal proce-
dures.
(8) Tighten latch screws to 9 Nzm (7 ft. lbs.) torque.
KEYLESS ENTRY
INDEX
page page
Diagnosing Power Door Locks............... 9
Door Lock/Unlock Relay Replacement......... 12
Receiver................................ 8
Receiver Service......................... 11
System Description........................ 8System Operation......................... 9
Transmitter.............................. 8
Transmitter Programming................... 9
Transmitter Service........................ 9
SYSTEM DESCRIPTION
The keyless entry system consists of a portable re-
mote control transmitter and a receiver mounted in
the overhead console or between the sun visors. Sys-
tem operation is based on a coded infrared signal
from the transmitter to the receiver. The transmitter
is programmed into the receiver providing the correct
programming sequence is met.
When the keyless entry system is activated, the cor-
responding relay operates to supply voltage to the mo-
tors. The use of either relay determines the polarity of
the voltage that is supplied to the door lock motors.
When the keyless entry system is used, the trans-
mitter sends a signal to the keyless entry module. If
the doors are unlocked, the module activates a tran-
sistor switch to apply voltage to the lock relay coil.
The coil is energized to close the normally open con-
tacts of the lock relay. Battery voltage from the relay
is applied to the door lock motors to lock the doors.
Current flows in the same path to ground as it does
when the master door lock switch is used.When the doors are locked, the keyless entry mod-
ule applies voltage to the unlock relay coil and a
similar action takes places to unlock the doors.
TRANSMITTER
The pocket size, solid state transmitter operates on
(2) 3-volt lithium (CR1616) batteries (Fig. 1). The
transmitter is activated by pressing either the LOCK
or UNLOCK button. This closes the internal contacts
that complete the battery circuit.
The battery voltage activates the transmitter diode
which in turn generates a coded infrared signal. The
signal is transmitted as pulses of infrared light.
If the red LED on the side of the transmitter does
not light when the transmitter is activated, the bat-
teries are low.
RECEIVER
The receiver is in circuit with the electric door lock
system. The coded infrared signal is picked up by the
receiver diode and is shaped, amplified and decoded by
an integrated circuit within the receiver. If the signal
Fig. 10 Latch Assembly Removal/Installation
8P - 8 POWER DOOR LOCKSJ
Page 464 of 1784
code received matches the code in the receiver memory
circuit, the receiver triggers the door lock/unlock relays.
The relays complete the circuit to the electric door lock
solenoid to either lock or unlock the doors.
SYSTEM OPERATION
To activate the system, aim the transmitter diode
toward the receiver and press the transmitter signal
button to lock or unlock the doors as desired.
Effective transmitter range is 4.75 meters (15 ft.)
with the transmitter positioned no more than 45 de-
grees from the receiver centerline.
For complete circuit diagrams refer to Group
8W - Wiring Diagrams.
TRANSMITTER PROGRAMMING
Up to 4 Transmitter Identification Codes (TIC's) can
be programed into the receiver at any given time.
(1) Open the driver's door of the vehicle. Leave it
open through the programming procedure.
(2) Move the mechanical door lock lever to the
LOCK position.
(3) Turn the ignition switch to the ON position.
(4) Within 20 seconds, aim a transmitter at the re-
ceiver dome and press the LOCK button for at least
5 seconds. Once the receiver accepts the program-
ming code, the driver's door will unlock.
(5) Once the first transmitter has been pro-
grammed, additional transmitters (up to 4) may be
programmed into the receiver. Within 20 seconds of
the previous transmitter programming, move the me-
chanical door lock lever to the LOCK position. Aimanother transmitter at the receiver dome and press
the LOCK button for at least 5 seconds. The door
lock will cycle again.
(6) To lock the programmed codes into the re-
ceiver, the ignition switch must be turned OFF and
back ON within 20 seconds after programming the
last transmitter's code. At that time, all previous
codes are erased from the module.
DIAGNOSING POWER DOOR LOCKS
NO DOOR LOCKS OPERATE, USING
TRANSMITTER
(1) Measure resistance at keyless entry module
terminal 10. Meter should read zero ohms. If not, re-
pair open to ground.
(2) Measure voltage at keyless entry module termi-
nal 1. Meter should read battery voltage.Battery
voltage must be at least 9 volts for this system to
operate.If not, repair open to #9 fuse.
(3) Jumper test leads keyless entry module termi-
nal 1 to terminal 3. Doors should lock. If OK, replace
module. If not, repair open from terminal 3 to lock
relay terminal 1.
(4) Jumper test leads keyless entry module termi-
nal 1 to terminal 4. Door should unlock. If OK, re-
place module. If not, repair open from terminal 4 to
unlock relay terminal 1.
TRANSMITTER SERVICE
If the receiver malfunctions, only the receiver will
have to be replaced. The new receiver will have to be
reprogrammed. If a transmitter is lost, replace the
transmitter and reprogram the receiver.
Batteries may not be supplied with some re-
placement transmitters. Be sure to check a re-
placement transmitter before attempting to
activate the system.
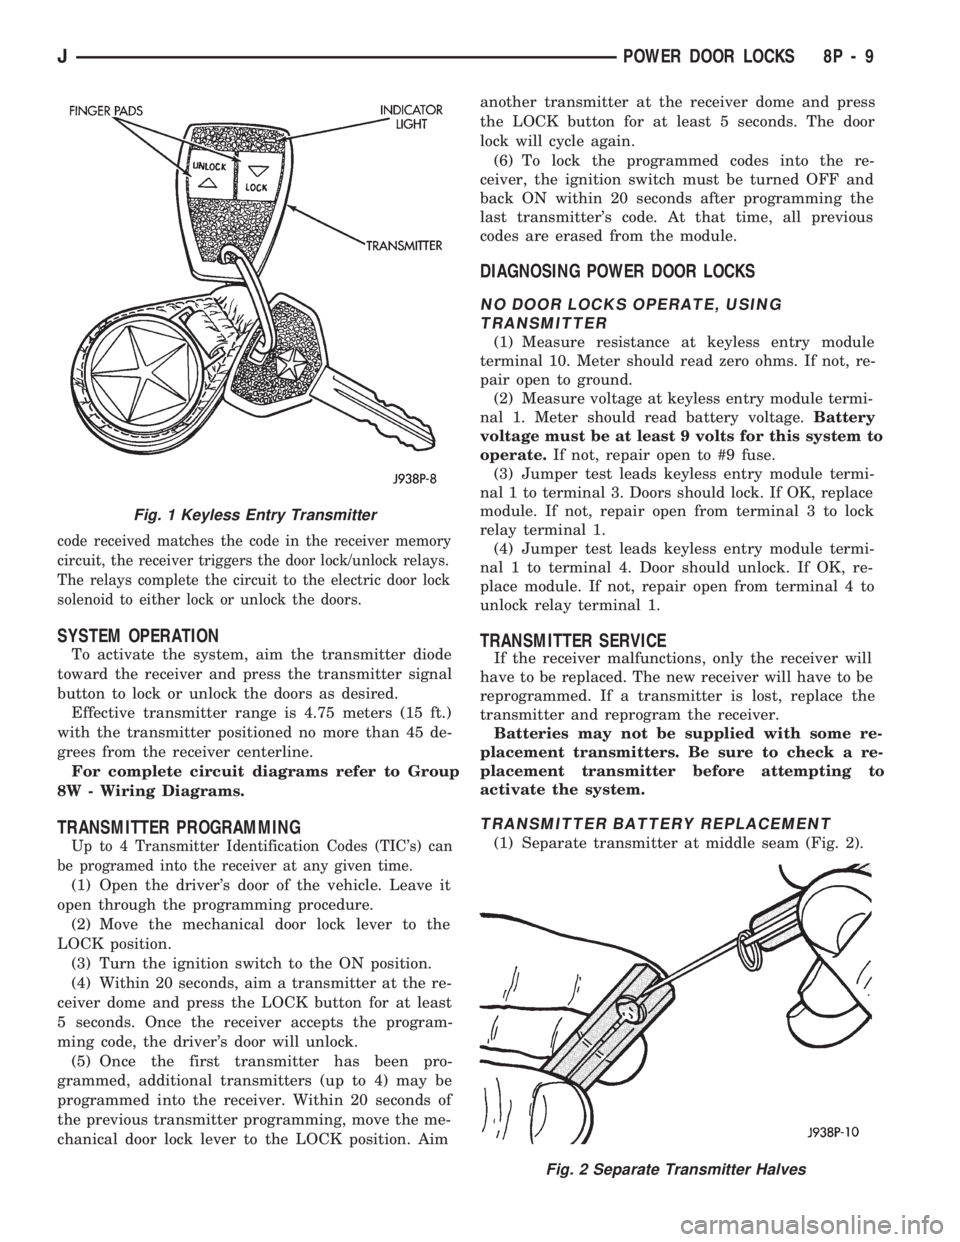
TRANSMITTER BATTERY REPLACEMENT
(1) Separate transmitter at middle seam (Fig. 2).
Fig. 2 Separate Transmitter Halves
Fig. 1 Keyless Entry Transmitter
JPOWER DOOR LOCKS 8P - 9
Page 466 of 1784
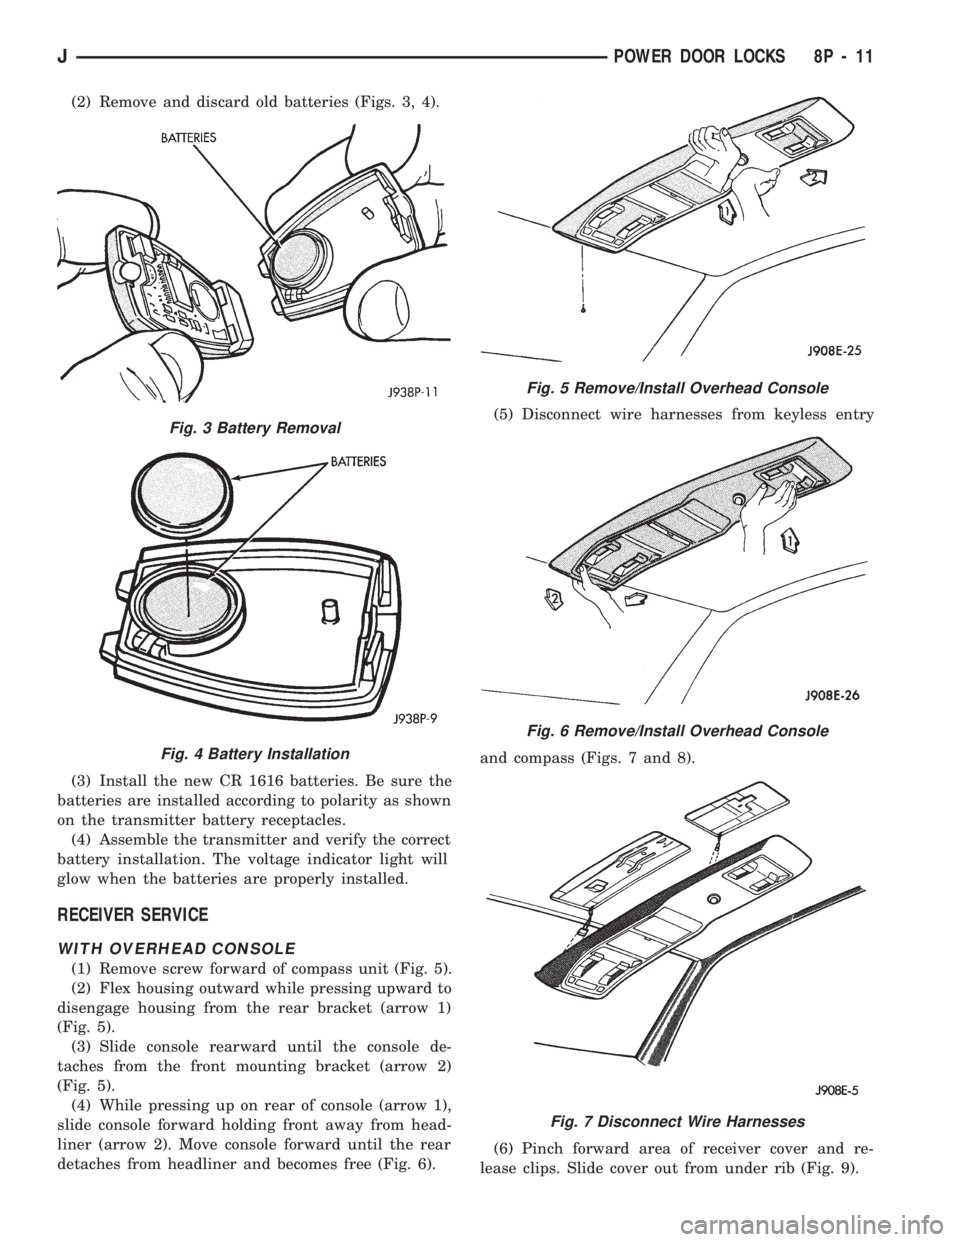
(2) Remove and discard old batteries (Figs. 3, 4).
(3) Install the new CR 1616 batteries. Be sure the
batteries are installed according to polarity as shown
on the transmitter battery receptacles.
(4) Assemble the transmitter and verify the correct
battery installation. The voltage indicator light will
glow when the batteries are properly installed.
RECEIVER SERVICE
WITH OVERHEAD CONSOLE
(1) Remove screw forward of compass unit (Fig. 5).
(2) Flex housing outward while pressing upward to
disengage housing from the rear bracket (arrow 1)
(Fig. 5).
(3) Slide console rearward until the console de-
taches from the front mounting bracket (arrow 2)
(Fig. 5).
(4) While pressing up on rear of console (arrow 1),
slide console forward holding front away from head-
liner (arrow 2). Move console forward until the rear
detaches from headliner and becomes free (Fig. 6).(5) Disconnect wire harnesses from keyless entry
and compass (Figs. 7 and 8).
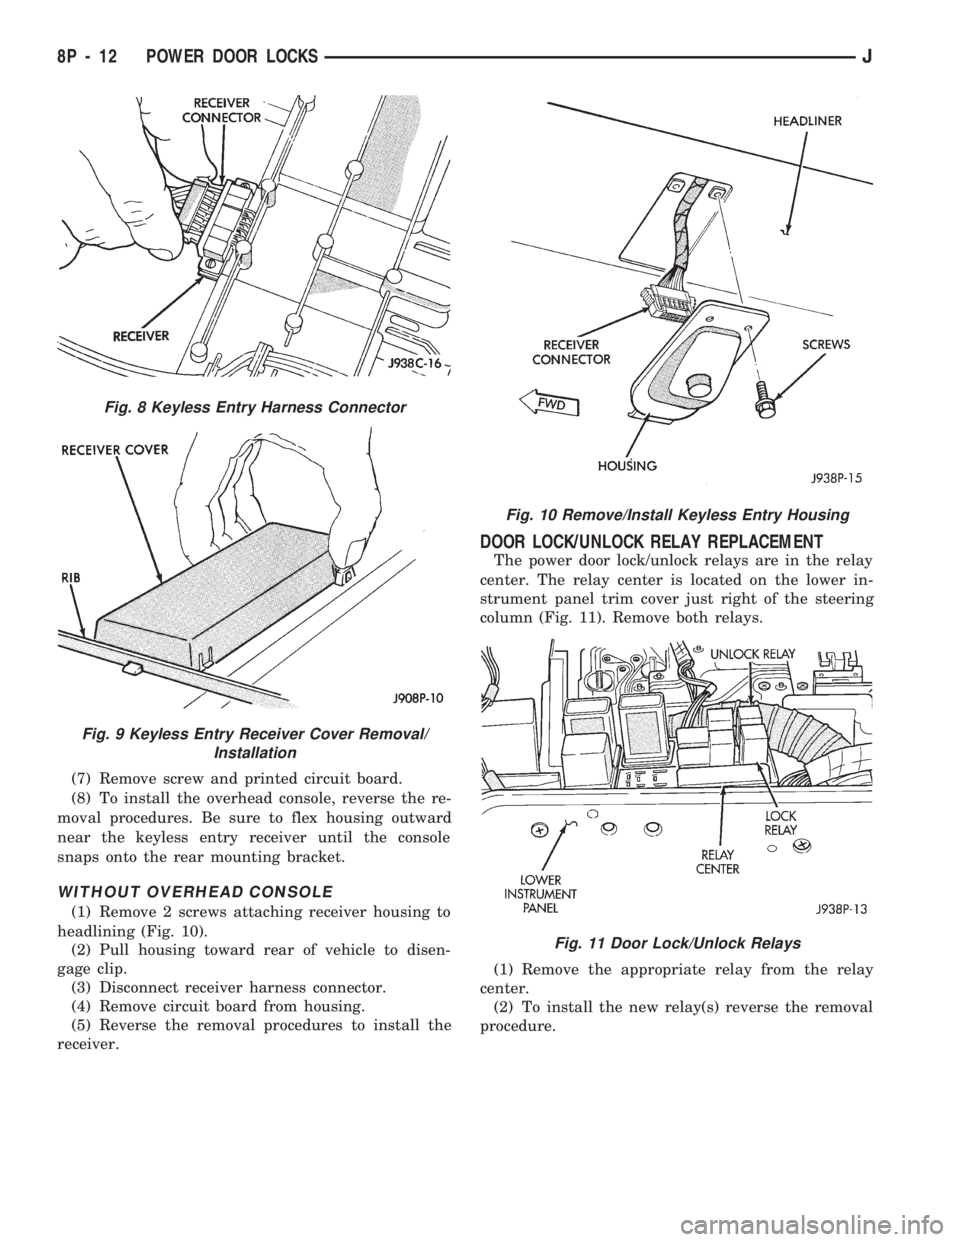
(6) Pinch forward area of receiver cover and re-
lease clips. Slide cover out from under rib (Fig. 9).
Fig. 3 Battery Removal
Fig. 4 Battery Installation
Fig. 5 Remove/Install Overhead Console
Fig. 6 Remove/Install Overhead Console
Fig. 7 Disconnect Wire Harnesses
JPOWER DOOR LOCKS 8P - 11
Page 467 of 1784
(7) Remove screw and printed circuit board.
(8) To install the overhead console, reverse the re-
moval procedures. Be sure to flex housing outward
near the keyless entry receiver until the console
snaps onto the rear mounting bracket.
WITHOUT OVERHEAD CONSOLE
(1) Remove 2 screws attaching receiver housing to
headlining (Fig. 10).
(2) Pull housing toward rear of vehicle to disen-
gage clip.
(3) Disconnect receiver harness connector.
(4) Remove circuit board from housing.
(5) Reverse the removal procedures to install the
receiver.
DOOR LOCK/UNLOCK RELAY REPLACEMENT
The power door lock/unlock relays are in the relay
center. The relay center is located on the lower in-
strument panel trim cover just right of the steering
column (Fig. 11). Remove both relays.
(1) Remove the appropriate relay from the relay
center.
(2) To install the new relay(s) reverse the removal
procedure.
Fig. 8 Keyless Entry Harness Connector
Fig. 9 Keyless Entry Receiver Cover Removal/
Installation
Fig. 10 Remove/Install Keyless Entry Housing
Fig. 11 Door Lock/Unlock Relays
8P - 12 POWER DOOR LOCKSJ