Page 130 of 1413
Installation Sequence
NOTE: Exhaust and intake valve seals are NOT interchangeable.
VAIVE IGEPGNS
INTAKE VALVE SPAING
/ v^LvEsP'ittNG
*nt /^no,n
/'=\/\y
VALVE SPRING
EXHAUST VALVE SEALNOE: Place the end ofv.lv€spring with closely wound coilgloward the cvlinder h€ad.(BLACK SPRINGIReplace.
SPRING SEATNOTE: lnstallthe valvo spring se6t6bsfore installing the valv6 so6ls,
VALVE GUIDE SEAL II{STALITRKD-2EgSNOTE: Uso smalllDond oftool.
VALVE SEALR€place.
@--'**
9-**
P.%
6-69
Page 131 of 1413

Valve lnstallation
When installing valves in cylinder head, coat valve
stems with oil before inserting into valve guides, and
make sure valves move up and down smoothly.
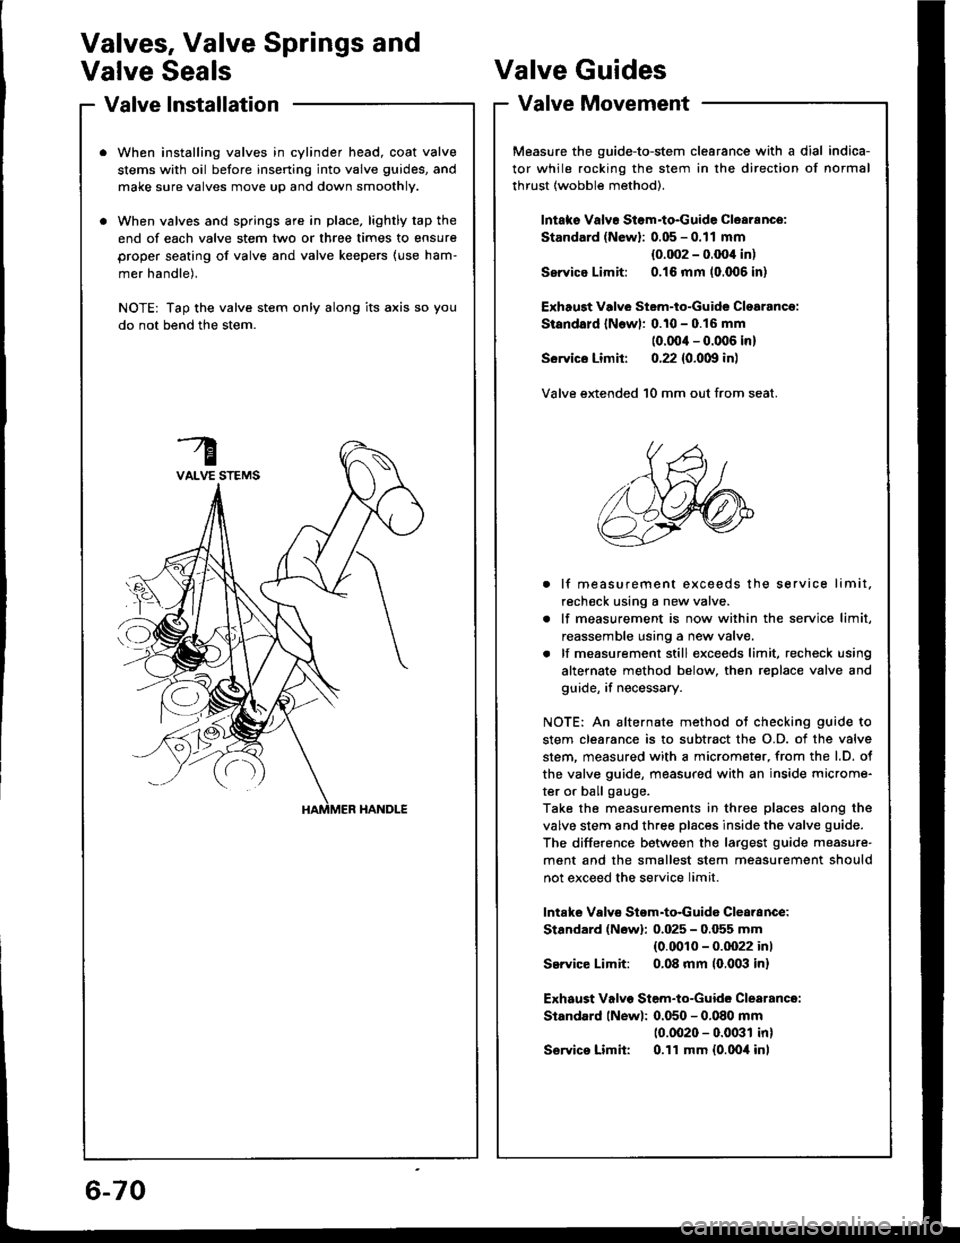
When valves and springs are in place, lightly tap the
end of each valve stem two or three times to ensure
proper seating of valve and valve keepers (use ham-
mer handle).
NOTE: Tap the valve stem only along its axis so you
do not bend the stem.
Valves, Valve Springs and
Valve SealsValve Guides
Valve Movement
Measure the guide-to-stem clearance with a dial indica-
tor while rocking the stem in the direction of normal
thrust (wobble method).
lntaks Valvr Stom-to-Guide Clearance:
Standard (Newl: 0.05 - 0.11 mm
{0.002 - 0.OO'l in)
Ssrvice Limit: 0.16 mm (0.006 in)
Exhaugt Vdve Stem-to-Guide Clsarancg:
Standald lNowl: 0.10 - 0.16 mm
(0.00'l - 0.006 in)
Sorvics Limit: 0.22 {0.0m in)
Valve extended 10 mm out from seat.
. lf measurement exceeds the service limit.
recheck using a new valve.
. lf measurement is now within the service limit,
reassemble using a new valve.
. lf measurement still exceeds limit, recheck using
alternate method below, then replace valve and
guide, if necessary.
NOTE: An alternate method ot checking guide to
stem clearance is to subtract the O.D. of the valve
stem. measured with a micrometer, from the l.D. ot
the valve guide, measured with an inside microme-
ter or ball gauge.
Take the measurements in three places along the
valve stem and three places inside the valve guide.
The difference between the largest guide measure'
ment and the smallest stem measurement should
not exceed the service limit.
lntafte Valvs Stom-to-Guida Clearance:
Stardard (Nowl: 0.025 - 0.055 mm(0.0010 - 0.0022 inl
Service Limit: 0.08 mm (0,003 in)
Exhaust Valvo Stem-to-Guide Clearance:
Standard lNew): 0.050 - 0.080 mm
10.0020 - 0.0031 in)
S€rvics Limit: 0.11 mm {0.0oil inl
6-70
Page 133 of 1413

Valve Guides
Replacement (cont'dl
7. Slip a 6 mm {0.2 in) steel washer and the correct
driver attachment over the end of the driver (The
washer will absorb some of the imDact and extendthe life of the driver).
:=:-/--PDRIVER6 mm 10.2 int ATTACHMENTWASHER
Install the new guide(s) from the camshaft side ofthe head; drive each one in until the attachment
bottoms on the head. lf you have all sixteen guides
to do, Vou may have to reheat the head one or twomore times.
Valve Guide Installed Height:
Intake: 12.55 - 13.05 mm {0.49it - 0.51it inl
Exhaust 12.55 - 13.05 mm {0.494 - 0.514 inl
VALVE GUIDE
Reaming
NOTE: For new valve guides only.
1. Coat both reamer and valve guide with cutting oil.
2, Rotate the reamer clockwise the full length of thevalve guide bore.
3. Continue to rotate the reamer clockwise whileremoving it from the bore.
4. Thoroughly wash the guide in detergent and waterto remove any cutting residue.
5. Check clearance with a valve (see page 6-70).
. Verify that the valve slides in the intake and ex-haust valve guides without exerting pressure.
REAMER HANDLE
Turn reamer inclockwise directiononry.
C'
o
a
-'{)
6-72
Page 134 of 1413

Valve Seats
Reconditioning
Renew the valve seats in the cylinder head using
valve seat cutters.
NOTE: lf guides are worn, replace them before cut-
ting the valve seats.
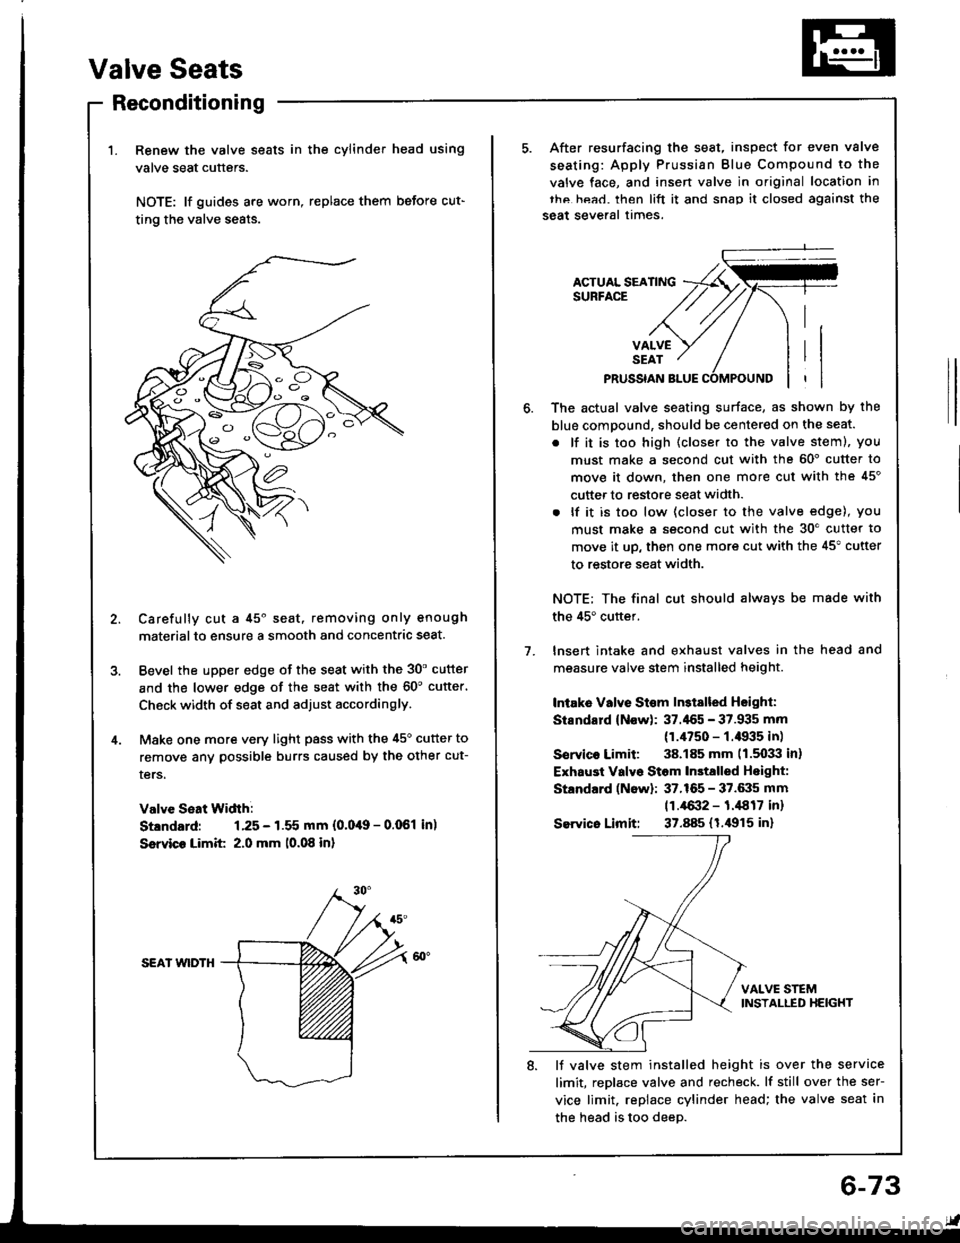
Carefully cut a 45o seat, removing only enough
materialto ensure a smooth and concentric seat.
Bevel the upper edge of the seat with the 30' cutter
and the lower edge of the seat with the 60'cutter'
Check width of seat and adjust accordingly.
Make one more very light pass with the 45o cutter to
remove anv possible burrs caused by the other cut-
ters.
Valve Seat Width:
Stlndard: 1.25 - 1.55 mm {0.0,19 - 0.061 in)
Ssrvico Limit 2.0 mm 10.08 in)
SEAI wlDTH
After resurfacing the seat, inspect for even valve
seating: Apply Prussian Blue Compound to the
valve face, and insen valve in original location in
thc hea.l. then lift it and snap it closed against the
seat several times.
ACTUAL SEATINGSURFACE
VALVESEAT
PRUSSIAN BLUE
1.
The actual valve seating surface, as shown by the
blue compound, should be centered on the seat.
. lf it is too high (closer to the valve steml, you
must make a second cut with the 60' cutter to
move it down, then one more cut with the 45'
cutter to restore seat width.
. lf it is too low (closer to the valve edge), you
must make a second cut with the 30'cutter to
move it up, then one more cut with the 45" cutter
to restore seat width.
NOTE; The final cut should alwavs be made with
the 45'cuttef.
lnsert intake and exhaust valves in the head and
measure valve stem installed height.
Intake Vllve St€m ln3tslled Hsighl:
Stsndard (Now): 37.'155 - 37.935 mm
(1.4750 - f .il935 in)
Sorvico Limit: 38.185 mm 11.5033 in)
Exhaust Valvo Stom In3talled Hoight:
Standard (Now): 37.165 - 37.6:15 mm
11.4{X}2 - 1.,1817 inr
Sewico Limit: 37.885 (1.i1915 in)
VALVE STEMINSTALLED HEIGHT
8. lJ valve stem installed height is over the service
limit, replace valve and recheck. lf still over the ser-
vice limit. replace cylinder head; the valve seat in
the head is too deeD.
6-73
Page 137 of 1413
Cylinder Head
8 r 1.25 mm2a N..n 12.4lgtm,r 7 tbf.ftl
Installation {cont'd)
4. Install the exhaust manifold and tighten the new
selJ-locking nuts in a crisscross pattern in two or
three steps, beginning with the inner nuts.
. Use new self-locking nuts.
SELF.LOCKING NUT8 x 1.25 mm31 N.m 13.2 kgf'm, 23 lbtltlReplace.
EXHAUST
a.l N.m 14.5 kgt m,33 tbr.trl
GASKETReplsco.
8 x 1.25 mm24 N.m (2.4 kgt m,rt tbfft)
&,x
6-76
5. Install the camshafts, camshaft oil seals and rubber
cap.
NOTE:
. Install the camshafts with keyway facing up.
o Installthe oil sealwith the spring side facing in.
. The oil seal housing surface should be dry,
. Set the O-ring and dowel pin in the oil passage
of th€ No. 3 camshaft holder
Kgyway is lacing up.
Apply liquid gasket around the rubber cap, then
install the rubber cap.
O-RING {ReDlace.)
Page 138 of 1413
7.Apply liquid gasket to the hesd mating surface of
th€ No. 1 and No. 5 camshaft holders on both the
intako and exhaust side. Confirm that the camshaft
koywEys face up, then place those holders, together
with th€ No.2, No. 3 and No.4 camshaft holders,
on th€ cylind6r head.
NOTE: The arrows msrked on the camshaft holders
should point to the timing belt.
INTAKE
t/
bl
ffi
rfl?x
rt
EXHAUST
Apply liquid gaskot
to lh6 3had€d aroas.
Temporarily tighton the bolts of tho camshaft hold-
6rs and thE camshaft holder plates,
lrlo. 6
d
ro
I
CAIISHAFT HOIDERS
Ho. a No.3 1to.2
rllttt
888
CAMSHAFT HOI,I'ER
9. Tighten the bolts in the sequence shown below.
(D - @: 8 x 1.25 mm 27 N.m {2.8 kgf.m,20 lbt ttl
(D - (D: 6 x 1.0 mm 9.8 N.m (1.0 kgrl.m, 7.2 lbf'ft}
10. Install the back cover and camshaft pulleys.
CAMSHAFT
ooooo0o
10 x 1.25 mm56 N.ln l5.t kgf.m,4r lbl.trl
6x1.0mm9.8 N.m 11.0 kgtm, t.2lbf'ft)
(cont'd)
6-77
Page 146 of 1413

lllustrated IndexF
(cont'd)
NOTE: New rod bearings must be selected by
connecting rod and crankshaft identification
(see pages 7-8,9)
matching
marKrngs
Lubricate all internal parts with engine oil during
reassemorv.
PISTON RINGSReplacement, page 7'16Measurement. page 7-17Alignment, page 7 18
PISTON PINRemoval, page 7-18lnstallation, pages 7 19, 20Inspection, page 7'20
PISTON INSTALLATION DIRECTION
EXHAUST
INTAKE
Removal, page 7'11Measurement, page 7 15Inspect top of each cylinder borefor carbon build-up or ridgobetore removing piston.Remove ridge it necessary, page 7'11CONNECTING ROOEnd play, page 7-21
CONNECTING RODEEARINGSClearance, page 7-9Selection, page 7-9
CONNECTING ROD NUT818B1 ongine8x 0.75 mm31 N.m {3.2 kgf.m,23 lbf ftl818C1 engine9 x 0.75 mma,a N.m (4.5 kgt m, 33 lbf.ft|After torquing each bearangcap, rotate crankshaft tocheck for binding.
r-(,
Selection, page 7-22Small end measurement. page 7-21
BLOCXCylinder bore inspection, page 7 13Warpage inspection, page 7'14Cylinder bore honing, page 7-14
CONNECTING ROD BEARING CAPInstallation, page 7'23NOTE: Install caps so the bearing recess ison the same side as the recess in the rod.
r@
-1@
Page 179 of 1413
lntake Manifold/Exhaust System
Intake Manifold
Replacement ............................... 9-2
Exhaust Manifold
Replacement ............................... 9-4
Exhaust Pipe and Muffler
Replacement ............................... 9-5