Page 1277 of 1413

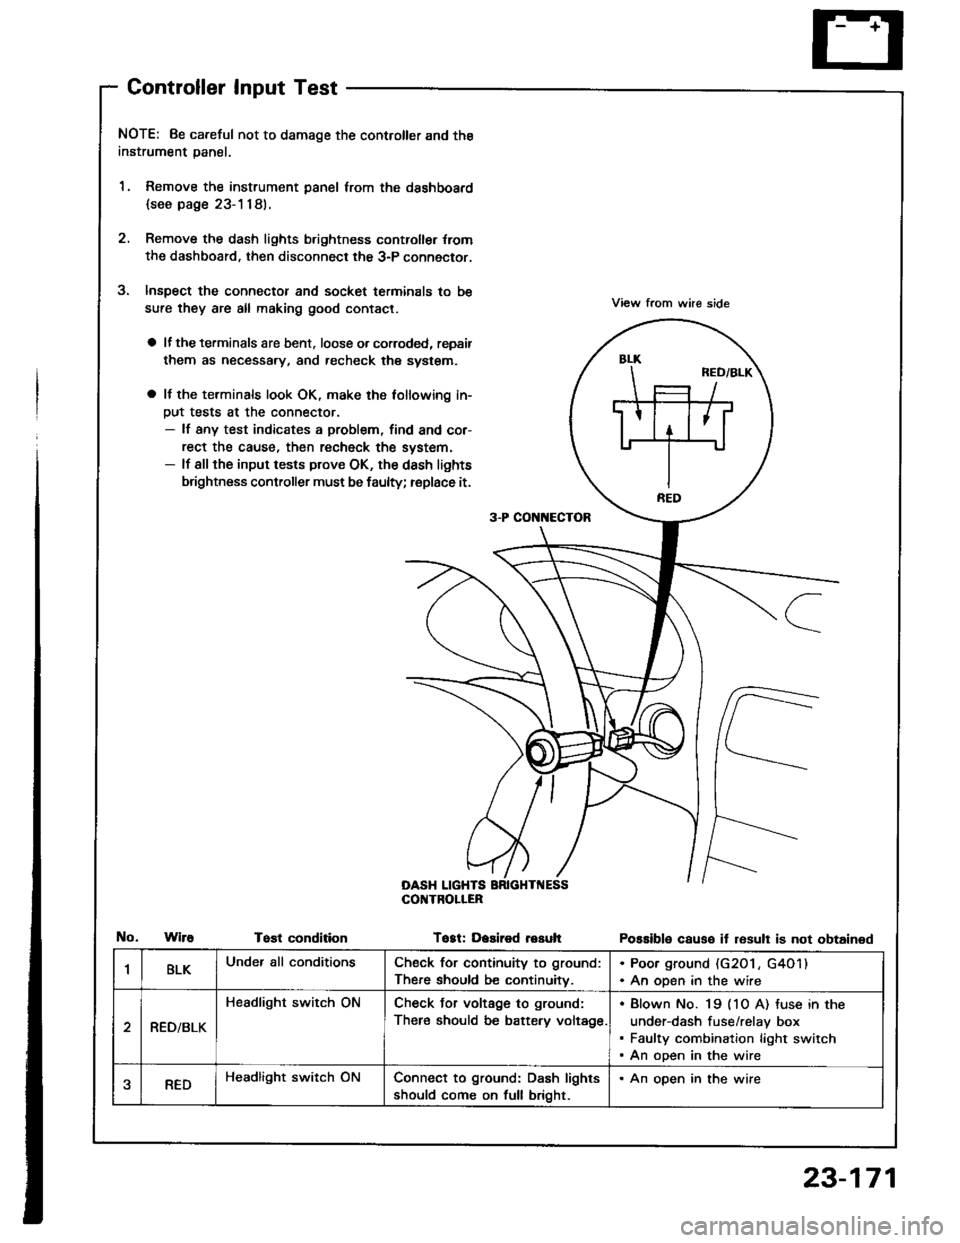
Controller Input Test
NOTE: 8e careful not to damage the controller and the
instrument panal.
1. Remove the instrument panel lrom the dsshboard
{see page 23-1181.
2. Remove the dash lights b.ightness controller {rom
the dashboard. then disconnect the 3-P connector.
Inspect the connector and socket terminals to be
sure they are all making good contact.
a lf the terminals are bent. loose o. corroded, repsir
them as necessary, and recheck the system.
a It the terminals look OK, make the tollowing in-
Dut tests at the connector.- lf any test indicates a problem, find and cor-
rect the cause, then recheck the system.- lf all the input tests prove OK, the dash lights
brightness controller must be faulty; replace it.
View from whe side
Possible causo it resull is not obtained
3-P CON[{ECTOR
OASH LIGHTSCOI{TROLIER
WireTost conditionTogt: Dasired resuh
1BLKUnder all conditionsCheck for continuity to ground:
There should be continuitv.
. Poor ground (G20 l , G4O1). An open in the wire
RED/BLK
Headlight switch ONCheck Jor voltage to ground:
There should be battery voltage.
Blown No. 19 (1O A) tuse in the
under-dash fuse/relay box
Faulty combination light switch
An open in the wire
aREDHeadlight switch ONConnect to ground: Dash lights
should come on full bright.
. An open in the wire
23-171
Page 1278 of 1413
Ceiling/Trunk/Gargo Area Lights, Spotlights
Component Location Index
23-172
r 1: Sedanr2: Hatchback
CEIIING LIGHTTest/Replac€mont. page 23-175
SPOTLIGHTSTest/Rsplscement, page 23-1 7 4
.1 LEFT REARDOOR SWTCHTest. page 23-150
FRONTPASSEl{GER'SDOORswtTcHTest, pago 23-150
*2 HATCH LATCHswtTcHTest/Replacement,page 23-178
11 RrcHT BEARDOOR SWrCHTost. page 23-150
11 TRUNK LATCHSWITCH '1 TRUI{K LIGHTTest/Replac€ment, Test/Replacemontpage 23-178 Page 23-177
rII-
Page 1280 of 1413
Ceiling/Trunk/Cargo Area Lights, Spotlights
Spotlight Test/Replacement
23-174
1. Turn the light switch OFF.
2. Pry off the lens.
3, Remove the two screws, then pull out the housing.
Hatchback:
4.
5.
Disconnect the connector from the housing.
Check for continuity between the terminals in each
switch position according to the table.
Sedan:
CONNECTOR
Torminal
;r,,-
----lABorB'CorC'
tEFrONo-/:\--o\:/
OFF
RIGHTONo---o
OFF
"" li ** li
B'O B
BULB
-FFmlliF-T
Page 1281 of 1413
Ceiling Light Test/Replacement
With moonrool:
1. Turn the light switch OFF.
2. Pry otJ the lens.
3. Remove the two mounting nuts, then pull out thehousing.
4. Disconnect the 3-P connector f.om the housing.
3-P CONNECTOR
re.mrnal
Position \A8or8'cD
OFFo-za--o\7
DOORo---o\7
ONG-/1--o\:.,/
5. Check for continuity between the terminals in €schswatch position according to the table.
F om o.3l7.5Al FUSE(ln th. snd.. - dr.h fu!./r€by boxl
23-175
Page 1282 of 1413
Geiling/Trunk/Cargo Area Lights' Spotlights
Geiling Light Test/Replacement
Without moonroot:
1. Turn the light switch OFF.
2. Pry ofJ the lens.
3. Remove the sctew, then pull out the housing'
4. Disconnect the 3-P connector from the housing.
3-PCONNECTOR
23-176
T6ninsl
P"riti"" \
ABor B'D
OFFo-/:\--o\:.,/
DOORo-A--o
ONLF/A--o
5. Check for continuity between the terminals in each
switch position according to the table.
F om o.3l7.5Al FUSEtln thr uid.r - ddr h|. /,.LY borlA
Page 1283 of 1413
Trunk/Cargo Area Light Test/Replacement
Pry the trunk/cargo afea light lens out of its housing.
Pry out the light assembly.
Disconnect the 2-P connector trom the housing.
Hatchback:
2.P CONNECTOR
BULE 13.4 Wl
A {+}B {-)
HOUSING
BULB {3.4 W)
2.P CONNECTOR
4. Make sure that the bulb is in good condition. Checkfor continuity between the A (+) and B (-ltermi-
nals. There should be continuitv (Hachback: theswitch must be Dushed).
Hatchback:
Sedan:
Froh o.3 (7.5A1FUSE
{ln th. undor - d!.hfur./r.hy box)
To HATCHLATCHswtTcH
F om o.3 (7.5A1FUSE
{ln th. und.i- da.htur€/r.hy box)
To TRU KLATCHswtTcH
23-177
Page 1284 of 1413
Ceiling/Trunk/Cargo Area Lights, Spotlight
Latch Switch Test/Replacemsnt
Sedan:
1. Open the trunk lid. and disconnect the 2-P connec-
tor from the trunk latch switch.
2. There should be continuity between the A and B ter-
minals.
ll necessary, remove the three mounting bolts to pull
out the trunk latch switch from the trunk lid, then
disconnect the lock rod from the trunk latch switch.
Disconnect the trunk opener cable from the trunk
latch switch.
4.
\j
CC
TRU'{K OPG ER
TRUNK LATCH SWITCH
lhtchb.ck:
1 . Op6n the hatch, and disconnect the 2-P connector
trom the hatch latch switch.
2. There should be continuity between thg A terminal
and component ground.
lf necessary, remove the three mounting bolts to pull
out the hatch latch switch trom the latch, then dis-
connact the lock rod Jrom the hatch latch switch
Disconnect the hatch opener cable trom the hatch
latch switch,
3.
4.
23-178
Page 1285 of 1413
Back-up Lights
Circuit Diagram
wHT/Bt( +WHT
A/T GEARPosrnotr swrTcHf 8ek - up lioht 'l
--------_JL---------
UI{DER_ IIOOO FUSEiBEIAY BOX
23-179