Page 1009 of 1413
Bumpers
Front Bumper RePlacement (cont'd)
4. Remove the absorber and bumper beam gusset on
each side. then remove the front bumper beam.
: Eolt locotions. 4
E6rcr
8 r 1.25 mm
22 N.m (2.2 kgt'm, I't6 tbt fti _/FRONT BUMPER BEAM
ABSORBER
20-140
FRONT FEiIDER
Installation is the reverse of the removal procedure.
NOTE:
o Install the holes in the front bumper beam over
the hooks on the bodY.
FrBo*sidorHOLE(Front bumper b€am sidel
Align the front bumper side clips with the tront
fender properly, then install the front bumper.
FRONTBUMPER
a Make sure the connector is connected properly.
Page 1010 of 1413
Rear Bumper Replacement
NOTE:
a An assjstant is helpful when femoving the rear bum-per and rear bumper beam.
a Take care not to scratch the rear bumper.
Hatchback
1. Remove the screw from each side.
REAR BUMPER
Open the hatch, then remove the rear trim panel (see
page 20-921-
Remove the nuts, and disconnect the license plate
light connector and grommet.
Scrow I
A
A\
:
J.
> : Nut locotions, 4
/ 6x1.Omm I
Q) i;L'i$-. l
_':'y:) ,/BIGHT SIDETRIM PANEL
To remove the nuts, remove the rearportion of the side trim panel oneach slde {see page 20-921.
LEFT S|DE L|CENSE PLATE LtcHT
4. Remove the bolts, then remove the rear bumper.
: Bolt locations, 2
5. lf necessary, remove the bumper upper beam from
the rear bumper.
: Screw locotions
A : Scr€w, 4 B <: Sc.ow, 4 V: Clip locations, I
REAR BUMPER
--E- I
.--r-Fl^ |--lEr-
_\"., J
^i
@sl
_'/
LICENSE PI-ATELIGHT HARNESS
(cont'd)
REAR BUMPER
20-141
Page 1011 of 1413
Bumpers
Rear Bumper Replacement (cont'dl
6. Remove the absorber, bumper beam gusset and rear
bumper beam.
y: Bolt localions, 4
12 x 1.25 mm I
64Nm{65kgfm,I* "r:,
)ACCESS CAP
LlF/d,rft
REAR EUMPERBEAMEUMPER BEAMGUSSET
lnstallation is the reverse of the removal prcedure.
NOTE: Make sure the license plate light connector
is connected, and the grommet is installed properly,
20-142
Sadan
1. Remove the screw from each side
: Sciow locations, 2
REAR BUMPER
2. ODen the trunk lid, then remove the rear trim panel
(see page 20-97).
3. Disconnect the license plate light connector and
grommet from the rear trunk atea. Remove the clips
and bolts, then remove the rear bumper'
v: Cllp loc.tions, 5 : 8ok locations, 2
€l
#.,1
9.8 N.m il1.O kgl m, I7.2 rbr.ft) J
6 x 1.0 mm I
GBOMMET
Page 1012 of 1413
4. lf necessary, remove the license plate light harness,bracket and lens from the rear bumper (see page20-1411.
5. Remove the absorb€r, bumper beam gusset and fearbumper beam.
V i Bolt locatlons, 4
REAR BUMPERBEAM
BUMPER BEAMGUSSET
12 x 1.25 mm64 .m (6.5 kgf47 tbt.ftl
I.m, j
)
6. Installation is the .everse of the removal procedure.
NOTE:
a Make sure the license plate light connector is con-
nected, and the grommet is installed properly.
a Make sure the rear bumper engages the side clips
securelv.
REAR BUMPER
20-143
Page 1013 of 1413
Hood
Replacement
NOTE:
a An assistant is helplul when removing the hood.
a Take care not to damage the hood and body.
a When removing the clips, use a clip remover.
a Open the hood.
1. It necessary, remove the hood edge protector.
: Clip loc.tions, 16
NOTE: It necessary, remove the hood hinge.
V : Boh locationa, 4
I3;;,iH"-,,., I
j .rtor"t
- )
HOOD EDGEPROTECTOR
\HOOD
2. Remove the bolts. then remove the hood.
: Bolt localions, 4
lnstallStion is the reverse of the removal procedure.
NOTE:
a lf necessary, replace any damaged clips.
a Make su.e the hood locks securely.
a Make sure the hood opens properly.
a Adjust the hood alignment (see page 20-1451.
6x1.0mm9.8 N'm{l.O kgl m,7.2 lbl.fr)
HOOD HINGE
n
r)
HOOD
20-144
Page 1014 of 1413
Adjustment
NOTE: Before adjusting the hood, loosen each bolt slightly.
1. Adjust the hood hinges right and left as well as tore and att by using the elongated holes.
2. Turn the hood edge cushions, as necessary, to make the hood lit flush with the body at front and side edges.
3. Adjust the hood latch to obtain the proper height at the forward edge.
NOTE: Move the hood latch right or left until the striker
is centered in the hood latch, as shown.HOOD LATCH
HOOD LATCH
6 r 1.o mm
4. After adiustment, tighten each bolt securely.
20-145
Page 1015 of 1413

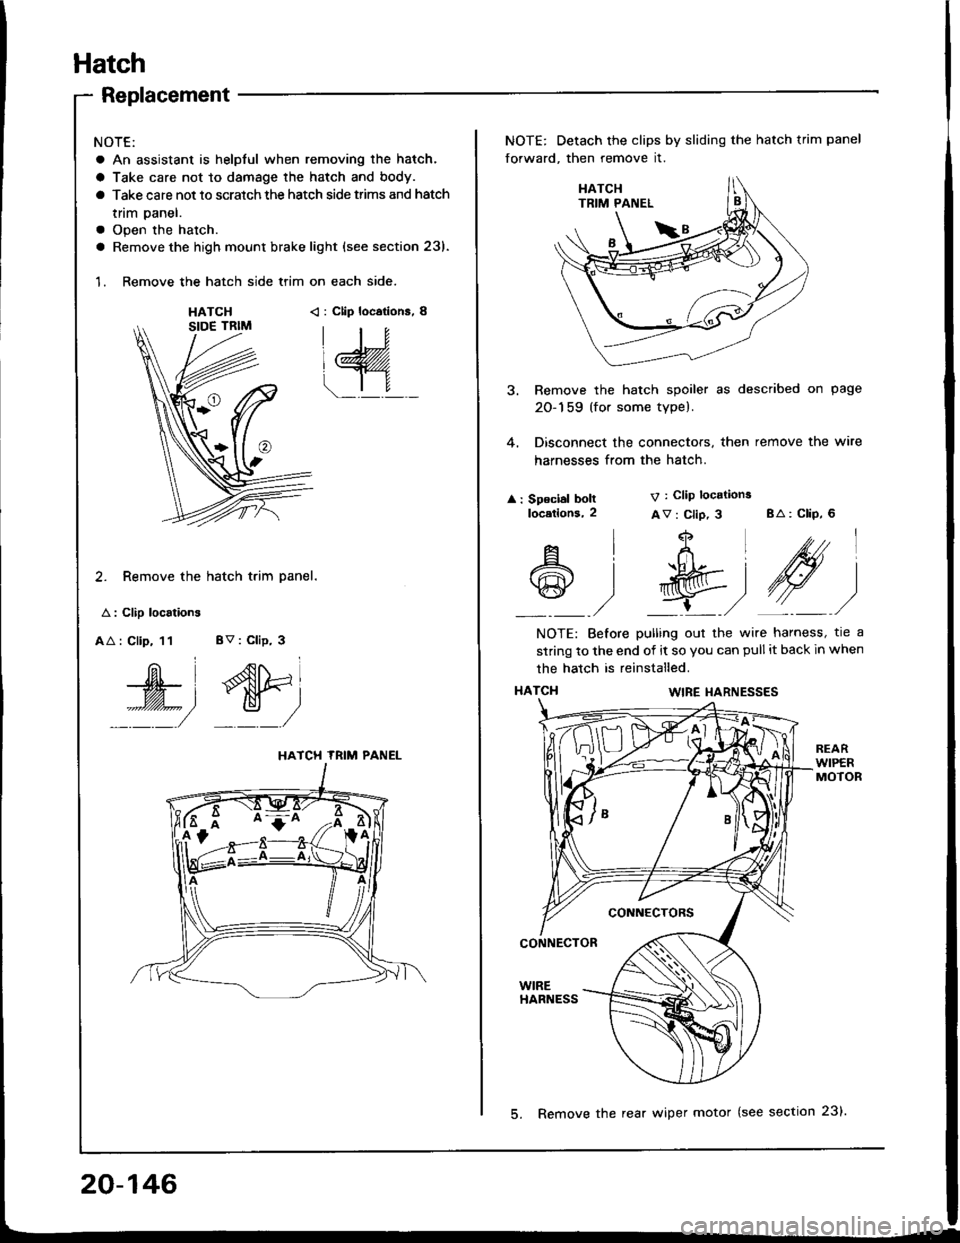
Hatch
Replacement
NOTE:
a An assistant is helpful when removing the hatch.
a Take care not to damage the hatch and body.
a Take care not to scratch the hatch side trims and hatch
tnm paner.
a Open the hatch.
a Remove the high mount brake light {see section 23).
1. Remove the hatch side trim on each side.
HATCH< : Clip locations, 8
2. Remove the hatch trim panel.
A : Clip localions
AA : Clip, 11 BV : Clip, 3
W', dtri
::::/ _:_/
HATCH TRIM PANEL
NOTE: Detach the clips by sliding the hatch trim panel
forward, then remove it.
3. Remove the hatch spoiler as described on page
20-159 (for some type).
4. Disconnect the connectors, then remove the wire
harnesses from the hatch.
: Speclal boltlocetlons,2
V : Clip locations
Av : Clip, 3 BA: CliP, 6
4
t+Ltfrl
l'R@t
,/ L,/
A
@
l
)
NOTE: Before pulling out the wire harness, tre a
strinq to the end of it so you can pull it back in when
the hatch is reinstalled.
HATCI{WIRE I{ARNESSES
CONNECTORS
CONNECTOR
WIREHARNESS
20-146
5. Remove the rear wiper motor (see section 23).
Page 1016 of 1413

8.
o.
7.
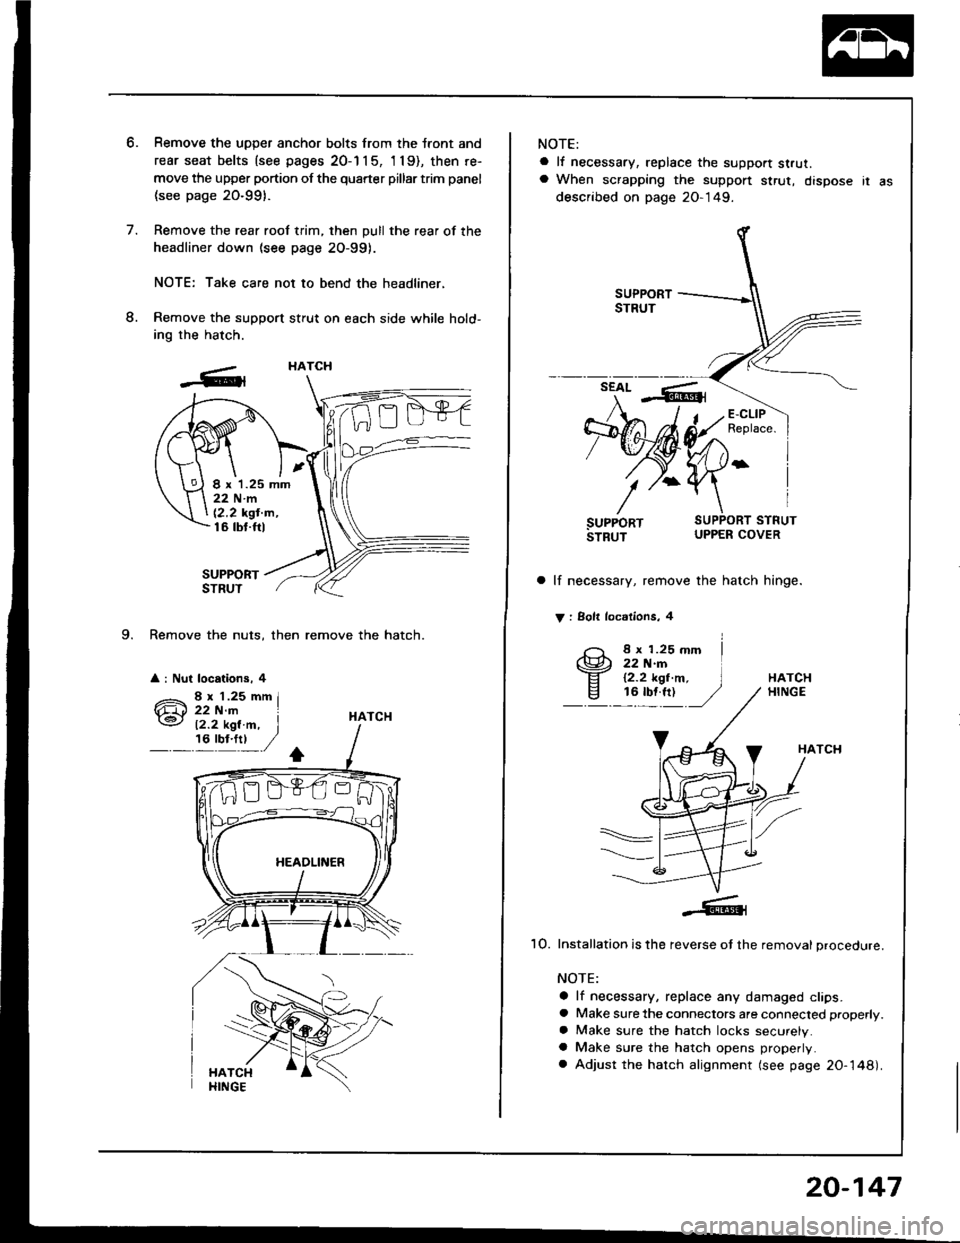
9. Remove the nuts, then remove the hatch.
a : Nut locations, 4
Remove the uDDer anchor bolts from the tront and
rear seat belts {see pages 20-1 1 5, 'l 19), then re-
move the upper portion of the quarter pillar trim panel
(see page 20-991.
Remove the rear roof trim, then pull the rear of the
headliner down (see page 2O-99).
NOTE: Take care not to bend the headliner,
Remove the support stfut on each side while hold-
ing the hatch.
SUPPORTSTRUT
HATCH
HATCH
I x 1.25 mm22Nm
12,2 kgt'm,16 tbt.ftl
12.2 kgl.m, I,6'y!:t ,/
NOTE:
a lf necessary, replace the support strut.a When scrapping the suppon $rut, dispose ir as
described on page 20-149.
a lf necessary, remove the hatch hinge.
V : Solt locdlions, 4
8 x 1.25 mm22 N.rn12.2 kgt.m,16 tbf.ft)HATCHHINGE
HATCH
1O. Installation is the reverse ot the removal procedure.
NOTE:
a lf necessary, replace any damaged clips.a Make sure the connectors are connected properly.
a Make sure the hatch locks securely.a Make sure the hatch opens properly.
a Adjust the hatch alignment (see page 20-148).
20-147