Page 9 of 225

o«8
Roadside repairs
Wheel changing
Some of the details shown horo will vary according to model. For Instance, the location of the spare wheel and jack is not the same on all cars. However, the basic principles apply to aii vehicles-
Preparation
• When a puncture occurs, stop as soon as it Is safe to do so. • Park on firm level ground. If possible, and v/etl out of the way of other traffic. • Use hazard warning lights if necessary.
Changing the wheel
A
Warning: Do not change a wheel (n a situation where you risk being hit by another vehicle. On busy roads, try to stop in a fay-by or a gateway. Be wary of passing traffic white changing the wheel - it Is easy to becomo distracted by the job in hand.
If you have one, use a warning triangle to alert other drivers of your presence. Apply the handbrake and engage first or reverse gear (or P on models with automatic transmission).
• Chock the wheel diagonally opposite the one being removed - a couple of largo stones will do for this. G If the ground is soft, use a flat piece of wood to spread the load under the iack.
I
Tbe spare wheel and tools (Including the jack) are stored
In
the luggage compartment beneath the floor covering. Unscrew the central plastic nut to remove the tool holder.
Slacken each wheel bolt by a half turn Locale the jack under the triangular mark on the 6)11 next to the wheel to be changed, on firm ground
4
Turn the Jack handle clockwise until the wheel Is raised clear of the ground Unscrew the wheel bolts, withdraw the trim and remove the whed
6
Fit Ihe spare wheel on the pins, and screw In the bolts. Lightly lighten tho bolts with the wheelbrace then lowor the vehicle to the ground
Finally...
Securely lighten the wheel bolts in Ihe sequence shown. Note that the wheel bolts should be slackened and retightened to the specified torque at the earliest possible opportunity.
• Remove l)>e wheel chocks.
• Stow the punctured wheel, jack and tools in the correct locations in the car. • Check the tyre pressure on the wheel just fitted. If it is low. or It you don't have a pressure gauge with you, drive slowly to the nearest garage and inflate the tyre to Ihe right pressure.
D When using tho space-saver spare wheel, do not exceed 50 mph (SO kph). C Have the damaged tyre or wheal repaired as soon as possible.
Page 10 of 225

Roadside repairs 0.9
Puddles on the garage floor or drive, or obvious wetness under the bonnet or underneath the car, suggest a leak that needs Investigating. It can sometimes be difficult to decide where the leak is coming from, especially if the engine bay is very dirty already. Leaking oil or fluid can also be blown rearwards by the passage of air under the car, giving a false impression of where the problem lies.
A
Warning: Most automotive oils and fluids aro poisonous. Wash them off skin, and change out of contaminated clothing, without delay.
Identifying leaks
The smell of 0 fluid leaking from the car may provide a clue to what's leaking. Some fluids are distinctively coloured. It may help to clean the car carefully and to park It over some clean paper overnight as an aid to locating the source of the leak. Remember that some leaks may only occur while the engine is running.
Sump oil
Engine oil may leak from the drain plug...
Antifreeze
Leaking antifreeze often leaves a crystalline oeposit like this.
Oil from filter
A leak occurring at a wheel Is almost certainly brake fluid.
Gearbox oil
Gearbox oil can leak from the seals at the inboard ends of the drivoshafts.
Power steering fluid
Power steering fluid may leak from the pipe connectors on the steering rack.
When ail else falls, you may llnd yourself having to get a tow home - or of course you may be helping somebody else. Long-distance recovery should only be done by a garage or breakdown service. For shorter distances. OIY towing using another car is easy enough, but observe the following points: • Use a proper tow-rope - they are not expensive. The vehicle being towed must display an ON TOW sign in its rear window. • Always turn the Ignition key to the ON position when the vehicle is being towed, so that the steering lock is released, and that the direction indicator and brake lights will work. • Only attach the tow-rope to the towing eyes provided.
• Before being towed, release the handbrake and select neutral on the transmission. • Note that greater-then-usual pedal pressure will be required to operate the brakes, since the vacuum servo unit is only operational with the engine running. • On models with power steering, greater-than-usual steering effort will also be required. • The driver of the car being towed must keep the tow-rope taut at all times to avoid snatching. • Make sure that both drivers know the route before setting off. • Only dnve at moderate speeds and keep the distance towed to a minimum. Drive smoothly and allow plenty of time for slowing down at junctions.
Towing
• On models with automatic transmission, special precautions apply(see Chapter 7B. Section 1). If In doubt, do not tow, or transmission damage may result. • The front towing eye is supplied as part of the tool kit stored in the luggage compart-ment. To fit the eye pnse out the plastic cover from the front or rear bumper using a screwdriver, then screw the eye onto the threaded pin as tightly as possible.
A
Warning: To prevent damage to the catalytic converter, e vehicle must not be push'started, or started by towing, when the engine is at operating temperature. Use jump leads (see Jump starting).
Page 11 of 225

do Weekly checks
Introduction
There are some very simple checks which need only take a few minutes to carry out, but which could save you a lot of inconvenience and expense.
These Weekly checks require no great skill or special lools, and the small amount of lime they take to perform could prove to be very well spent, for example;
P Keeping an eye on tyre condition and pressures, will not only help to stop them wearing out prematurely, but could also save your life.
C Many breakdowns are caused by electacai problems. Battery-relalod faults are particularly common, and a quick check on a regular basis will ofton prevent the majority of these.
• If your car develops a brake fluid teak, the first time you might know about it is when your brakes don't work properly. Checking the level regularly will give advance warning of this kind of problem.
• If the oil or coolant levels run low. the cost of repairing any engine damage will be far greater than fixing the leak, for example.
Underbonnet check points
4 1.1 litre petrol
A Engine oil level dipstick Q Engine oil filler cap C Cooteof expansion tank P Brake fluid reservoir E Screen washer fluid reservoir p Battery
< 1.2 litre
m (8-valve) petrol
^ 1 A Engine oII level dipstick
B Engine otl tiller cap
fi i: c Coolant expansion tank
D Brake fluid reservoir
E Screen washer fluid reservoir
F Battery
Page 12 of 225
Weekly checks o.n
Ulllllli
B
4 1.2 litre (16-valve) petrol
A Engine oil level dipstick
B Engine oil fitter cap 0 Coolant expansion tank D 8rake fluid reservoir £ Screen ivasfter fluid reservoir P Battery G Power steenng fluid reservoir
B
4
1.7 litre Turbo diesel
A Engine otl level dipstick B Engine oil filler cap Q Coolant expansion tank Q Brake fluid reservoir E Screen washer fluid reservoir F Battery
G Power steering fluid reservoir
Page 13 of 225

o*i2 Weekly checks
Engine oil level
Before you start • Make euro that your cor is on level ground. • Check ihe oil level oefore ihe cor is driven, or at least 5 minutes alter the engine has been switched off.
HHifffl If tho oil Is checked rTf"™^ Immediately after driving the IHlAIT vehicle,
some
of the oil will " remain In the upper engine components, resulting in on inaccurate reading on the dipstick!
The correct oil Modern engines place great demands on their oil. It Is very important that the correct oil for your car is used
Lubricants and fluids).
Car Care • If you have to add oil frequently, you should check whother you have any oil leaks. Place some clean paper under the car overnight, and check for stains In the morning. If there are no leaks, the engine may be burning oil.
• Always maintain the level between the upper and lower dipstick marks (see pholo 2). If Ihe level Is too low
sqvoio
engine damage may oecur. Oil seal failure may result if tho engine is overfilled by adding too much oil.
I
Tho dipstick is brightly coloured for easy identification (seo Under bonnet check points). Withdraw the dipstick (petrol engine shown).
3
If more oil is needed, remove the oil filler cap Irom the top of the ongine (petrol engine shown).
SI i J
2
Using a clean rag or paper towel remove all oil from the dipstick. Insert the clean dipstick into the tube as far as it will go, then withdraw it again. The level should be between the upper and lower marks.
4
Oil Is added through the filler cap aperture (diesel engine shown). Add the oil a little at a time, checking the level on the dipstick often. Using a funnel will help to reduce spillage. Don't overfill (see Car Care).
Coolant level
A
Warning: DO NOT attempt to remove the expansion tank pressure cap when the engine is hot, as there is a very great risk of scalding. Do not leave open containers of coo/ant about, as It is poisonous.
Car Care • With a sealed-type cooling system, adding coolant should not be necessary on a regular basis. If frequent topping-up is required, it is likely there Is a leak. Check the radiator, all hoses and Joint faces for signs of staining or wetness, and roctify as necessary.
• It is important that antifreeze is used in the cooling system all year round, not just during the winter months. Don't top-up with water alone, as the antifreeze will become too diluted.
H Check that the coolant level is between I the MIN and MAX marks, il topping up is necessary, wait until tho engine is cold. Slowly unscrew the expansion tank cap to release any pressure present in the cooling system, and remove it (petrol engine shown).
2
On diesel engine models, Ihe ooolant expansion tank is a different shape, but Ihe same procedure applies as for petrol engine models (see photo 1). Tho MlN and MAX marks appear on the side of tlie tank neorosl the engine.
3
Add a mixture of water and antifreeze to the expansion tank until the coolant level is up to the MAX mark (petrol engine shown), The MIN and MAX marks appear on the tank below the filler neck.
Page 14 of 225

Weekly checks 0.13
Brake fluid level
A
Warning: • Brake fluid can harm your eyes and damage painted surfaces, so use extreme caution when handling and pouting it.
• Do not use fluid that has been standing open for so mo time, as It absorbs moisture from the air, which can cause a dangerous loss of braking effectiveness.
Mpmna * Make sure that your car Is I on level ground. HiNTi * Th* ffftt 'eve/ In the reservoir will drop slightly as
I
The MIN and MAX marks are indicated on the side of Ihe reservoir The fluid level must be kept between the marks at all times.
2
11 topping-up is necessary, first wipe clean the area around the filler cap to prevent dirt entering the hydraulic system.
the brake pads wear down, but the fluid level must never be allowed to drop below the "MIN" mark.
Safety First! • If the reservoir requires repeated topping* up this is an indication of a fluid leak somev/here In the system, which should be investigated immediately.
• If a leak is suspected, the car should not be driven until the braking system has been checked. Never take any risks where brakes are concerned.
Unscrew the reservoir cap and carefully lift it out of position, taking care not to damage the level switch float. Inspect the reservoir: if the fluid Is dirty Ihe hydraulic system should be drained and refilled (see Chapter 1A or 1B).
4
Carefully add fluid, taking care not to spill it onto the surrounding components, Use only the specified fluid; mixing different types can cause damage to the system. After topping-up to the correct level, secureiy refit the cap and wipe off any spilt fluid.
Power steering fluid level
Before you start: •Park the vehicle on level ground. • Set the steering wheel straight-ahead. •
The
engine should be turned off.
I
The reservoir is located on the right-hand side of the bulkhead in the engine compartment. Wipe clean the area around the reservoir filler cap then unscrew It from the reservoir.
For the check to be accurate, the steering must HlHT; not be turned once the engine has been stopped.
2
Dip the fluid with the reservoir cap/ dipstick (do not screw the cap into position). When the engine is cold, the fluid level should be up to Ihe MIN mark (B): when hot. it should be on the MAX mark (A).
Safety First! • The need for frequent topping-up indicates a leak, which should be investigated immediately.
3
When topping-up, use the specified type of lluid and do noi overfill the reservoir. When the level is correct, securely refit the cap.
Page 15 of 225

o»i4 Weekly checks
Tyre condition and pressure
l( is very important that tyres are In good condition, and at the correct pressure - having a tyre (allure at any speed is highly dangerous. Tyre wear is influenced by driving style • harsh braking and acceleration, or fast cornering, will ail produce more rapid tyre wear. As a general rule, the front tyres wear out faster than the rears. Interchanging the tyres from front to rear ("rotating' the tyres) may result in more even wear. However, if this is completely effective, you may have the expense of replacing ail four tyres at once! Remove any nails or stones embedded In the tread before they penetrate the tyro to cause deflation. If removal of a nail does reveal that
r
the tyre has been punctured, refit the nail so (hat its point of penetration is marked. Then Immediately change the wheel, and have the tyre repaired by a tyre dealer. Regularly check the tyres for damage (n the form of cuts or bulges, especially in the sidewails. Periodically remove the wheels, and clean any dirt or mud from the Inside and outside surfaces. Examine the wheel rims for signs of rusting, corrosion or other damage, Light alloy wheels are easily damaged by •kerbing"1 whilst parking; steel wheels may also become dented or buckled. A new wheel Is very often the only way to overcome severe damage.
New tyres should be balanced when they are fitted, but it may become necessary to re-balance them as they wear, or if the balance weights fitted to the wheel rim should fall off. Unbalanced tyres will v/ear more quickly, as will the steering and suspension components. Wheel imbalance is normally signified by vibration, particularly at a certain speed (typically around 50 mph). If this vibration is fett only through the steering, then II Is likely that |ust the front wheels need balancing. H, however, the vibration is felt through the whole car. the rear wheels could be out of balance. Whoel balancing should be carried out by a tyre dealer or garage.
-j Tread Depth • visual check The original tyres have tread wear safety bands {8}, which wiU appear when the tread depth reaches approximately 1.6 mm. The band positions are indicated by a triangular mark on the tyre sidewail (A).
Tyre tread wear patterns
2 Tread Depth * manual check Alternatively, tread wear can be monitored with a simple, inexpensive device known as a tread depth indicator gauge.
2 Tyre Pressure Check Check the tyre pressures regularly with the tyres cold. Do not adjust the tyre pressures immediately alter the vehicle has been used, or an inaccurate setting will result Tyre pressures are shown on page 0*18.
Shoulder Wear Centre Wear Uneven Wear
Underinflatlon {wear an both sides) Under-lnflatton will cause overheating of the tyre, because the tyre will flex too much, and the tread will not sit correctly on the road surface. This will cause a loss of grip and excessive wear, not to mention the danger of sudden tyre failure due to heat build-up. Check and adjust pressures Incorrect wheel camber (wear on one side] Repair or renew suspension parts Hard cornering Reduce speed!
Overinflation Over-inflation will cause rapid wear of the centre part of the tyro tread, coupled with reduced grip, harsher ride, and the danger of shock damage occurring in the tyre casing. Check and adjust pressures
It you sometimes have (o inflate your car's tyres to the higher pressures specified tor maximum load or sustained high speed, don't forget to reduce the pressures to normal afterwards.
Front tyres may wear unevenly as a result of wheel misalignment. Most lyre dealers and garages can check and adjust the wheel alignment (or 'tracking") for a modest charge. Incorrect camber or castor Repair or renew suspension parts Malfunctioning suspension Repair or renew suspension parts Unbalanced wheel Balance tyres Incorrect toe setting Adjust front wheel alignment Note: The feathered edge of I he treed which typifies toe wear is best checked by feel.
Page 16 of 225

Weekly checks 015
Automatic transmission fluid level
Before you start: • Park the vohicle on level ground, and apply the handbrake firmly. Let the engine idle, and select P or N.
Safety First! • The need for frequent topping-up indicates a leak, which should bo Investigated immediately.
I
Open the bonnet. Withdraw the trans-mission dipstick, and wipe it with a clean non-fluffy rag. Re-Insert the dipstick fully, withdraw it again and read the fluid level. II should be between (he two level marks. There are two sets of marks. Use the COOL marks if the transmission is cold (20" to 40°C) or the HOT marks if it Is hot (60" to 809C).
2
If topping up fs necessary, add the specified fluid via the dipstick tube, using a funnel with a fine mesh filter. Take great care nol to introduce dirt into the transmission.
Screen washer fluid level
Screenwash additives not only keep the wlnscreen clean during foul weather, they also prevent the washer system freezing kn cold weather • which is when you are likely to need it most. Don't top up using plain water as the screenwash will become too diluted, and will freeze during cold weather. On no account use coolant antifreeze In the washer system • this could discolour or damage paintwork.
3H
m
I
The screen washer fluid reservoir is located on the left-hand side of the engine compartment, next to the battery. Prise off the cap and pull out the telescopic filler.
2
When topping-up the reservoir, add a screenwash additive In the quantities recommended on the bottle. Use of a funnel wilt prevent spillage.
Wiper blades
1
Check the condition of the wiper blades; if they are cracked or show any signs of deterioration, or if the glass swept area is smeared, renew them. Wiper blades should be renewed annually. Don't forget to check the tailgate wiper as well.
2
To remove a wiper blade, pull the arm fully away from the screen until It locks. Swivel the blade through 90", press the locking tab with your fingers and slide the blade out of the arm's hooked end.
 1
1 2
2 3
3 4
4 5
5 6
6 7
7 8
8 9
9 10
10 11
11 12
12 13
13 14
14 15
15 16
16 17
17 18
18 19
19 20
20 21
21 22
22 23
23 24
24 25
25 26
26 27
27 28
28 29
29 30
30 31
31 32
32 33
33 34
34 35
35 36
36 37
37 38
38 39
39 40
40 41
41 42
42 43
43 44
44 45
45 46
46 47
47 48
48 49
49 50
50 51
51 52
52 53
53 54
54 55
55 56
56 57
57 58
58 59
59 60
60 61
61 62
62 63
63 64
64 65
65 66
66 67
67 68
68 69
69 70
70 71
71 72
72 73
73 74
74 75
75 76
76 77
77 78
78 79
79 80
80 81
81 82
82 83
83 84
84 85
85 86
86 87
87 88
88 89
89 90
90 91
91 92
92 93
93 94
94 95
95 96
96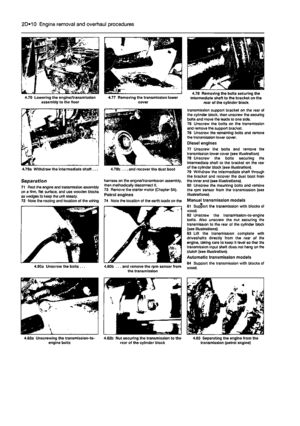 97
97 98
98 99
99 100
100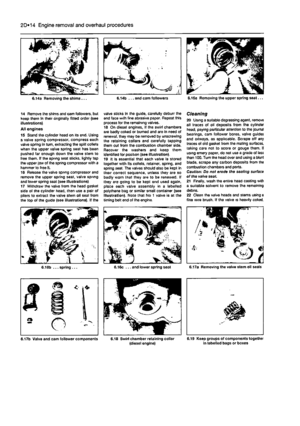 101
101 102
102 103
103 104
104 105
105 106
106 107
107 108
108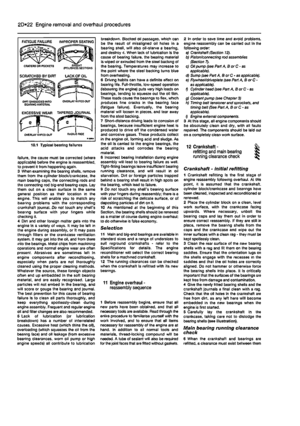 109
109 110
110 111
111 112
112 113
113 114
114 115
115 116
116 117
117 118
118 119
119 120
120 121
121 122
122 123
123 124
124 125
125 126
126 127
127 128
128 129
129 130
130 131
131 132
132 133
133 134
134 135
135 136
136 137
137 138
138 139
139 140
140 141
141 142
142 143
143 144
144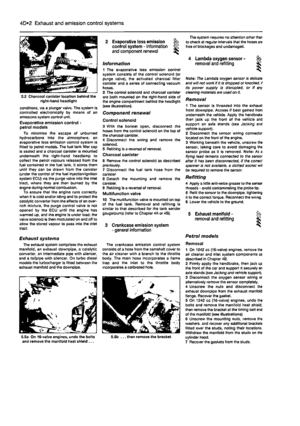 145
145 146
146 147
147 148
148 149
149 150
150 151
151 152
152 153
153 154
154 155
155 156
156 157
157 158
158 159
159 160
160 161
161 162
162 163
163 164
164 165
165 166
166 167
167 168
168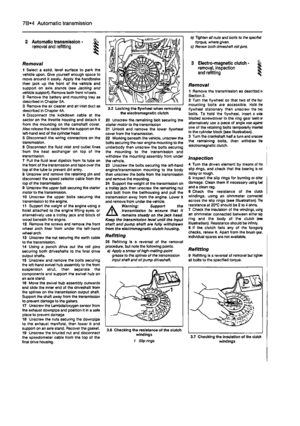 169
169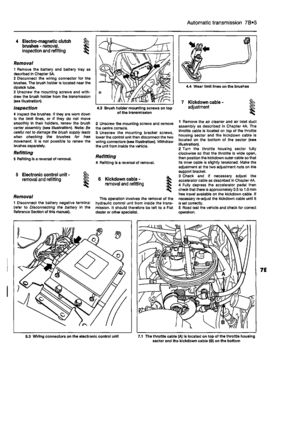 170
170 171
171 172
172 173
173 174
174 175
175 176
176 177
177 178
178 179
179 180
180 181
181 182
182 183
183 184
184 185
185 186
186 187
187 188
188 189
189 190
190 191
191 192
192 193
193 194
194 195
195 196
196 197
197 198
198 199
199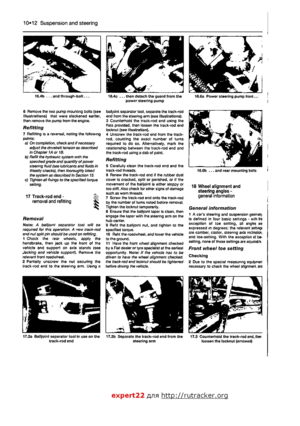 200
200 201
201 202
202 203
203 204
204 205
205 206
206 207
207 208
208 209
209 210
210 211
211 212
212 213
213 214
214 215
215 216
216 217
217 218
218 219
219 220
220 221
221 222
222 223
223 224
224 petrol
A Engine oil level dipstick
B Engine oil fitter cap 0 Coolant expansion tank D 8rake fluid reservoir £ Screen ivasfter fluid reservoir")