1994 CHEVROLET CORVETTE engine oil
[x] Cancel search: engine oilPage 212 of 274
Downloaded from www.Manualslib.com manuals search engine 0 Use solvent-type cleaners in a
well-ventilated area only. If you use
them, don’t saturate the stained area.
If a ring forms after spot cleaning,
clean the entire area immediately or it
will set.
Using Foam-Type Cleaner on Fabric
Vacuum and brush the area to remove
any loose dirt.
Always clean a whole trim panel or
section. Mask surrounding trim along
stitch or welt lines.
Mix Multi-Purpose Powdered Cleaner
following the directions on the
container label.
Use suds only and apply with a clean
sponge.
Don’t saturate the material.
Don’t rub it roughly.
As soon as you’ve cleaned the section,
use a sponge to remove the suds.
Rinse the section with a clean, wet
sponge.
Wipe
off what’s left with a slightly
damp paper towel or cloth.
Then dry it immediately with a blow
dryer or a heat lamp.
I NOTICE:
I
Be careful with a hair dryer or heat
lamp. You could scorch the fabric.
Wipe with a clean cloth.
Using Solvent-Type Cleaner on Fabric
First, see if you have to use solvent-type
cleaner at all. Some spots and stains will
clean
off better with just water and mild
soap.
If you need to use a solvent:
0
0 Gently scrape excess soil from the
trim material with a clean, dull knife
or scraper. Use very little cleaner, light
pressure and clean cloths (preferably
cheesecloth). Cleaning should start at
the outside of the stain, “feathering”
toward the center. Keep changing to a
clean section of the cloth.
When you clean a stain from fabric,
immediately dry the area with an air
hose, hair dryer, or heat lamp to help
prevent a cleaning ring. (See the
previous NOTICE.)
Fabric Protection
Your Corvette has upholstery and carpet
that has been treated with Scotchgard”
Fabric Protector, a 3M product.
Scotchgard
” protects fabrics by repelling
oil and water, which are the carriers of
most stains. Even with this protection,
you still need to clean your upholstery
often to keep it looking new.
Further information on cleaning is
available by calling 1-800-433-3296
(in Minnesota, 1-800-642-6167).
Special Cleaning Problems
Greasy or oily stains:
Such as grease,
oil, butter, margarine, shoe polish, coffee
with cream, chewing gum, cosmetic
creams, vegetable oils, wax crayon, tar
and asphalt.
Carefully scrape
off excess stain.
Follow the solvent-type instructions
described earlier.
Shoe polish, wax crayon, tar and
asphalt will stain if left on a vehicle
seat fabric. They should be removed
as soon as possible. Be careful,
because the cleaner will dissolve them
and may cause them to spread.
211 ...
Page 213 of 274
Downloaded from www.Manualslib.com manuals search engine Service and Appearance Care
Non-greasy stains: Such as catsup,
coffee (black), egg, fruit, fruit juice, milk,
soft drinks, wine, vomit, urine and blood.
Carefully scrape off excess stain, then
sponge the soiled area with cool water.
0 If a stain remains, follow the
foam-type instructions described
earlier.
0 If an odor lingers after cleaning
vomit or urine, treat the area
with
a waterbaking soda solution:
1 teaspoon (5 ml) of baking soda to
1 cup (250 ml) of lukewarm water.
solvent-type cleaner.
0 If needed, clean lightly with
Combination stains: Such as candy,
ice cream, mayonnaise, chili sauce and
unknown stains.
0 Carefully scrape off excess stain, then
clean with cool water and allow to dry.
0 If a stain remains, clean it with
solvent-type cleaner.
Cleaning Vinyl
Use warm water and a clean cloth.
0 Rub with a clean, damp cloth to
remove dirt.
You may have to do it
more than once.
. . .212
0 Things like tar, asphalt and shoe
polish will stain if you don’t get them
off quickly. Use a clean cloth and
solvent-type vinyl cleaner.
Cleaning Leather
Use a soft cloth with lukewarm water and
a mild soap or saddle soap.
For stubborn stains, use a mild
solution of
10% isopropyl alcohol
(rubbing alchohol) and
90% water.
Never use oils, varnishes,
solvent-based or abrasive cleaners,
furniture polish or shoe polish on
leather.
Soiled leather should be cleaned
immediately. If dirt is allowed to work
into finish, it can harm the leather.
Cleaning Soft-Touch Surfaces
Use only mild soap and water to clean the
Soft-Touch paint surfaces in your
Corvette. For protection, use ArmorAll8
or equivalent.
Cleaning the Top of the Instrument
Panel
Use only mild soap and water to clean the
top surfaces of the instrument panel. Sprays containing silicones or waxes
may
cause annoying reflections in the
windshield and even make it difficult to
see through the windshield under certain conditions.
Cleaning Speaker Covers
Vacuum around a speaker cover gently,
so that the speaker won’t be damaged. If
something gets on one of them, follow the
steps under “Using Solvent-Type Cleaner
on Fabric.” Use as little solvent as you
can.
Care of Safety Belts
Keep belts clean and dry.
Page 214 of 274
Downloaded from www.Manualslib.com manuals search engine Glass
Glass should be cleaned often. GM Glass
Cleaner (GM Part
No. 1050427) or a
liquid household glass cleaner will
remove normal tobacco smoke and dust
films.
Don’t use abrasive cleaners on glass,
because they may cause scratches. Avoid
placing decals on the inside rear window,
since they may have to be scraped
off
later. If abrasive cleaners are used on the
inside of the rear window, an electric
defogger element may be damaged. Any
temporary license should not be attached
across the defogger grid.
Cleaning Dulso-Coated Moldings
These moldings are around the hatch
opening in your Corvette’s rear area.
When lightly soiled, wipe with a
sponge or
soft lint-free cloth
dampened with water.
water.
When heavily soiled, use warm soapy
You can remove scratches from a
Dulso-coated molding by wiping briskly
with the solvent-type cleaner described
earlier. If a ring forms, repeat the procedure
over a larger area, feathering
toward the center of the ring. If the ring
still remains, wipe the whole molding.
Cleaning the Outside of the Windshield
and Wiper Blades
If the windshield is not clear after using
the windshield washer, or if the wiper
blade chatters when running, wax or other
material may be on the blade or
windshield.
Clean the outside of the windshield with
GM Windshield Cleaner, Bon-Ami
Powder@
(GM Part No. 1050011). The
windshield is clean
if beads do not form
when you rinse it with water.
If you use a glass treatment or conditioner
containing ethyl alcohol or ethyl sulfate
on your glass, be sure to remove the
acrylic roof panel, if
so equipped. These
products may damage the panel.
Clean the blade by wiping vigorously
with a cloth soaked in full strength
windshield washer solvent. Then rinse the
blade with water.
Wiper blades should be checked on a
regular basis and replaced when worn.
Cleaning a Removable Roof Panel
Special care is necessary when cleaning,
removing and/or storing the roof panel.
Flush with water to remove dust and
dirt, then dry the panel.
Cleaner (GM Part
No. 1050427) or
a liquid household glass cleaner.
Leave the cleaner on the panel for
one minute, then wipe the panel with
a
soft, lint-free cloth.
Clean the panel with GM Glass
Don’t use abrasive cleaning materials.
If water drops are frequently allowed to
dry on the roof panel, impurities in the
water will adhere to the top, These
impurities may destroy the finish. When
the panel gets wet, you should dry it
off.
Do not use a glass treatment or
conditioner containing ethyl alcohol
or ethyl sulfate on the roof panel.
These products may damage the
panel.
213..
Page 216 of 274
Downloaded from www.Manualslib.com manuals search engine To protect the convertible top:
0 After you wash the vehicle, make sure
the top is completely dry before you
lower it.
0 Don’t get any cleaner on the vehicle’s
painted finish; it could leave streaks.
0 If you decide to go through an
automatic car wash, ask the manager
if the equipment could damage your
top.
Cleaning and Storage of Your Hardtop
The optional hardtop has the same
durable finish as the painted surfaces
of
your Corvette. You can wash, polish and
wax it.
If you store the hardtop for a long time,
keep it covered in a dry place. Apply
silicone grease to all the weatherstrips.
Sngine Cleaning
Jse care when cleaning the LT5 engine.
10 not direct water into the “V” area on
he engine between the cylinder heads.
NOTICE:
I
Don’t use a cleaner with a strong
alkaline base. It will discolor the
aluminum.
4luminum Wheels
Your aluminum wheels have a protective
zoating similar to the painted surface of
your vehicle. Don’t use strong soaps,
shemicals, chrome polish,
or other
abrasive cleaners on them because you
could damage this coating. After rinsing
thoroughly, a wax may be applied.
I NOTICE:
I
Don’t use an automatic car wash that
has hard silicon carbide cleaning
brushes. These brushes can take
off
the protective coating.
rires
Your Chevrolet dealer has a GM White
Sidewall Tire Cleaner. You can
use a stiff
)rush with the cleaner.
When applying a tire dressing always take
;are to wipe
off any overspray or splash
from painted surfaces. Petroleum-based
products may damage the paint finish.
Weatherstrips
Silicone grease on weatherstrips will
make them last longer, seal better, and not
stick or squeak. Apply silicone grease
with a clean cloth at least every
six
months. During very eold, damp weather
more frequent application may be
required. (See “Recommended Fluids and
Lubricants’’ in the Index.)
Foreign Material
Calcium chloride and other salts, ice
melting agents, road oil and tar, tree sap,
bird droppings, chemicals from industrial
chimneys, and other foreign matter can
damage your vehicle’s finish if they
remain on painted surfaces. Use cleaners
that are marked safe for painted surfaces
to remove foreign matter.
215 ...
Page 221 of 274

Downloaded from www.Manualslib.com manuals search engine Service and Appearance Care
I EoA7 I
POWER WINDOW
lu
D
.
Instrument Panel Fuse Block
1 - A/C Module (5 Amp)
2 - Blank
3 - Windshield WiperNVasher Switch
4 - Radio Receiver Box (Ignition)
5 - Heated Mirrors (5 Amp.)
6 - Taillight, Daytime Running Lights
Module (15 Amp.)
Assembly
(30 Amp.)
(5 Amp.)
7 - Horn Relay
(15 Amp.)
*Export Horn
(20 Amp.)
8 - Hazard Flashers; Brake Switch
(20 Amp.)
9 - Crank-Air Bag (5 Amp.)
10 - Crank-Parmeutral Shitch
(Automatic); Clutch (Manual)
(5 Amp.)
11 - RH Illumination (5 Amp.)
12 - LH Illumination (5 Amp.)
13 - Console Illumination (5 Amp.)
14 - Fuel Pump 1 (10 Amp.)
15 - Fuel Pump 2 (LT5) (IO Amp.)
16 - Central Control Module; Daytime
Running Lights Module
(5 Amp.)
17 - Generator; Vacuum Pump (LT5);
Valet Mode (LT5); EGR Circuit
(LT5); Oxygen Sensors (LT5)
(10 Amp.)
and A/C Control Head; Heater and
A/C Programmer; Rear Defog
Relay
(10 Amp.)
19 - Utility Plug (15 Amp.)
20 - Heated Oxygen Sensors (LT1)
(15 Amp.)
21 - Fuel Pump Relay Coil #2 (LT5);
Selective Ride Control Module;
ABS Module; Transmission Clutch
Control Switch (Automatic);
Air Pump Relay; Diverter Valve;
Secondary Bypass Valve (LT5)
(10 Amp.)
22 - Injectors #1,4,6,7 (LT1); Primary
Injectors #1-8 (LT5); Ignition Coil
Module (LT5); Ignition Coil Plate
Connector (LT5) (10 Amp.)
18 - A/C Compressor Clutch; Heater
. . .220
Page 222 of 274

Downloaded from www.Manualslib.com manuals search engine 23 - Injectors #2, 3, 5, 8 (LTI);
Secondary Injector Relays (#1,2
(LT5); Secondary SF1 Control
Modules (LT5)
(10 Amp.)
24 - Turn Signal Flashers (10 Amp.)
25 - Ignition Coil and Ignition Coil
26 - Passive Keyless Entry Module
27 - Instrument Cluster; Driver Module (10 Amp.)
(5 Amp.)
Information Center; Air Bag Derm; Acceleration Slip Regulation
Switch
(15 Amp.)
Transmission Position Switch; One
to Four Shift Solenoid
(10 Amp.)
29 - Primary Cooling Fan Relay Coil;
Secondary Cooling Fan Relay Coil
28 - Backup Lights Switch;
(5 Amp.)
30 - Direct Ignition Module; Camshaft Sensor; Canister Purge Solenoid;
Throttle Position Sensor Buffer
Module; EGR Circuit (LT1);
31
32
Secondary Air Inlet Solenoid
(LT5); Electronic Ignition Control
Module (LT5); One to Four Shift
Relay
( 10 Amp.)
Power Mirror Adjuster Control;
Lighted Rearview Mirror; Visor
Vanity Mirrors
(5 Amp.)
Cruise Control Engage Switch;
Daytime Running Lights Module;
Low Tire Pressure Warning
Module
(5 Amp.)
33 - Engine Control Module (5 Amp.)
34 - Air Bag System (15 Amp.)
35 - Central Control Module (5 Amp.)
36 - Footwell Courtesy Lights; Door
Courtesy Lights; Glove
Compartment Lights; Lighted
Rearview Mirror
(5 Amp.)
37 - Bose Amplifier Relay; Power
Antenna Relay; Cargo
Compartment Lights
(20 Amp.)
Relay
(5 Amp.)
38 - LCD; Tone Generator; Dome Light
39 - Central Control Module (5 Amp.)
40 - Radio Receiver Box (Battery);
Radio Control Head; Passive
Keyless Entry Module
(5 Amp.)
41 - Sport Seat (10 Amp.)
42 - Power Door Lock Switches; Driver
Information Center; Passive
Keyless Entry Module
(20 Amp.)
43 - A/C Programmer (5 Amp.)
44 - Cigar Lighter; Accessory Plug
45 - Hatch or Deck Lid Release Relay
K - Power Seats (30 Amp. Circuit
L - Blank
M - Power Windows (30 Amp: Circuit
N - Blank
P - Blank
(15 Amp.)
(25 Amp.)
Breaker)
Breaker)
221 . I
Page 226 of 274
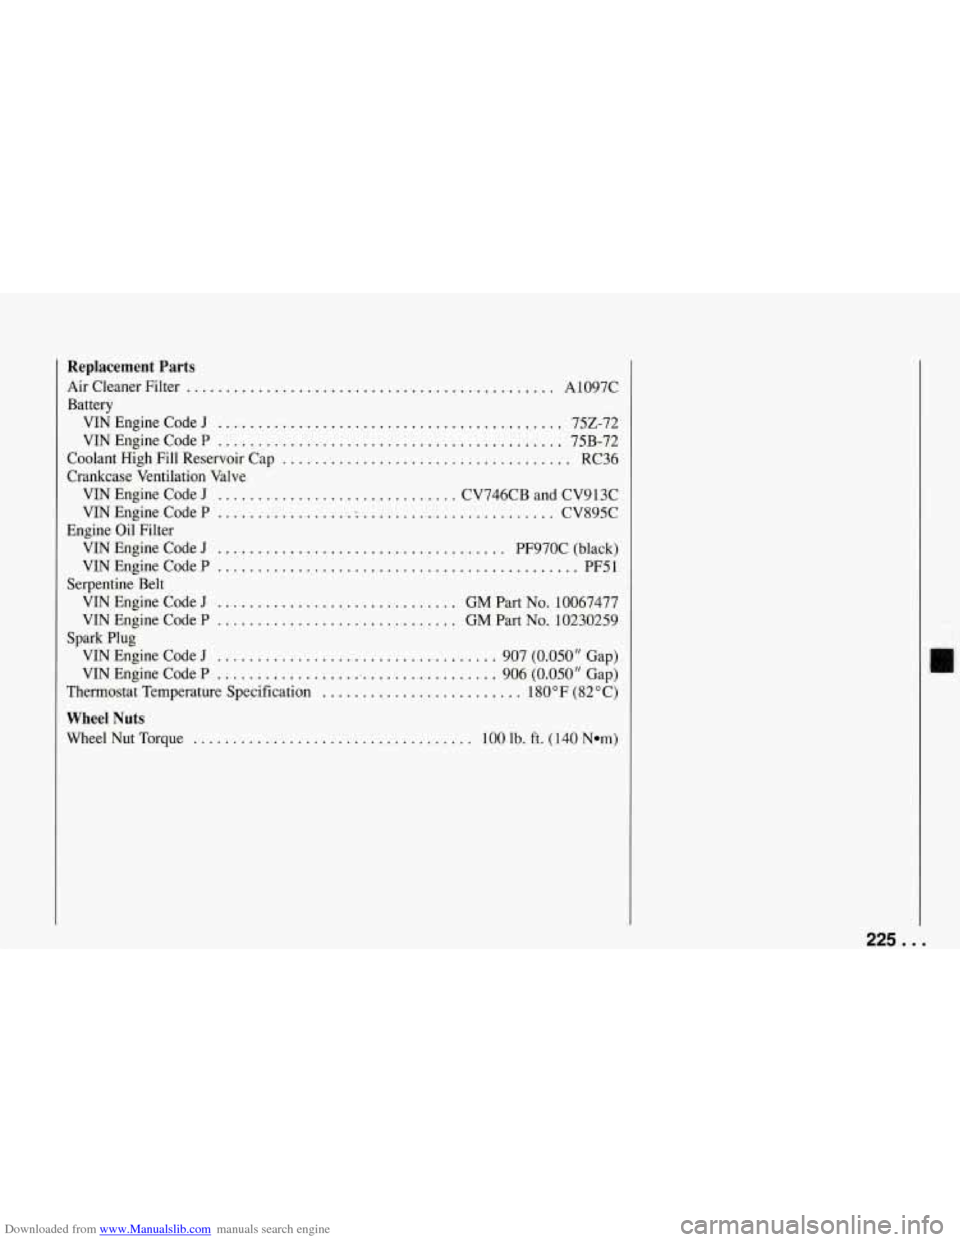
Downloaded from www.Manualslib.com manuals search engine Replacement Parts
AirCleanerFilter .............................................. A1097C
Battery VINEngineCodeJ
........................................... 752-72
VIN Engine Code P
........................................... 75B-72
Coolant High Fill Reservoir Cap
.................................... RC36
Crankcase Ventilation Valve VIN Engine Code J
.............................. CV746CB and CV9 13C
VIN Engine Code P
................. : ........................ CV895C
VIN Engine Code
J .................................... PF970C (black)
VINEngineCodeP
............................................. PF51
VIN Engine Code J
.............................. GM Part No. 10067477
VIN Engine Code P
.............................. GM Part No. 10230259
VIN Engine Code
J ................................... 907 (0.050" Gap)
VIN Engine Code P
.................................... 906 (0.050" Gap)
Thermostat Temperature Specification
......................... 1 80 "F (82 O C)
Wheel Nuts
Wheel Nut Torque ................................... 100 lb. ft. ( 140 Nam)
Engine Oil Filter
Serpentine Belt
Spark Plug
225. ..
Page 230 of 274
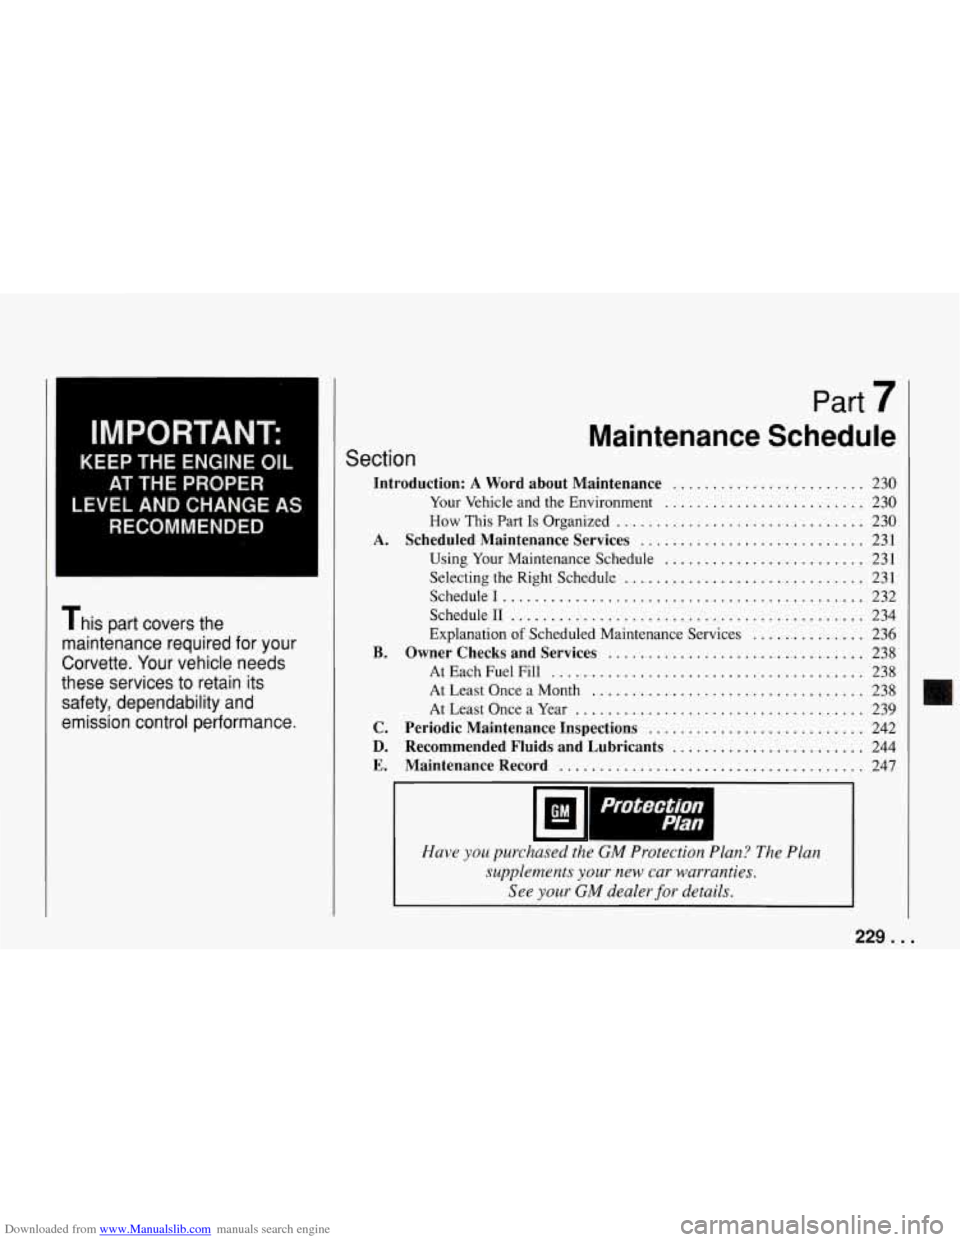
Downloaded from www.Manualslib.com manuals search engine IMPORTANT:
KEEP THE ENGINE OIL
AT THE PROPER
LEVEL AND CHANGE AS
RECOMMENDED
This part covers the
maintenance required for your
Corvette
. Your vehicle needs
these services to retain its
safety. dependability and
emission control performance
.
.
Maintenance Schedule
Section
Introduction: A Word about Maintenance ........................ 230
A .
B .
C .
D .
E .
Your Vehicle and the Environment ......................... 230
How This Part Is Organized ............................... 230
Scheduled Maintenance Services ............................ 231
Using Your Maintenance Schedule
......................... 231
Selecting the Right Schedule
.............................. 231
Schedule1
............................................. 232
Schedule11
............................................ 234
Explanation
of Scheduled Maintenance Services .............. 236
Owner Checks and Services ................................ 238
At Each Fuel
Fill ....................................... 238
AtLeastOnceaMonth
.................................. 238
At Least Once
a Year .................................... 239
Periodic Maintenance Inspections ........................... 242
Recommended Fluids and Lubricants ........................ 244
Maintenance Record ...................................... 247
I
Protection
Plan
Have you purchased the GM Protection Plan? The Plan
supplements your new car warranties
.
See your GM dealer for details .
229 ...