1994 CADILLAC SEVILLE brakes
[x] Cancel search: brakesPage 213 of 399
Downloaded from www.Manualslib.com manuals search engine Most of the time, those places where your tires meet the road probably
have good traction.
However, if there is snow or ice between your tires and the road, you can
have a very slippery situation. You’ll have
a lot less traction or “grip” and
will need to be very careful.
What’s the worst time for this? “Wet ice.” Very cold snow or ice can be
slick and hard to drive on. But wet
ice can be even more trouble because
it may offer the least traction
of all. You can get “wet ice” when it’s about
freezing
(32’F; O°C) and freezing rain begins to fall. Try to avoid driving
on wet
ice until salt and sand crews can get there.
Whatever the condition
-- smooth ice, packed, blowing or loose snow --
drive with caution.
If you have the traction control system, it will improve your ability to
accelerate when driving on a slippery road. Even though your vehicle has
a traction control system, you’ll want to slow down and adjust your
driving to the road conditions. See “Traction Control System” in the
Index.
Your anti-lock brakes improve your ability to make a hard stop on a
slippery road. Even though you have the anti-lock braking system, you’ll
want
to begin stopping sooner than you would on dry pavement. See
“Anti-lock” in the Index.
e Allow greater following distance on any slippery road.
Watch for slippery spots. The road might be fine until you hit a spot
that’s covered with ice. On an otherwise clear road, ice patches may
appear in shaded areas where the sun can’t reach: around clumps of
trees, behind buildings, or under bridges. Sometimes the surface
of a
curve or an overpass may remain icy when the surrounding roads are
clear. If you see a patch of ice ahead
of you, brake before you are on
it. Try not to brake while you’re actually on the ice, and avoid sudden
steering maneuvers.
200
Page 219 of 399
Downloaded from www.Manualslib.com manuals search engine when you remove the hitch. If you don’t seal them, deadly carbon
monoxide (CO) from your exhaust can get into your vehicle (see
Index under “Carbon Monoxide”). Dirt and water can, too.
NOTICE:
-
The bumpers on your vehicle are not intended for hitches. Do
not attach rental hitches or other bumper-type hitches to them. I-
Safety Chains
You should always attach chains between your vehicle and your trailer.
Cross the safety chains under the tongue-of the trailer so that the tongue
will not drop to the road if it becomes separated from the hitch. Follow
the manufacturer’s recommendation for attaching safety chains. Always
leave just enough slack
so you can turn with your rig. And, never allow
safety chains
to drag on the ground.
Trailer Brakes
Be sure to read and follow the instructions for the trailer brakes so you’ll
be able to install, adjust and maintain them properly.
Driving with a Trailer
Towing a trailer requires a certain amount of experience. Before setting
out for the open road, you’ll want to get to know your rig. Acquaint
yourself with the feel
of handling and braking with the added weight of
the trailer. And always keep in mind that the vehicle you are driving is
now a good deal longer and not nearly
so responsive as your vehicle is by
itself.
Before you start, check the trailer hitch and platform, safety chains,
electrical connector, lights, tires and mirror adjustment. If the trailer has
electric brakes, start your vehicle and trailer moving and then apply the
trailer brake controller
by hand to be sure the brakes are working. This
lets you check your electrical connection at the same time.
206
Page 220 of 399
Downloaded from www.Manualslib.com manuals search engine During your trip, check occasionally to be sure that the load is secure,
and that the lights and any trailer brakes are still working.
Following Distance
Stay at least twice as far behind the vehicle ahead as you would when
driving your vehicle without a trailer. This can help you avoid situations
that require heavy braking,and sudden turns.
Passing
You’ll need more passing distance up ahead when you’re towing a trailer.
And, because you’re a good deal longer, you’ll need to go much farther
beyond the passed vehicle before you can return to your lane.
Backing Up
Hold the bottom of the steering wheel with one hand. Then, to move the
trailer to the left, just move that hand to the left. To move the trailer to
the right, move your hand
to the right. Always back up slowly and, if
possible, have someone guide you.
Making Turns
When you’re turning with a trailer, make wider turns than normal. Do
this so your trailer won’t strike soft shoulders, curbs, road signs, trees, or
other objects. Avoid jerky or sudden maneuvers. Signal well in advance.
Turn Signals When Towing a Trailer
When you tow a trailer, your vehicle has to have a different turn signal
flasher and extra wiring. The green arrows on your instrument panel will
flash whenever you signal a turn or lane change. Properly hooked up, the
trailer lights will also flash, telling
other drivers you’re about to turn,
change lanes or stop.
When towing
a trailer, the green arrows on your instrument panel will
flash for turns even if the bulbs on the trailer are burned out. Thus, you
may think drivers behind you are seeing your signal when they are not.
It’s important to check occasionally to be sure the trailer bulbs are still
working.
207
Page 221 of 399
Downloaded from www.Manualslib.com manuals search engine Driving On Grades
Reduce speed and shift to a lower gear before you start down a long or
steep downgrade.
If you don’t shift down, you might have to use your
brakes
so much that they would get hot and no longer work well.
On a long uphill grade, shift down and reduce your speed to around 45 mph
(70 km/h) or less to reduce the possibility of engine and transaxle overheating.
If your trailer weighs more than 1,000 pounds (450 Kg) and you have an
automatic transaxle with Overdrive, you may want to drive in
66 3 ¶? instead
of Overdrive
Parking on Hills
You really should not park your vehicle, with a trailer attached, on a hill.
If something goes wrong, your rig could start to move. People can be
injured, and both your vehicle and the trailer can be damaged.
But
if you ever have to park your rig on a hill, here’s how to do it:
Apply your regular brakes, but do not shift into “P” (Park).
Have someone place chocks under the trailer wheels.
When the wheel chocks are in place, release the regular brakes until
0 Reapply the regular brakes. Then shift into “P” (Park) firmly and
the
chocks absorb the load.
apply your parking brakes.
Release the regular brakes.
when You Are Ready to Leave A@er Parking on a Hill
1. Apply your regular brakes and hold the pedal down while you:
Start your engine;
Shift into a gear; and
0 Be sure the parking brake has released.
2. Let up on the brake pedal.
3. Drive slowly until the trailer is clear of the chocks.
4. Stop and have someone pick up and store the chocks.
208
Page 285 of 399
Downloaded from www.Manualslib.com manuals search engine BRAKES
Brake Master Cylinder
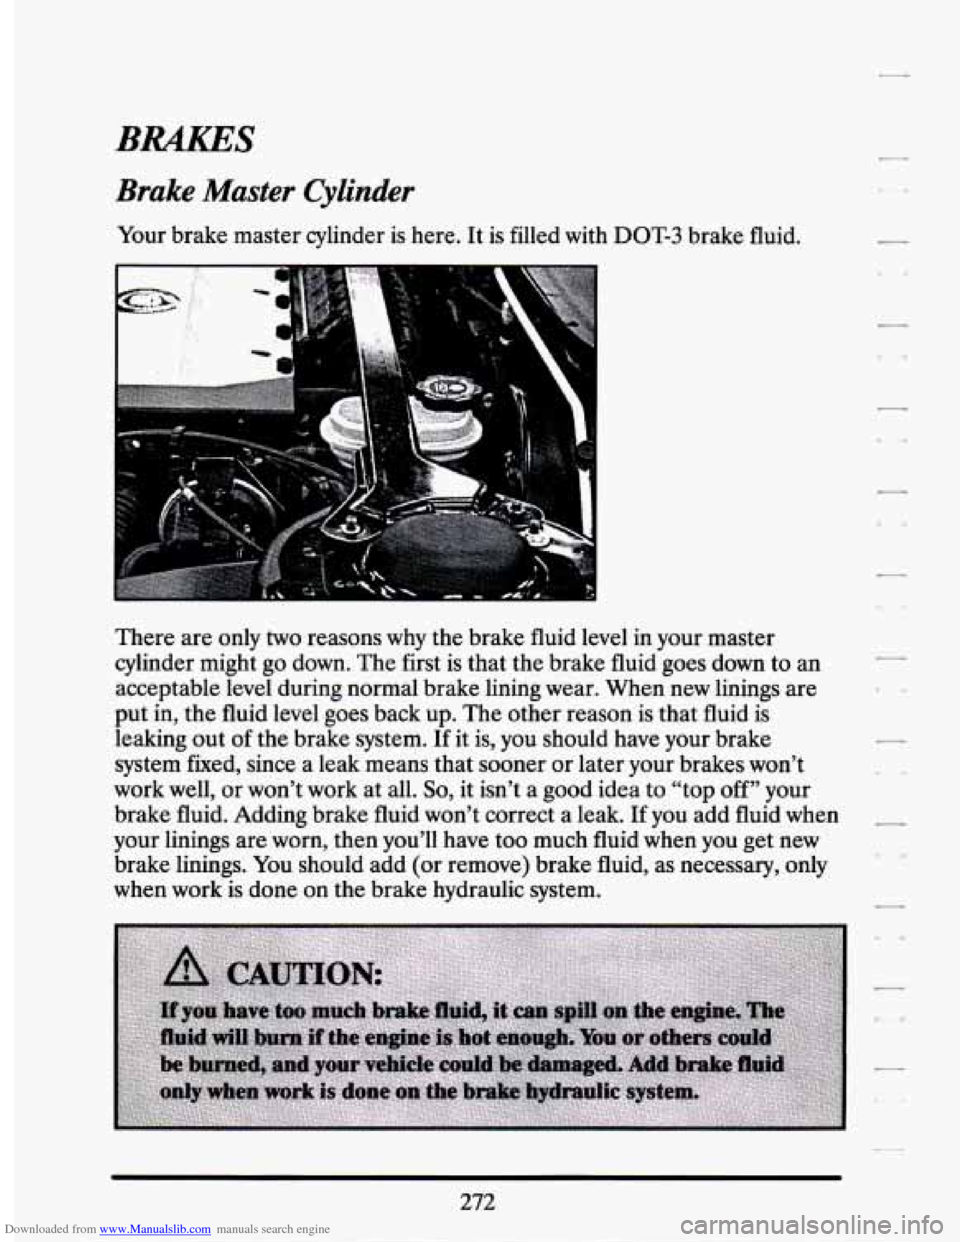
Your brake master cylinder is here. It is filled with DOT-3 brake fluid.
There are only
two reasons why the brake fluid level in your master
cylinder might go down. The first
is that the brake fluid goes down to an
acceptable level during normal brake lining wear. When new linings are
put in, the fluid level goes back up. The other reason is that fluid is
leaking out of the brake system.
If it is, you should have your brake
system fixed, since a leak means that sooner or later your brakes won’t
work well, or won’t work at all.
So, it isn’t a good idea to “top off’ your
brake fluid. Adding brake fluid won’t correct a leak. If you add fluid when
your linings are worn, then you’ll have too much fluid when you get new
brake linings. You should add (or remove) brake fluid, as necessary, only
when work is done on the brake hydraulic system.
272
Page 287 of 399
Downloaded from www.Manualslib.com manuals search engine NOTICE:
0
0
0
DOT4 silicone brake fluid can damage your vehicle. Don’t
use it.
Don’t let someone put in the wrong kind
of fluid. For
example, just
a few drops of mineral-based oil, such as
engine oil, in your brake system can damage brake system
parts
so badly that they’ll have to be replaced.
Brake fluid can damage paint,
so be careful not to spill brake
fluid on your vehicle.
If you do, wash it off immediately. See
“Appearance Care” in the Index.
Brake Wear
Your Cadillac has four-wheel disc brakes.
Disc brake pads have built-in wear indicators that make a high-pitched
warning sound when the brake pads are worn and
new pads are needed.
The sound may come and
go or be heard all the time your vehicle is
moving (except when you are pushing on the brake pedal firmly).
NOTICE:
Continuing to drive with worn-out brake pads could result in
costly brake repair.
274
Page 288 of 399
Downloaded from www.Manualslib.com manuals search engine Some driving conditions or climates may cause a brake squeal when the
brakes are first applied or lightly applied. This does not mean something
is wrong with your brakes.
Brake linings should always be replaced as complete
axle sets.
Brake Pedal Travel
See your dealer if the brake pedal does not return to normal height, or if
there is a rapid increase in pedal travel. This could be a sign of brake
trouble.
Brake Adjustment
Every time you make a moderate brake stop, your disc brakes adjust for
wear. If you rarely make a moderate or heavier stop, then your brakes
might not adjust correctly.
If you drive in that way, then -- very carefully --
make a few moderate brake stops about every 1000 miles (1600 km), so
your brakes will adjust properly.
Replacing Brake System Parts
The braking system on a modern vehicle is complex. Its many parts have
to be of top quality and work well together if the vehicle is to have really
good braking. Vehicles we design and test have top-quality
GM brake
parts in them, as your Cadillac does when it is
new. When you replace
parts
of your braking system -- for example, when your brake linings wear
down and you have to have new ones put in
-- be sure you get new
genuine
GM replacement parts. If you don’t, your brakes may no longer
work properly. For example,
if someone puts in brake linings that are
wrong for your vehicle, the balance between your front and rear brakes
can change, for the worse. The braking performance you’ve come to
expect can change in many other ways if someone puts in the wrong
replacement brake parts.
BATTERY
Every new Cadillac has a Delco Freedom@ battery. You never have to
add water to one
of these. When it’s time for a new battery, we
recommend a Delco Freedom@ battery. Get one that has the catalog
number shown on the original battery’s label.
275
Page 326 of 399
Downloaded from www.Manualslib.com manuals search engine 60A I
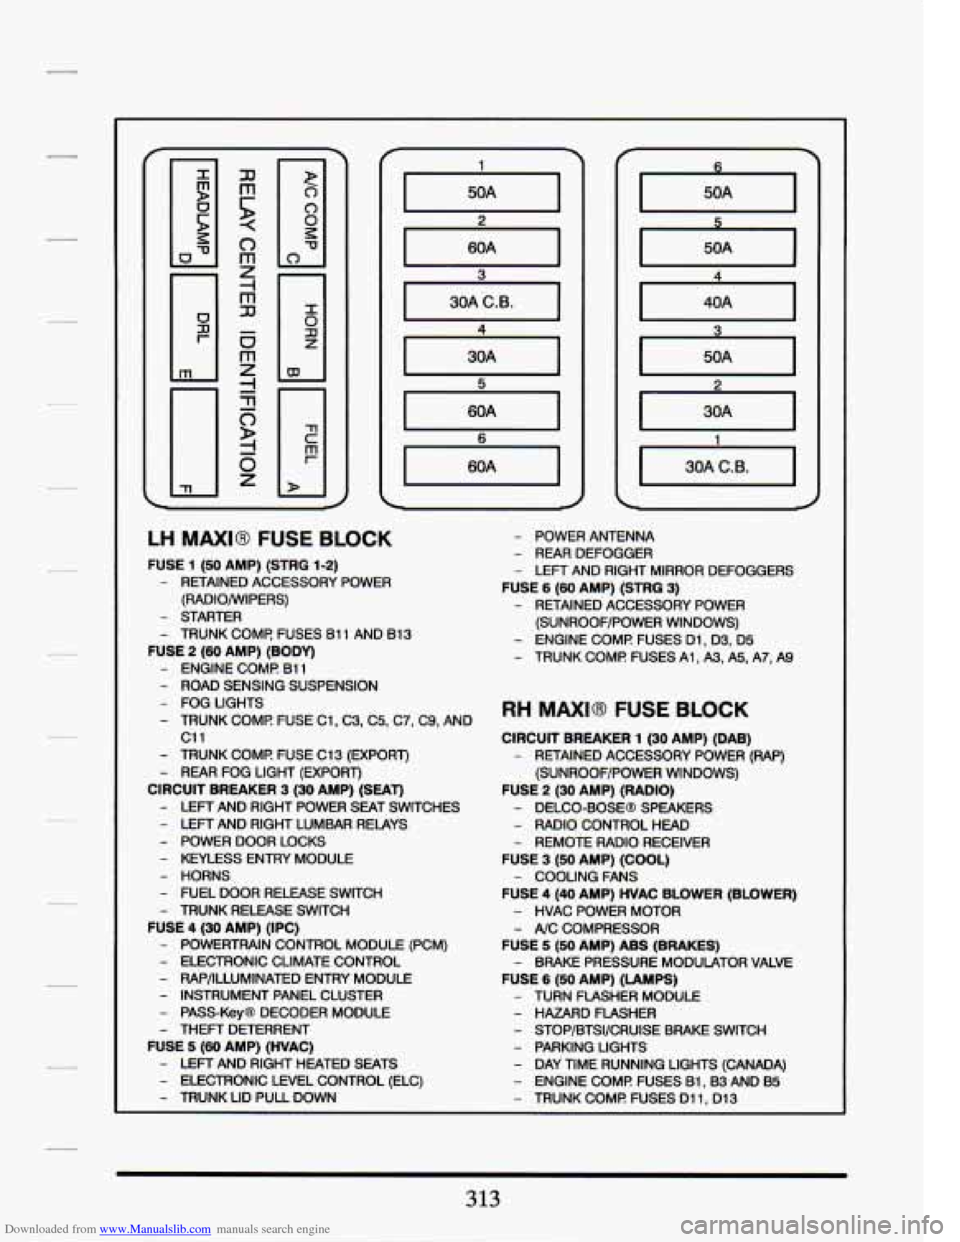
LH MAXI8 FUSE BLOCK
FUSE 1 (50 AMP) (STRG 1-2)
- RETAINED ACCESSORY POWER
(RADIO/WIPERS)
- STARTER
- TRUNK COMF! FUSES 61 1 AND 81 3
FUSE 2 (60 AMP) (BODY)
- ENGINE COMI? B11
- ROAD SENSING SUSPENSION
- FOG LIGHTS
- TRUNK COMI? FUSE C1, C3, C5, C7, C9, AND
c11
- TRUNK COME FUSE C13 (EXPORT)
- REAR FOG LIGHT (EXPORT)
CIRCUIT BREAKER 3 (30 AMP) (SEAT)
- LEFT AND RIGHT POWER SEAT SWITCHES
- LEFT AND RIGHT LUMBAR RELAYS
- POWER DOOR LOCKS
- KEYLESS ENTRY MODULE
- HORNS
- FUEL DOOR RELEASE SWITCH
- TRUNK RELEASE SWITCH
FUSE 4 (30 AMP) (IPC)
- POWERTRAIN CONTROL MODULE (PCM)
- ELECTRONIC CLIMATE CONTROL
- W/ILLUMINATED ENTRY MODULE
- INSTRUMENT PANEL CLUSTER
- PASS-Key@ DECODER MODULE
- THEFT DETERRENT
FUSE 5 (60 AMP) (HVAC)
- LEFT AND RIGHT HEATED SEATS
- ELECTRONIC LEVEL CONTROL (ELC)
- TRUNK LID PULL DOWN
- POWER ANTENNA
- REAR DEFOGGER
- LEFT AND RIGHT MIRROR DEFOGGERS
FUSE 6 (60 AMP) (STRQ 3)
- RETAINED ACCESSORY POWER
(SUNROOF/POWER WINDOWS)
- ENGINE COMI? FUSES Dl, 03, D5
- TRUNK COMI? FUSES A1 , A3, A5, A7, A9
RH MAXI@ FUSE BLOCK
CIRCUIT BREAKER 1 (30 AMP) (DAB)
- RETAINED ACCESSORY POWER (RAP)
(SUNROOF/POWER WINDOWS)
FUSE 2 (30 AMP) (RADIO)
- DELCO-BOSEB SPEAKERS
- RADIO CONTROL HEAD
- REMOTE RADIO RECEIVER
FUSE 3 (50 AMP) (COOL)
FUSE
4 (40 AMP) HVAC BLOWER (BLOWER)
- COOLING FANS
- HVAC POWER MOTOR
- A/C COMPRESSOR
FUSE 5 (So AMP) ABS (BRAKES)
FUSE
6 (So AMP) (LAMPS)
- BRAKE PRESSURE MODULATOR VALVE
- TURN FLASHER MODULE
- HAZARD FLASHER
- STOP/BTSI/CRUISE BRAKE SWITCH
- PARKING LIGHTS
- DAY TIME RUNNING LIGHTS (CANADA)
- ENGINE COMI? FUSES Bl,B3 AND B5
- TRUNK COMI? FUSES Dl 1, Dl3
313