1993 VOLKSWAGEN GOLF wiper
[x] Cancel search: wiperPage 44 of 156
Downloaded from www.Manualslib.com manuals search engine CONTROLS AND EQUIPMENT
2 -Multi function indicator *
In addition to the time display, the multi
function indicator (MFI) gives a whole range
of additional information:
• Driving time
• Distance driven
• Average speed
• Average fuel consumption
• Engine oil temperature
•
Ambient temperature
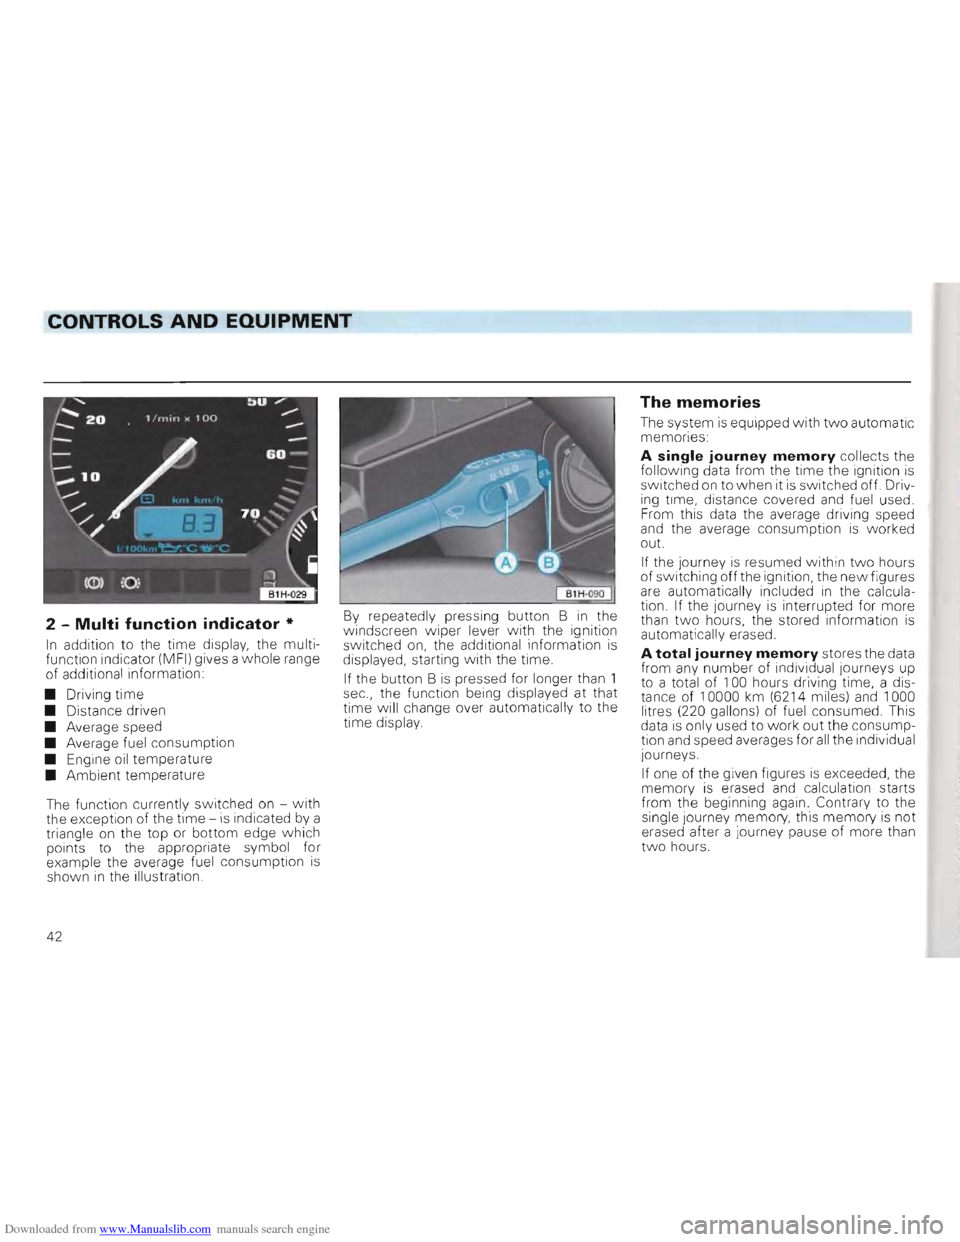
The function currently switched on -
with the exception of the time -is indicated by a
triangle on the top or bottom edge which
points to the appropriate symbol for
example the average fuel consumption
is shown in the illustration.
By repeatedly pressing button B in the
windscreen wiper lever with the ignition
switched on, the additional information is displayed, starting with the time.
If the button B
is pressed for longer than 1
sec., the function being displayed at that
time will change over automatically to the
time display.
The memories
The system is equipped with two automatic
memories:
A single journey memory collects the
following data from the time the ignition is
switched on to when it is switched off. Driv
ing time, distance covered and fuel used.
From this data the average driving speed
and the average consumption
is worked
out.
If the journey is resumed within two hours
of switching off the ignition, the new figures
are automatically included in the calcula
tion. If the journey is interrupted for more
than two hours, the stored information is
automatically erased.
A total journey memory stores the data
from any number of individual Journeys up
to a total of 100 hours driving time, a dis
tance of 10000 km (6214 miles)
and 1000
litres (220 gallons) of fuel consumed. This
data
is only used to work out the consump
tion and speed averages for all the individual
journeys.
If one of the given figures
is exceeded, the
memory is erased and calculation starts
from the beginning again. Contrary to the
single Journey memory, this
memory is not
erased after a journey pause of more than
two hours.
42
Page 45 of 156
Downloaded from www.Manualslib.com manuals search engine CONTROLS AND EQUIPMENT
-0 call up the da ta th e memories are se
ac ted by means of the switch A in the wiper
ev er:
. - S
ingle jou rne y memory
2 -
Total jo urne y memory
l1e foll owi ng data can be ob tained from the
m em ories :
•
Driving time
• Distance drive n
• Average speed
• Averag e fuel cons umpti
on
he amount of fuel used IS not indicated.
Erasing the memories
With the ignition switched on, both mem
ories can be eras ed separate ly in eac h switch positio n by pres sing sw itch A
p assed the appro priate detente position to opositio n for longer than one second.
If t
he battery is discon nected for any reason, the stored information is automaticall y
erased .
The displays
No symbol -Time
The time is shown even when the ignitio n
i s switched off.
The time can be set with the butt ons (h and min) on right below the rev count er -see
"Dig ita l Clock" page 41
G -Driving time
In switch position 1 the driving time
which has elapsed since ig nition was
switc hed on or the memory cance lled is indica ted -see previous page also "Single
j o urney memo ry"
In switch position 2 the total driv ing time for all IndiVidual jo urneys is ind icatedsee previous page also " T otal journey mem
ory"
The maximum time in both sw itch positions is 99 hours 59 minutes. When thi s figure is exceeded the indicatio n starts at zero again.
km -Distance covered
The remarks made under "Dri ving time" also aoply in principle to "Dist ance cov
ered" 'T he maxim um distance indicated is
9999 km or 6214 miles.
km/h -Average speed
Afte r swi tching on the ignitio n or eras ing
the memory being used, the average speed is in d ic ated after a dista nce of about 100 m . Up to th is point a dash appea rs instead of a
figure.
In switch position 1 the ave rage speed
for the current single journe y is ind icated.
In switch position 2 the average speed
indicated is tha t achieved during all single
j ourneys -see prev ious page "total jou rne y
memory"
Itr./100 km -Average fuel
consumption
It is the ave rage fuel cons umption which is in dicated and not the momentary consump
t ion at the time of reading. In principle the
remarks made under "average speed" also
apply here.
Note
The amount of fuel used is not indicated.
43
Page 57 of 156
Downloaded from www.Manualslib.com manuals search engine CONTROLS AND EQUIPMENT
Windscreen wiper and washer system
Vipers and washe rs o nly work w hen igni
t io n is switched on.ff : r The heated windscreen washer jets* are swit c hed o n when the ign ition is 9 swi tc hed on and the amoun t of heat is reguat ed automa tically acco rding to the ambi ent tem peratu re
Wh
en it is fr eez ing, ch eck that th e wipe r blades are not fro zen to t he g lass before switching the wipers on for the first time .
Windscreen
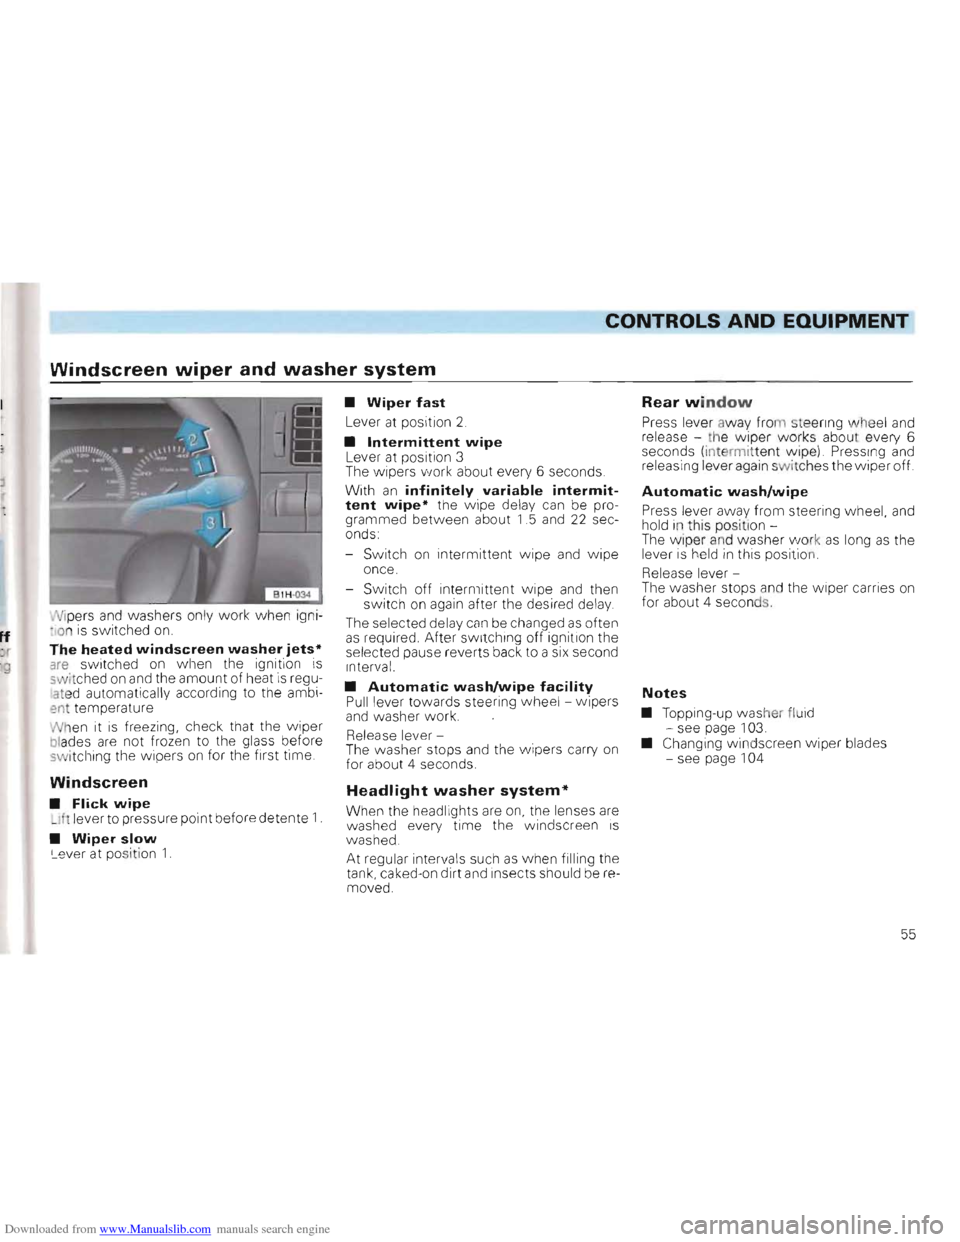
• Flick wipe _Ih lever to pressure point befo re deten te 1 .
• Wiper slow Le ve r at pos it io n 1.
• Wiper fast
Lever at posit ion 2
• Intermittent wipe Lever at posit io n 3 The w ipers "vork about every 6 seco nds.
W ith
an infinitely variable intermit
tent wipe* the wipe dela y can be pro
gram med betw een abou t 1.5 and 22 sec
o nds:
- Sw it c h
on intermitte nt wipe and wipe
once.
- Swi tc h off intermitte nt wi
pe an d then swi tch on again afte r the desired delay
The selec ted delay can be ch anged as oft e n as required. A fter switching off ignition the
se lec ted pause r ever ts back to a six seco nd
I n terv al.
• Automatic washJwipe facility Pull leve r tow ards steer ing whee l -wipe rs
and wash e r work.
R elease
lever-
The was he r st ops an d th e wi pers ca rry on
for abo ut 4 seconds.
Headlight w asher system*
Whe n the head lights are on, the lenses are
washed ev ery tim e the windsc reen is w ashed.
At r egular intervals such a s when filli ng t he tank, cake d-o n dir t a nd Insec ts should be re
m oved.
Rear window
Press lever aw ay fr om steenng whee l and release -th e wipe r works about every 6
seco nds (inte rm ittent wip e) Pressing and releasi ng lever agai n switches the w iper off.
Automatic wash/wipe
P ress lever away from stee ring wh eel, an d
ho ld in t his positi on The wip er an d was her wor k as long as th e
l ever is he ld in thi s posi tio n
Release leve r
T he was her stops and th e wiper carr ies on for abo ut 4 seco nd s,
Notes
• T opp ing-up was her fluid
- se e page 103. • Changing winds creen w ipe r blades
- see page 1 04
55
Page 90 of 156
Downloaded from www.Manualslib.com manuals search engine GENERAL MAINTENANCE
Cleaning seat belts
Keep belts clean because they ma y not
retract properly if very dirty .
Dirt y be
lts can be cleaned by was hing w ith
a mild soap solutio n without taking the belts
out of the vehicle.
Note
Inert ia reel belts should be completel y dry
before they are allowed to roll up.
Attention Do not have the belts cleaned chemically because the cleaning compounds damage the webbing material. Ensure that the belts do not come into contact with corrosive fluids.
Steel wheels
The wheels and the whee l tr ims should be
cle aned thoroughly at regular inter vals w hen the vehicle is being washed. This w ill
prevent brake dust , dirt and road salt from
accu mulating on the wheel. Persistent
ingr ained brake dust can be removed With an industrial grim e remov er. P aint damage
should be repaired before rust can form.
Alloy wheels
In order to maintain th e smart appearan ce
of all oy wheels for a long period, regular
car e is necessary . In particular, salt and brake pad dust must be washed off th or ough
ly
at leas t every tw o w eeks otherwise
the surface of the alloy Will be damaged
After being w ashed, the w heels shou ld be treated with an acid-free cleaner for al loy wheels. About every three months it is necessary to give wheels a good rubbing
w ith hard wax. Paint polish or other abrasiv e
solutions must not
be used. If the protecti ve
paint coat has been damaged , eg. by stone
impact, the damaged spots should be dealt with as soon as possible.
Cleaning and anti-corrosion
treatment of engine compart
ment
Attention Before doing any work in the engine compartment it is essential to read the notes on page 91!
The leaves, blossoms etc . w hich drop into
the water box (underneath the engine
bonnet
in f ront of the windscreen) should
be cleaned out occasional ly This w ill pre
v ent the water drain holes becoming
blocked
and -on veh ic les w ithout a fresh air
filter -foreign bodies entering the vehicle
interior v
ia the heating and ventilat ion sys
tem.
Attention For safety reasons pull out ignition key before reaching into the water box. Otherwise if the windscreen wipers are switched on unintentionally the movement of the wiper linkage could cause injury.
The engine compartment an d th e outsi de
surface of the power unit are given anti-cor
rosion treatment at the factor y.
In th e winter w hen the vehicle is being
driven frequ entl y on salted roads, good anti
corrosion treatment is very important. For
th is reason the entire engin e comp
artment and the plen um chamber should be thor
ough ly cleaned before and after the salting
period
and then preserved so that the salt cannot have a damag ing effect
The ignition must be switched off before washing the engine.
If the engine compartment is cle aned at any
time with greas e removing solution s 1) or if
one has the engine washed, the anti-cor
rosion compound is nearly alwa ys removed as wel l. It is the refore essential to ask for
durable preserv ation of all surfaces, seams,
joints and components in the engine compartment to be carried out. This applies also
1) Only the corre e clean ing solutions may be use d -on no aecoun petrol or Diesel.
88
Page 92 of 156
Downloaded from www.Manualslib.com manuals search engine GENERAL MAINTENANCE
Bonnet
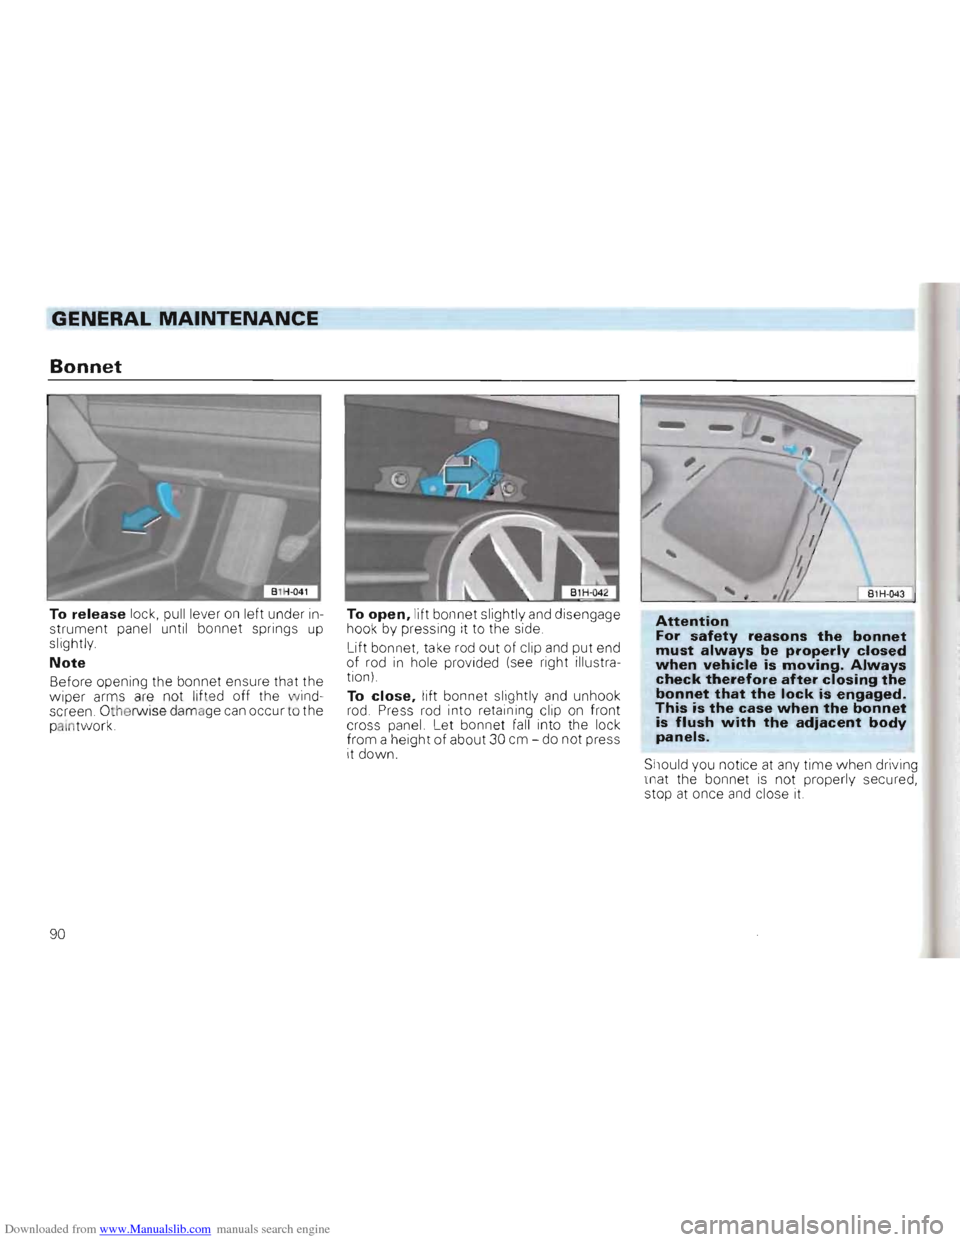
To release lock, pull lever on left under in
strument panel until bonnet springs up slightly.
Note
Before opening the bo nnet ensure that the
wiper arms are not lifted off the wind
screen. Othe rwise damage can occur to the
palntwork. To
open, lift
bonnet slightly and disengage
hook by pressing it to the side.
Lift bonnet, take rod out of
clip
and put end
of rod in hole provided (see right illustra
tion)
To
close, lift bonnet slightly and unhoo k
rod. Press rod into retaining cl ip on front
cross panel. Let bonnet fall into the lock
from a height of about 30 cm -do not press
it down.
B1H -043
Attention For safety reasons the bonnet must always be properly closed when vehicle is moving. Always check therefore after closing the bonnet that the lock is engaged. This is the case when the bonnet is flush with the adiacent body panels.
Should you notice at any time when driving
that the bonnet is not properly secured,
stop at once and close it.
90
Page 105 of 156

Downloaded from www.Manualslib.com manuals search engine Washer system
The fluid container is on the left of the en
gine compartment. The container holds
about 4 litres, on ve hicles with headlight
washer system * about 7 litres. The con
t ainer illustrated is for veh icle s with head
l ight washer system.
T he rear
window washer is supplied w ith
flu i d from the container in the engine com
partment.
Filling the container
It is advisable to add a window cleaning solution with a wa x remo ver (with anti-freeze
additive in winter) to the water because
plai n water is not usually sufficient to clean
the glass and headlight lenses quickl y and
th oroughly The mixing ratios on the window cleaner packaging must be adhered to.
E v
en w hen heated windscreen washer jets* ar e fitted, a w indow clean
ing solution containing anti-freeze should be
added to the water in th e w inter.
Note I' If at any time no window cleaning solution
w ith anti-freeze additive is available, methylated spirits can be used. Do not,
under any circumstances, add engine cool
ing system fluid or other additives.
GENERAL MAINTENANCE
Adjusting washer jets
When the vehicle is stationary, the water should hit the windscreen approximately as sh own .
The
Jet for the rear w indow washer is in the wiper shaft. The water jet shou ld hit the
g lass in the cen tre of the wiped area.
The jets
can be adjusted with a need le .
The jets fo r the
headlight washer system* can only be adjusted with a special
tool. When adju stmen t is necessary, con
tact your Volkswagen dealer.
103
Page 106 of 156

Downloaded from www.Manualslib.com manuals search engine GENERAL MAINTENANCE
Windscreen wiper blades Dust and pollen filter*
Good w iper blades are essential for clear vi
sion.
To prevent streaks from forming on the
glass the wiper blades should be cleaned
regularly with a window cleaning so lution .
When very dirty and full of insect remain s,
the blades can be cleaned with a sponge or
cloth.
Jerky operation of the w iper blades
can be
caused by wax rema ins on the w indscreen ,
after washing the vehicle in an automat ic
car-was h. Fillin g the winds creen washer
container with a w indo w cleaner containing
a wax remo ver
can cure the prob lem
For safet y reasons the wiper blades shou ld
be rene wed once or twice a year Wiper
blade s can be obtained fro m all Volkswagen
dealers.
B1H 052 1
; Changing w iper blades
Taking the wiper blade off
• Hinge the w iper arm up and position the
blad e horizontally. • Press the retainin g spring (arrow A) and push the blade towards the sc ree n at the
same time (arrow B)
Securing the w iper blade
The retai ning sp ring must engage audibly in
the w iper arm.
W h
en fitting wiper blade s with mou ld ed
w in d def lectors one sho uld ensure that the
defle ctor is point in g downwards.
The dust and polle n f ilter for the heating and
vent ilation system can be found under the two-piece cover on the right in the plenum
chamber. The filt er should be ch anged in accord ance with th e detai ls given in the Ser
v ice Schedules. If the air thro ughput reduc es cons id e ra b ly, th e filte r shou ld be ch ang ed earl ier:
• Lo o sen and remove tJ,e f our plastic
screws .
•
Pull off rubbe r seal on the bu lkhead to
engine comp artmen t upwards as far as ce n tr e o f vehi cle.
•
Pus h the connec ting parts towards the
sid e of th e vehicle.
• Push front cover upwards.
• P u
sh back elem ent spring clips and take
out ele me nt up w rds .
104
Page 132 of 156
Downloaded from www.Manualslib.com manuals search engine DO-lT-YOURSELF
• The emergency lights must be switched
on on both vehicles -unless local regula
tions differ.
•
Turn ignition key to "Drive" position so that the steering wheel is free and the turn
signals, horn, and, if necessary, the wind
screen wiper and washer can be used.
•
As the brake servo only works when the
engine is running, considerab ly more pres
sure is required on the brake pedal when
the engine is not running
•
On vehicles with power assisted steer
ing more force is required to turn steering
wheel when engine is not running.
• When there
is no lubricant in the manual
gearbox/automatic gearbox, the vehicle
may
on l y be towed with driving wheels
lifted.
Tow starting
The following points must be
noted when tow starting:
• Before moving off, engage 2nd or 3rd
gear .
• Switc h ignition
on. • As soon as engine starts, depress clutch and move gear lever into neutral to avoid
running into the towing vehicle.
• On vehicles with a catalytic converter the engine must not be started by towing the vehicle in ex
cess of 50 mll. Because then, fuel can pass into the converter and cause damage.
• For technical reasons tow starting a vehicle with an automatic gearbox is not possible.
Towing
When towing vehicles with an automatic gearbox, the following points
must be noted in addition to the details on the previous page :
• Selector lever
at " N". • Do not have the vehicle towed faste r
than 30 mph (50 km/h)
• Do not
tow further than 30 miles (50 km).
If the vehicle has to be towed long dis
tances it mu st be lifted at the front.
Reason: When the engine
is not running ,
the gearbox oi l pump is not working and the
gearbox is not adequately lubricated fo r
high speeds or long distances .
• With a breakdown vehicle the vehicle
may only be suspended at the front.
Reason: If given a rear suspended tow, the
drive shafts turn backwards . The plane tary
gears
in the automatic gearbox then turn at
such high speeds that the gearbox will be severely damaged in a short time .
1) Does not apply to Diese l e ng ines wi h cata
lytic conve rter
Note for the Golf syncro:
• The veh icle can be towed like any two
wheel drive Golf.
• With a recovery vehicle the car
can be
towed with front or rear wheels suspended.
If the vehicle has to be towed with the rear
wheels lifted and the rear wheels cannot
turn freely, one must ensure that the free
wheel
in the rear axle has not been bridged
beforehand by driving vehicle in reverse. To reintroduce the freewheel action the gear
lever must be moved briefly in to 1 st gear
wi th ignition on and then back in to neutral.
1 30