1993 VOLKSWAGEN CORRADO cruise control
[x] Cancel search: cruise controlPage 1 of 920
1993 Volkswagen Corrado All Categories All Sections
Title List for Volkswagen Technical Site: http://vw.belcom.ru
Copyright © 1998 Mitchell Repair Information Company, LLC
Wednesday, March 22, 2000 09:28PM* A/C-HEATER SYSTEM UNIFORM INSPECTION GUIDELINES ** ANTI-LOCK BRAKES UNIFORM INSPECTION GUIDELINE ** AUTO TRANS DIAGNOSIS MENU - VOLKSWAGEN* BRAKE SYSTEM UNIFORM INSPECTION GUIDELINES ** ELECTRICAL SYSTEM UNIFORM INSPECTION GUIDELINES ** ENGINE SYSTEMS UNIFORM INSPECTION GUIDELINES ** EXHAUST SYSTEM UNIFORM INSPECTION GUIDELINES ** STEERING UNIFORM INSPECTION GUIDELINES ** SUSPENSION UNIFORM INSPECTION GUIDELINES ** SYMPTOM CHECK LIST *2.8L IN-LINE V6 (VR6)A - ENGINE/VIN IDA/C COMPRESSOR OIL CHECKINGA/C COMPRESSOR SERVICINGA/C SYSTEM GENERAL DIAGNOSTIC PROCEDURESA/C SYSTEM GENERAL SERVICINGA/C-HEATER SYSTEM - MANUALAA - USING THIS SECTION (GENERAL HELP INFORMATION)ABBREVIATIONSALTERNATOR & REGULATORANTI-LOCK BRAKE SAFETY PRECAUTIONSANTI-LOCK BRAKE SYSTEMANTI-THEFT SYSTEMAXLE SHAFTSB - EMISSION APPLICATIONBRAKE SYSTEMC - SPECIFICATIONSCLUTCHCOMPUTER RELEARN PROCEDURESCRUISE CONTROL SYSTEMD - ADJUSTMENTSDEFOGGER - REAR WINDOWDOOR LOCKS - POWERE - THEORY/OPERATIONELECTRICAL COMPONENT LOCATORELECTROSTATIC DISCHARGE WARNING - BASIC INFORMATIONEMISSION CONTROL VISUAL INSPECTION PROCEDURESENGINE OVERHAUL PROCEDURES - GENERAL INFORMATIONF - BASIC TESTINGFAULTY RADIATOR FAN MOTOR COULD OVERHEAT & STALL ENGFUSES & CIRCUIT BREAKERSG - TESTS W/CODESGEAR TOOTH CONTACT PATTERNSGENERAL COOLING SYSTEM SERVICINGH - TESTS W/O CODES
Page 87 of 920

* ELECTRICAL SYSTEM UNIFORM INSPECTION GUIDELINES *
Article Text (p. 22)
1993 Volkswagen Corrado
For Volkswagen Technical Site: http://vw.belcom.ru
Copyright © 1998 Mitchell Repair Information Company, LLC
Wednesday, March 22, 2000 08:34PMÄÄÄÄÄÄÄÄÄÄÄÄÄÄÄÄÄÄÄÄÄÄÄÄÄÄÄÄÄÄÄÄÄÄÄÄÄÂÄÄÄÄÄÄÄÄÄÄÄÄÄÄÄÄÄÄÄÄÄÄÄÄÄÄÄÄÄÄÄÄCondition
³ Procedure
ÄÄÄÄÄÄÄÄÄÄÄÄÄÄÄÄÄÄÄÄÄÄÄÄÄÄÄÄÄÄÄÄÄÄÄÄÄÅÄÄÄÄÄÄÄÄÄÄÄÄÄÄÄÄÄÄÄÄÄÄÄÄÄÄÄÄÄÄÄÄInoperative, intermittent
³ Require repair or replacement.
ÄÄÄÄÄÄÄÄÄÄÄÄÄÄÄÄÄÄÄÄÄÄÄÄÄÄÄÄÄÄÄÄÄÄÄÄÄÅÄÄÄÄÄÄÄÄÄÄÄÄÄÄÄÄÄÄÄÄÄÄÄÄÄÄÄÄÄÄÄÄCorroded, loose terminals
³ Suggest repair or replacement.
ÄÄÄÄÄÄÄÄÄÄÄÄÄÄÄÄÄÄÄÄÄÄÄÄÄÄÄÄÄÄÄÄÄÄÄÄÄÅÄÄÄÄÄÄÄÄÄÄÄÄÄÄÄÄÄÄÄÄÄÄÄÄÄÄÄÄÄÄÄÄDamaged
³ Suggest repair or replacement.
ÄÄÄÄÄÄÄÄÄÄÄÄÄÄÄÄÄÄÄÄÄÄÄÄÄÄÄÄÄÄÄÄÄÄÄÄÄÁÄÄÄÄÄÄÄÄÄÄÄÄÄÄÄÄÄÄÄÄÄÄÄÄÄÄÄÄÄÄÄÄ CLOCK
CLOCK
ÄÄÄÄÄÄÄÄÄÄÄÄÄÄÄÄÄÄÄÄÄÄÄÄÄÄÄÄÄÄÄÄÄÄÄÄÄÂÄÄÄÄÄÄÄÄÄÄÄÄÄÄÄÄÄÄÄÄÄÄÄÄÄÄÄÄÄÄÄÄCondition
³ Procedure
ÄÄÄÄÄÄÄÄÄÄÄÄÄÄÄÄÄÄÄÄÄÄÄÄÄÄÄÄÄÄÄÄÄÄÄÄÄÅÄÄÄÄÄÄÄÄÄÄÄÄÄÄÄÄÄÄÄÄÄÄÄÄÄÄÄÄÄÄÄÄInoperative, intermittent
³ Require repair or replacement.
ÄÄÄÄÄÄÄÄÄÄÄÄÄÄÄÄÄÄÄÄÄÄÄÄÄÄÄÄÄÄÄÄÄÄÄÄÄÅÄÄÄÄÄÄÄÄÄÄÄÄÄÄÄÄÄÄÄÄÄÄÄÄÄÄÄÄÄÄÄÄMissing, damaged mounting hardware
³ Require repair or replacement
³ of mounting hardware.
ÄÄÄÄÄÄÄÄÄÄÄÄÄÄÄÄÄÄÄÄÄÄÄÄÄÄÄÄÄÄÄÄÄÄÄÄÄÅÄÄÄÄÄÄÄÄÄÄÄÄÄÄÄÄÄÄÄÄÄÄÄÄÄÄÄÄÄÄÄÄCorroded, loose terminals
³ Suggest repair or replacement.
ÄÄÄÄÄÄÄÄÄÄÄÄÄÄÄÄÄÄÄÄÄÄÄÄÄÄÄÄÄÄÄÄÄÄÄÄÄÅÄÄÄÄÄÄÄÄÄÄÄÄÄÄÄÄÄÄÄÄÄÄÄÄÄÄÄÄÄÄÄÄDamaged (e.g., melted, burned,
³ Suggest repair or replacement.
cracked, etc.)
³
ÄÄÄÄÄÄÄÄÄÄÄÄÄÄÄÄÄÄÄÄÄÄÄÄÄÄÄÄÄÄÄÄÄÄÄÄÄÁÄÄÄÄÄÄÄÄÄÄÄÄÄÄÄÄÄÄÄÄÄÄÄÄÄÄÄÄÄÄÄÄ CIGARETTE LIGHTER/SOCKET/ELEMENT
CIGARETTE LIGHTER/SOCKET/ELEMENT
ÄÄÄÄÄÄÄÄÄÄÄÄÄÄÄÄÄÄÄÄÄÄÄÄÄÄÄÄÄÄÄÄÄÄÄÄÄÂÄÄÄÄÄÄÄÄÄÄÄÄÄÄÄÄÄÄÄÄÄÄÄÄÄÄÄÄÄÄÄÄCondition
³ Procedure
ÄÄÄÄÄÄÄÄÄÄÄÄÄÄÄÄÄÄÄÄÄÄÄÄÄÄÄÄÄÄÄÄÄÄÄÄÄÅÄÄÄÄÄÄÄÄÄÄÄÄÄÄÄÄÄÄÄÄÄÄÄÄÄÄÄÄÄÄÄÄInoperative, intermittent
³ Require repair or replacement.
ÄÄÄÄÄÄÄÄÄÄÄÄÄÄÄÄÄÄÄÄÄÄÄÄÄÄÄÄÄÄÄÄÄÄÄÄÄÅÄÄÄÄÄÄÄÄÄÄÄÄÄÄÄÄÄÄÄÄÄÄÄÄÄÄÄÄÄÄÄÄCorroded, loose terminals
³ Suggest repair or replacement.
ÄÄÄÄÄÄÄÄÄÄÄÄÄÄÄÄÄÄÄÄÄÄÄÄÄÄÄÄÄÄÄÄÄÄÄÄÄÅÄÄÄÄÄÄÄÄÄÄÄÄÄÄÄÄÄÄÄÄÄÄÄÄÄÄÄÄÄÄÄÄMissing
³ Suggest replacement.
ÄÄÄÄÄÄÄÄÄÄÄÄÄÄÄÄÄÄÄÄÄÄÄÄÄÄÄÄÄÄÄÄÄÄÄÄÄÅÄÄÄÄÄÄÄÄÄÄÄÄÄÄÄÄÄÄÄÄÄÄÄÄÄÄÄÄÄÄÄÄMissing, damaged mounting hardware
³ Require repair or replacement
³ of mounting hardware.
ÄÄÄÄÄÄÄÄÄÄÄÄÄÄÄÄÄÄÄÄÄÄÄÄÄÄÄÄÄÄÄÄÄÄÄÄÄÅÄÄÄÄÄÄÄÄÄÄÄÄÄÄÄÄÄÄÄÄÄÄÄÄÄÄÄÄÄÄÄÄDamaged
³ Suggest repair or replacement.
ÄÄÄÄÄÄÄÄÄÄÄÄÄÄÄÄÄÄÄÄÄÄÄÄÄÄÄÄÄÄÄÄÄÄÄÄÄÁÄÄÄÄÄÄÄÄÄÄÄÄÄÄÄÄÄÄÄÄÄÄÄÄÄÄÄÄÄÄÄÄ CRUISE CONTROL/LINKAGE/CABLES
CRUISE CONTROL/LINKAGE/CABLES
ÄÄÄÄÄÄÄÄÄÄÄÄÄÄÄÄÄÄÄÄÄÂÄÄÄÄÄÄÄÄÄÄÄÄÄÄÄÄÄÄÄÄÄÄÂÄÄÄÄÄÄÄÄÄÄÄÄÄÄÄÄÄÄÄÄÄÄÄÄÄCondition
³ Procedure ³ Note
ÄÄÄÄÄÄÄÄÄÄÄÄÄÄÄÄÄÄÄÄÄÅÄÄÄÄÄÄÄÄÄÄÄÄÄÄÄÄÄÄÄÄÄÄÅÄÄÄÄÄÄÄÄÄÄÄÄÄÄÄÄÄÄÄÄÄÄÄÄÄMissing
³ Require replacement. ³
Page 452 of 920

COMPUTER RELEARN PROCEDURES
Article Text (p. 2)
1993 Volkswagen Corrado
For Volkswagen Technical Site: http://vw.belcom.ru
Copyright © 1998 Mitchell Repair Information Company, LLC
Wednesday, March 22, 2000 08:58PM
"D" and allow engine to idle for one minute.
* Accelerate at normal throttle position (20-50%) until vehicle
shifts into top gear.
* Cruise at light to medium throttle.
* Decelerate to a stop, allowing vehicle to downshift, and use
brakes normally.
* Process may be repeated as necessary.
Manual Transmission
* Place transmission in Neutral position.
* Ensure emergency brake has been set and all accessories
are turned off.
* Start engine and bring to normal operating temperature.
* Allow vehicle to idle in Neutral for one minute.
* Initial relearn is complete: process will be completed during
normal driving.
Some manufacturers identify a specific relearn procedure
which will help establish suitable driveability during relearn stage.
These procedures are especially important if vehicle is equipped with
and electronically controlled automatic transmission or transaxle.
Always complete procedure before returning vehicle to customer.
END OF ARTICLE
Page 453 of 920
CRUISE CONTROL SYSTEM
Article Text
1993 Volkswagen Corrado
For Volkswagen Technical Site: http://vw.belcom.ru
Copyright © 1998 Mitchell Repair Information Company, LLC
Wednesday, March 22, 2000 08:58PM
ARTICLE BEGINNING
1993 ACCESSORIES & EQUIPMENT
Volkswagen Cruise Control Systems
Volkswagen; Corrado SLC, EuroVan, Passat
DESCRIPTION & OPERATION
The cruise control system allows driver to maintain a
constant cruising speed above 22 MPH without depressing the
accelerator pedal. The cruise control system consists of a vacuum
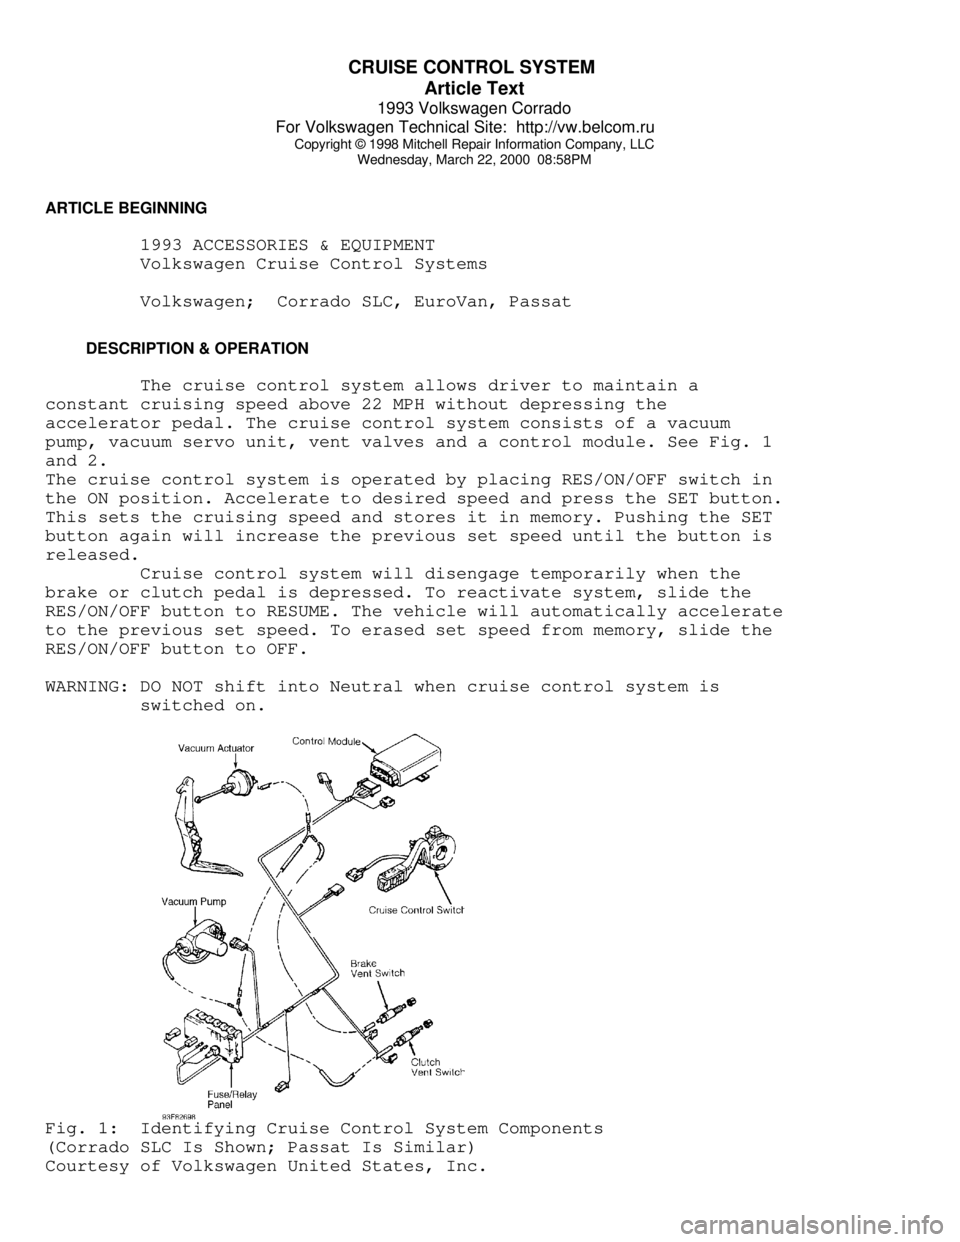
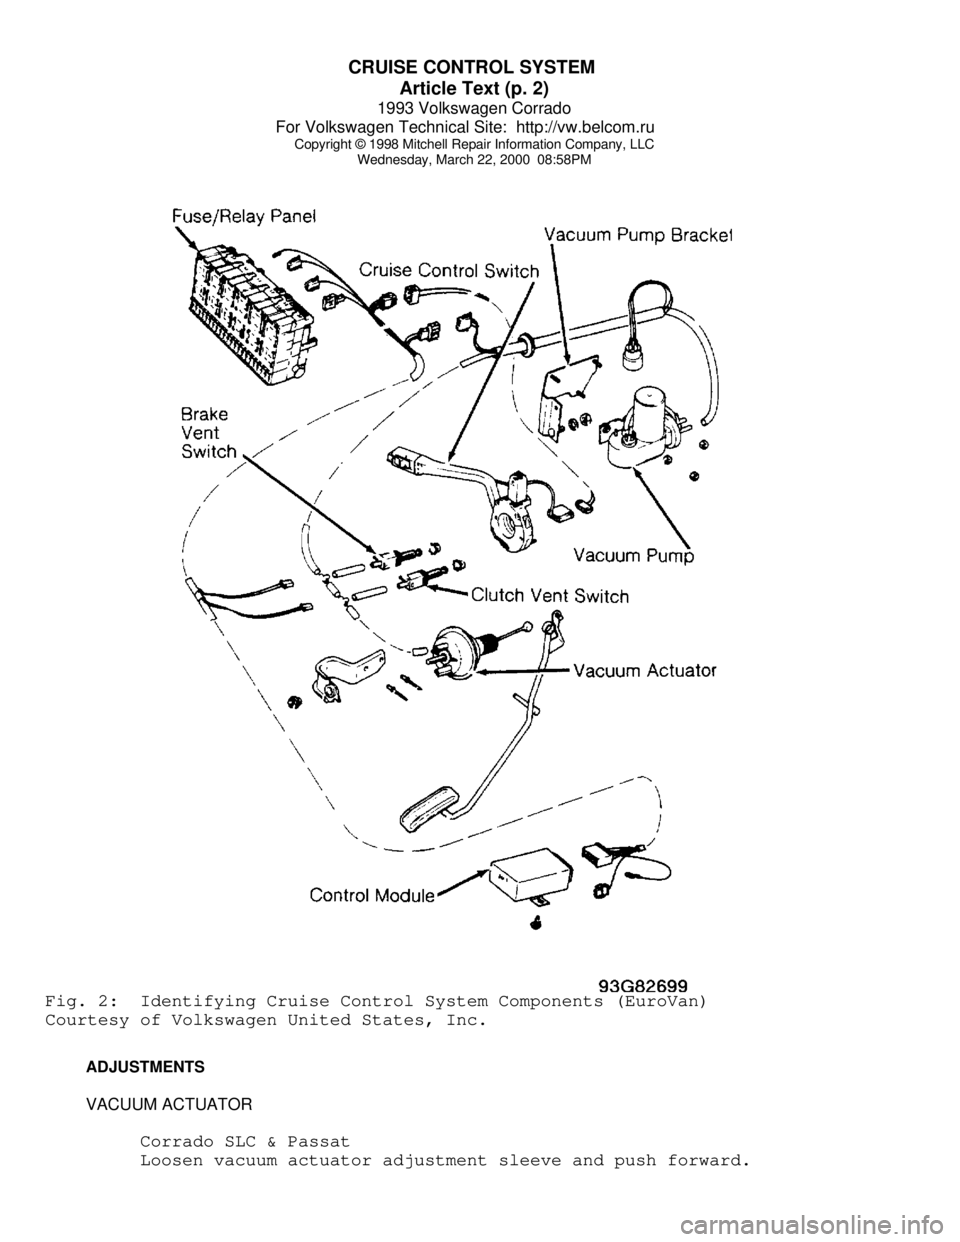
pump, vacuum servo unit, vent valves and a control module. See Fig. 1
and 2.
The cruise control system is operated by placing RES/ON/OFF switch in
the ON position. Accelerate to desired speed and press the SET button.
This sets the cruising speed and stores it in memory. Pushing the SET
button again will increase the previous set speed until the button is
released.
Cruise control system will disengage temporarily when the
brake or clutch pedal is depressed. To reactivate system, slide the
RES/ON/OFF button to RESUME. The vehicle will automatically accelerate
to the previous set speed. To erased set speed from memory, slide the
RES/ON/OFF button to OFF.
WARNING: DO NOT shift into Neutral when cruise control system is
switched on.Fig. 1: Identifying Cruise Control System Components
(Corrado SLC Is Shown; Passat Is Similar)
Courtesy of Volkswagen United States, Inc.
Page 454 of 920
CRUISE CONTROL SYSTEM
Article Text (p. 2)
1993 Volkswagen Corrado
For Volkswagen Technical Site: http://vw.belcom.ru
Copyright © 1998 Mitchell Repair Information Company, LLC
Wednesday, March 22, 2000 08:58PMFig. 2: Identifying Cruise Control System Components (EuroVan)
Courtesy of Volkswagen United States, Inc.
ADJUSTMENTS
VACUUM ACTUATOR
Corrado SLC & Passat
Loosen vacuum actuator adjustment sleeve and push forward.
Page 455 of 920
CRUISE CONTROL SYSTEM
Article Text (p. 3)
1993 Volkswagen Corrado
For Volkswagen Technical Site: http://vw.belcom.ru
Copyright © 1998 Mitchell Repair Information Company, LLC
Wednesday, March 22, 2000 08:58PM
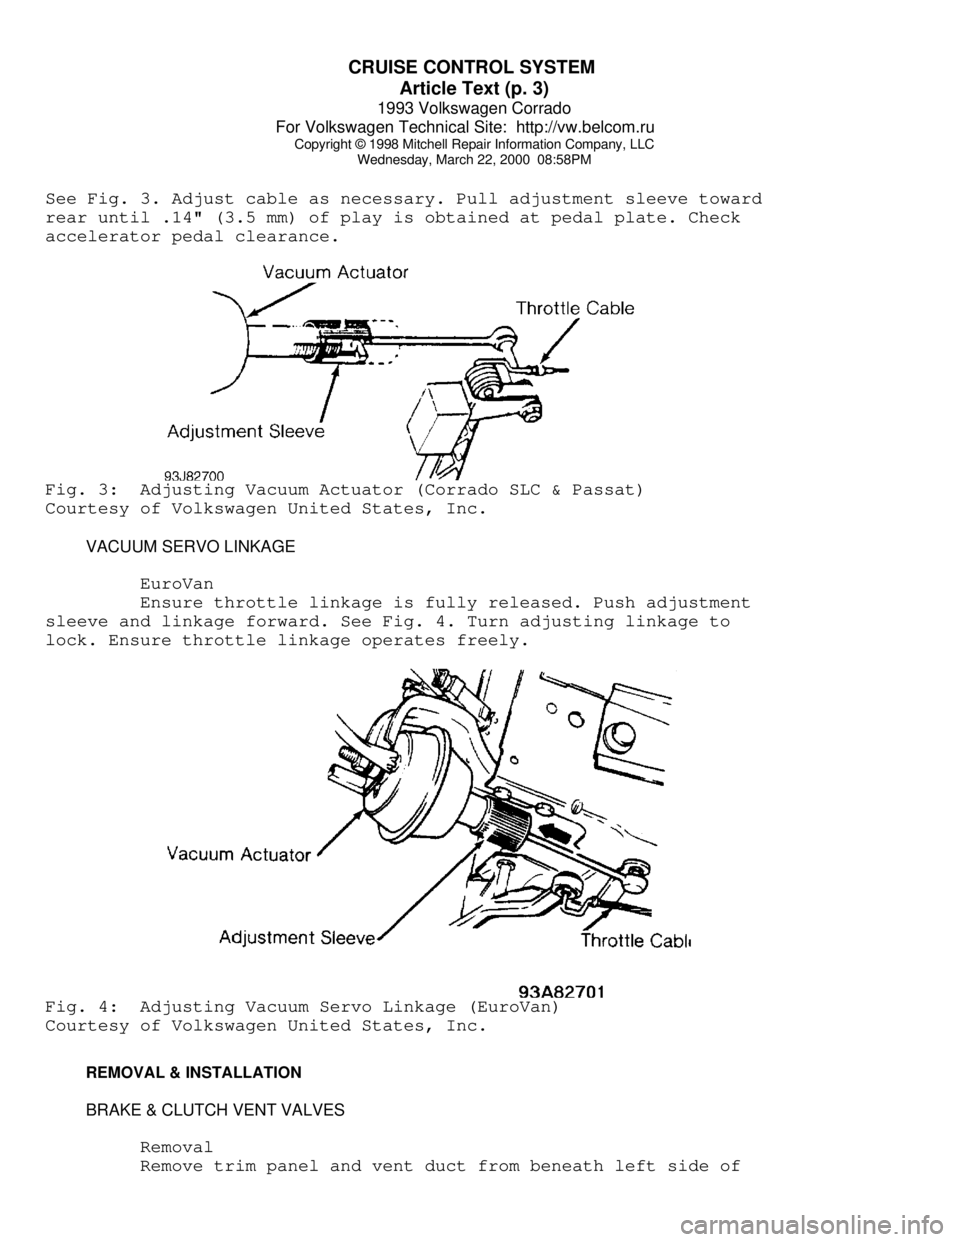
See Fig. 3. Adjust cable as necessary. Pull adjustment sleeve toward
rear until .14" (3.5 mm) of play is obtained at pedal plate. Check
accelerator pedal clearance.Fig. 3: Adjusting Vacuum Actuator (Corrado SLC & Passat)
Courtesy of Volkswagen United States, Inc.
VACUUM SERVO LINKAGE
EuroVan
Ensure throttle linkage is fully released. Push adjustment
sleeve and linkage forward. See Fig. 4. Turn adjusting linkage to
lock. Ensure throttle linkage operates freely.Fig. 4: Adjusting Vacuum Servo Linkage (EuroVan)
Courtesy of Volkswagen United States, Inc.
REMOVAL & INSTALLATION
BRAKE & CLUTCH VENT VALVES
Removal
Remove trim panel and vent duct from beneath left side of
Page 456 of 920
CRUISE CONTROL SYSTEM
Article Text (p. 4)
1993 Volkswagen Corrado
For Volkswagen Technical Site: http://vw.belcom.ru
Copyright © 1998 Mitchell Repair Information Company, LLC
Wednesday, March 22, 2000 08:58PM
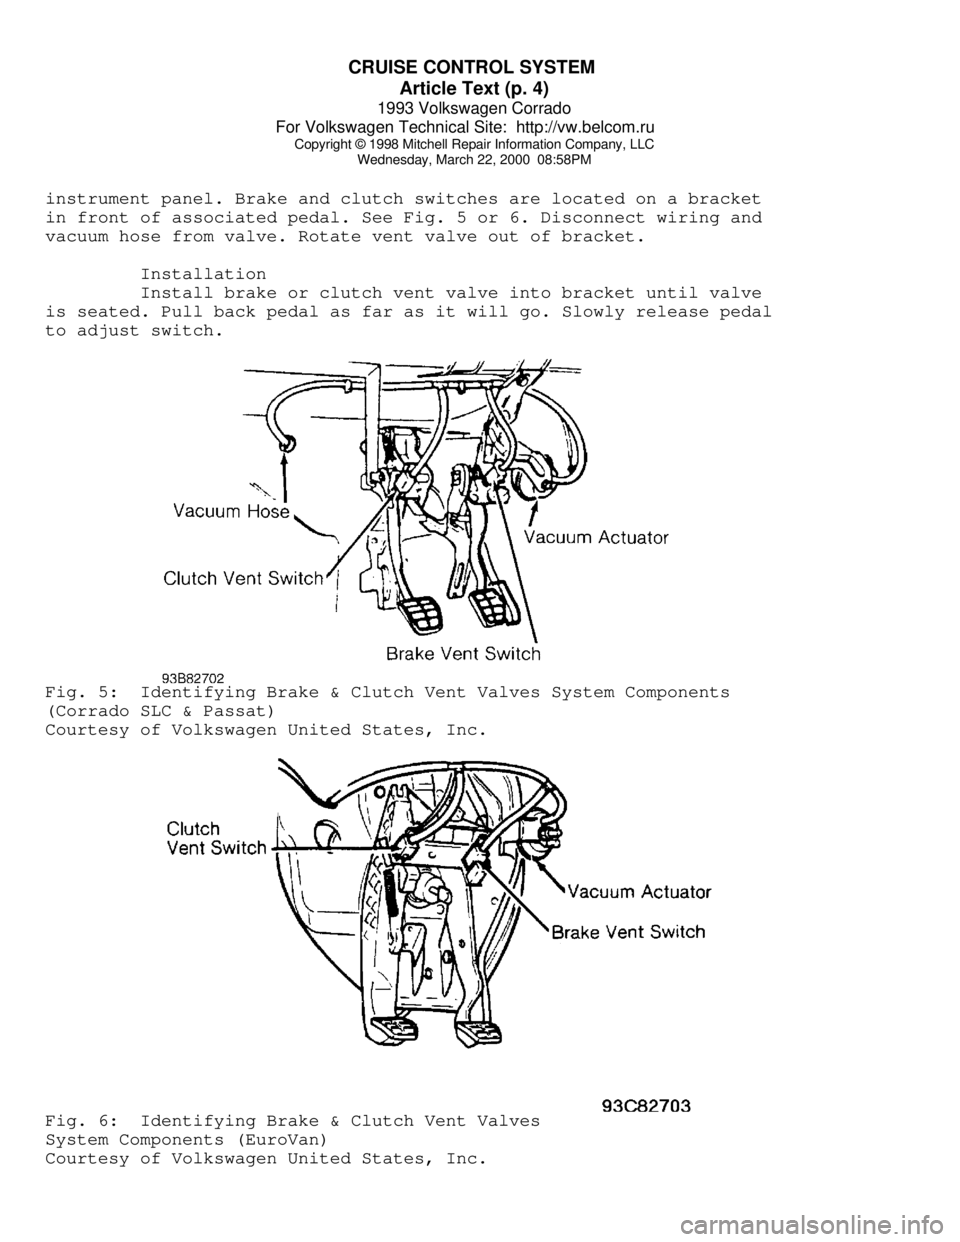
instrument panel. Brake and clutch switches are located on a bracket
in front of associated pedal. See Fig. 5 or 6. Disconnect wiring and
vacuum hose from valve. Rotate vent valve out of bracket.
Installation
Install brake or clutch vent valve into bracket until valve
is seated. Pull back pedal as far as it will go. Slowly release pedal
to adjust switch.Fig. 5: Identifying Brake & Clutch Vent Valves System Components
(Corrado SLC & Passat)
Courtesy of Volkswagen United States, Inc.Fig. 6: Identifying Brake & Clutch Vent Valves
System Components (EuroVan)
Courtesy of Volkswagen United States, Inc.
Page 457 of 920
CRUISE CONTROL SYSTEM
Article Text (p. 5)
1993 Volkswagen Corrado
For Volkswagen Technical Site: http://vw.belcom.ru
Copyright © 1998 Mitchell Repair Information Company, LLC
Wednesday, March 22, 2000 08:58PM
CONTROL UNIT
Removal & Installation
Remove glove compartment. Remove control module mounting
bracket. Remove control unit wiring harness connectors. Remove control
module. To install, reverse removal procedure.
STEERING COLUMN CONTROL SWITCH
Removal & Installation
Remove steering wheel. Loosen steering column switch clamp
and pull up steering column switch. Disconnect electrical connector
and remove steering column control switch. To install, reverse removal
procedure.
VACUUM PUMP
Removal & Installation
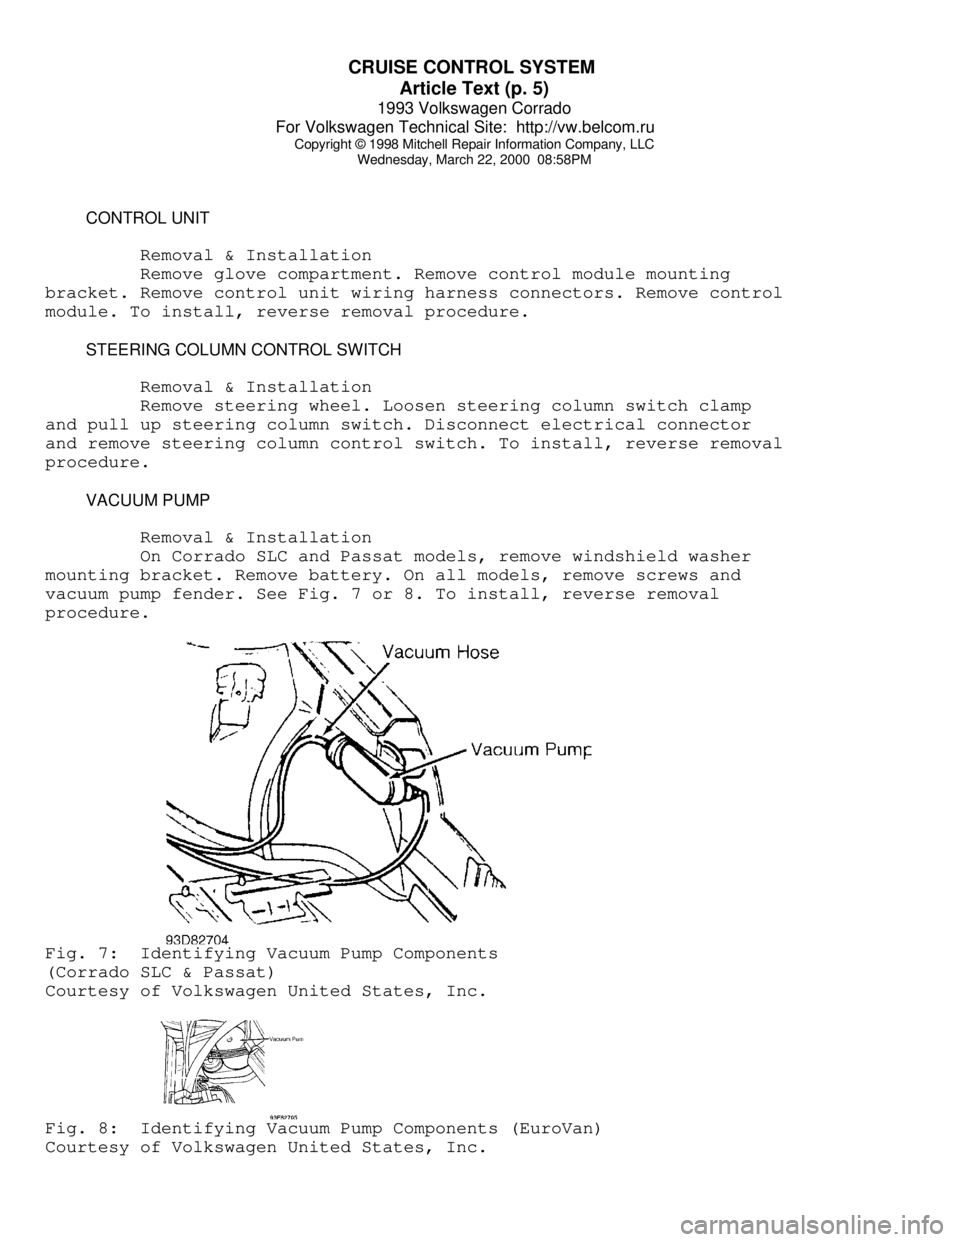
On Corrado SLC and Passat models, remove windshield washer
mounting bracket. Remove battery. On all models, remove screws and
vacuum pump fender. See Fig. 7 or 8. To install, reverse removal
procedure.Fig. 7: Identifying Vacuum Pump Components
(Corrado SLC & Passat)
Courtesy of Volkswagen United States, Inc.Fig. 8: Identifying Vacuum Pump Components (EuroVan)
Courtesy of Volkswagen United States, Inc.