1993 VOLKSWAGEN CORRADO clutch
[x] Cancel search: clutchPage 446 of 920
CLUTCH
Article Text
1993 Volkswagen Corrado
For Volkswagen Technical Site: http://vw.belcom.ru
Copyright © 1998 Mitchell Repair Information Company, LLC
Wednesday, March 22, 2000 08:58PM
ARTICLE BEGINNING
1993 CLUTCHES
Volkswagen FWD - Corrado SLC & Passat
Volkswagen; Corrado SLC & Passat
DESCRIPTION
The clutch is a single dry disc type, which uses a diaphragm
spring-type pressure plate. The clutch is hydraulically operated.
ADJUSTMENTS
CLUTCH PEDAL
Clutch is automatically adjusted and requires no manual
adjustment. If clutch pedal does not operate clutch or return
properly, check hydraulic system for leaking fluid or air in system.
GEARSHIFT LEVER CABLES
1) Place gearshift in Neutral position. Remove gearshift knob
and boot. Loosen bolt and nut (at transaxle slotted levers) of both
cables.
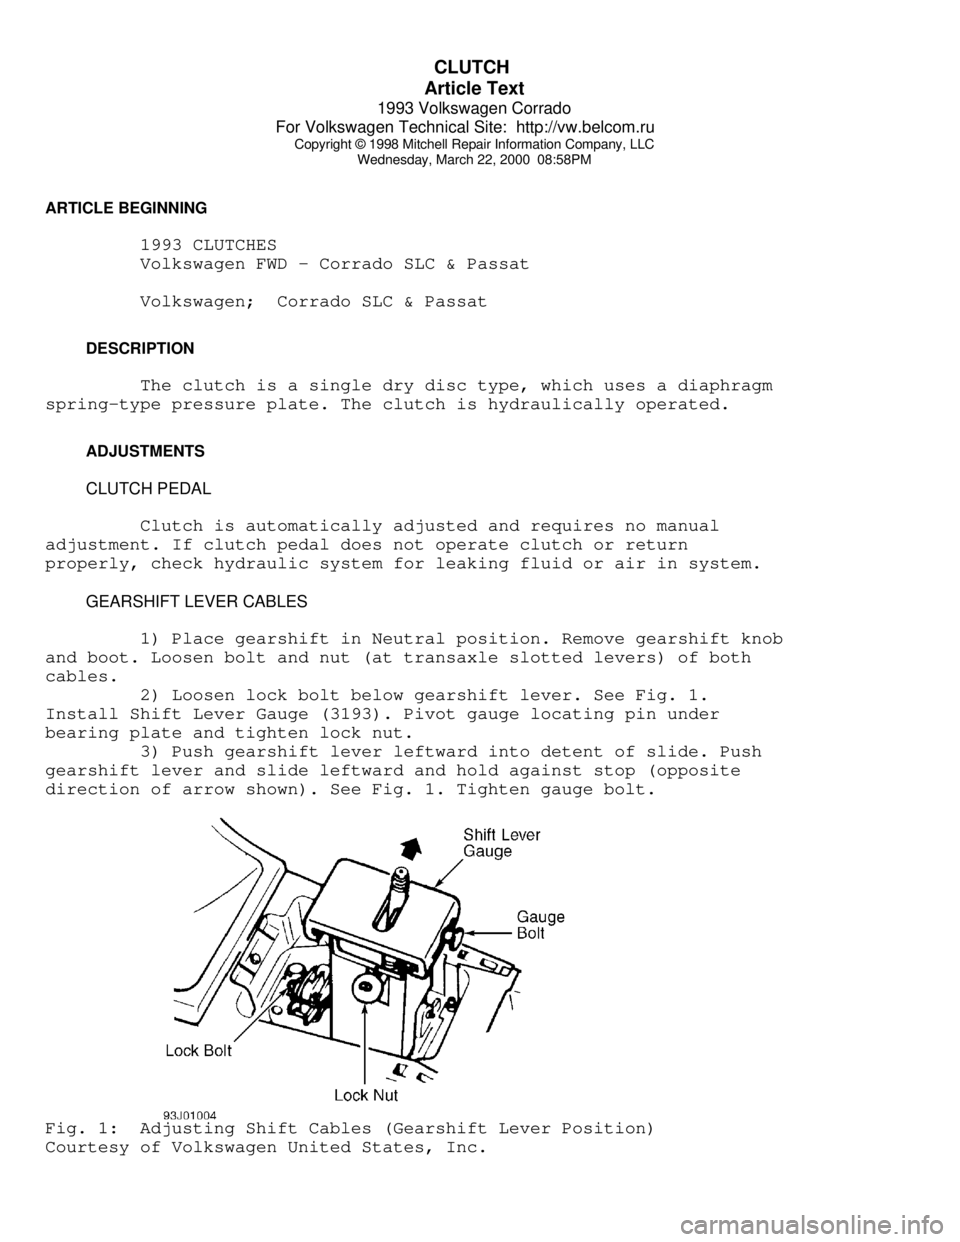
2) Loosen lock bolt below gearshift lever. See Fig. 1.
Install Shift Lever Gauge (3193). Pivot gauge locating pin under
bearing plate and tighten lock nut.
3) Push gearshift lever leftward into detent of slide. Push
gearshift lever and slide leftward and hold against stop (opposite
direction of arrow shown). See Fig. 1. Tighten gauge bolt.Fig. 1: Adjusting Shift Cables (Gearshift Lever Position)
Courtesy of Volkswagen United States, Inc.
Page 447 of 920
CLUTCH
Article Text (p. 2)
1993 Volkswagen Corrado
For Volkswagen Technical Site: http://vw.belcom.ru
Copyright © 1998 Mitchell Repair Information Company, LLC
Wednesday, March 22, 2000 08:58PM
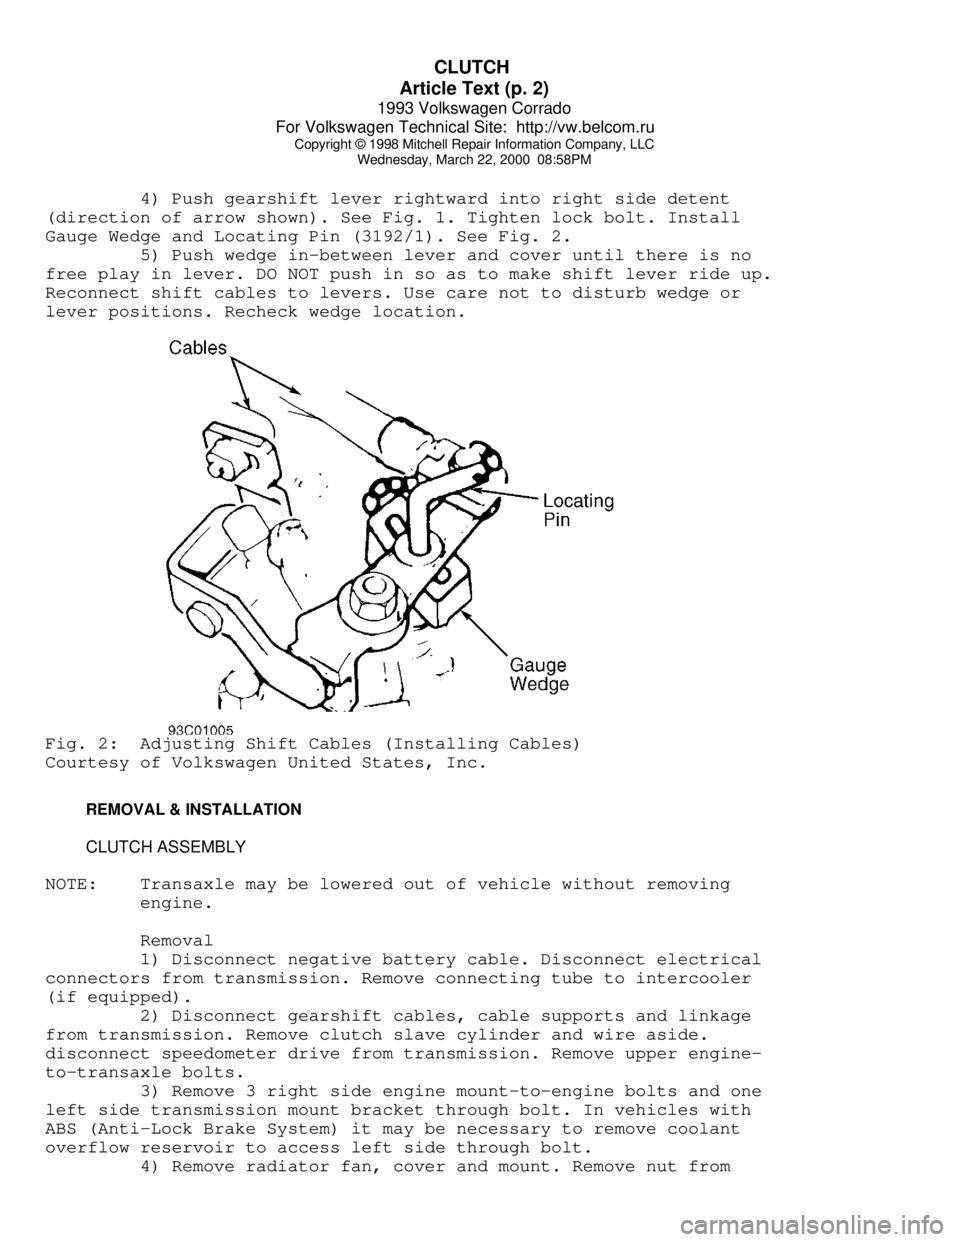
4) Push gearshift lever rightward into right side detent
(direction of arrow shown). See Fig. 1. Tighten lock bolt. Install
Gauge Wedge and Locating Pin (3192/1). See Fig. 2.
5) Push wedge in-between lever and cover until there is no
free play in lever. DO NOT push in so as to make shift lever ride up.
Reconnect shift cables to levers. Use care not to disturb wedge or
lever positions. Recheck wedge location.Fig. 2: Adjusting Shift Cables (Installing Cables)
Courtesy of Volkswagen United States, Inc.
REMOVAL & INSTALLATION
CLUTCH ASSEMBLY
NOTE: Transaxle may be lowered out of vehicle without removing
engine.
Removal
1) Disconnect negative battery cable. Disconnect electrical
connectors from transmission. Remove connecting tube to intercooler
(if equipped).
2) Disconnect gearshift cables, cable supports and linkage
from transmission. Remove clutch slave cylinder and wire aside.
disconnect speedometer drive from transmission. Remove upper engine-
to-transaxle bolts.
3) Remove 3 right side engine mount-to-engine bolts and one
left side transmission mount bracket through bolt. In vehicles with
ABS (Anti-Lock Brake System) it may be necessary to remove coolant
overflow reservoir to access left side through bolt.
4) Remove radiator fan, cover and mount. Remove nut from
Page 448 of 920
CLUTCH
Article Text (p. 3)
1993 Volkswagen Corrado
For Volkswagen Technical Site: http://vw.belcom.ru
Copyright © 1998 Mitchell Repair Information Company, LLC
Wednesday, March 22, 2000 08:58PM
front transmission mount. Attach Engine Support (10-222A) with Bases
(10-222A/1) to engine. Slightly tighten engine support and remove
starter. Remove left transaxle mount bracket.
5) Remove long left side transmission support bracket. Remove
balance weight from mount. Remove heat shield for right side inner CV
(constant velocity) joint.
6) Disconnect axle shafts at flanges and wire aside. Remove
left side transaxle mount from transaxle. It will be necessary to push
rearward on mount for clearance to remove long transaxle mount bolt.
7) Push transaxle mount to right and pull down to remove from
vehicle. Remove small gear carrier housing cover. Support transaxle
with floor jack. Remove rear transaxle mount. Remove lower transaxle-
to-engine bolts. Carefully pry transaxle from engine and lower.
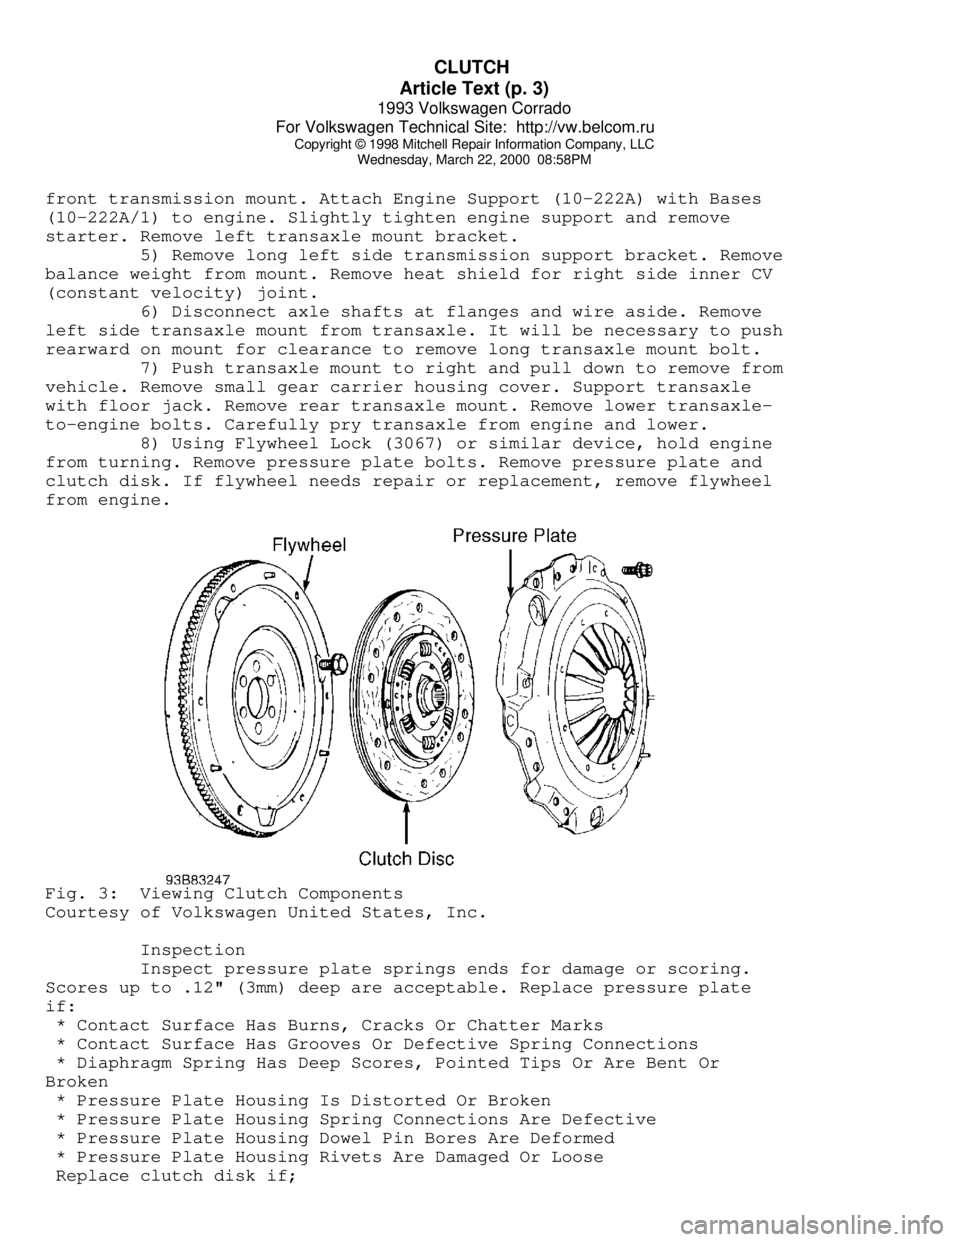
8) Using Flywheel Lock (3067) or similar device, hold engine
from turning. Remove pressure plate bolts. Remove pressure plate and
clutch disk. If flywheel needs repair or replacement, remove flywheel
from engine.Fig. 3: Viewing Clutch Components
Courtesy of Volkswagen United States, Inc.
Inspection
Inspect pressure plate springs ends for damage or scoring.
Scores up to .12" (3mm) deep are acceptable. Replace pressure plate
if:
* Contact Surface Has Burns, Cracks Or Chatter Marks
* Contact Surface Has Grooves Or Defective Spring Connections
* Diaphragm Spring Has Deep Scores, Pointed Tips Or Are Bent Or
Broken
* Pressure Plate Housing Is Distorted Or Broken
* Pressure Plate Housing Spring Connections Are Defective
* Pressure Plate Housing Dowel Pin Bores Are Deformed
* Pressure Plate Housing Rivets Are Damaged Or Loose
Replace clutch disk if;
Page 449 of 920
CLUTCH
Article Text (p. 4)
1993 Volkswagen Corrado
For Volkswagen Technical Site: http://vw.belcom.ru
Copyright © 1998 Mitchell Repair Information Company, LLC
Wednesday, March 22, 2000 08:58PM
* Worn To Surface Of Rivet Heads
* Rivets Are Loose, Missing Or Damaged
* Friction Material Is Oil Or Grease Soaked
* Friction Material Is Loose, Cracked Or Grooved
* Hub Is Rusted Or Damaged
* Springs Are Rusted Solid, Broken, Cracked Or Loose
* Torsion Damper Spring Guide Is Broken
* Torsion Damper Cover Damaged
* Torsion Damper Grooved Or Not Functioning
NOTE: Pressure plate has a protective grease coating. Remove
contact surface grease only. Service life will be shortened
if remaining portions of pressure plate protective grease
are removed.
Installation
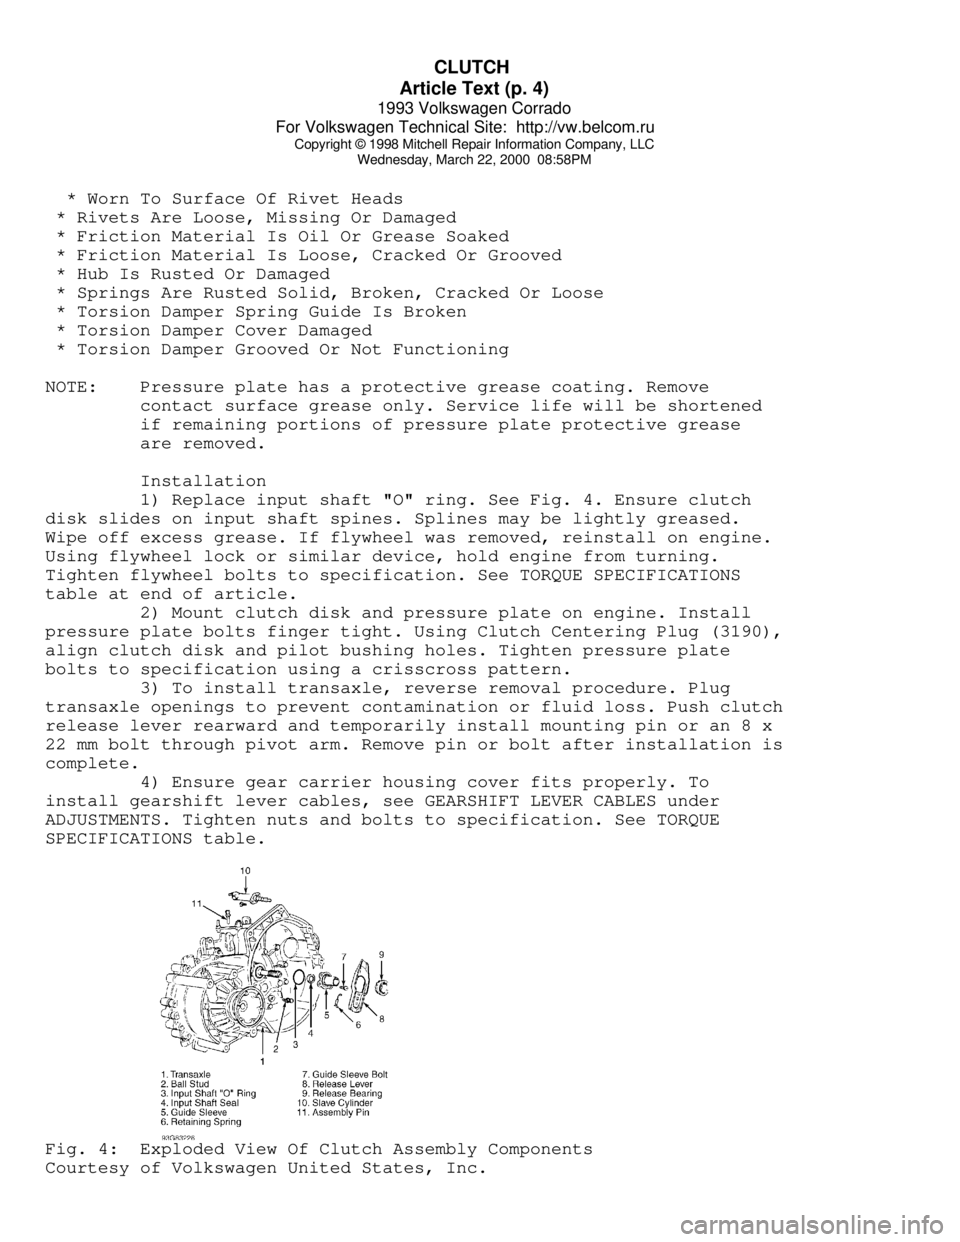
1) Replace input shaft "O" ring. See Fig. 4. Ensure clutch
disk slides on input shaft spines. Splines may be lightly greased.
Wipe off excess grease. If flywheel was removed, reinstall on engine.
Using flywheel lock or similar device, hold engine from turning.
Tighten flywheel bolts to specification. See TORQUE SPECIFICATIONS
table at end of article.
2) Mount clutch disk and pressure plate on engine. Install
pressure plate bolts finger tight. Using Clutch Centering Plug (3190),
align clutch disk and pilot bushing holes. Tighten pressure plate
bolts to specification using a crisscross pattern.
3) To install transaxle, reverse removal procedure. Plug
transaxle openings to prevent contamination or fluid loss. Push clutch
release lever rearward and temporarily install mounting pin or an 8 x
22 mm bolt through pivot arm. Remove pin or bolt after installation is
complete.
4) Ensure gear carrier housing cover fits properly. To
install gearshift lever cables, see GEARSHIFT LEVER CABLES under
ADJUSTMENTS. Tighten nuts and bolts to specification. See TORQUE
SPECIFICATIONS table.Fig. 4: Exploded View Of Clutch Assembly Components
Courtesy of Volkswagen United States, Inc.
Page 450 of 920

CLUTCH
Article Text (p. 5)
1993 Volkswagen Corrado
For Volkswagen Technical Site: http://vw.belcom.ru
Copyright © 1998 Mitchell Repair Information Company, LLC
Wednesday, March 22, 2000 08:58PM
TORQUE SPECIFICATIONS
TORQUE SPECIFICATIONS TABLEÄÄÄÄÄÄÄÄÄÄÄÄÄÄÄÄÄÄÄÄÄÄÄÄÄÄÄÄÄÄÄÄÄÄÄÄÄÄÄÄÄÄÄÄÄÄÄÄÄÄÄÄÄÄÄÄÄÄÄÄÄÄÄÄÄÄÄÄÄÄApplication Ft. Lbs. (N.m)
Balance Weight-To-Mount Bolt ............................... 22 (30)
Drive Axle-To-Flange Bolt .................................. 33 (45)
Flywheel Bolt ................................... 22 (30) + 1/4 Turn
Front Transaxle Mount Nut .................................. 44 (60)
Gearshift Cable Bolt ....................................... 18 (25)
Gearshift Cable Support Bolt ............................... 18 (25)
Left Transaxle Mount
Bracket-To-Mount Bolt ..................................... 44 (60)
Bracket-To-Transaxle Bolt ................................. 18 (25)
Pressure Plate Bolt ........................................ 15 (20)
Right Rear Transaxle Mount Bolt ............................ 18 (25)
Slave Cylinder Bolt ........................................ 18 (25)
Starter Bolt ............................................... 44 (60)
Transaxle Support-To-Transaxle Bolt ........................ 44 (60)
Transaxle-To-Engine Bolt ................................... 59 (80)
ÄÄÄÄÄÄÄÄÄÄÄÄÄÄÄÄÄÄÄÄÄÄÄÄÄÄÄÄÄÄÄÄÄÄÄÄÄÄÄÄÄÄÄÄÄÄÄÄÄÄÄÄÄÄÄÄÄÄÄÄÄÄÄÄÄÄÄÄÄÄEND OF ARTICLE
Page 453 of 920
CRUISE CONTROL SYSTEM
Article Text
1993 Volkswagen Corrado
For Volkswagen Technical Site: http://vw.belcom.ru
Copyright © 1998 Mitchell Repair Information Company, LLC
Wednesday, March 22, 2000 08:58PM
ARTICLE BEGINNING
1993 ACCESSORIES & EQUIPMENT
Volkswagen Cruise Control Systems
Volkswagen; Corrado SLC, EuroVan, Passat
DESCRIPTION & OPERATION
The cruise control system allows driver to maintain a
constant cruising speed above 22 MPH without depressing the
accelerator pedal. The cruise control system consists of a vacuum
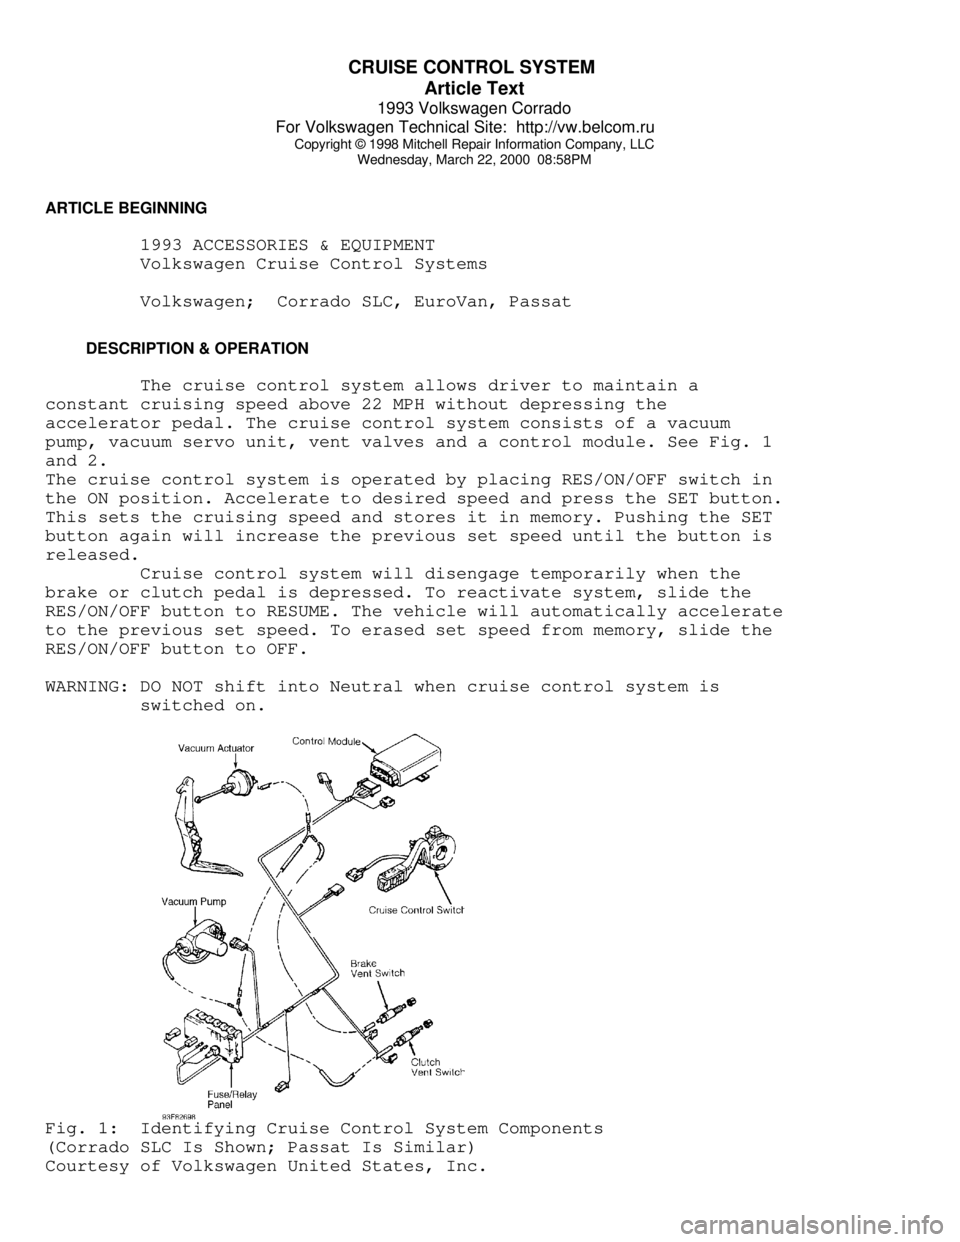
pump, vacuum servo unit, vent valves and a control module. See Fig. 1
and 2.
The cruise control system is operated by placing RES/ON/OFF switch in
the ON position. Accelerate to desired speed and press the SET button.
This sets the cruising speed and stores it in memory. Pushing the SET
button again will increase the previous set speed until the button is
released.
Cruise control system will disengage temporarily when the
brake or clutch pedal is depressed. To reactivate system, slide the
RES/ON/OFF button to RESUME. The vehicle will automatically accelerate
to the previous set speed. To erased set speed from memory, slide the
RES/ON/OFF button to OFF.
WARNING: DO NOT shift into Neutral when cruise control system is
switched on.Fig. 1: Identifying Cruise Control System Components
(Corrado SLC Is Shown; Passat Is Similar)
Courtesy of Volkswagen United States, Inc.
Page 455 of 920
CRUISE CONTROL SYSTEM
Article Text (p. 3)
1993 Volkswagen Corrado
For Volkswagen Technical Site: http://vw.belcom.ru
Copyright © 1998 Mitchell Repair Information Company, LLC
Wednesday, March 22, 2000 08:58PM
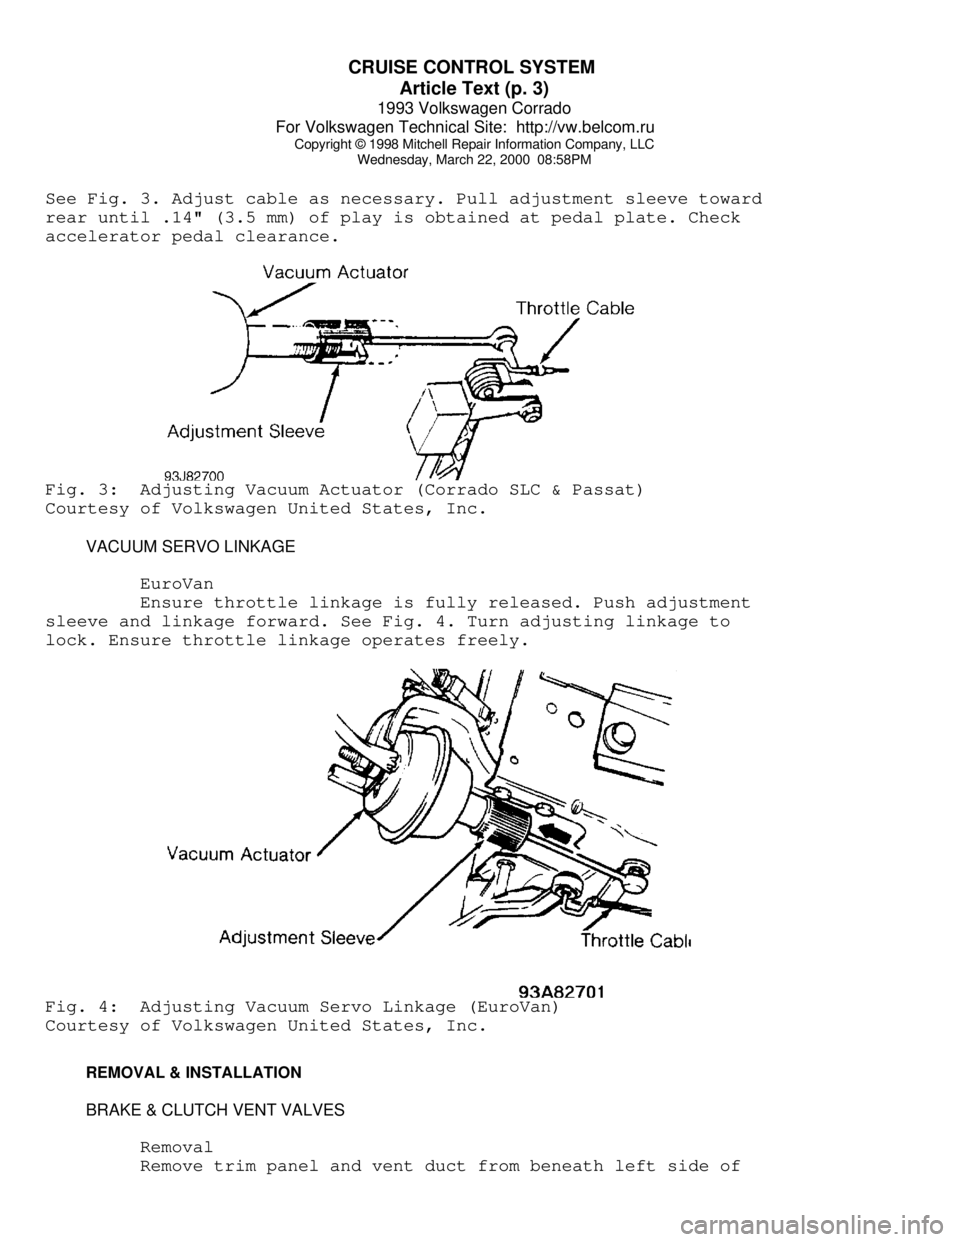
See Fig. 3. Adjust cable as necessary. Pull adjustment sleeve toward
rear until .14" (3.5 mm) of play is obtained at pedal plate. Check
accelerator pedal clearance.Fig. 3: Adjusting Vacuum Actuator (Corrado SLC & Passat)
Courtesy of Volkswagen United States, Inc.
VACUUM SERVO LINKAGE
EuroVan
Ensure throttle linkage is fully released. Push adjustment
sleeve and linkage forward. See Fig. 4. Turn adjusting linkage to
lock. Ensure throttle linkage operates freely.Fig. 4: Adjusting Vacuum Servo Linkage (EuroVan)
Courtesy of Volkswagen United States, Inc.
REMOVAL & INSTALLATION
BRAKE & CLUTCH VENT VALVES
Removal
Remove trim panel and vent duct from beneath left side of
Page 456 of 920
CRUISE CONTROL SYSTEM
Article Text (p. 4)
1993 Volkswagen Corrado
For Volkswagen Technical Site: http://vw.belcom.ru
Copyright © 1998 Mitchell Repair Information Company, LLC
Wednesday, March 22, 2000 08:58PM
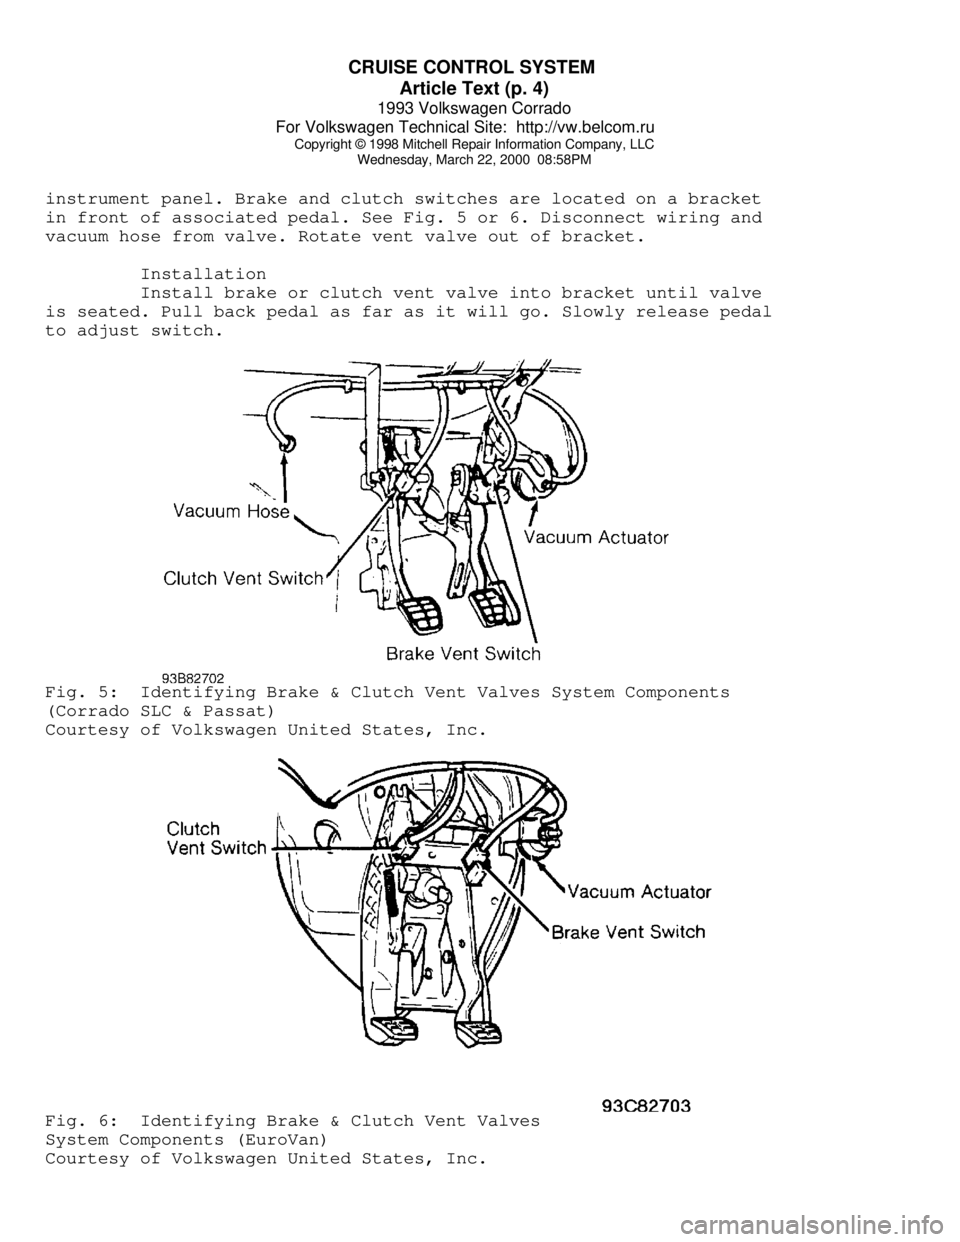
instrument panel. Brake and clutch switches are located on a bracket
in front of associated pedal. See Fig. 5 or 6. Disconnect wiring and
vacuum hose from valve. Rotate vent valve out of bracket.
Installation
Install brake or clutch vent valve into bracket until valve
is seated. Pull back pedal as far as it will go. Slowly release pedal
to adjust switch.Fig. 5: Identifying Brake & Clutch Vent Valves System Components
(Corrado SLC & Passat)
Courtesy of Volkswagen United States, Inc.Fig. 6: Identifying Brake & Clutch Vent Valves
System Components (EuroVan)
Courtesy of Volkswagen United States, Inc.