1993 VOLKSWAGEN CORRADO technical specifications
[x] Cancel search: technical specificationsPage 274 of 920

* SUSPENSION UNIFORM INSPECTION GUIDELINES *
Article Text (p. 63)
1993 Volkswagen Corrado
For Volkswagen Technical Site: http://vw.belcom.ru
Copyright © 1998 Mitchell Repair Information Company, LLC
Wednesday, March 22, 2000 08:45PM
diameter difference on a ³ ³ four-wheel drive vehicle
³ ³
ÄÄÄÄÄÄÄÄÄÄÄÄÄÄÄÄÄÄÄÄÄÄÄÄÄÄÄÄÄÄÅÄÄÄÄÄÄÅÄÄÄÄÄÄÄÄÄÄÄÄÄÄÄÄÄÄÄÄÄÄÄÄÄÄÄÄÄÄÄÄTread area puncture larger in
³ B ³ Require replacement.
diameter than tire
³ ³ manufacturer's specifications
³ ³
ÄÄÄÄÄÄÄÄÄÄÄÄÄÄÄÄÄÄÄÄÄÄÄÄÄÄÄÄÄÄÅÄÄÄÄÄÄÅÄÄÄÄÄÄÄÄÄÄÄÄÄÄÄÄÄÄÄÄÄÄÄÄÄÄÄÄÄÄÄÄTread missing pieces
³ A ³ Require replacement.
(chunking), exposing cord
³ ³
ÄÄÄÄÄÄÄÄÄÄÄÄÄÄÄÄÄÄÄÄÄÄÄÄÄÄÄÄÄÄÅÄÄÄÄÄÄÅÄÄÄÄÄÄÄÄÄÄÄÄÄÄÄÄÄÄÄÄÄÄÄÄÄÄÄÄÄÄÄÄTread missing pieces
³ A ³ Suggest replacement.
(chunking), not exposing cord
³ ³
ÄÄÄÄÄÄÄÄÄÄÄÄÄÄÄÄÄÄÄÄÄÄÄÄÄÄÄÄÄÄÅÄÄÄÄÄÄÅÄÄÄÄÄÄÄÄÄÄÄÄÄÄÄÄÄÄÄÄÄÄÄÄÄÄÄÄÄÄÄÄTread separations
³ A ³ Require replacement.
ÄÄÄÄÄÄÄÄÄÄÄÄÄÄÄÄÄÄÄÄÄÄÄÄÄÄÄÄÄÄÅÄÄÄÄÄÄÅÄÄÄÄÄÄÄÄÄÄÄÄÄÄÄÄÄÄÄÄÄÄÄÄÄÄÄÄÄÄÄÄTube in tubeless tire
³ C,3 ³ Suggest removal of tube.
³ ³ See note (4) below.
ÄÄÄÄÄÄÄÄÄÄÄÄÄÄÄÄÄÄÄÄÄÄÄÄÄÄÄÄÄÄÅÄÄÄÄÄÄÅÄÄÄÄÄÄÄÄÄÄÄÄÄÄÄÄÄÄÄÄÄÄÄÄÄÄÄÄÄÄÄÄWeather-checking
³ ³ No service required/suggested.
ÄÄÄÄÄÄÄÄÄÄÄÄÄÄÄÄÄÄÄÄÄÄÄÄÄÄÄÄÄÄÅÄÄÄÄÄÄÅÄÄÄÄÄÄÄÄÄÄÄÄÄÄÄÄÄÄÄÄÄÄÄÄÄÄÄÄÄÄÄÄWorn to tread wear indicators
³ B ³ Require replacement.
ÄÄÄÄÄÄÄÄÄÄÄÄÄÄÄÄÄÄÄÄÄÄÄÄÄÄÄÄÄÄÁÄÄÄÄÄÄÁÄÄÄÄÄÄÄÄÄÄÄÄÄÄÄÄÄÄÄÄÄÄÄÄÄÄÄÄÄÄÄÄNOTE: (1) Determine and correct cause of irregular tire wear.
(2) If radials and bias or bias-belted ply tires are on the same
vehicle, the radials must be on the rear axle, except for
high-pressure temporary spares.
(3) Excessive is defined as enough to contribute to performance
problems. Match mounting may correct run-out. If not,
require replacement of appropriate part. Refer to
manufacturer's specifications.
(4) Most manufacturers do not recommend tubes in tubeless tires.
Inspect tire and wheel assembly to determine the reason for
a tube in tubeless tire. Recommendation for repair or
replacement should be based upon condition of tires and/or
wheel listed in these guidelines.
ÄÄÄÄÄÄÄÄÄÄÄÄÄÄÄÄÄÄÄÄÄÄÄÄÄÄÄÄÄÄÄÄÄÄÄÄÄÄÄÄÄÄÄÄÄÄÄÄÄÄÄÄÄÄÄÄÄÄÄÄÄÄÄÄÄÄÄÄÄÄ VALVE STEMS
VALVE STEMS
ÄÄÄÄÄÄÄÄÄÄÄÄÄÄÄÄÄÄÄÄÄÄÄÄÄÄÄÄÄÄÄÄÄÄÂÄÄÄÄÄÄÂÄÄÄÄÄÄÄÄÄÄÄÄÄÄÄÄÄÄÄÄÄÄÄÄÄÄÄÄCondition
³ Code ³ Procedure
ÄÄÄÄÄÄÄÄÄÄÄÄÄÄÄÄÄÄÄÄÄÄÄÄÄÄÄÄÄÄÄÄÄÄÅÄÄÄÄÄÄÅÄÄÄÄÄÄÄÄÄÄÄÄÄÄÄÄÄÄÄÄÄÄÄÄÄÄÄÄBent
³ A,1 ³ Suggest replacement.
ÄÄÄÄÄÄÄÄÄÄÄÄÄÄÄÄÄÄÄÄÄÄÄÄÄÄÄÄÄÄÄÄÄÄÅÄÄÄÄÄÄÅÄÄÄÄÄÄÄÄÄÄÄÄÄÄÄÄÄÄÄÄÄÄÄÄÄÄÄÄBroken
³ A ³ Require replacement.
ÄÄÄÄÄÄÄÄÄÄÄÄÄÄÄÄÄÄÄÄÄÄÄÄÄÄÄÄÄÄÄÄÄÄÅÄÄÄÄÄÄÅÄÄÄÄÄÄÄÄÄÄÄÄÄÄÄÄÄÄÄÄÄÄÄÄÄÄÄÄCut, but not leaking
³ A,1 ³ Suggest replacement.
ÄÄÄÄÄÄÄÄÄÄÄÄÄÄÄÄÄÄÄÄÄÄÄÄÄÄÄÄÄÄÄÄÄÄÅÄÄÄÄÄÄÅÄÄÄÄÄÄÄÄÄÄÄÄÄÄÄÄÄÄÄÄÄÄÄÄÄÄÄÄDeteriorated (cracking, dry rot)
³ A,1 ³ Suggest replacement.
ÄÄÄÄÄÄÄÄÄÄÄÄÄÄÄÄÄÄÄÄÄÄÄÄÄÄÄÄÄÄÄÄÄÄÅÄÄÄÄÄÄÅÄÄÄÄÄÄÄÄÄÄÄÄÄÄÄÄÄÄÄÄÄÄÄÄÄÄÄÄLeaking
³ A ³ Require repair/replacement.
Page 275 of 920

* SUSPENSION UNIFORM INSPECTION GUIDELINES *
Article Text (p. 64)
1993 Volkswagen Corrado
For Volkswagen Technical Site: http://vw.belcom.ru
Copyright © 1998 Mitchell Repair Information Company, LLC
Wednesday, March 22, 2000 08:45PMÄÄÄÄÄÄÄÄÄÄÄÄÄÄÄÄÄÄÄÄÄÄÄÄÄÄÄÄÄÄÄÄÄÄÅÄÄÄÄÄÄÅÄÄÄÄÄÄÄÄÄÄÄÄÄÄÄÄÄÄÄÄÄÄÄÄÄÄÄÄMissing
³ C ³ Require replacement.
ÄÄÄÄÄÄÄÄÄÄÄÄÄÄÄÄÄÄÄÄÄÄÄÄÄÄÄÄÄÄÄÄÄÄÅÄÄÄÄÄÄÅÄÄÄÄÄÄÄÄÄÄÄÄÄÄÄÄÄÄÄÄÄÄÄÄÄÄÄÄThreads damaged
³ A ³ Require repair/replacement.
ÄÄÄÄÄÄÄÄÄÄÄÄÄÄÄÄÄÄÄÄÄÄÄÄÄÄÄÄÄÄÄÄÄÄÅÄÄÄÄÄÄÅÄÄÄÄÄÄÄÄÄÄÄÄÄÄÄÄÄÄÄÄÄÄÄÄÄÄÄÄThreads stripped (threads missing)
³ A ³ Require replacement.
ÄÄÄÄÄÄÄÄÄÄÄÄÄÄÄÄÄÄÄÄÄÄÄÄÄÄÄÄÄÄÄÄÄÄÅÄÄÄÄÄÄÅÄÄÄÄÄÄÄÄÄÄÄÄÄÄÄÄÄÄÄÄÄÄÄÄÄÄÄÄValve cap missing
³ C ³ Require replacement of cap.
ÄÄÄÄÄÄÄÄÄÄÄÄÄÄÄÄÄÄÄÄÄÄÄÄÄÄÄÄÄÄÄÄÄÄÅÄÄÄÄÄÄÅÄÄÄÄÄÄÄÄÄÄÄÄÄÄÄÄÄÄÄÄÄÄÄÄÄÄÄÄWeather-checking
³ A,1 ³ Suggest replacement.
ÄÄÄÄÄÄÄÄÄÄÄÄÄÄÄÄÄÄÄÄÄÄÄÄÄÄÄÄÄÄÄÄÄÄÅÄÄÄÄÄÄÅÄÄÄÄÄÄÄÄÄÄÄÄÄÄÄÄÄÄÄÄÄÄÄÄÄÄÄÄWon't take air
³ A ³ Require repair/replacement.
ÄÄÄÄÄÄÄÄÄÄÄÄÄÄÄÄÄÄÄÄÄÄÄÄÄÄÄÄÄÄÄÄÄÄÁÄÄÄÄÄÄÁÄÄÄÄÄÄÄÄÄÄÄÄÄÄÄÄÄÄÄÄÄÄÄÄÄÄÄÄ WHEEL ATTACHMENT HARDWARE
For conditions noted below, also check conditions of wheel
stud holes.
CAUTION: Proper lug nut torque is essential. Follow manufacturer's
torque specifications and tightening sequence. DO NOT
lubricate threads unless specified by the vehicle
manufacturer.
WHEEL ATTACHMENT HARDWARE
ÄÄÄÄÄÄÄÄÄÄÄÄÄÄÄÄÄÄÄÄÄÄÄÄÄÄÄÄÄÂÄÄÄÄÄÄÂÄÄÄÄÄÄÄÄÄÄÄÄÄÄÄÄÄÄÄÄÄÄÄÄÄÄÄÄÄÄÄÄÄCondition
³ Code ³ Procedure
ÄÄÄÄÄÄÄÄÄÄÄÄÄÄÄÄÄÄÄÄÄÄÄÄÄÄÄÄÄÅÄÄÄÄÄÄÅÄÄÄÄÄÄÄÄÄÄÄÄÄÄÄÄÄÄÄÄÄÄÄÄÄÄÄÄÄÄÄÄÄBent
³ A ³ Require replacement.
ÄÄÄÄÄÄÄÄÄÄÄÄÄÄÄÄÄÄÄÄÄÄÄÄÄÄÄÄÄÅÄÄÄÄÄÄÅÄÄÄÄÄÄÄÄÄÄÄÄÄÄÄÄÄÄÄÄÄÄÄÄÄÄÄÄÄÄÄÄÄBroken
³ A ³ Require replacement.
³ ³ See note (1) below.
ÄÄÄÄÄÄÄÄÄÄÄÄÄÄÄÄÄÄÄÄÄÄÄÄÄÄÄÄÄÅÄÄÄÄÄÄÅÄÄÄÄÄÄÄÄÄÄÄÄÄÄÄÄÄÄÄÄÄÄÄÄÄÄÄÄÄÄÄÄÄLoose
³ B ³ Require repair or replacement
³ ³ of affected component.
ÄÄÄÄÄÄÄÄÄÄÄÄÄÄÄÄÄÄÄÄÄÄÄÄÄÄÄÄÄÅÄÄÄÄÄÄÅÄÄÄÄÄÄÄÄÄÄÄÄÄÄÄÄÄÄÄÄÄÄÄÄÄÄÄÄÄÄÄÄÄLug nut installed backward
³ B ³ Require repair.
ÄÄÄÄÄÄÄÄÄÄÄÄÄÄÄÄÄÄÄÄÄÄÄÄÄÄÄÄÄÅÄÄÄÄÄÄÅÄÄÄÄÄÄÄÄÄÄÄÄÄÄÄÄÄÄÄÄÄÄÄÄÄÄÄÄÄÄÄÄÄLug nut mating type incorrect
³ B ³ Require replacement of nut.
ÄÄÄÄÄÄÄÄÄÄÄÄÄÄÄÄÄÄÄÄÄÄÄÄÄÄÄÄÄÅÄÄÄÄÄÄÅÄÄÄÄÄÄÄÄÄÄÄÄÄÄÄÄÄÄÄÄÄÄÄÄÄÄÄÄÄÄÄÄÄLug nut mating surface dished
³ A ³ Require replacement of nut.
ÄÄÄÄÄÄÄÄÄÄÄÄÄÄÄÄÄÄÄÄÄÄÄÄÄÄÄÄÄÅÄÄÄÄÄÄÅÄÄÄÄÄÄÄÄÄÄÄÄÄÄÄÄÄÄÄÄÄÄÄÄÄÄÄÄÄÄÄÄÄLug nut flats rounded
³ A ³ Require replacement of nut.
³ ³ See note (2) below.
ÄÄÄÄÄÄÄÄÄÄÄÄÄÄÄÄÄÄÄÄÄÄÄÄÄÄÄÄÄÅÄÄÄÄÄÄÅÄÄÄÄÄÄÄÄÄÄÄÄÄÄÄÄÄÄÄÄÄÄÄÄÄÄÄÄÄÄÄÄÄLug nut seized
³ A ³ Require replacement of nut
³ ³ and/or stud. See note (2) below.
ÄÄÄÄÄÄÄÄÄÄÄÄÄÄÄÄÄÄÄÄÄÄÄÄÄÄÄÄÄÅÄÄÄÄÄÄÅÄÄÄÄÄÄÄÄÄÄÄÄÄÄÄÄÄÄÄÄÄÄÄÄÄÄÄÄÄÄÄÄÄStud incorrect
³ B ³ Require replacement of stud.
ÄÄÄÄÄÄÄÄÄÄÄÄÄÄÄÄÄÄÄÄÄÄÄÄÄÄÄÄÄÅÄÄÄÄÄÄÅÄÄÄÄÄÄÄÄÄÄÄÄÄÄÄÄÄÄÄÄÄÄÄÄÄÄÄÄÄÄÄÄÄThreads damaged
³ A ³ Require repair or replacement of
³ ³ component with damaged threads.
Page 277 of 920

* SUSPENSION UNIFORM INSPECTION GUIDELINES *
Article Text (p. 66)
1993 Volkswagen Corrado
For Volkswagen Technical Site: http://vw.belcom.ru
Copyright © 1998 Mitchell Repair Information Company, LLC
Wednesday, March 22, 2000 08:45PM
Cracked ³ A ³ Require replacement.
ÄÄÄÄÄÄÄÄÄÄÄÄÄÄÄÄÄÄÄÄÄÄÄÄÄÄÄÅÄÄÄÄÄÄÅÄÄÄÄÄÄÄÄÄÄÄÄÄÄÄÄÄÄÄÄÄÄÄÄÄÄÄÄÄÄÄÄÄÄÄDirectional/asymmetrical
³ B ³ Require remounting and/or
wheels mounted incorrectly
³ ³ repositioning.
ÄÄÄÄÄÄÄÄÄÄÄÄÄÄÄÄÄÄÄÄÄÄÄÄÄÄÄÅÄÄÄÄÄÄÅÄÄÄÄÄÄÄÄÄÄÄÄÄÄÄÄÄÄÄÄÄÄÄÄÄÄÄÄÄÄÄÄÄÄÄLoad capacity less than
³ B ³ Require replacement.
OEM specifications
³ ³
ÄÄÄÄÄÄÄÄÄÄÄÄÄÄÄÄÄÄÄÄÄÄÄÄÄÄÄÅÄÄÄÄÄÄÅÄÄÄÄÄÄÄÄÄÄÄÄÄÄÄÄÄÄÄÄÄÄÄÄÄÄÄÄÄÄÄÄÄÄÄOffset mismatched on same
³ B ³ Require replacement.
axle
³ ³
ÄÄÄÄÄÄÄÄÄÄÄÄÄÄÄÄÄÄÄÄÄÄÄÄÄÄÄÅÄÄÄÄÄÄÅÄÄÄÄÄÄÄÄÄÄÄÄÄÄÄÄÄÄÄÄÄÄÄÄÄÄÄÄÄÄÄÄÄÄÄRivets leaking
³ A ³ Require replacement.
ÄÄÄÄÄÄÄÄÄÄÄÄÄÄÄÄÄÄÄÄÄÄÄÄÄÄÄÅÄÄÄÄÄÄÅÄÄÄÄÄÄÄÄÄÄÄÄÄÄÄÄÄÄÄÄÄÄÄÄÄÄÄÄÄÄÄÄÄÄÄRun-out beyond OEM specs
³ B ³ Require replacement.
ÄÄÄÄÄÄÄÄÄÄÄÄÄÄÄÄÄÄÄÄÄÄÄÄÄÄÄÅÄÄÄÄÄÄÅÄÄÄÄÄÄÄÄÄÄÄÄÄÄÄÄÄÄÄÄÄÄÄÄÄÄÄÄÄÄÄÄÄÄÄStud holes elongated
³ A ³ Require replacement. See note (1)
ÄÄÄÄÄÄÄÄÄÄÄÄÄÄÄÄÄÄÄÄÄÄÄÄÄÄÄÅÄÄÄÄÄÄÅÄÄÄÄÄÄÄÄÄÄÄÄÄÄÄÄÄÄÄÄÄÄÄÄÄÄÄÄÄÄÄÄÄÄÄWelded or brazed repair
³ B,2 ³ Suggest replacement.
ÄÄÄÄÄÄÄÄÄÄÄÄÄÄÄÄÄÄÄÄÄÄÄÄÄÄÄÅÄÄÄÄÄÄÅÄÄÄÄÄÄÄÄÄÄÄÄÄÄÄÄÄÄÄÄÄÄÄÄÄÄÄÄÄÄÄÄÄÄÄWelds leaking
³ A ³ Require replacement.
ÄÄÄÄÄÄÄÄÄÄÄÄÄÄÄÄÄÄÄÄÄÄÄÄÄÄÄÅÄÄÄÄÄÄÅÄÄÄÄÄÄÄÄÄÄÄÄÄÄÄÄÄÄÄÄÄÄÄÄÄÄÄÄÄÄÄÄÄÄÄWheel hub centering (pilot)
³ B ³ Require replacement.
hole incorrect
³ ³
ÄÄÄÄÄÄÄÄÄÄÄÄÄÄÄÄÄÄÄÄÄÄÄÄÄÄÄÁÄÄÄÄÄÄÁÄÄÄÄÄÄÄÄÄÄÄÄÄÄÄÄÄÄÄÄÄÄÄÄÄÄÄÄÄÄÄÄÄÄÄNOTE: (1) Inspect wheel attaching hardware for damage.
ÄÄÄÄÄÄÄÄÄÄÄÄÄÄÄÄÄÄÄÄÄÄÄÄÄÄÄÄÄÄÄÄÄÄÄÄÄÄÄÄÄÄÄÄÄÄÄÄÄÄÄÄÄÄÄÄÄÄÄÄÄÄÄÄÄÄÄÄÄÄEND OF ARTICLE
Page 294 of 920
2.8L IN-LINE V6 (VR6)
Article Text (p. 3)
1993 Volkswagen Corrado
For Volkswagen Technical Site: http://vw.belcom.ru
Copyright © 1998 Mitchell Repair Information Company, LLC
Wednesday, March 22, 2000 08:47PM
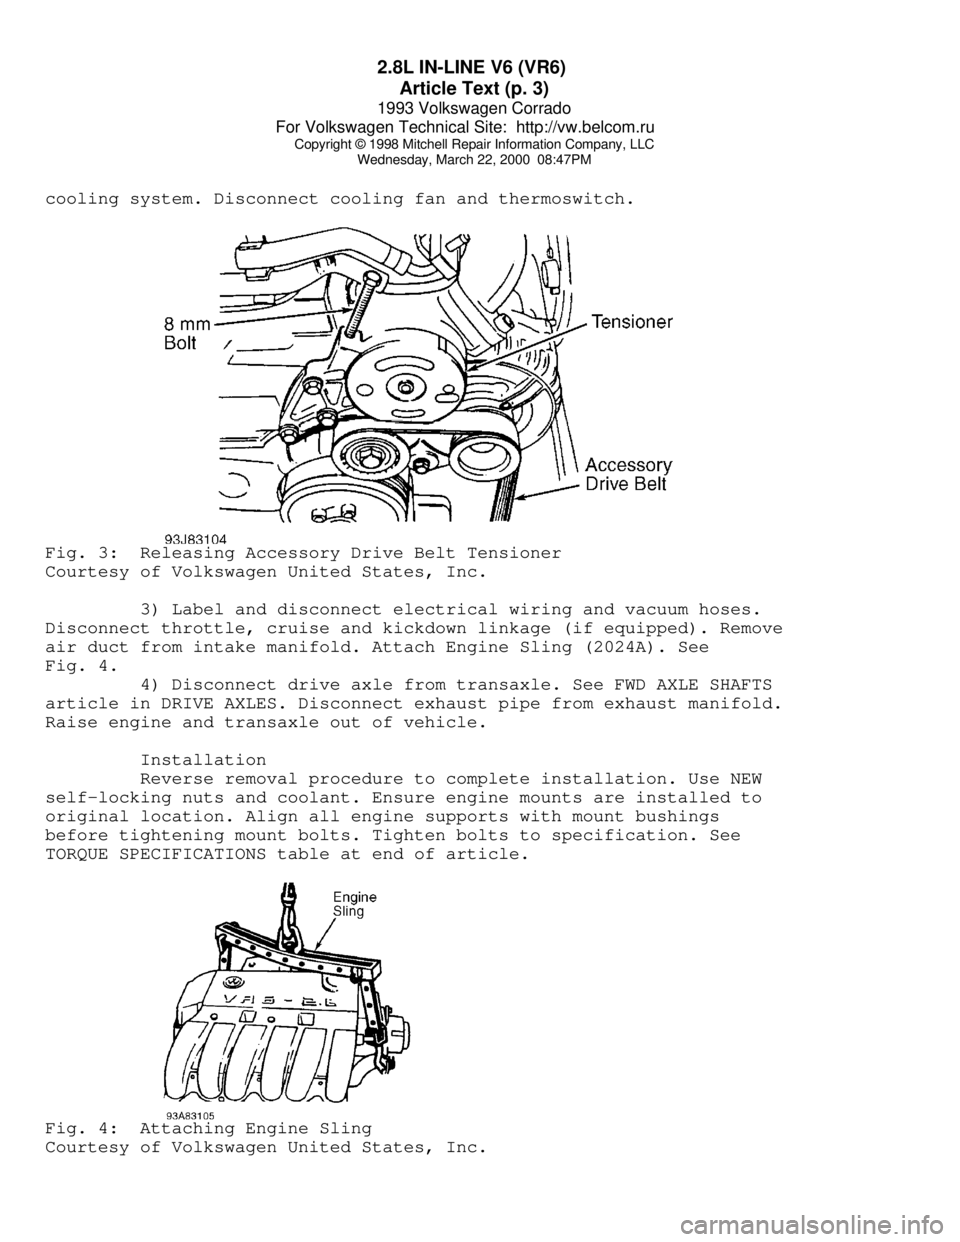
cooling system. Disconnect cooling fan and thermoswitch.Fig. 3: Releasing Accessory Drive Belt Tensioner
Courtesy of Volkswagen United States, Inc.
3) Label and disconnect electrical wiring and vacuum hoses.
Disconnect throttle, cruise and kickdown linkage (if equipped). Remove
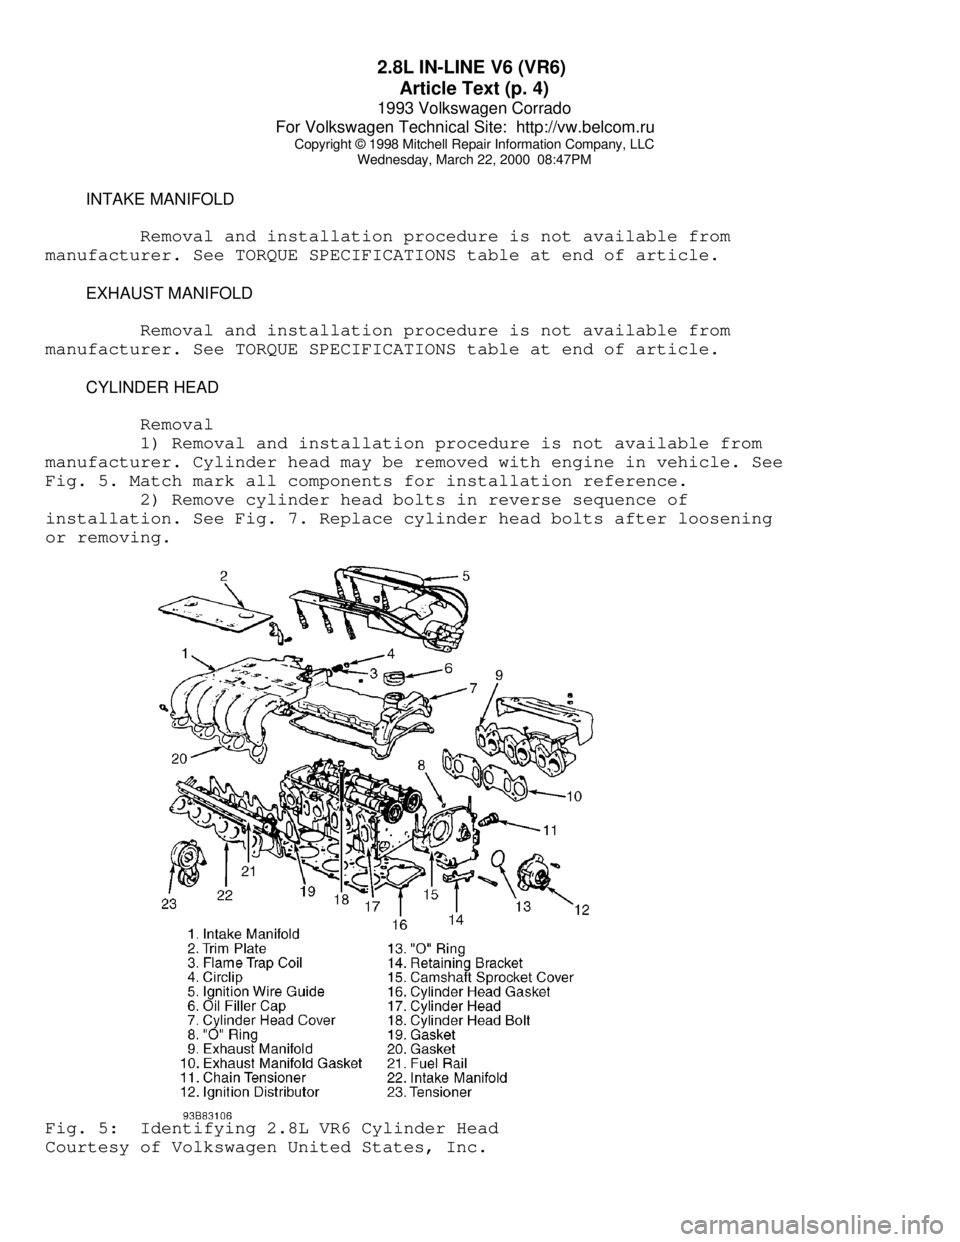
air duct from intake manifold. Attach Engine Sling (2024A). See
Fig. 4.
4) Disconnect drive axle from transaxle. See FWD AXLE SHAFTS
article in DRIVE AXLES. Disconnect exhaust pipe from exhaust manifold.
Raise engine and transaxle out of vehicle.
Installation
Reverse removal procedure to complete installation. Use NEW
self-locking nuts and coolant. Ensure engine mounts are installed to
original location. Align all engine supports with mount bushings
before tightening mount bolts. Tighten bolts to specification. See
TORQUE SPECIFICATIONS table at end of article.Fig. 4: Attaching Engine Sling
Courtesy of Volkswagen United States, Inc.
Page 295 of 920
2.8L IN-LINE V6 (VR6)
Article Text (p. 4)
1993 Volkswagen Corrado
For Volkswagen Technical Site: http://vw.belcom.ru
Copyright © 1998 Mitchell Repair Information Company, LLC
Wednesday, March 22, 2000 08:47PM
INTAKE MANIFOLD
Removal and installation procedure is not available from
manufacturer. See TORQUE SPECIFICATIONS table at end of article.
EXHAUST MANIFOLD
Removal and installation procedure is not available from
manufacturer. See TORQUE SPECIFICATIONS table at end of article.
CYLINDER HEAD
Removal
1) Removal and installation procedure is not available from
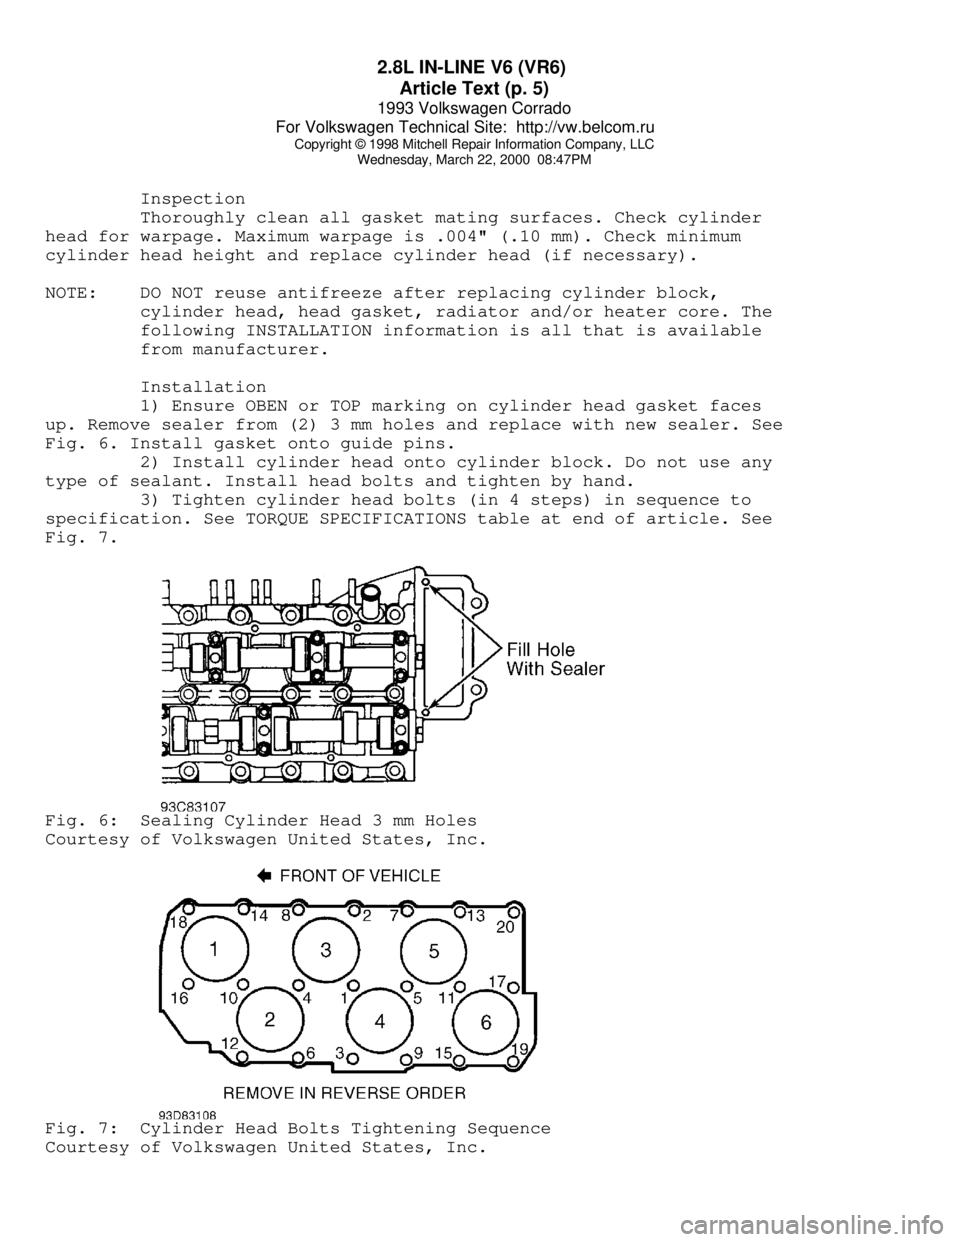
manufacturer. Cylinder head may be removed with engine in vehicle. See
Fig. 5. Match mark all components for installation reference.
2) Remove cylinder head bolts in reverse sequence of
installation. See Fig. 7. Replace cylinder head bolts after loosening
or removing.Fig. 5: Identifying 2.8L VR6 Cylinder Head
Courtesy of Volkswagen United States, Inc.
Page 296 of 920
2.8L IN-LINE V6 (VR6)
Article Text (p. 5)
1993 Volkswagen Corrado
For Volkswagen Technical Site: http://vw.belcom.ru
Copyright © 1998 Mitchell Repair Information Company, LLC
Wednesday, March 22, 2000 08:47PM
Inspection
Thoroughly clean all gasket mating surfaces. Check cylinder
head for warpage. Maximum warpage is .004" (.10 mm). Check minimum
cylinder head height and replace cylinder head (if necessary).
NOTE: DO NOT reuse antifreeze after replacing cylinder block,
cylinder head, head gasket, radiator and/or heater core. The
following INSTALLATION information is all that is available
from manufacturer.
Installation
1) Ensure OBEN or TOP marking on cylinder head gasket faces
up. Remove sealer from (2) 3 mm holes and replace with new sealer. See
Fig. 6. Install gasket onto guide pins.
2) Install cylinder head onto cylinder block. Do not use any
type of sealant. Install head bolts and tighten by hand.
3) Tighten cylinder head bolts (in 4 steps) in sequence to
specification. See TORQUE SPECIFICATIONS table at end of article. See
Fig. 7.Fig. 6: Sealing Cylinder Head 3 mm Holes
Courtesy of Volkswagen United States, Inc.Fig. 7: Cylinder Head Bolts Tightening Sequence
Courtesy of Volkswagen United States, Inc.
Page 300 of 920
2.8L IN-LINE V6 (VR6)
Article Text (p. 9)
1993 Volkswagen Corrado
For Volkswagen Technical Site: http://vw.belcom.ru
Copyright © 1998 Mitchell Repair Information Company, LLC
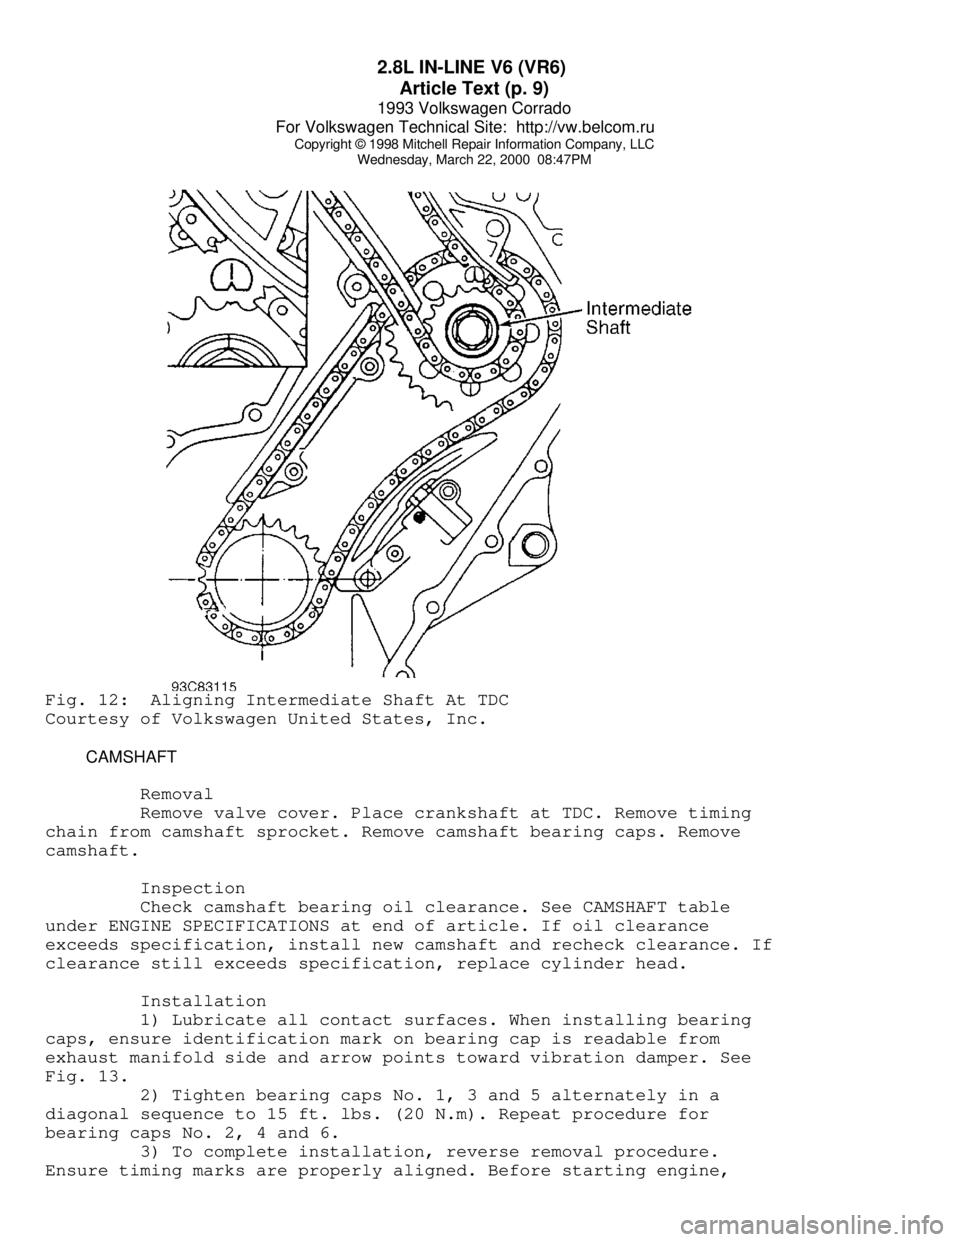
Wednesday, March 22, 2000 08:47PMFig. 12: Aligning Intermediate Shaft At TDC
Courtesy of Volkswagen United States, Inc.
CAMSHAFT
Removal
Remove valve cover. Place crankshaft at TDC. Remove timing
chain from camshaft sprocket. Remove camshaft bearing caps. Remove
camshaft.
Inspection
Check camshaft bearing oil clearance. See CAMSHAFT table
under ENGINE SPECIFICATIONS at end of article. If oil clearance
exceeds specification, install new camshaft and recheck clearance. If
clearance still exceeds specification, replace cylinder head.
Installation
1) Lubricate all contact surfaces. When installing bearing
caps, ensure identification mark on bearing cap is readable from
exhaust manifold side and arrow points toward vibration damper. See
Fig. 13.
2) Tighten bearing caps No. 1, 3 and 5 alternately in a
diagonal sequence to 15 ft. lbs. (20 N.m). Repeat procedure for
bearing caps No. 2, 4 and 6.
3) To complete installation, reverse removal procedure.
Ensure timing marks are properly aligned. Before starting engine,
Page 302 of 920
2.8L IN-LINE V6 (VR6)
Article Text (p. 11)
1993 Volkswagen Corrado
For Volkswagen Technical Site: http://vw.belcom.ru
Copyright © 1998 Mitchell Repair Information Company, LLC
Wednesday, March 22, 2000 08:47PM
Cylinder Head
Clean all gasket mating surfaces. Check cylinder head for
warpage. Ensure warpage does not exceed .004" (0.1 mm).
Valve Stem Oil Seals
With valve springs removed, remove oil seals using Valve Seal
Remover (3047A). To install new oil seal, slide plastic sleeve over
valve stem. Lubricate new oil seal. Using Valve Seal Installer (3129),
push oil seal on valve guide.
Valve Guides
1) Check valve-to-guide clearance specification. See
CYLINDER HEAD table under ENGINE SPECIFICATIONS at end of article. If
valve guide have previously been replaced, replace cylinder head.
2) To replace valve guide, press guide out from camshaft
side. Lubricate guide and press in cold cylinder head (from camshaft
side) until shoulder makes contact. DO NOT exceed one ton pressure.
Ream guides to proper valve-to-guide clearance. See CYLINDER HEAD
table under ENGINE SPECIFICATIONS at end of article.
Valve Seats
1) Check valve seats before any other cylinder head service.
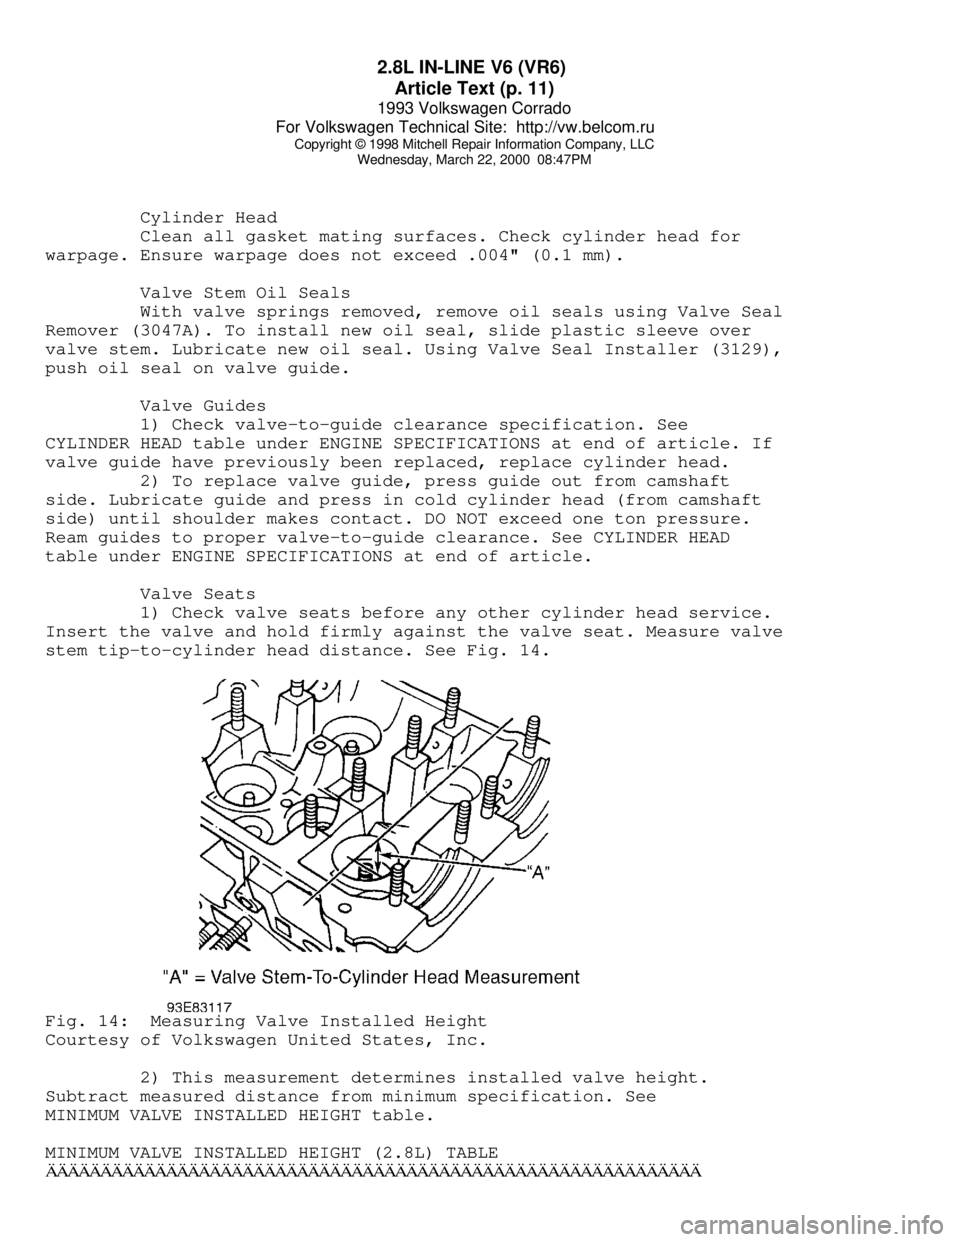
Insert the valve and hold firmly against the valve seat. Measure valve
stem tip-to-cylinder head distance. See Fig. 14.Fig. 14: Measuring Valve Installed Height
Courtesy of Volkswagen United States, Inc.
2) This measurement determines installed valve height.
Subtract measured distance from minimum specification. See
MINIMUM VALVE INSTALLED HEIGHT table.
MINIMUM VALVE INSTALLED HEIGHT (2.8L) TABLEÄÄÄÄÄÄÄÄÄÄÄÄÄÄÄÄÄÄÄÄÄÄÄÄÄÄÄÄÄÄÄÄÄÄÄÄÄÄÄÄÄÄÄÄÄÄÄÄÄÄÄÄÄÄÄÄÄÄÄÄ