1993 CHEVROLET SUBURBAN automatic transmission fluid
[x] Cancel search: automatic transmission fluidPage 230 of 386
. .
6. Release the regular brakes.
CAUTION
It can be dangerous to get out of your vehicle if the shift lever is no
fully in
P (Park) wi-. the parking brake firmly set. Your vehicle can
roll.
If you have left the engine running, the vehicle can move suddenl\
y.
You or others could be injured.
To be sure your vehicle won’t move,
when you’re on fairly level ground, use the steps that foll\
ow.
If you have four-wheel drive and your transfer case is in N (Neutral),
your vehicle will be free to
roll, even if your shift lever is in P (Park)
So, be sure the transfer case is in a drive gear-not in N (Neutral).
If you are parking on a hill, or if you’re pulling a trailer, also see
I “Parking On Hills” in the Index. I
When You Are Ready to Leave After Parking on a Hill
1. Apply your regular brakes and hold the pedal down while you:
Start your engine.
Shift into a gear; and
Release the parking brake.
2. Let up on the brake pedal.
3. Drive slowly until the trailer is clear of the chocks.
4. Stop and have someone pick up and stow the chocks.
Maintenance When Trailer Towing
Your vehicle will need service more often when you’re pulling a \
trailer. .See
the Maintenance Schedule for more on this. Things that are especially
important in trailer operation are automatic transmission fluid (don’t overfill),
engine oil, axle lubricant, belts, cooling system, and brake ad\
justment. Each
of these is covered in this manual, and the Index will help you find them
quickly.
If you’re trailering, it’s a good idea to review these sections before
you start your trip.
Check periodically to see that all hitch nuts and bolts are tight.
4-63
ProCarManuals.com
Page 235 of 386
ground connection you don’t want. You wouldn’t be able to start your
vehicle, and the bad grounding could damage the electrical systems.
CAUTION
A You could be injured if the vehicles roll. Set the parking brake firmly
on each vehicle. Put an automatic transmission in
P (Park) or a
manual transmission in
N (Neutral).
If you have a four-wheel-drive vehicle, be sure the transfer case is
not in N (Neutral).
3. Turn off the ignition on both vehicles. Turn off all lights that aren’t
needed, and radios. This will avoid sparks and help save both \
batteries.
And it could save your radio!
I
I jou leave a radio on, it could be badly damaged. The repairs woulc
be covered by your warranty.
4. Open the hoods and locate the batteries.
Find the positive
(t) and negative (-) terminals on each battery,
CAUTION
A Using a match near a battery can cause battery gas to explode.
b People have been hurt doing this, and some have been blinded. \
Use
a flashlight if you need more light.
Be sure the batteries have enough water.
You don’t need to add
water
to the Delco Freedom@ battery installed in every new GM
vehicle. But if a battery has filler caps, be sure the right amount of
fluid
is there. If it is low, add water to take care of that first. If you
don’t, explosive gas could be present.
Battery fluid contains acid that can bum you. Don’t get
it on you. If’
you accidentally get it in your eyes or on your skin, flush the place
with water and get medical help immediately. c
5. Check that the jumper cables don’t have loose or missing insulation. If
they do, you could get a shock. The vehicles could be damaged, too.
Before you connect the cables, here are some things you should\
know.
Positive (t) will go to positive (t) and negative (-) will go to negative
5-4
ProCarManuals.com
Page 266 of 386
Service & Appearance Care
.
Here you will find information about the care of your vehicle . This section
begins with service and fuel information. and then it shows
how to check
important fluid and lubricant levels
. There is also technical information about
your vehicle. and a section devoted to its appearance care
.
Service ........................................................................\
........................................... 6-3
Fuel ........................................................................\
................................................ 6-4
Checking Things Under the Hood
....................................................................... \
6-8
Hood Release
........................................................................\
............................ 6-8
Engine Oil ........................................................................\
.................................. 6-9
Air Cleaner
........................................................................\
............................... 6-16
Automatic Transmission Fluid
........................................................................\
. 6-17
Manual Transmission Fluid ........................................................................\
..... 6-20
Hydraulic Clutch
........................................................................\
....................... 6-21
Transfer Case
........................................................................\
.......................... 6-23
Front
Axle ........................................................................\
................................. 6-24
Rear Axle
........................................................................\
................................. 6-24
Engine Coolant
........................................................................\
........................ 6-25
Power Steering Fluid
........................................................................\
............... 6-29
Windshield Washer Fluid
........................................................................\
......... 6-31
Brake Master Cylinder
........................................................................\
............. 6-32
6-1
ProCarManuals.com
Page 282 of 386
I CAUTION
I 10 Operating the engine with the air cleaner off can cause you or others
to be burned. The air cleaner not only cleans the air, it
stops flame
if the engine backfires.
If it isn’t there, and the engine backfires, y(--
could be burned. Don’t drive with it
off, and be cr-ful working on
the engine with the air cleaner
off.
~
NOTICE I
If the air cleaner is off, a backfire can cause a damaging engine fire. And,
dirt
can easily get into your engine, which will damage it. Always have the
air cleaner
in place when you’re driving.
Ib remove the air cleaner filter on a gas engine, turn the wing nuts
counterclockwise. Remove the cover and change the filter.
-
Automatic Transmission Fluid
When to Check and Change:
A good time to check your automatic transmission fluid level is when the
engine
oil is changed. Refer to the Maintenance Schedule to determine when
to change your fluid. See “Scheduled Maintenance Services” in \
the Index.
How to Check:
Because this operation can be a little difficult, you may choose to have this
done at a General Motors dealership Sewice Department.
If you do it yourself, be sure to follow all the instructions here, or you could
get
a false reading on the dipstick.
NOTICE I
I
Too much or too little fluid can damage your transmission. Too much can
mean that some of the fluid could come out and fail
on hot engine parts,
I
starting a fire. Be sure to get an accurate reading if you check-your
transmission fluid.
Wait at least
30 minutes before checking the transmission fluid level if you
have been driving:
When outside temperatures are above 90°F (32°C).
At high speed for quite a while.
In heavy traffic-especially in hot weather.
While pulling a trailer.
6-1 7
ProCarManuals.com
Page 284 of 386
PO053
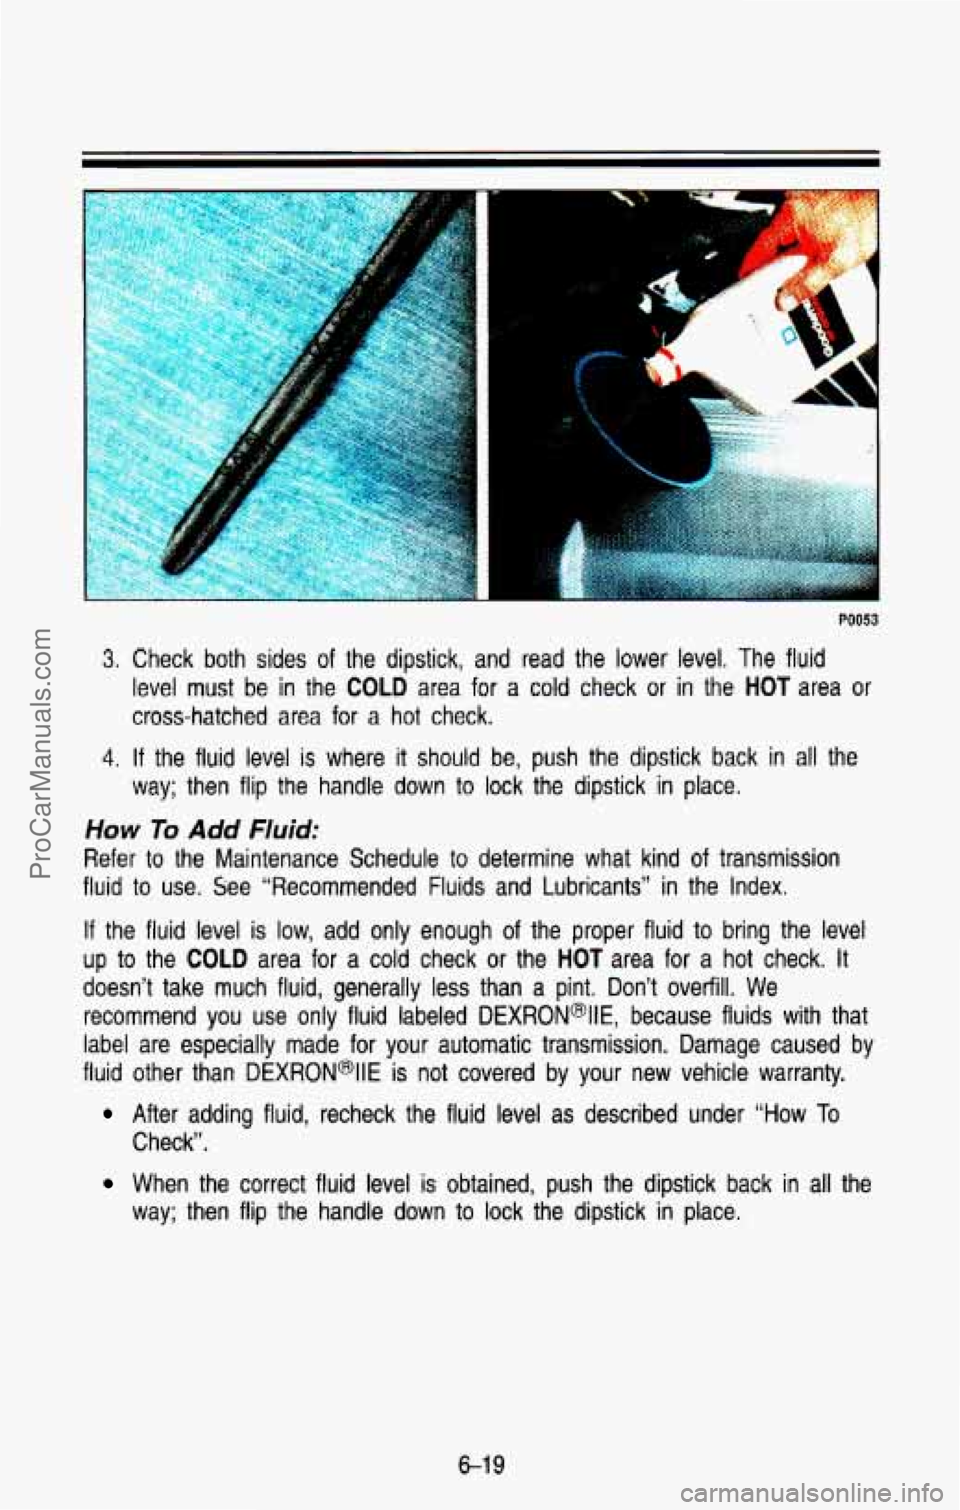
3. Check both sides of the dipstick, and read the lower level, The fluid
level must be in the
COLD area for a cold check or in the HOT area or
cross-hatched area for a hot check.
4. If the fluid level is where it should be, push the dipstick back in all the
way; then flip the handle down to lock the dipstick in place.
HOW To Add Fluid:
Refer to the Maintenance Schedule to determine what kind of transmission
fluid
to use. See “Recommended Fluids and Lubricants” in the Index.
If the fluid level is low, add only enough of the proper fluid to bring the level
up to the COLD area for a cold check or the HOT area for a hot check. It
doesn’t take much fluid, generally less than a pint. Don’t overfill. We
recommend you use only fluid labeled
DEXRON@IIE, because fluids with that
label are especially made for your automatic transmission. Damag\
e caused by
fluid other than
DEXRON@llE is not covered by your new vehicle warranty.
After adding fluid, recheck the fluid level as described under “How To
Check”.
When the correct fluid level is obtained, push the dipstick back in all the
way; then flip the handle down
to lock the dipstick in place.
6-1 9
ProCarManuals.com
Page 356 of 386
6. AIR CLEANER FILTER REPLACEMENT* -Replace at every 30,000
miles (50 000 km) or more often under dusty conditions. Ask your dealer
for the proper replacement intervals for your driving conditions\
.
7. FRONT WHEEL BEARING REPACK (2 WHEEL DRIVE ONLY) -Clean
and repack the front wheel bearings at each brake relining,
or at the
specified interval, whichever comes first.
8.
TRANSMISSION SERVICE
Automatic Transmission
-Change the transmission fluid and filter every
15,000 miles (25 000 km) for vehicles under 8,600 GVWR or every
12,000 miles
(20 000 km) for vehicles over 8,600 GVWR if the vehicle
is mainly driven under one
or more of these conditions:
In heavy city traffic.
Where the outside temperature regularly reaches 90°F (32°C) or
In hilly or mountainous terrain.
higher.
Frequent trailer pulling.
Uses such as taxi, police, delivery or other commercial service.
If the vehicle is not used mainly under any of these conditions, change
the fluid and filter every
30,000 miles (50 000 km) for vehicles under
8600 GVWR or every
24,000 miles (40 000 km) for vehicles over 8600
GVWR. See “Automatic Transmission Fluid” in the Index for more
information.
Manual Transmission -Transmission fluid does not require periodic
changing.
9. CDRV SYSTEM INSPECTION* -Check the Crankcase Depression
Regulator Valve System
for any worn, plugged or collapsed hoses. Have
the system checked as described in the Service Manual.
10. FUEL FILTER REPLACEMENT --Replace the fuel filter at the specified
interval
or sooner if clogged.
11.
SPARK PLUGS REPLACEMENT” --Replace spark plugs with the type
listed in Section
6. See “Specification Charts” in the Index.
12.
SPARK PLUG WIRE INSPECTION* -Clean wires and inspect for burns,
cracks
or other damage. Check the wire boot fit at the distributor and at
the spark plugs. Replace wires as needed.
*An Emission Control Service
7-1 9
ProCarManuals.com
Page 359 of 386
Scheduled Maintenance Services
When the wheels are removed for rotation, inspect disc brake p\
ads for wear
and rotors for surface condition.
Also inspect drum brake linings for wear and
cracks. Inspect other brake parts, including drums, wheel cylind\
ers, parking
brake, etc., at the same time. Remove any rust
or dirt from the wheel and
mounting surfaces before mounting the wheel.
Inspect brakes more often if driving habits or conditions result in
frequent braking.
Owner Checks and Services
Listed below are owner checks and services which should be made at the
time period specified to help ensure proper safety, emission pe\
rformance, and
dependability of your vehicle.
Be sure any necessary repairs are completed at once. Whenever \
any fluids
or lubricants are added to your vehicle, make sure they are the proper ones,
as shown in this Section.
At Least Once a Month
Tire inflation pressure check --Check the tires for proper inflation. If they
are low, inflate them to the level specified on the certification label
or on the
tire inflation charts. See “Loading Your Vehicle” or “Inflation-Tire Pressure” in
the Index.
At Least Once a Year
Key lock cylinder lubrication --Lubricate key lock cylinders with engine oil.
See the “Recommended Fluid and Lubricants” chart in this section.
Transmission neutral or clutch start switch operation
4 When you are doing this check, the vehicle could move suddenly. If
it does, you or others could be injured. Follow the steps below. I
1. Before you start, be sure you have enough room around the veh\
icle.
2. Firmly apply both the manual parking brake and the regular bra\
ke. See
“Brakes” and “Parking Brake” in the Index.
Do not use the accelerator
pedal.
3. Be ready to turn off the engine immediately if it starts.
4. On automatic transmission vehicles, try to start the engine in each gear.
The starter should work only in
P (Park) or N (Neutral).
7-22
ProCarManuals.com
Page 362 of 386
Recommended Fluids & Lubricants
NOTE: Fluids and lubricants identified below by name, part number or
specification may be obtained from your GM Dealer.
Engine Oil
IEnginelant
II
Hydraulic Clutch System
Hydraulic Brake Systems
Parking Brake Cables
(
(
Power Steering System (
t
Manual Steering Gear
Automatic Transmission
r
Manual Transmission:
a. 5-Speed with Low Gear
1 b. 5-Speed without Low Gear
I
FLUID/LUBRICANT
;M Goodwrench Motor Oil or equivalent for API Service SG
)r SGiCE of the recommended viscosity.
ilixture
of water and a good quality ethylene glycol base
intifreeze conforming to
GM-6038-M (GM Part No. 1052103).
iydraulic Clutch Fluid
(GM Part No. 12345347 or equivalent).
lelco Supreme 11
8 brake fluid (GM Part No. 1052535 or
2hassis grease meeting requirements
of NLGl Grade 2,
2atagory LB or GC-LB (GM Part
No. 1052497).
3iM Power Steering Fluid (GM Part No. 1050017) or
2quivalent conforming to
GM spec 9985010.
3M Lubricant (GM Part No. 1052182) or equivalent.
IEXRON@ IIE Automatic Transmission Fluid (GM Part No.
1051 855). lOT-
3).
a. CastrolCo
Syntorq or equivalent (GM Part No.
b. Standard Transmission Fluid (GM Part No. 12345349). 12346074).
Differential:
a.
Standard (Saginaw) Front
and Rear Axle
I
b. Locking
Transfer Case a. SAE-80W-90 gear lubricant (GM Part
No. 1052271).
b.
SAE-80W-90 gear lubricant (GM Part No. 1052271).
DexronB
IIE Automatic Transmission Fluid (GM Part No.
12345881 ).
IGas- IL
Weather Strips I:
?as Line De-leer (GM Part No. 1051516).
Spray-ASqueek (GM Part No. 1052277).
Column Shift, Transfer Case Shift Lever, and Propeller Shaft.
Clutch Fork Ball Stud
(
(
>hassis grease meeting requirements of NLGl Grade 2,
;ategory LB or GC-LB
(GM Part No. 1052497).
zhassis grease meeting requirements
of NLGl Grade 2,
;ateaorv LB or GC-LB (GM Part No. 1052497).
(Continued next page) TO391
7-25
ProCarManuals.com