1993 CHEVROLET DYNASTY wheel
[x] Cancel search: wheelPage 329 of 2438

REMOVE (1) Hold system relay with one hand, while pulling
strait down on the wiring harness connector. Until
connector is free from the relay (do not twist the
connector). (2) Remove screw (Fig. 6) holding the system relay
and bracket to the CAB bracket. Then remove the
system relay and mounting bracket assembly from
the CAB bracket.
INSTALL (1) Mount the system relay and its mounting
bracket assembly to the CAB mounting bracket, with
the mounting screw (Fig. 6). (2) Holding the system relay with one hand, push-
ing the wiring harness connector strait onto the ter-
minals of the relay. Make sure connector is fully
seated onto terminals of the system relay and the
lock on the wiring harness connector is fully engaged
with the relay. (3) Road test vehicle to verify correct operation of
the vehicles's Antilock brake system.
REMOVE/INSTALL PUMP MOTOR RELAY
Find location of Antilock Pump Motor Relay (Fig. 7
& 8), depending on whether the vehicle being ser-
viced has or does not have a power distribution cen-
ter PDC. (1) Hold the Antilock pump motor relay with one
hand, while pulling wiring harness relay connector
strait off the relay terminals. (2) Remove the pump motor relay assembly from
the vehicle. (3) Installation is done in the reverse order off re-
moval. Be sure that the wiring harness connector is
fully seated onto the terminals of the Pump Motor
Relay.
WHEEL SPEED SENSORS
INSPECTION
Inspect tonewheel for missing or broken teeth, this
can cause erratic sensor signals. Tonewheel should show no evidence of contact with
the wheel speed sensor. If contact was made, deter-
mine cause and correct. Excessive runout of the tonewheel can cause er-
ratic wheel speed sensor. Replace assembly if runout
exceeds approximately 0.25 mm (0.010 inch).
FRONT WHEEL SPEED SENSOR (FIG. 9)
REMOVAL
(1) Raise vehicle and remove wheel and tire as-
sembly. (2) Remove screw from grommet retainer clip that
holds the grommet into fender shield (Fig. 9). (3) Remove the 2 screws that fasten the sensor
routing tube to the frame rail.
Fig. 6 System Relay And Bracket Removal
Fig. 7 Pump Motor Relay Location On AA Body W/O Power Distribution Center
Fig. 8 Pump Motor Relay Location On AJ Body WithPower Distribution Center
Ä ANTILOCK 4 BRAKE SYSTEM 5 - 43
Page 330 of 2438

(4) Carefully, pull sensor assembly grommet from
fender shield. (5) Unplug speed sensor connector from vehicle
wiring harness. (6) Remove the sensor assembly grommets from
the retainer brackets. (7) Remove sensor head screw.
(8) Carefully, remove sensor head from steering
knuckle. If the sensor has seized, due to corrosion,
DO NOT USE PLIERS ON SENSOR HEAD. Use
a hammer and a punch and tap edge of sensor ear,
rocking the sensor side to side until free.
INSTALLATION
(1) Connect the wheel speed sensor connector to
the wiring harness. (2) Push sensor assembly grommet into hole in
fender shield. Install clip and screw. (3) Install the 2 screws that fasten the speed sen-
sor routing tube to the frame rail. (4) Install sensor grommets in brackets on fender
shield and strut damper. (5) Coat the speed sensor with High Temperature
Multi-purpose E.P. Grease before installing into the
steering knuckle. Install screw tighten to 7 N Im (60
in. lbs.)
CAUTION: Proper installation of wheel speed sen-
sor cables is critical to continued system operation.
Be sure that cables are installed in retainers. Fail-
ure to install cables in retainers, as shown in this
section, may result in contact with moving parts
and/or over extension of cables, resulting in an
open circuit.
REAR WHEEL SPEED SENSOR (FIGS. 10 AND 11)
REMOVAL
(1) Raise vehicle and remove wheel and tire as-
sembly. (2) Remove sensor assembly grommet from under-
body and pull harness through hole in underbody. (3) Unplug connector from harness.
(4) Remove sensor assembly grommets from
bracket which is screwed into the body hose bracket,
just forward of trailing arm bushing (batwing brack-
et.) (5) Remove sensor and brake tube assembly clip,
located on the inboard side of trailing arm. (6) Remove sensor wire fastener from rear brake
hose bracket. (7) Remove outboard sensor assembly retainer nut.
This nut also is used to capture the brake tube clip. (8) Remove sensor head screw.
(9) Carefully, remove sensor head from adapter as-
sembly. If the sensor has seized, due to corrosion, DO
NOT USE PLIERS ON SENSOR HEAD. Use a ham-
mer and a punch and tap edge of sensor ear, rocking
the sensor side to side until free.
INSTALLATION Installation is reverse order of removal. Be sure to
coat sensor with High Temperature Multi-purpose
E.P. Grease before installing into adapter assembly.
Tighten screw to 7 N Im (60 in. lbs.) torque.
Fig. 9 Front Wheel Speed Sensor Routing
5 - 44 ANTILOCK 4 BRAKE SYSTEM Ä
Page 331 of 2438

Fig. 11 Body Routing of Rear Speed Sensor Wiring
Fig. 10 Rear Wheel Speed Sensor Routing at Trailing Arm
Ä ANTILOCK 4 BRAKE SYSTEM 5 - 45
Page 333 of 2438
MANUAL TRANSAXLE CLUTCH
CONTENTS
page page
CLEANING PRECAUTIONS ................. 6
CLUTCH CABLE MECHANISM .............. 1
CLUTCH CABLE REPLACEMENT ............ 2
CLUTCH CHATTER COMPLAINTS ........... 1
CLUTCH DISC REPLACEMENT ............. 5
CLUTCH PEDAL NOISE/POP ............... 2 CLUTCH PEDAL POSITION SWITCH
......... 4
EXCESSIVE CLUTCH SPIN TIME/CLASH INTO REVERSE COMPLAINTS ............ 1
GENERAL INFORMATION .................. 1
RELEASE BEARING AND FORK ............. 6
GENERAL INFORMATION
Throughout this group, references may be made to
a particular vehicle by letter or number designation.
A chart showing the breakdown of these designations
is included in the Introduction Section at the front of
this service manual. The clutch used in all models are a single, dry disc
type with no adjustment for wear being provided in
the clutch itself. The clutch pedal is connected to the release shaft
through a cable and lever. The upper end of the clutch pedal pivots in the
pedal bracket on two nylon bushings. These bushings
do not require periodic lubrication.
CLUTCH CHATTER COMPLAINTS
For all clutch chatter complaints, do the following:
(1) Check for loose, misaligned, or broken engine
and transmission mounts. If present, they should be
corrected at this time. Test vehicle for chatter. If
chatter is gone, there is no need to go any further. If
chatter persists: (2) Check to see if clutch cable routing is correct
and operates smoothly. (3) Check for loose connections in drive train. Cor-
rect any problems and determine if clutch chatter
complaints has been satisfied. If not, (4) Remove transaxle. See Group 21, Manual Tran-
saxle, for procedure. (5) Check to see if the release bearing is sticky or
binding. Replace bearing, if needed. (6) Check linkage for excessive wear on bushings.
Replace all worn parts. A small amount of bearing
grease between the release shaft bushings and the
shaft is beneficial, but not required. (7) Check flywheel and clutch pressure plate for
contamination (dirt, oil) or scored. Replace flywheel
and/or pressure plate, if required. (8) Check to see if the clutch disc hub splines are
damaged. Replace with new disc. (9) Check input shaft splines for damage. Replace
if necessary. (10) Check for uneven wear on clutch fingers.
EXCESSIVE CLUTCH SPIN TIME/CLASH INTO
REVERSE COMPLAINTS
For all excessive clutch spin time/clash into reverse
complaints, do the following: (1) Depress clutch pedal to floor and hold. After
three seconds, shift to reverse. If clash is present,
clutch has excessive spin time. (2) Remove transaxle. See Group 21, Manual Tran-
saxle, for procedure. (3) Check the input shaft spline, clutch disc splines
and release bearing for dry rust. If present, clean
rust off and apply a light coat of bearing grease to
the input shaft splines. Apply grease on the input
shaft splines only where the clutch disc slides. (4) Check to see if the clutch disc hub splines are
damaged, replace with new disc if required. (5) Check the input shaft for damaged splines. Re-
place as necessary. (6) Check for excessive clutch disc runout or
warpage. (7) Install clutch assembly and transaxle.
CLUTCH CABLE MECHANISM
The manual transaxle clutch release system has a
unique self-adjusting mechanism to compensate for
clutch disc wear. This adjuster mechanism is located
within the clutch pedal. The preload spring main-
tains tension on the cable. This tension keeps the
clutch release bearing continuously loaded against
the fingers of the clutch cover assembly. When the pedal is depressed, teeth on the adjuster
and the positioner engage and pull the release cable.
A spring located behind the adjuster ensures proper
tooth engagement. When the pedal is released, the adjuster contacts
the bumper. This separates the adjuster and posi-
tioner teeth, allowing the preload spring to function.
Ä MANUAL TRANSAXLE CLUTCH 6 - 1
Page 337 of 2438
CLUTCH DISC REPLACEMENT
REMOVAL
(1) Remove transaxle. See Group 21, Manual Tran-
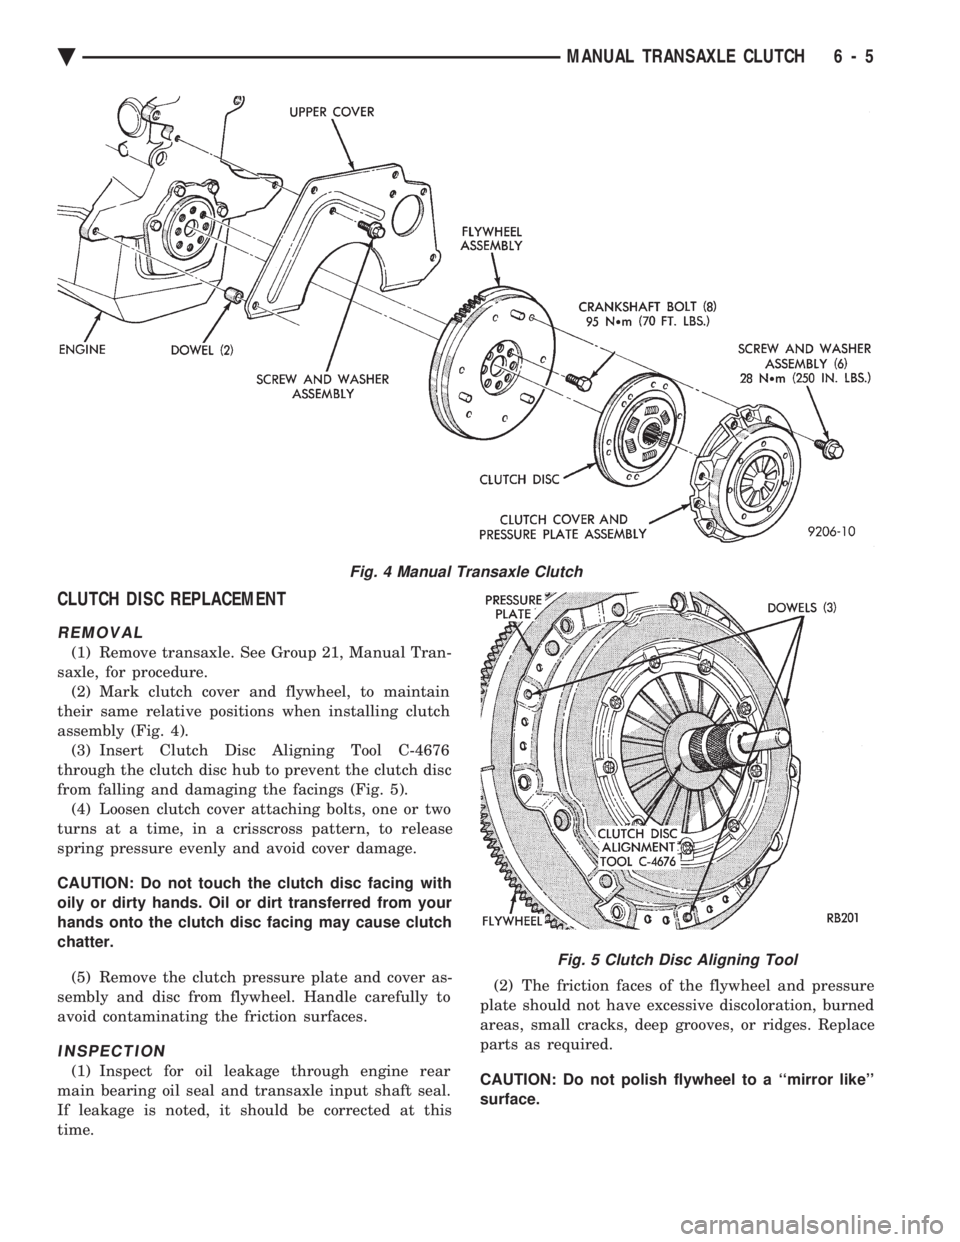
saxle, for procedure. (2) Mark clutch cover and flywheel, to maintain
their same relative positions when installing clutch
assembly (Fig. 4). (3) Insert Clutch Disc Aligning Tool C-4676
through the clutch disc hub to prevent the clutch disc
from falling and damaging the facings (Fig. 5). (4) Loosen clutch cover attaching bolts, one or two
turns at a time, in a crisscross pattern, to release
spring pressure evenly and avoid cover damage.
CAUTION: Do not touch the clutch disc facing with
oily or dirty hands. Oil or dirt transferred from your
hands onto the clutch disc facing may cause clutch
chatter.
(5) Remove the clutch pressure plate and cover as-
sembly and disc from flywheel. Handle carefully to
avoid contaminating the friction surfaces.
INSPECTION
(1) Inspect for oil leakage through engine rear
main bearing oil seal and transaxle input shaft seal.
If leakage is noted, it should be corrected at this
time. (2) The friction faces of the flywheel and pressure
plate should not have excessive discoloration, burned
areas, small cracks, deep grooves, or ridges. Replace
parts as required.
CAUTION: Do not polish flywheel to a ``mirror like''
surface.
Fig. 4 Manual Transaxle Clutch
Fig. 5 Clutch Disc Aligning Tool
Ä MANUAL TRANSAXLE CLUTCH 6 - 5
Page 338 of 2438
(3) Clean the flywheel face with medium sandpa-
per (80-160 grade), then wipe the surface with min-
eral spirits. If the surface is severely scored, heat
checked, or warped, replace the flywheel.
CAUTION: Do not flat-machine the flywheel face.
The surface profile is tapered.
(4) The heavy side of the flywheel is indicated by a
daub of white paint near the outside diameter. To
minimize the effects of flywheel unbalance, perform
the following installation procedure: (a) Loose assemble the flywheel to the crank-
shaft. Use new flywheel attaching bolts which have
sealant on the threads. If new bolts are not avail-
able, apply Loctite sealant to the threads of the
original bolts. This sealant is required to prevent
engine oil leakage. (b) Rotate the flywheel and crankshaft until the
daub of white paint (heavy side) is at the 12 o'clock
position. (c) Torque flywheel attaching bolts to 95 N Im(70
ft. lbs.). Use a crisscross pattern when tightening
bolts.
(5) The disc assembly should be handled without
touching the facings. Replace disc if the facings show
evidence of grease or oil soakage, or wear to within
less than .38 mm (.015 inch) of the rivet heads. The
splines on the disc hub and transaxle input shaft
should be a snug fit without signs of excessive wear.
Metallic portions of disc assembly should be dry and
clean, and not been discolored from excessive heat.
Each of the arched springs between the facings
should not be broken and all rivets should be tight. (6) Wipe the friction surface of the pressure plate
with mineral spirits. (7) Using a straight edge, check clutch cover (pres-
sure plate) for flatness. The clutch cover (pressure
plate) friction area should be slightly concave, with
the inner diameter 0.02 mm to 0.1 mm (.0008 in. to
.0039 in.) below the outer diameter. It should also be
free from discoloration, burned areas, cracks,
grooves, or ridges. (8) Using a surface plate, test cover for flatness.
All sections around attaching bolt holes should be in
contact with surface plate within .015 inch. (9) The cover should be a snug fit on flywheel dow-
els. If the clutch assembly does not meet these re-
quirements, it should be replaced.
INSTALLATION
(1) Mount clutch assembly on flywheel,being care-
ful to properly align dowels and the alignment marks
made before removal. The flywheel side of the clutch
disc is marked for proper installation. If new clutch
or flywheel is installed, align cover balance spot as
close as possible to flywheel balance orange spot. Ap-
ply pressure to the alignment tool. Center the tip of the tool into the crankshaft and the sliding cone into
the clutch fingers. Tighten the clutch attaching bolts
sufficiently to hold the disc in position. (2) To avoid distortion of the clutch cover, bolts
should be tightened a few turns at a time, in a criss-
cross pattern, until they are all seated. Tighten bolts
to 28 N Im (250 in. lbs.) following a crisscross pattern
sequence. Remove clutch disc alignment tool. (3) Install transaxle. See group 21, Manual Tran-
saxle, for procedures.
RELEASE BEARING AND FORK
Remove the transaxle from the vehicle. See group
21 for removal and installation procedures.
REMOVAL AND INSTALLATION
(1) Remove clutch release shaft E-clip.
(2) Remove the clutch release shaft and then slide
the fork and bearing assembly off the bearing pilot. (3) Remove the fork from the bearing thrust plate.
(4) Examine the condition of the bearing. It is pre-
lubricated and sealed and should not be im-
mersed in oil or solvent. (5) The bearing should turn smoothly when held in
the hand under a light thrust load. A light drag
caused by the lubricant fill is normal. If the bearing
is noisy, rough, or dry, replace the complete bearing
assembly with a new bearing. (6) The bearing has a plastic sleeve pre-lubricated
at assembly. Wipe out the old grease. Refill the
sleeve cavities and coat the inner surface with mul-
tipurpose grease. If the liner is cracked or worn, re-
place the bearing assembly. (7) Check the condition of the spring clips. If the
clips are broken or distorted, replace the bearing as-
sembly. (8) Before assembling the fork, lubricate the
rounded thrust pads and the spring clip cavities with
multipurpose grease. (9) Assemble the fork to the bearing by sliding the
thrust pads under the spring clips. Be careful to
avoid distorting the spring clips. These clips prevent
the bearing thrust plate from rotating with the bear-
ing. (10) Slide the bearing and fork assembly onto the
input shaft bearing retainer. (11) Position the release shaft bushings in the
housing and install the release shaft. A small
amount of bearing grease between the release shaft
bushing and the shaft is beneficial but not required.
Install the retainer clip in the shaft groove near the
large bushing. (12) Install the release lever and retaining clip on
the outer end of the release shaft.
CLEANING PRECAUTIONS
Condensation from steam vapors tend to accumu-
late on the internal clutch mechanism when the ve-
6 - 6 MANUAL TRANSAXLE CLUTCH Ä
Page 339 of 2438
hicle is steam cleaned. The facing of the disc will
absorb moisture. The force exerted by the pressure
plate will bond the facings to flywheel and/or, pres-
sure plate, if vehicle is allowed to stand for some
time before use. If this condition occurs, it will re- quire replacement of disc assembly, flywheel, and/or
clutch assembly. After cleaning, drive the vehicle to
its normal clutch operating temperature. This will
dry off disc assembly, pressure plate, and flywheel.
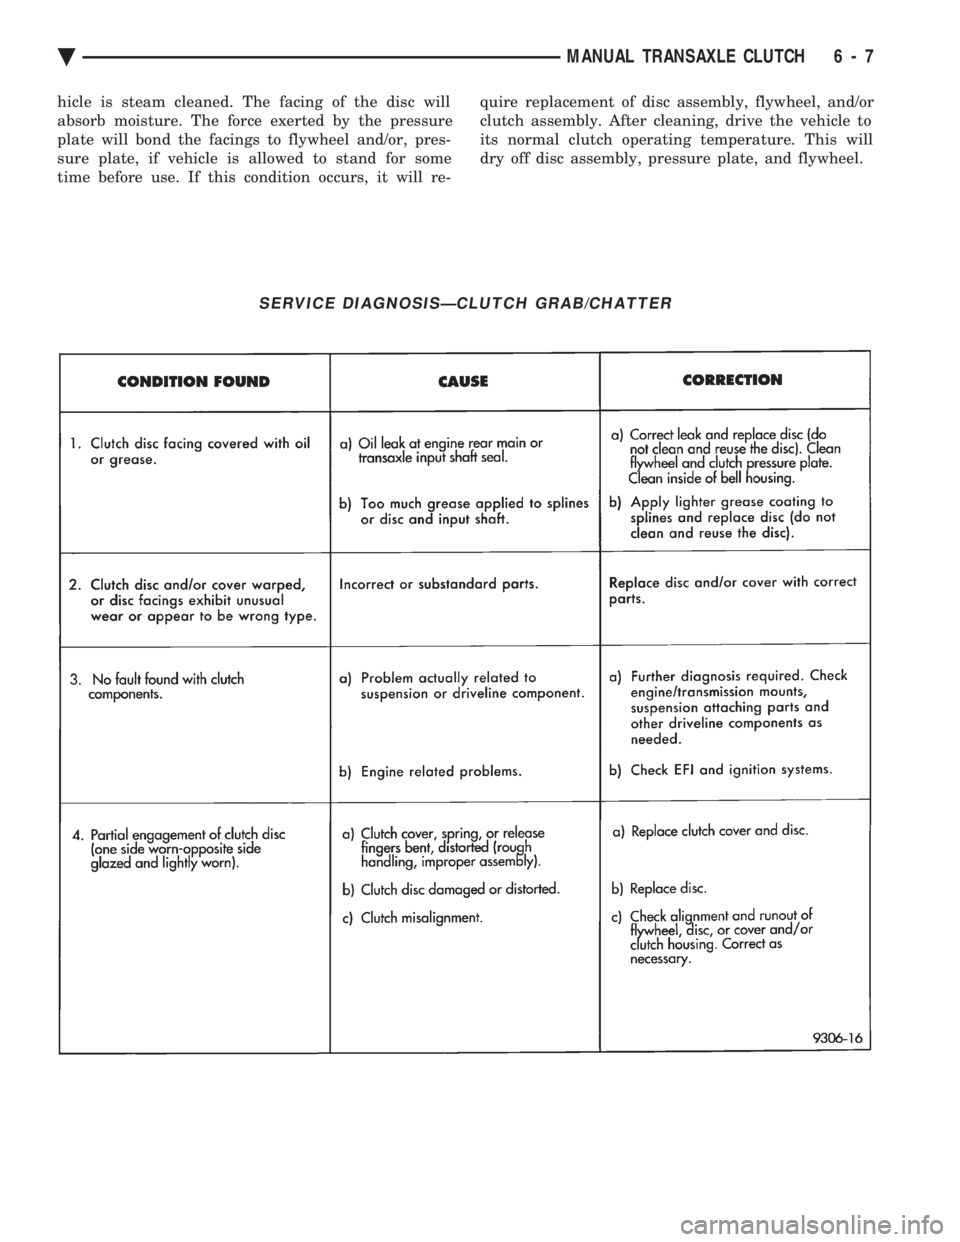
SERVICE DIAGNOSISÐCLUTCH GRAB/CHATTER
Ä MANUAL TRANSAXLE CLUTCH 6 - 7
Page 373 of 2438
BATTERY/STARTING/CHARGING SYSTEMS DIAGNOSTICS
CONTENTS
page page
BATTERY TEST PROCEDURES ON-VEHICLE . . 3
FAULT CODESÐON BOARD DIAGNOSTICS . . 23
GENERAL INFORMATION .................. 1
GENERATOR TEST PROCEDURES ON VEHICLE.19 IGNITION OFF DRAW (IOD)
............... 9
SPECIFICATIONS ....................... 28
STARTER TEST PROCEDURES ON VEHICLE . 11
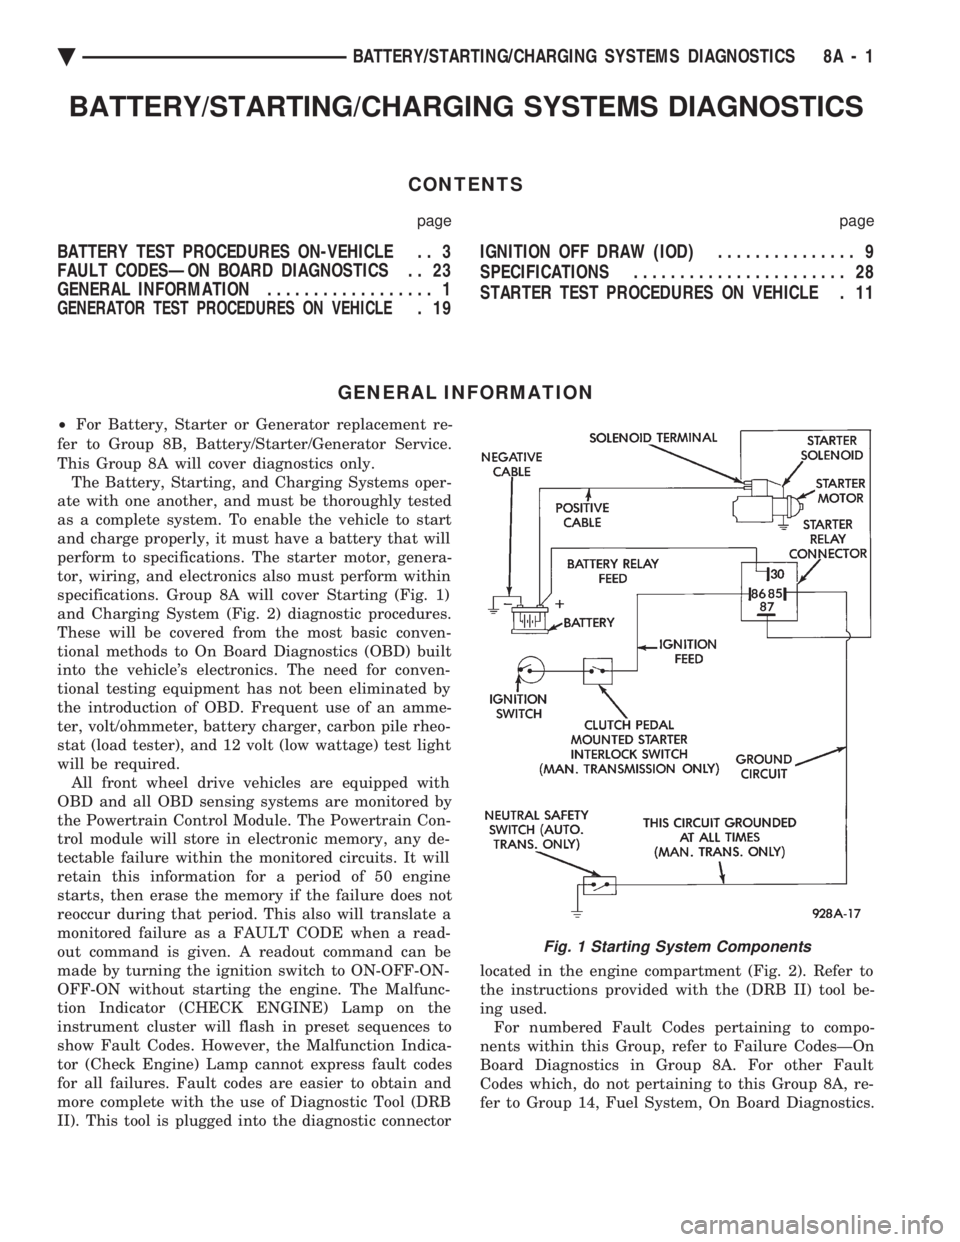
GENERAL INFORMATION
² For Battery, Starter or Generator replacement re-
fer to Group 8B, Battery/Starter/Generator Service.
This Group 8A will cover diagnostics only. The Battery, Starting, and Charging Systems oper-
ate with one another, and must be thoroughly tested
as a complete system. To enable the vehicle to start
and charge properly, it must have a battery that will
perform to specifications. The starter motor, genera-
tor, wiring, and electronics also must perform within
specifications. Group 8A will cover Starting (Fig. 1)
and Charging System (Fig. 2) diagnostic procedures.
These will be covered from the most basic conven-
tional methods to On Board Diagnostics (OBD) built
into the vehicle's electronics. The need for conven-
tional testing equipment has not been eliminated by
the introduction of OBD. Frequent use of an amme-
ter, volt/ohmmeter, battery charger, carbon pile rheo-
stat (load tester), and 12 volt (low wattage) test light
will be required. All front wheel drive vehicles are equipped with
OBD and all OBD sensing systems are monitored by
the Powertrain Control Module. The Powertrain Con-
trol module will store in electronic memory, any de-
tectable failure within the monitored circuits. It will
retain this information for a period of 50 engine
starts, then erase the memory if the failure does not
reoccur during that period. This also will translate a
monitored failure as a FAULT CODE when a read-
out command is given. A readout command can be
made by turning the ignition switch to ON-OFF-ON-
OFF-ON without starting the engine. The Malfunc-
tion Indicator (CHECK ENGINE) Lamp on the
instrument cluster will flash in preset sequences to
show Fault Codes. However, the Malfunction Indica-
tor (Check Engine) Lamp cannot express fault codes
for all failures. Fault codes are easier to obtain and
more complete with the use of Diagnostic Tool (DRB
II). This tool is plugged into the diagnostic connector located in the engine compartment (Fig. 2). Refer to
the instructions provided with the (DRB II) tool be-
ing used. For numbered Fault Codes pertaining to compo-
nents within this Group, refer to Failure CodesÐOn
Board Diagnostics in Group 8A. For other Fault
Codes which, do not pertaining to this Group 8A, re-
fer to Group 14, Fuel System, On Board Diagnostics.
Fig. 1 Starting System Components
Ä BATTERY/STARTING/CHARGING SYSTEMS DIAGNOSTICS 8A - 1