1993 CHEVROLET DYNASTY brakes
[x] Cancel search: brakesPage 305 of 2438

(4) Provide communication to the DRB II while in
the Antilock brakes diagnostic mode. The CAB continuously monitors the speed of each
wheel, through the signals generated at the Wheel
Speed Sensors. This is used to determine if any
wheel of the vehicle is beginning to lock-up (skid)
when the brakes are applied. When a wheel locking
tendency is detected during brake apply. The CAB
commands the appropriate Build/Decay valves to
modulate brake fluid pressure in some or all of the
hydraulic circuits. The CAB continues to control
pressure in individual hydraulic circuits until a lock-
ing tendency is no longer present. The ABS system is constantly monitored by the
CAB for proper operation. If the CAB detects a fault,
it will turn on the Amber Antilock Warning Lamp
and disable the ABS brake system. The normal Non
ABS brake system will remain operational. The CAB contains a self-diagnostic program which
will turn on the Amber Antilock Warning Lamp
when a system fault is detected. Faults are stored in
a diagnostic program memory. There are 16 fault
codes which may be stored in the CAB and displayed
through the DRB II. These fault codes will remain in
the CAB memory even after the ignition has been
turned off. The fault codes can be cleared by using
the DRB II diagnostics tester, or they will be auto-
matically cleared from the memory after (50) ignition
switch on/off cycles.
CONTROLLER ANTILOCK BRAKE (INPUTS)
² Four wheel speed sensors.
² Stop lamp switch.
² Ignition switch.
² System relay voltage.
² Ground.
² Pump/Motor Relay Monitor
² Diagnostics Communications
CONTROLLER ANTILOCK BRAKE (OUTPUTS)
²4 Build/Decay valves.
² Antilock warning lamp.
² System relay actuation.
² Diagnostic communication.
² Pump/Motor relay actuation
DIAGNOSTIC CONNECTOR
The Bendix Antilock 4 Brake System diagnostic
connector is located under the fuse panel access
cover. The access cover is located on the lower sec-
tion of the instrument panel to the left side of the
steering column. The diagnostics connector is a blue
6 way connector see (Fig. 9).
ANTILOCK SYSTEM RELAYS AND WARNING LAMPS
SYSTEM RELAY
The ABS Modulator Valves are powered through
the System Relay which is located on a bracket
mounted to the CAB (Fig. 10). The System Relay
provides power to the CAB for modulator valve oper-
ation (pins 47 and 41) after the startup cycle when
the ignition is turned on.
Fig. 8 CAB Location
Fig. 9 Antilock Diagnostic Connector Location
Fig. 10 System Relay Location On The CAB
Ä ANTILOCK 4 BRAKE SYSTEM 5 - 19
Page 306 of 2438

ANTILOCK WARNING LAMP DIODE
The Warning Lamp Relay on the Bendix Antilock
4 Brake System has been replaced with a diode. The
diode is used to control the function of the warning
lamp and is located inside the CAB module wiring
harness. The diode is a replaceable component of the
wiring harness, and will not require replacement of
the entire wiring harness if only the diode is diag-
nosed to have failed. When the system relay is de-energized, the Anti-
lock warning lamp will be lit. This will occur because
a ground path exists for the Antilock warning lamp
through the Antilock warning lamp diode and the
system relay armature. When the system relay is en-
ergized by the CAB, the system relay armature will
no longer provide a ground and the lamp will turn
off. Thus, the lamp will be lit if either the CAB is
disconnected or a system fault causes the Antilock to
be turned off.
PUMP/MOTOR RELAY
Pump/Motor power is supplied by the Pump/Motor
Relay. The Pump/Motor Relay is either mounted on
the left front inner fender shield, or the front of the
left shock tower. The mounting location is dependent
on whether the vehicle is or is not equipped with a
power distribution center. See (Fig. 11 and 12) for
specific mounting locations.
ANTILOCK WARNING LAMP OFF
System Relay Energized
From pin 57, the CAB energizes the Antilock sys-
tem relay coil, thus the electrical current flow in the
coil closes the system relay. Then electrical current
is provided to pins 47 and 41 of the CAB to provide
power to the modulator valves. The CAB turns off the Amber Antilock Warning
Lamp by breaking the ground path through pin 15 of
the CAB.
ANTILOCK WARNING LAMP ON
System Relay De-Energized.
When the Amber Antilock Warning Lamp is on,
there is no electrical current flow from the CAB at
pin 57 and the System Relay coil is NOT energized.
No electrical current flows to pin 47 and 41 (modula-
tor valve power), or to the Antilock Warning Lamp
diode. Thus, the Amber Antilock Warning Lamp is
not energized. The Amber Antilock Warning Lamp is
now grounded through the Antilock Warning Lamp
diode and pin 15 of the CAB turning on the Amber
Antilock Warning Lamp.
HYDRAULIC CIRCUITS AND VALVE OPERATION
Through the following operation descriptions and
diagrams. The function of the various hydraulic con-
trol valves in the ABS system will be described. The
fluid control valves mentioned below, control the flow
of pressurized brake fluid to the wheel brakes during
the different modes of Antilock braking. For explanation purposes we will assume all speed
sensors are sending the same wheel speed informa-
tion, requiring the same hydraulic fluid modulation
at the same rate.
NORMAL BRAKING
BUILD/DECAY VALVES
Closed (Fig. 1)
The brake pedal is applied. The travel of the brake
pedal closes primary and secondary circuits from the
master cylinder fluid supply. Brake fluid from the
master cylinder primary and secondary circuits flows
through the build/decay valves to the wheel brakes.
ABS BRAKING-BUILD PRESSURE
BUILD/DECAY VALVES
Open (Fig. 2)
Fig. 11 Pump Motor Relay Location On AA Body W/O Power Distribution Center
Fig. 12 Pump Motor Relay Location On AJ BodyWith Power Distribution Center
5 - 20 ANTILOCK 4 BRAKE SYSTEM Ä
Page 308 of 2438
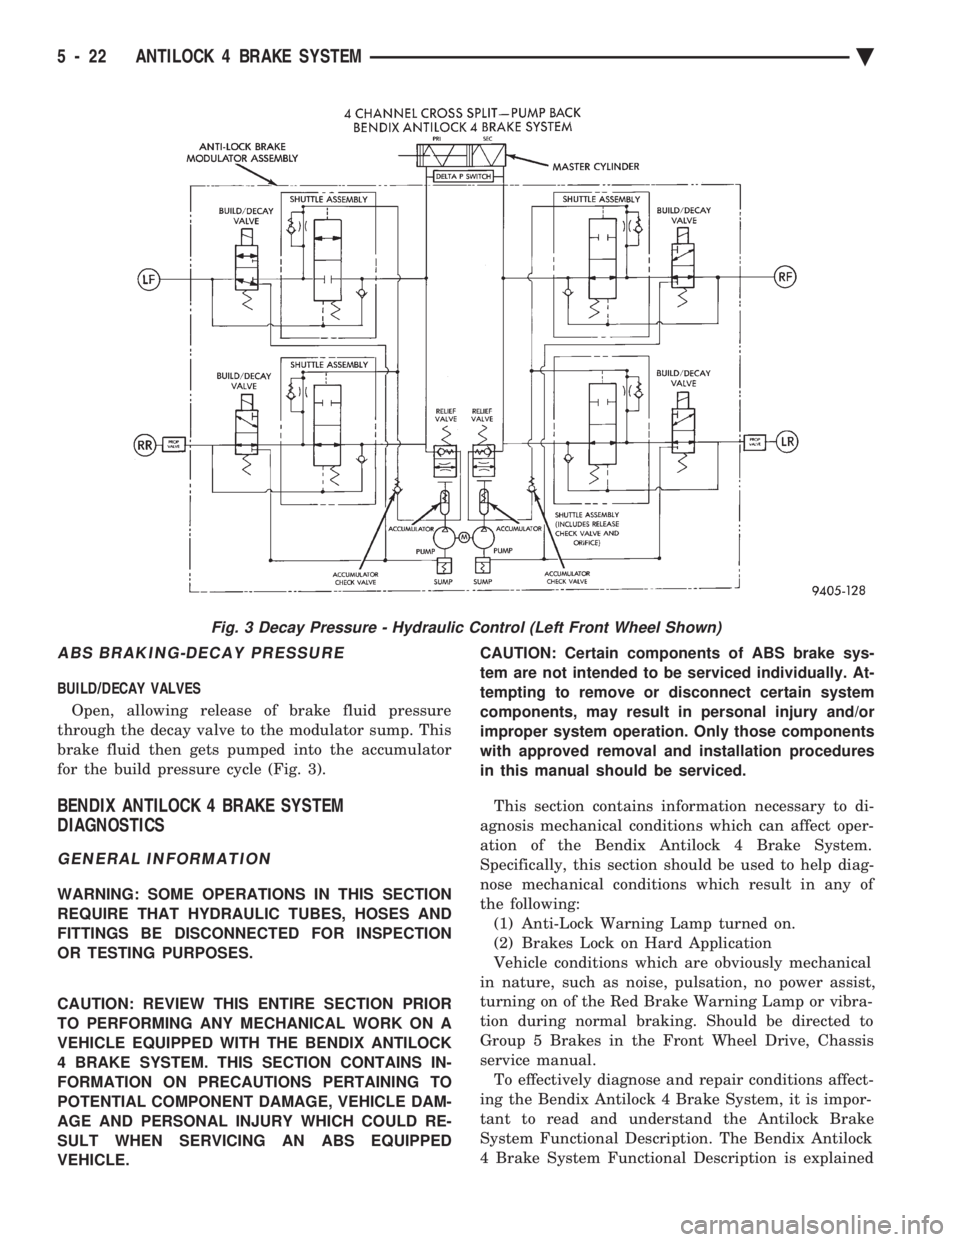
ABS BRAKING-DECAY PRESSURE
BUILD/DECAY VALVES Open, allowing release of brake fluid pressure
through the decay valve to the modulator sump. This
brake fluid then gets pumped into the accumulator
for the build pressure cycle (Fig. 3).
BENDIX ANTILOCK 4 BRAKE SYSTEM
DIAGNOSTICS
GENERAL INFORMATION
WARNING: SOME OPERATIONS IN THIS SECTION
REQUIRE THAT HYDRAULIC TUBES, HOSES AND
FITTINGS BE DISCONNECTED FOR INSPECTION
OR TESTING PURPOSES.
CAUTION: REVIEW THIS ENTIRE SECTION PRIOR
TO PERFORMING ANY MECHANICAL WORK ON A
VEHICLE EQUIPPED WITH THE BENDIX ANTILOCK
4 BRAKE SYSTEM. THIS SECTION CONTAINS IN-
FORMATION ON PRECAUTIONS PERTAINING TO
POTENTIAL COMPONENT DAMAGE, VEHICLE DAM-
AGE AND PERSONAL INJURY WHICH COULD RE-
SULT WHEN SERVICING AN ABS EQUIPPED
VEHICLE. CAUTION: Certain components of ABS brake sys-
tem are not intended to be serviced individually. At-
tempting to remove or disconnect certain system
components, may result in personal injury and/or
improper system operation. Only those components
with approved removal and installation procedures
in this manual should be serviced.
This section contains information necessary to di-
agnosis mechanical conditions which can affect oper-
ation of the Bendix Antilock 4 Brake System.
Specifically, this section should be used to help diag-
nose mechanical conditions which result in any of
the following: (1) Anti-Lock Warning Lamp turned on.
(2) Brakes Lock on Hard Application
Vehicle conditions which are obviously mechanical
in nature, such as noise, pulsation, no power assist,
turning on of the Red Brake Warning Lamp or vibra-
tion during normal braking. Should be directed to
Group 5 Brakes in the Front Wheel Drive, Chassis
service manual. To effectively diagnose and repair conditions affect-
ing the Bendix Antilock 4 Brake System, it is impor-
tant to read and understand the Antilock Brake
System Functional Description. The Bendix Antilock
4 Brake System Functional Description is explained
Fig. 3 Decay Pressure - Hydraulic Control (Left Front Wheel Shown)
5 - 22 ANTILOCK 4 BRAKE SYSTEM Ä
Page 311 of 2438
LATCHING VERSUS NON-LATCHING ABS FAULTS
Some faults detected by the CAB are latching; the
fault is latched and ABS is disabled until the igni-
tion switch is reset. Thus ABS is disabled even if the
original fault has disappeared. Other faults are non-
latching; any warning lights that are turned on, are
only turned on as long as the fault condition exists.
As soon as the condition goes away, the Antilock
Warning Light is turned off. Although a fault code
will be set in most cases.
BENDIX ANTILOCK 4 BRAKE SYSTEM DIAGNOSTICS
Bendix Antilock 4 Brake System Diagnostics, be-
yond basic mechanical diagnostics, covered earlier in
this section, are accomplished by using the DRB scan
tool. See testing procedures outlined in the 1994 Ben-
dix Antilock 4 Diagnostics Manual. Please refer to the above mentioned manual for
any further electronic diagnostics and service proce-
dures that are required on the Bendix Antilock 4
Brake System.
ON-CAR ABS BRAKE SYSTEM SERVICE
GENERAL SERVICE PRECAUTIONS
The following are general cautions which should be
observed when servicing the Bendix Antilock 4
Brake System and other vehicle electronic systems.
Failure to observe these precautions may result in
Antilock Brake System component damage. If welding work is to be performed on a vehicle us-
ing an electric arc welder, disconnect the 60 way wir-
ing harness connector from the CAB, prior to
performing the welding operation. The wiring harness connector should never be con-
nected or disconnected from the CAB with the igni-
tion key in the ON or Run position. (3) Most components making up the assemblies of
the Bendix Antilock 4 Brake System can not be ser-
viced separately from those assemblies. This will re-
quire replacement of the complete assembly for the
servicing of these components. Do not disassemble
any component from an assembly which is desig-
nated as non-serviceable.
CHECKING BRAKE FLUID LEVEL
CAUTION: Only use brake fluid conforming to DOT
3 specifications, such as Mopar or Equivalent. Do
not use any fluid which contains a petroleum base.
Do not use a container which has been used for pe-
troleum based fluids or a container which is wet
with water. Petroleum based fluids will cause swell-
ing and distortion of rubber parts in the hydraulic
brake system. Water will mix with brake fluid, low-
ering the boiling point of the brake fluid, possibly causing brake fluid to boil resulting in brake fade.
Keep all brake fluid containers capped to prevent
contamination. Remove the front cap of the master
cylinder reservoir and fill to the bottom of the split
ring.
For the specific procedure for the inspection of
brake fluid level and adding of brake to the reser-
voir. Refer to the Service Adjustments Section in this
group of the service manual.
BLEEDING BENDIX ANTILOCK 4 BRAKE SYSTEM
The base brakes and Antilock Brake System must
be bled anytime air is permitted to enter the hydrau-
lic system, due to disconnection of brake lines, hoses
or components. If the Antilock Modulator Assembly is removed
from the vehicle, both the Base Brake System and
the Antilock Brake System must be bled using the
appropriate procedure. It is important to note that
excessive air in the brake system will cause a soft or
spongy feeling brake pedal. During brake bleeding operations, ensure that
brake fluid level remains close to the FULL level in
the reservoir. Check brake fluid level periodically
during bleeding procedure, adding DOT 3 brake fluid
as required.
CAUTION: The base brake and Antilock brake hy-
draulic systems, on the Bendix Antilock 4 Brake
System, can NOT be bled using any type of brake
pressure bleeding equipment. This type of bleeding
equipment does not develop the pressure required
in the brake hydraulic system, to adequately bleed
all trapped air. The only approved method for bleed-
ing air out of the hydraulic system on vehicles
equipped with the Bendix Antilock 4 Brake System,
is the manual procedure of pressurizing the hydrau-
lic system using constant, moderate to heavy foot
pressure on the brake pedal.
The Bendix Antilock 4 Brake System must be bled
as two independent brake systems. The non ABS por-
tion of the brake system is to be bled the same as
any non ABS system. Refer to the Service Adjust-
ments section in this manual for the proper bleeding
procedure to be used. The Bendix Antilock 4 Brake
System can only be bled using a manual method of
pressurizing the brakes hydraulic system. The Antilock portion of brake system MUST be
bled separately. This bleeding procedure requires the
use of the DRB Diagnostic tester and the bleeding se-
quence procedure outlined below.
Ä ANTILOCK 4 BRAKE SYSTEM 5 - 25
Page 328 of 2438
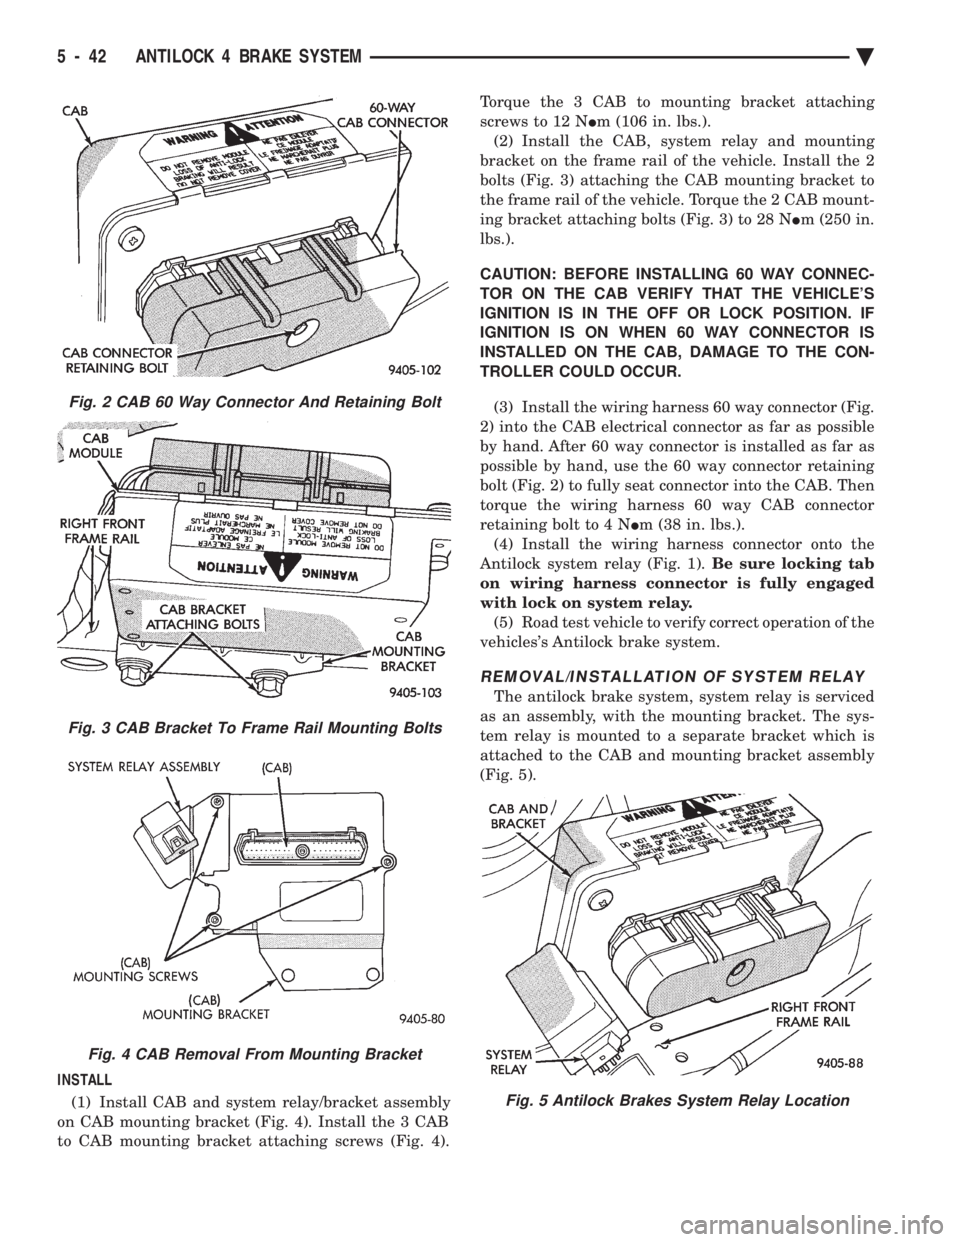
INSTALL (1) Install CAB and system relay/bracket assembly
on CAB mounting bracket (Fig. 4). Install the 3 CAB
to CAB mounting bracket attaching screws (Fig. 4). Torque the 3 CAB to mounting bracket attaching
screws to 12 N Im (106 in. lbs.).
(2) Install the CAB, system relay and mounting
bracket on the frame rail of the vehicle. Install the 2
bolts (Fig. 3) attaching the CAB mounting bracket to
the frame rail of the vehicle. Torque the 2 CAB mount-
ing bracket attaching bolts (Fig. 3) to 28 N Im (250 in.
lbs.).
CAUTION: BEFORE INSTALLING 60 WAY CONNEC-
TOR ON THE CAB VERIFY THAT THE VEHICLE'S
IGNITION IS IN THE OFF OR LOCK POSITION. IF
IGNITION IS ON WHEN 60 WAY CONNECTOR IS
INSTALLED ON THE CAB, DAMAGE TO THE CON-
TROLLER COULD OCCUR.
(3) Install the wiring harness 60 way connector (Fig.
2) into the CAB electrical connector as far as possible
by hand. After 60 way connector is installed as far as
possible by hand, use the 60 way connector retaining
bolt (Fig. 2) to fully seat connector into the CAB. Then
torque the wiring harness 60 way CAB connector
retaining bolt to 4 N Im (38 in. lbs.).
(4) Install the wiring harness connector onto the
Antilock system relay (Fig. 1). Be sure locking tab
on wiring harness connector is fully engaged
with lock on system relay. (5) Road test vehicle to verify correct operation of the
vehicles's Antilock brake system.
REMOVAL/INSTALLATION OF SYSTEM RELAY
The antilock brake system, system relay is serviced
as an assembly, with the mounting bracket. The sys-
tem relay is mounted to a separate bracket which is
attached to the CAB and mounting bracket assembly
(Fig. 5).
Fig. 2 CAB 60 Way Connector And Retaining Bolt
Fig. 3 CAB Bracket To Frame Rail Mounting Bolts
Fig. 4 CAB Removal From Mounting Bracket
Fig. 5 Antilock Brakes System Relay Location
5 - 42 ANTILOCK 4 BRAKE SYSTEM Ä
Page 611 of 2438
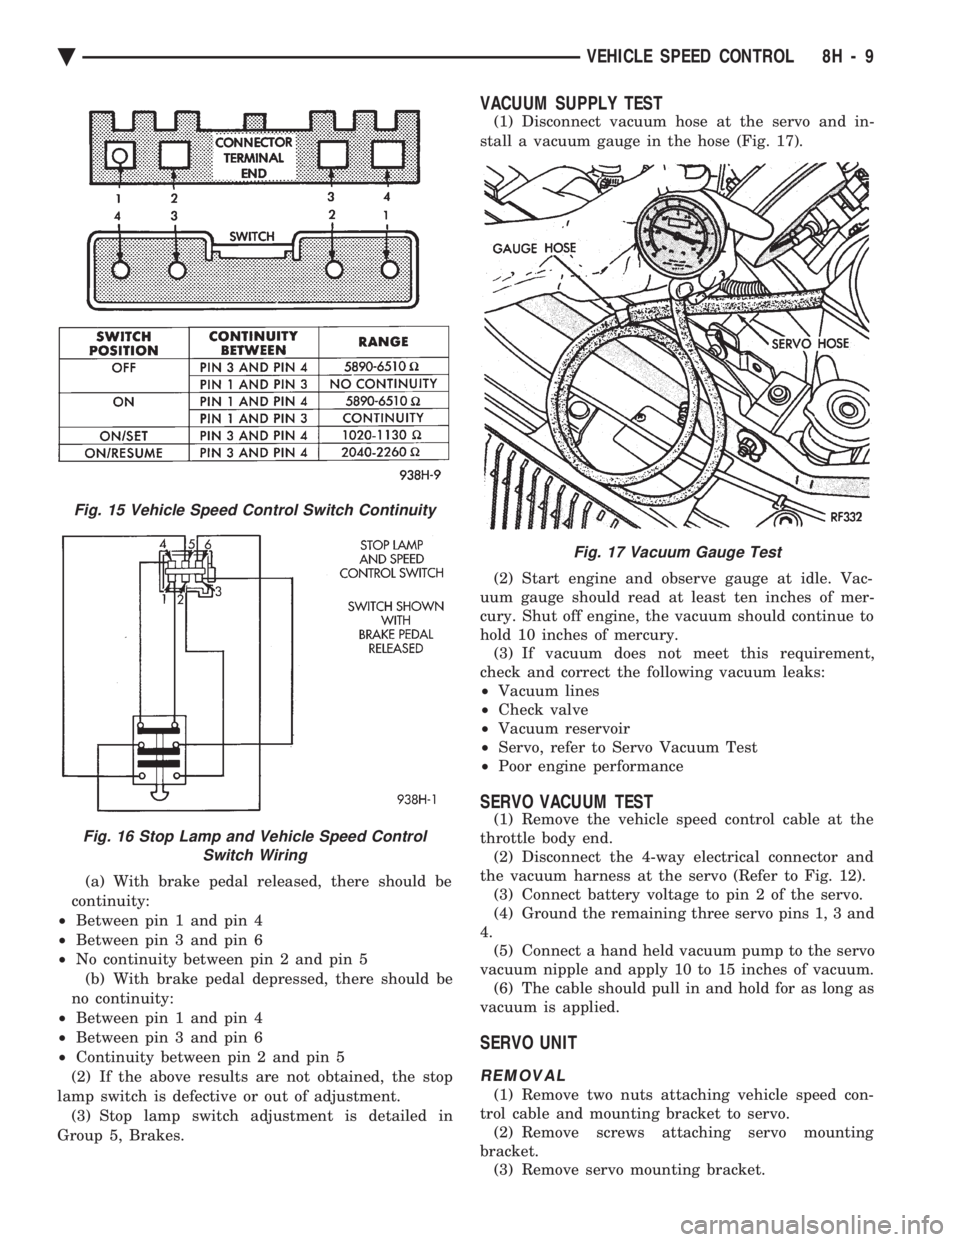
(a) With brake pedal released, there should be
continuity:
² Between pin 1 and pin 4
² Between pin 3 and pin 6
² No continuity between pin 2 and pin 5
(b) With brake pedal depressed, there should be
no continuity:
² Between pin 1 and pin 4
² Between pin 3 and pin 6
² Continuity between pin 2 and pin 5
(2) If the above results are not obtained, the stop
lamp switch is defective or out of adjustment. (3) Stop lamp switch adjustment is detailed in
Group 5, Brakes.
VACUUM SUPPLY TEST
(1) Disconnect vacuum hose at the servo and in-
stall a vacuum gauge in the hose (Fig. 17).
(2) Start engine and observe gauge at idle. Vac-
uum gauge should read at least ten inches of mer-
cury. Shut off engine, the vacuum should continue to
hold 10 inches of mercury. (3) If vacuum does not meet this requirement,
check and correct the following vacuum leaks:
² Vacuum lines
² Check valve
² Vacuum reservoir
² Servo, refer to Servo Vacuum Test
² Poor engine performance
SERVO VACUUM TEST
(1) Remove the vehicle speed control cable at the
throttle body end. (2) Disconnect the 4-way electrical connector and
the vacuum harness at the servo (Refer to Fig. 12). (3) Connect battery voltage to pin 2 of the servo.
(4) Ground the remaining three servo pins 1, 3 and
4. (5) Connect a hand held vacuum pump to the servo
vacuum nipple and apply 10 to 15 inches of vacuum. (6) The cable should pull in and hold for as long as
vacuum is applied.
SERVO UNIT
REMOVAL
(1) Remove two nuts attaching vehicle speed con-
trol cable and mounting bracket to servo. (2) Remove screws attaching servo mounting
bracket. (3) Remove servo mounting bracket.
Fig. 15 Vehicle Speed Control Switch Continuity
Fig. 16 Stop Lamp and Vehicle Speed Control Switch Wiring
Fig. 17 Vacuum Gauge Test
Ä VEHICLE SPEED CONTROL 8H - 9
Page 1766 of 2438
it de-activates the ASD relay and fuel pump relay.
When these relays are deactivated, power is shut off
from the fuel injector, fuel pump, ignition coil, and
oxygen sensor heater element. The PCM contains a voltage converter that
changes battery voltage to a regulated 8.0 volts to
power the distributor pick-up and vehicle speed sen-
sor. The PCM also provides a 5.0 volts supply for the
coolant temperature sensor, manifold absolute pres-
sure sensor and throttle position sensor.
AIR CONDITIONING SWITCH SENSEÐPCM INPUT
ALL VEHICLES EXCEPT AC-BODY
When the air conditioning or defrost switch is put
in the ON position and the low pressure and high
pressure switches are closed, the PCM receives an in-
put indicating that the air conditioning has been se-
lected. After receiving this input, the PCM activates
the A/C compressor clutch by grounding the A/C
clutch relay. The PCM also adjusts idle speed to a
scheduled RPM to compensate for increased engine
load.
AC-BODY VEHICLES
When the air conditioning or defrost switch is put
in the ON position and the low pressure switch, high
pressure switch and electronic cycling switch close,
the PCM receives an air conditioning select input.
After receiving this input, the PCM activates the
A/C compressor clutch by grounding the A/C com-
pressor clutch relay. The PCM also adjusts idle speed
to a scheduled RPM to compensate for increased en-
gine load.
BATTERY VOLTAGEÐPCM INPUT
The PCM monitors the battery voltage input to de-
termine fuel injector pulse width and generator field
control. If battery voltage is low, the PCM increases
injector pulse width.
BRAKE SWITCHÐPCM INPUT
When the brake switch is activated, the PCM re-
ceives an input indicating that the brakes are being
applied. After receiving the input, the PCM vents the
speed control servo. Venting the servo turns the
speed control system off.
COOLANT TEMPERATURE SENSORÐPCM INPUT
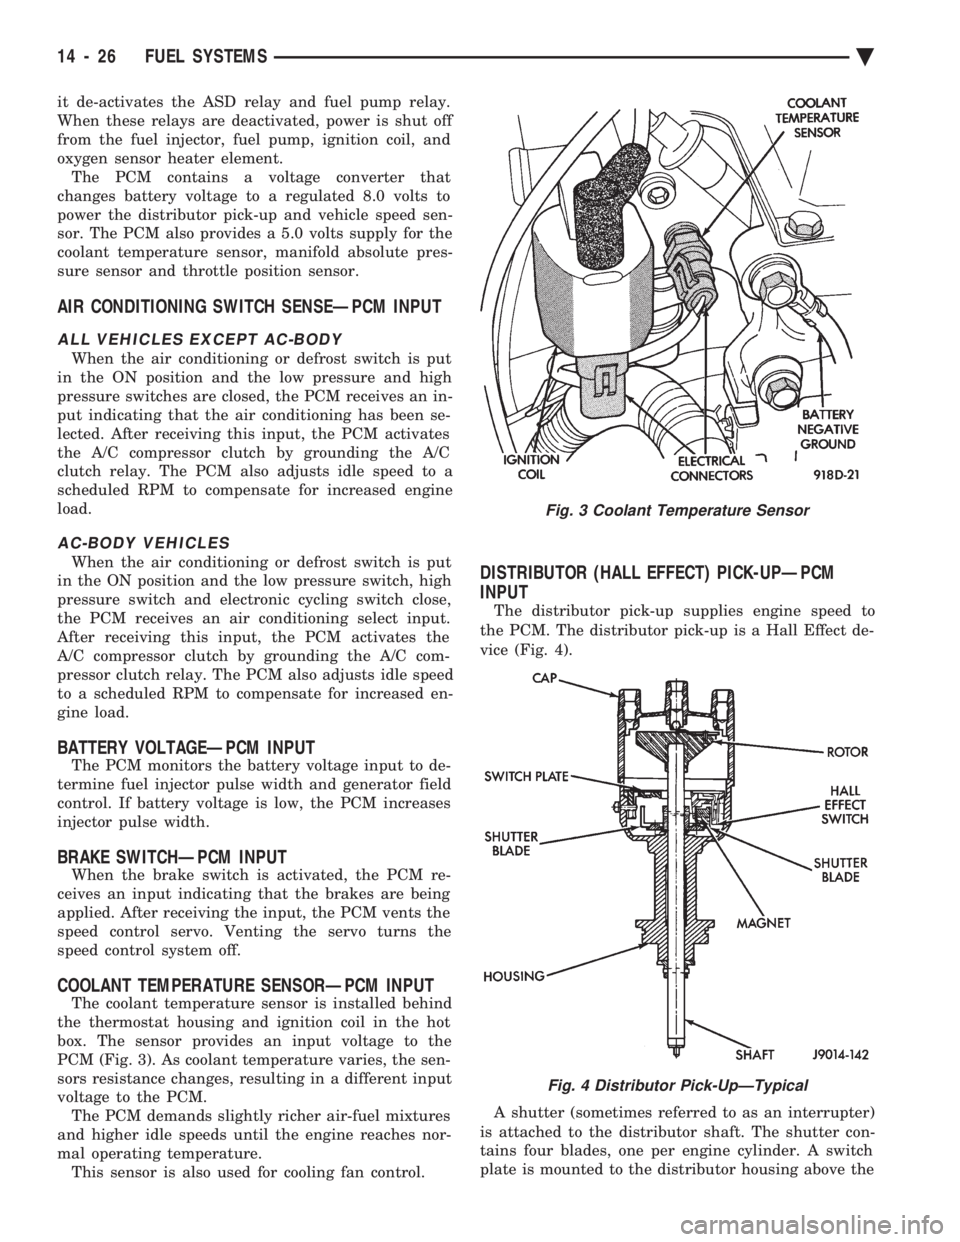
The coolant temperature sensor is installed behind
the thermostat housing and ignition coil in the hot
box. The sensor provides an input voltage to the
PCM (Fig. 3). As coolant temperature varies, the sen-
sors resistance changes, resulting in a different input
voltage to the PCM. The PCM demands slightly richer air-fuel mixtures
and higher idle speeds until the engine reaches nor-
mal operating temperature. This sensor is also used for cooling fan control.
DISTRIBUTOR (HALL EFFECT) PICK-UPÐPCM
INPUT
The distributor pick-up supplies engine speed to
the PCM. The distributor pick-up is a Hall Effect de-
vice (Fig. 4).
A shutter (sometimes referred to as an interrupter)
is attached to the distributor shaft. The shutter con-
tains four blades, one per engine cylinder. A switch
plate is mounted to the distributor housing above the
Fig. 3 Coolant Temperature Sensor
Fig. 4 Distributor Pick-UpÐTypical
14 - 26 FUEL SYSTEMS Ä
Page 1798 of 2438
A/C clutch relay. To compensate for increased engine
load, the PCM also adjusts idle speed to a scheduled
RPM.
BATTERY VOLTAGEÐPCM INPUT
The powertrain control module (PCM) monitors the
battery voltage input to determine fuel injector pulse
width and generator field control. If battery voltage
is low, the PCM increases injector pulse width to
compensate.
BRAKE SWITCHÐPCM INPUT
When the brake switch activates, the powertrain
control module (PCM) receives an input indicating
that the brakes are being applied. After receiving the
input, the PCM vents the speed control servo. Vent-
ing the servo turns the speed control system off.
ENGINE COOLANT TEMPERATURE SENSORÐPCM
INPUT
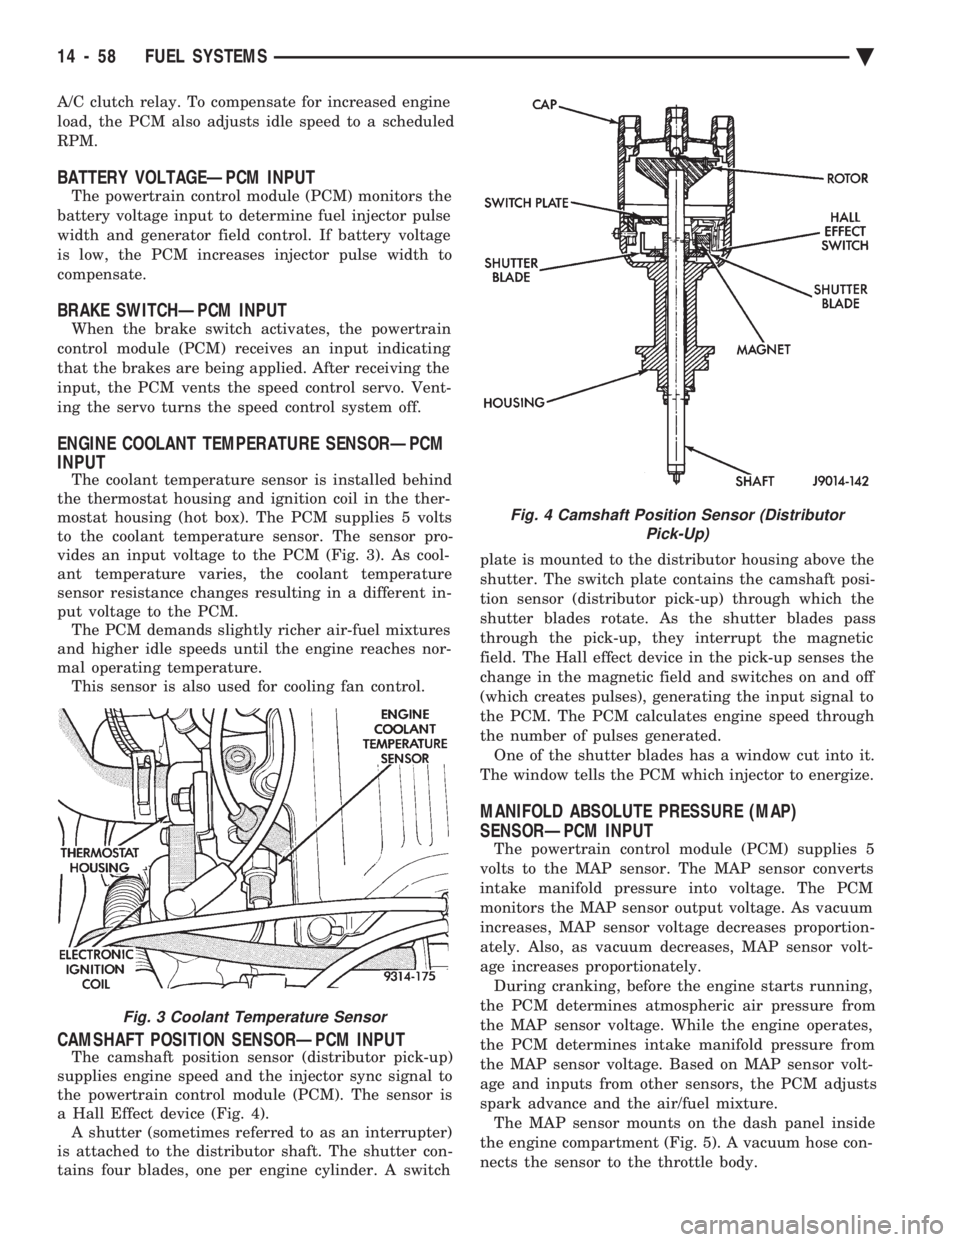
The coolant temperature sensor is installed behind
the thermostat housing and ignition coil in the ther-
mostat housing (hot box). The PCM supplies 5 volts
to the coolant temperature sensor. The sensor pro-
vides an input voltage to the PCM (Fig. 3). As cool-
ant temperature varies, the coolant temperature
sensor resistance changes resulting in a different in-
put voltage to the PCM. The PCM demands slightly richer air-fuel mixtures
and higher idle speeds until the engine reaches nor-
mal operating temperature. This sensor is also used for cooling fan control.
CAMSHAFT POSITION SENSORÐPCM INPUT
The camshaft position sensor (distributor pick-up)
supplies engine speed and the injector sync signal to
the powertrain control module (PCM). The sensor is
a Hall Effect device (Fig. 4). A shutter (sometimes referred to as an interrupter)
is attached to the distributor shaft. The shutter con-
tains four blades, one per engine cylinder. A switch plate is mounted to the distributor housing above the
shutter. The switch plate contains the camshaft posi-
tion sensor (distributor pick-up) through which the
shutter blades rotate. As the shutter blades pass
through the pick-up, they interrupt the magnetic
field. The Hall effect device in the pick-up senses the
change in the magnetic field and switches on and off
(which creates pulses), generating the input signal to
the PCM. The PCM calculates engine speed through
the number of pulses generated. One of the shutter blades has a window cut into it.
The window tells the PCM which injector to energize.
MANIFOLD ABSOLUTE PRESSURE (MAP)
SENSORÐPCM INPUT
The powertrain control module (PCM) supplies 5
volts to the MAP sensor. The MAP sensor converts
intake manifold pressure into voltage. The PCM
monitors the MAP sensor output voltage. As vacuum
increases, MAP sensor voltage decreases proportion-
ately. Also, as vacuum decreases, MAP sensor volt-
age increases proportionately. During cranking, before the engine starts running,
the PCM determines atmospheric air pressure from
the MAP sensor voltage. While the engine operates,
the PCM determines intake manifold pressure from
the MAP sensor voltage. Based on MAP sensor volt-
age and inputs from other sensors, the PCM adjusts
spark advance and the air/fuel mixture. The MAP sensor mounts on the dash panel inside
the engine compartment (Fig. 5). A vacuum hose con-
nects the sensor to the throttle body.
Fig. 3 Coolant Temperature Sensor
Fig. 4 Camshaft Position Sensor (Distributor Pick-Up)
14 - 58 FUEL SYSTEMS Ä