Page 65 of 164

Downloaded from www.Manualslib.com manuals search engine
CONTROLS AND EQUIPMENT
Auxiliary
heater*
To
switch heater on
•
Press
rocker switch D on rent.
• Select desired heat
with
knee -
The
green heater in-operatior. =~~" _
comes
on.
Regulating
heat
The
heat is infinitely adjustable
with
:~e knob A.
After heater has been switched on it takes
a
little
time before heat can be
felt.
When
the set temperature is reached, the green in-operation lamp becomes darker.
The
temperature is then held fairly constant by the heater thermostatically.
w-^
=
jxiliary heater works independently of
me .ehicle heating. It is supplied
with
fuel
I: rr the vehicle tank.
He suxiliary heater can be used continu
es
. when on the move or stationary.
|r~? current is supplied from a 2nd battery.
r~T
air flows from the outlets behind the p*.er's seat.
k- the summer the heater blower can be
(sed
to circulate the air in the vehicle with-
it.: heat.
5v. itching on and off and regulating the aux-
tey heater are done from the control panel
r the dash panel.
-
a
timer* is
fitted
(see page 65) the control
panel
is located on the roof cross member I the passenger compartment.
A
BCD
[J70~-T971
Control
elements
A
- Regulating heat output
B
- Overheating indicator (red)
C
- Heater in-operation lamp (green)
D
-
Rocker
switch for switching heater on
and
off and operating blower without heat.
www.vwT4camper.info - a useful website for owners and enthusiasts of VW T4 Transporter Campervans
Page 66 of 164

Downloaded from www.Manualslib.com manuals search engine
CONTROLS
AND EQUIPMENT
To
switch
heater
off
• Move rocker switch D to centre position.
The
heater in-operation lamp C then goes out, but the biower continues to run for a
short time.
Note
The
warning lamp B flashes if the heater
overheats.
If this happens, check whether
the air intake or the warm air outlet are
blocked.
Switching
blower
on
without
heat
Press
rocker switch D on the
left.
The green
in-operation lamp C comes on.
Switching
off
• Move switch D to centre position. The in-operation lamp goes out.
Stipulation is
that
the heater is not being
controlled at the same time by the timer
(see
next page).
Attention
The
heater
must
be
switched
off in enclosed spaces and
when
fil
ling
the
tank.
Notes
• Every time the heater is switched off the blower continues to run for a while to cool
the heater down quicker. When filling tank it is not necessary to wait to end of run-on.
• When driving cross-country or through mud or deep snow the heater exhaust pipe
can
become blocked. Before switching the heater on intheseconditions, check thatthe
pipe is clear. • The
following
official
regulation
is
applicable
in
Germany:
The
heat exchanger of the heater may be
used
for 10 years. After this period the heat
exchanger
must be replaced by a Genuine heat exchanger in a Volkswagen Dealer
ship.
To enable this period of time to be monitored the year when the heater is taken
into use is marked on the maker's plate on
the heater (under vehicle floor).
The
Volkswagen dealer enters the date of
replacement on the plate on the heater.
64
www.vwT4camper.info - a useful website for owners and enthusiasts of VW T4 Transporter Campervans
Page 67 of 164

Downloaded from www.Manualslib.com manuals search engine
CONTROLS
AND EQUIPMENT
12
3 4 5 6 m.bc
"fy
7 8 9 10 111
Timer*
'. ih the timer in the instrument panel up to
r-ee different switch-on times can be se
eded
for the auxiliary heater*. It is thus
::ssible
to start the heater without having
go
to the vehicle.
e
heater runs for maximum 120 minutes
ie'.d
it switches itself off. It can be switched
c~
prematurely by pressing button 9. The
preset
time is stored and can be called up
again
so that the heater switches on again =: the same time.
~ne
switch-on time can be programmed up :: one week in advance. 1- Display for 3 possible pre-selected
times
2-
Time display/pre-selected time
3-
System malfunction display
4-
Temperature display*
5-
"On" or "Off" display
6-
Display for pre-selected day 7-
Push
button for time and day of week
8-
Push
button for selecting time and day
9-
Push
button for "On" or "Off"
10-
Push
button for re-setting time or pre
selected
time and calling up remaining running time
11-
Push
button for setting time or pre-se
lected
time, setting pre-selected day
and
temperature display*
Notes
• As a temperature sender is not
fitted
at the factory an incorrect temperature figure
appears
when button 11 is
pressed.
• Displays 2 and 6 appear continuously after switching on the ignition. After switching off the ignition both displays will only ap
pear
if button 7 is
pressed.
Setting
the
actual
time
•
Press
and hold button 7.
• Set correct time with buttons
":1c".
Setting
the
actual
day of week
•
Press
and hold button 7.
• Set correct day of week with button 8.
Switching
heater
on (without preset
operation)
•
Press
button 9; symbol 5 appears r 're
display.
A
prerequisite is that rocker switch D z" control panel of heater is in centre pos : z~
With the ignition switched off the heate' .•.
be
switched on for approx. max. MZ —-
utes.
The
remaining running time can ce := e: by pressing button 10 briefly. If the c_r.c~
is
pressed longer than one second :~e
ning time will be shortened.
Note
If continuous operation of :~e -ea:e •
wanted,
it must be switcher :" B: re ::'-
trol
panel (see page 63).
www.vwT4camper.info - a useful website for owners and enthusiasts of VW T4 Transporter Campervans
Page 68 of 164

Downloaded from www.Manualslib.com manuals search engine
CONTROLS AND
EQUIPMENT
Switching
heater
off
•
Press
button
9/symbol 5 disappears.
Setting
the
pre-selected
times
•
Press
button
8/the
three possible pre
selected
times and actual time can be called up separately as follows:
1st pre-selected time
2nd pre-selected time
3rd pre-selected time
Actual
time etc.
At the same time the day of week is dis played in each level.
For
the initial input and for each change to
an old input
first
call up the corresponding pre-selected time level
with
button
8. It is
then possible to set the desired pre-se lected time in each level
with
buttons 10 or
11.
If a time is set before the actual time of
day, the next day of the week appears in the display automatically. If a different day of the week is desired, it is
necessary
to wait
until
the weekday display
flashes
before setting the new day of the
week by pressing
button
11.
The inputs are stored in the memory if no
further
inputs are made
within
about 10
sec
onds after setting a pre-selected time and
day of the week. With the ignition switched
on the actual time is
displayed,
with
the igni
tion
switched off the display disappears. However the numbers 1,2 or 3 remain in the
display 1 to indicate
that
a pre-selected
time is activated.
Notes
• If not activated the heater will not start at the pre-selected time!
• Only one pre-selected time can be acti
vated,
which in
turn
also runs only once. However, the time can be repeated by acti
vating again. When doing this the inputs re main stored in the memory.
• The switched-on period is determined
as
described in the "Switching heater on"
section (see previous page).
If the activation (not the pre-selected set
tings!) is to be cancelled, press
button
8
until
the number in display
1
is no longer vis
ible.
66
www.vwT4camper.info - a useful website for owners and enthusiasts of VW T4 Transporter Campervans
Page 69 of 164

Downloaded from www.Manualslib.com manuals search engine
CONTROLS
AND
EQUIPVE\
Additional
water
heater*
E
additional water heater heats the
cool-
— ;he heater circuit and supplies the nor- • ^eating heat exchanger and the addi-
:~a
heat exchanger* for heating up the
rsaenger
compartment
with
heated
cool-
' ""e engine coolant circuit is not heated.
I current is supplied from a 2nd battery.
:ching
on and off and pre-selecting the
. :ch on/off times is effected via the timer,
- :h can be found in the instrument panel.
~a
air distribution and the air flow is ef-
:::ed
via the normal heating and ventila- : li aontrol elements (operating see page
a
additional water heater can be used
•en
stationary (short term operation) or -g the journey (continuous operation). If
.a;
when the vehicle is stationary the
•Her
runs for maximum 30 minutes,
;eoy
preserving the battery. Apart from
• 5 t switches off automatically, when a .: ant temperature of 92 degrees C is
Bcned.
"
an
the coolant temperature has dropped
-: .v 84 degrees C the heater switches on
The
additional water heater is supplied
with
fuel from the vehicle tank. It consumes up
to
1
litre
of fuel per hour. The heater output
is
approx. 7.0 kW.
Notes
• If the coolant temperature in the heater circuit reaches 55 degrees C, the fresh air
blower is automatically switched to stage 2.
• The additional water heater will only switch on when the temperature selector
lever
(see page 55, lever C) is pushed fully
to the
right.
• With the heater switched on the tem perature selector lever must not be pushed
to the
left.
• Regulating the heat output is not
poss
ible
with
the temperature selector lever.
• When driving across country through mud or deep snow the heater exhaust pipe
can
become blocked. Therefore under
these
conditions check
that
the pipe is clear before switching on the heater.
Attention
The
heater
must
be s . ::'-
a
: : in confined spaces and when fil
ling
the
tank.
•
Each
time the heater is sw :ce:
circu
at .-' pump and the comes::-blower continues to run for a v. K.e :: :::
down the heater
unit
quicker. Wher,-:. rg
the tank it is not necessary to vva :
end
of the run-on.
www.vwT4camper.info - a useful website for owners and enthusiasts of VW T4 Transporter Campervans
Page 70 of 164

Downloaded from www.Manualslib.com manuals search engine
CONTROLS
AND EQUIPMENT
1 2 3 4 5 6
7 8 9 10 11
Timer
With the timer in the instrument panel up to
three different switch-on times can be se
lected
for the additional water heater. It is
thus possible to start the heater without
having
to go to the vehicle.
The
heater runs for maximum 30 minutes
and
then switches itself
off.lt
can be
switched
off prematurely by pressing but
ton 9. The preset time is stored and can be
called
up again so that the heater switches on again at the same time.
The
switch-on time can be programmed up
to one week in advance. 1- Display for 3 possible pre-selected
times
2-
Time display/pre-selected time
3-
System malfunction display
4-
Temperature display*
5-
"On" or "Off" display
6-
Display for pre-selected day
7-
Push
button for time
8-
Push
button for selecting time and day
9-
Push
button for "On" or "Off"
10-
Push
button for re-setting time or pre
selected
time and calling up remaining running time
11-
Push
button for setting time or pre-se
lected
time, setting pre-selected day
and
temperature display*
Notes
• As a temperature sender is not
fitted
in the factory an incorrect temperature figure
appears
when button 11 is
pressed.
• Displays 2 and 6 appear continuously after switching on the ignition. With the igni
tion switched off both displays will only ap
pear
if button 7 is
pressed.
Setting
the
actual
time
•
Press
and hold button 7.
• Set correct time with buttons 10 or 11.
Setting
the
actual
day of
week
•
Press
and hold button 7.
• Set correct day of week with button 8. Switching on
heater
(without pre-set
operation)
•
Press
button 9; symbol 5 appears in the
display.
A
prerequisite is that the temperature
selec
tor lever is pushed fully to the right.
With ignition switched off the heater will be
switched
on for approx. max. 30 minutes.
The
remaining running time can be
called-
up by pressing button 10 briefly. If the but
ton is pressed for longer than 1
second,
the running time will be shortened.
Note
Continuous
operation of the additiona
water heater is only possible with the igni
tion switched on. Additionally the heater must be switched on at the timer with but
ton 9.
68
www.vwT4camper.info - a useful website for owners and enthusiasts of VW T4 Transporter Campervans
Page 71 of 164

Downloaded from www.Manualslib.com manuals search engine
CONTROLS AND
EQUIPMENT
Switching
heater
off
• -'ess
button
9; symbol 5 disappears. '.;te
-_e"
switching off the heater the circulation
b-~o and the combustion blower con- " • ^es to run for 2 minutes.
2
jring
this
time
the
temperature
se
lector
lever
must
not be pushed to
ae
left
-
danger
that
heater
unit
will
: .
erheat!
Setting
the
pre-selected
times
•
r-ess
button
8/the
three possible pre ss ect times and the actual time can be .i ed up one after the other as follows:
r. cre-selected time
I-; ore-selected time •-z ore-selected time
jfcrjal
time
: -jltaneously the day of the week is dis-
: z.ed at each level.
::' :he initial input and for each change to
r" Did input
first
call up the corresponding
:'e-selected
time level
with
button
8. It is "en possible to set the desired pre-select
~e
at each level
with
buttons 10 or 11. If
I: Tie is set before the actual time of day,
re next day of the week appears automati- za y in the display. If a different day of the week is desired, it is
necessary
to wait
until
the week day display
flashes
before setting the new day of the
week by pressing
button
11.
The inputs are stored in the memory if no
further
inputs are made
within
about 10
sec
onds after setting a pre-select time and day
of the week. With the ignition switched on
the actual time is displayed,
with
the ignition switched off the display disappears. How
ever
the numbers 1, 2 or 3 remain in the dis
play 1 to indicate
that
a pre-selected time is
activated.
Notes
• If not activated the heater will not
start
at
the pre-selected time!
• Only one pre-selected time can ce act •
vated,
which in
turn
only runs once, r: ever, the time can be repeated by activating
again.
When doing this the input remains stored in the memory.
• The switched-on period is determined
as
described in "Switching heater on" (see previous page). If the activation (not the pre-selected set
tings!) is to be cancelled, press
button
8
until
the number in display 1 is no longer vis
ible.
69
www.vwT4camper.info - a useful website for owners and enthusiasts of VW T4 Transporter Campervans
Page 72 of 164
Downloaded from www.Manualslib.com manuals search engine
CONTROLS AND
EQUIPMENT
Sun
roof*
The roof is opened and closed
with
the
hand-wheel.
The roof can be
tilted
at the rear as desired or taken out altogether.
Raising
Turn the hand-wheel clockwise.
Lowering
Turn the hand-wheel anti-clockwise.
To take
out
• With the roof closed
turn
the retaining
screw
(A) in centre of the hand-wheel one
quarter
turn
clockwise
with
a screwdriver.
• Then raise the roof and press it up.
•
Press
up locking lever (B).
• Detach the
roof.
•
Lift
the roof from outside and pull it out to the rear.
To
put
back
• Slide the roof back
into
the hinges and let it drop lightly
into
the retainers.
Attention Ensure that
the
roof
is
properly
inserted into
the two
retaining
hinges
at the
front,
and
secured
at
the
rear.
The roof must only
be
released when vehicle
is
stationary.
70
www.vwT4camper.info - a useful website for owners and enthusiasts of VW T4 Transporter Campervans
 1
1 2
2 3
3 4
4 5
5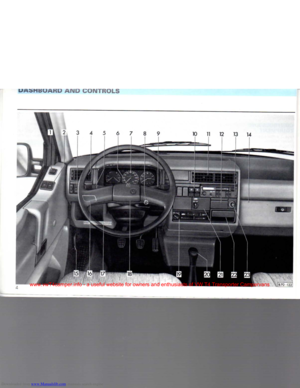 6
6 7
7 8
8 9
9 10
10 11
11 12
12 13
13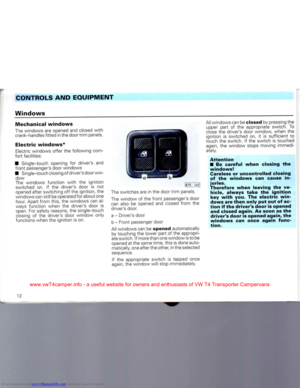 14
14 15
15 16
16 17
17 18
18 19
19 20
20 21
21 22
22 23
23 24
24 25
25 26
26 27
27 28
28 29
29 30
30 31
31 32
32 33
33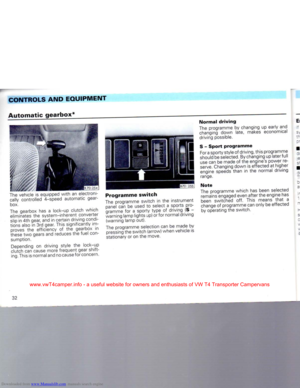 34
34 35
35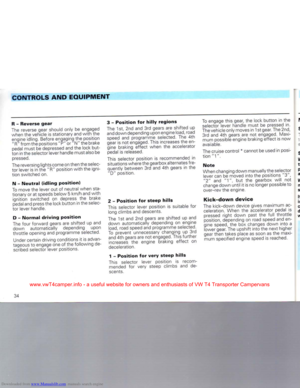 36
36 37
37 38
38 39
39 40
40 41
41 42
42 43
43 44
44 45
45 46
46 47
47 48
48 49
49 50
50 51
51 52
52 53
53 54
54 55
55 56
56 57
57 58
58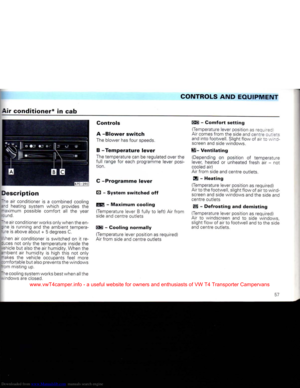 59
59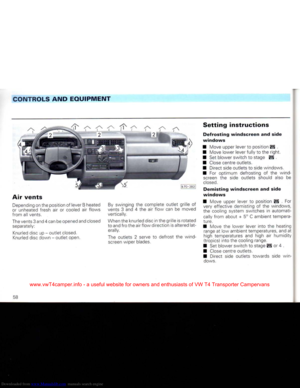 60
60 61
61 62
62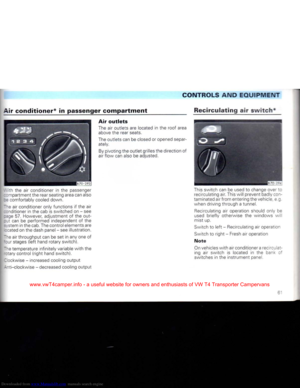 63
63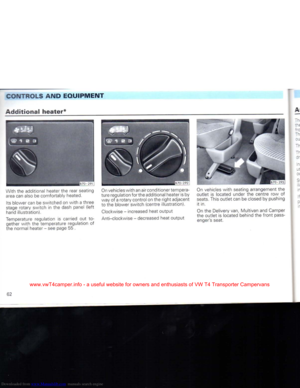 64
64 65
65 66
66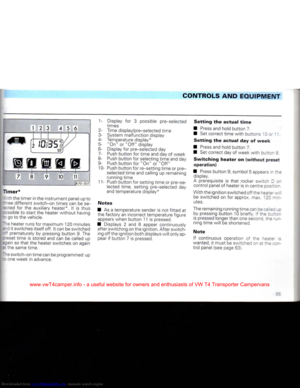 67
67 68
68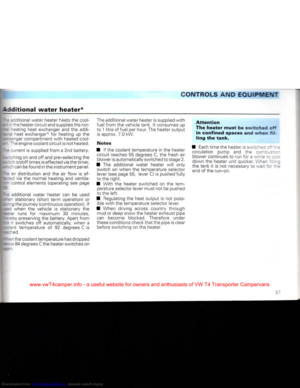 69
69 70
70 71
71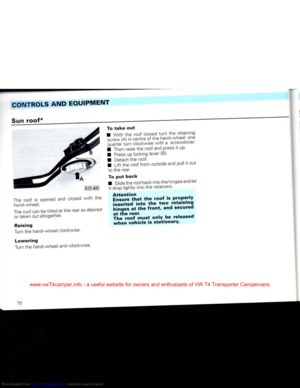 72
72 73
73 74
74 75
75 76
76 77
77 78
78 79
79 80
80 81
81 82
82 83
83 84
84 85
85 86
86 87
87 88
88 89
89 90
90 91
91 92
92 93
93 94
94 95
95 96
96 97
97 98
98 99
99 100
100 101
101 102
102 103
103 104
104 105
105 106
106 107
107 108
108 109
109 110
110 111
111 112
112 113
113 114
114 115
115 116
116 117
117 118
118 119
119 120
120 121
121 122
122 123
123 124
124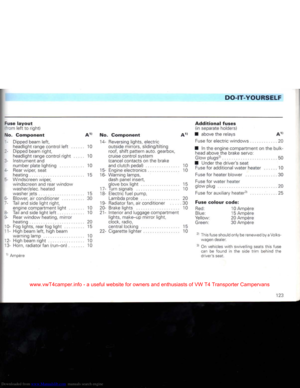 125
125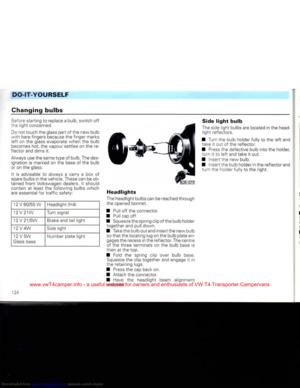 126
126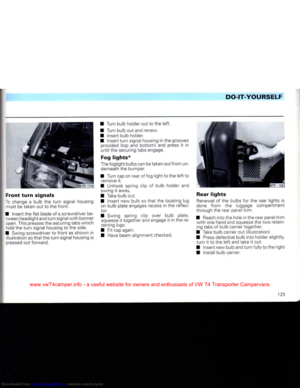 127
127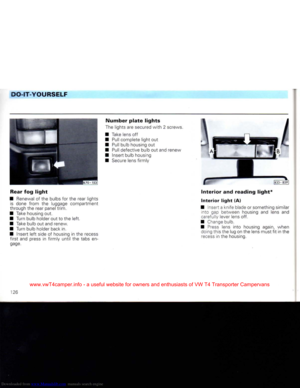 128
128 129
129 130
130 131
131 132
132 133
133 134
134 135
135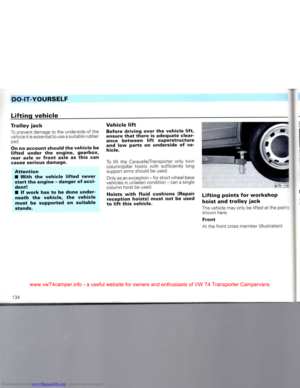 136
136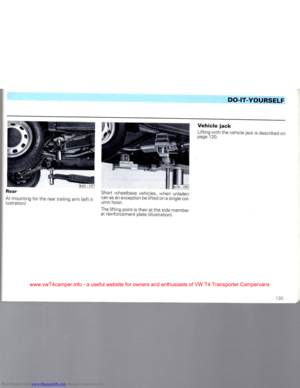 137
137 138
138 139
139 140
140 141
141 142
142 143
143 144
144 145
145 146
146 147
147 148
148 149
149 150
150 151
151 152
152 153
153 154
154 155
155 156
156 157
157 158
158 159
159 160
160 161
161 162
162 163
163