1992 HONDA PRELUDE coolant temperature
[x] Cancel search: coolant temperaturePage 38 of 225

Gauges
Fuel Gauge
This shows how much fuel you
have. The fuel gauge is fully
electronic, lighting one of the
indicator bars to show the current
fuel level. It is most accurate when you are driving or parked on level
ground. The indicated fuel level may vary when you are driving on
curved or hilly roads. As a test, all the indicator bars in
the fuel gauge light for several
seconds when you turn the ignition
to ON (II).
Temperature Gauge
The temperature gauge is fully
electronic. It uses a series of
illuminated indicator bars to show
the engine coolant's temperature range. Under normal driving
conditions, you will see one of the
bars at the display's midpoint. In more severe driving conditions,
such as very hot weather or
climbing a long hill, the engine may
get hot enough to illuminate the
white indicator on the right side of
the gauge. If the red indicator
above the H comes on, pull safely
to the side of the road. Turn to
page 193 for instructions and
precautions on checking the
engine's cooling system.
As a test, all the indicator bars in the temperature gauge illuminate
when you turn the ignition ON (II).
Instruments and Controls
FUEL GAUGE
TEMPERATURE
GAUGEProCarManuals.comMain Menu Table of Contents s t
Page 71 of 225

Heating and Cooling
How to Use the System
This section covers the best way to
use the system for ventilation, cooling, dehumidifying, defrosting
and heating. In most cases, the
mode and air source selections are
only recommendations. You may
prefer different settings.
Use the Recirculation mode to heat
or cool the interior more quickly, or
to keep out smoke and dust.
Leaving the system in recirculation
mode with the A/C off can cause
the windows to fog up. Switch to
the Fresh Air mode as soon as the
interior reaches a comfortable
temperature or the outside smoky,
dusty condition clears.
The engine must be running for the
heater and air conditioner to pro-
vide hot and cold air. The heater
uses engine coolant to warm the air.
If the engine is cold, it will be sever-
al minutes before you feel warm air
circulating.
The air conditioner does not de-
pend on engine temperature. It can produce cold air almost immedi-
ately.
Controlling Air Flow direction
Air flows into the interior at three
levels: Toward the floor
through the dash vents
toward the windshield and side windows You select the air
flow level or combination of levels
with th
e five mode buttons. Ventilation
Your car has a flow-through
ventilation system. Air enters the car through vents in front of the
windshield. I
t circulates through
the interior then exits through
vents nea
r the rear window. This
system provides fresh air even
when th
e car is standing still. To
bring i
n outside air, select the
Fresh Air mode. Set the fan at a
comfortable speed
.
CONTINUED
Comfort an
d Convenience Features
and
ProCarManuals.comMain Menu Table of Contents s t
Page 72 of 225

Heating and Cooling
To Cool
To operate the air conditioner,
press the air conditioning button.
Set the fan to the desired speed.
You can also use the mode
button to direct air out of the dash
and heater vents.
To cool the interior down rapidly after the car has been sitting in the
sun:
1. Start the engine.
2. Turn o
n the A/C by pressing the
button.
3. Set
the fan to maximum speed.
4.
Open the windows partially.
Select the Recirculation mode
and
When the
interior reaches a com-
fortable temperature, close the
windows and set the system for
cooling as described above.
MODE BUTTONS
AIR CONDITIONER
BUTTON
TEMPERATURE
CONTROL LEVER
The air conditioner places an extra
load on the engine. Watch the
coolant temperature gauge (see
page 38 ) when using the A/C in
heavy traffic or driving up long
hills. If the temperature indication
climbs near the H, turn off the air
conditioner until the gauge reads
normally.
FAN CONTROL
LEVER
Comfort and Convenience FeaturesProCarManuals.comMain Menu Table of Contents s t
Page 74 of 225

Heating and Cooling
To Heat
To warm the interior, press and select the Fresh Air
mode. Set the fan to the desired
speed. Adjust the warmth of the air
with the temperature control lever.
To warm the interior rapidly after
the car has been sitting out in cold
weather.
1. Start the engine.
2. Select
the Recirculation mode
and
3. Slide the temperature control
lever to maximum heat.
4. Leave
the fan OFF for the first
few minutes. When the tempera-
ture gauge rises above the bot-
tom white mark, set the fan to
medium speed.
5. Whe
n
the interior warms up,
switch to fresh air mode and
adjust the temperature control
lever to a comfortable setting.
To Defrost
To remove frost or ice from the
windshield and side windows after the car has been sitting out in cold
weather.
1. Start the engine.
2. Selec t
the Recirculation mode
and
3. Open
the side defroster vents.
4. Set the fan and temperature
controls to maximum.
These settings
direct all the air
flow to the defroster vents at the
base of the windshield and the side
window defroster vents. The air
flow will get warmer and clear the
windows faster as the engine
warms up. You can close the corner
vents with the dial beside each vent.
That will send more warm air to
the side defroster vents.
For safety, make sure you have a
clear view through all the windows
before driving away.
To Turn Everything Off
To shut off the system temporarily,
slide the fan speed and temperature
control levers all the way to the left.
You should only shut the system completely off for the first few
minutes of driving in cold weather,
until the engine coolant warms up
enough to operate the heater. Keep
the fan on at all other times so stale
air does not build up in the interior.
Comfort and Convenience FeaturesProCarManuals.comMain Menu Table of Contents s t
Page 125 of 225

Maintenance
Regularly maintaining your Honda
is the best way to protect your investment. You will be rewarded
with safer, more economical,
trouble-free driving. This section
lists items that need to be checked
regularly and explains how to check them. It also details some
simple maintenance tasks you can
do yourself. The maintenance
schedules for normal and severe
driving conditions show you when
these things need to be done.
If you are interested in how to per-
form more complex maintenance
on your Honda, you can purchase
the Service Manual. See page 221 for information on how to
obtain a copy, or see your Honda
dealer.
Maintenance Schedule................ 128
Maintenance Record................ 131
Periodic Checks............................ 133
Fluid Locations............................. 134
Engine Oil...................................... 135
Checking Engine Oil................ 135
Adding........................................ 135
Recommended Oil.................... 136
Additives.................................... 136 Oil and Filter Changes ............ 137
Cooling System............................. 139 Checking the Coolant Level... 139
Adding Radiator Coolant........ 139
Replacing Coolant.................... 140
Windshield Washers.................... 143
Transmission Oil.......................... 144
Automatic Transmission........ 144
5-speed Transmission.............. 145
Brake and Clutch Fluid............... 146
Brake System............................ 146
Anti-lock Brake System ......... 147 Clutch System........................... 147
Power Steering............................. 148
Air Filter....................................... 149
Fuel Filter..................................... 150
Spark Plugs.................................. .
150
Replacement.............................. 150
Specification.............................. 152
Battery............................................ 152
Windshield Wipers....................... 155
Air Conditioner............................. 157 Engine Belts.................................. 158
Tires................................................ 158 Inflation...................................... 158
Inspection................................... 159
Maintenance.............................. 160
Tire Rotation............................ 160
Replacing Tires ........................ 161
Wheels and Tires...................... 161
DOT Tire Quality Grading..... 161 Treadwear............................. 161
Traction................................. 162
Temperature......................... 162
Winter Driving.......................... 163 Snow Tires............................ 163
Tire Chains............................ 163
Lights.............................................. 164
Replacing Bulbs........................ 164
Storing Your Car.......................... 173
MaintenanceProCarManuals.comMain Menu s t
Page 139 of 225

Cooling System
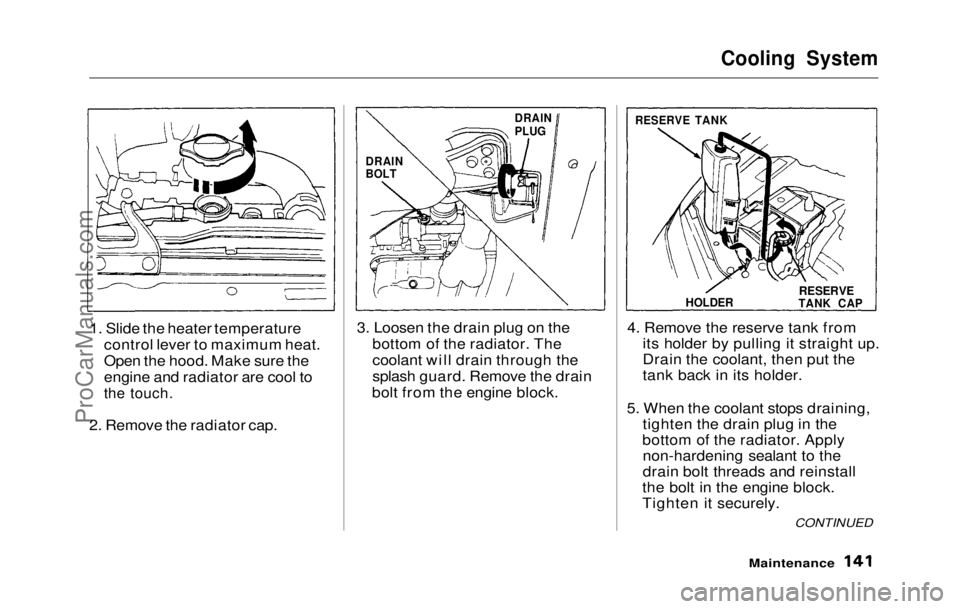
1. Slide the heater temperature control lever to maximum heat.
Open the hood. Make sure the
engine and radiator are cool to
the touch.
2. Remove the radiator cap. 3. Loosen the drain plug on the
bottom of the radiator. The
coolant will drain through the
splash guard. Remove the drain
bolt from the engine block. 4. Remove the reserve tank from
its holder by pulling it straight up.
Drain the coolant, then put the
tank back in its holder.
5. When the coolant stops draining, tighten the drain plug in the
bottom of the radiator. Apply non-hardening sealant to the
drain bolt threads and reinstall
the bolt in the engine block.
Tighten it securely.
Maintenance
DRAIN
PLUG
DRAIN
BOLT RESERVE TANK
HOLDER
RESERVE
TANK CAP
CONTINUEDProCarManuals.comMain Menu Table of Contents s t
Page 189 of 225

If Your Engine Overheats
Your car's temperature gauge
should register in the midrange
under most conditions. It may register higher if you are driving
up a long steep hill on a very hot
day. If it illuminates the red
marker at the right end of the
gauge, you should determine the
reason.
Driving with the temperature
gauge's red marker lit can cause serious damage to your engine. Your car can overheat for several
reasons, such as lack of coolant or a
mechanical problem. The only
indication may be the temperature
gauge illuminating the red marker. Or you may see steam or spray
coming from under the hood. In
either case, you should take
immediate action.
1. Safely pull to the side of the road.
Put the transmission in neutral
or Park and set the parking
brake. Turn off the climate control and all other accessories.
Turn on the hazard warning indicators.
2. I f
you see steam and/or spray
coming from under the hood,
turn off the engine.
3. If you do not see steam or spray,
leave the engine running and
watch the temperature gauge. If
the high heat is due to overload- ing (climbing a long, steep hill on
a hot day with the A/C running,
for example), the engine should
start to cool down almost immedi-
ately. If it does, wait until the
temperature gauge comes down
to the midpoint then continue
driving.
4. If
the temperature gauge
continues to display the red
marker, turn off
the
engine.
5. Wait until you see no more signs
of steam or spray, then open the
hood.
Taking Care of the Unexpected
NOTICE
Steam and spray from an over-
heated engine can seriously
scald you.
Do not open the hood if steam
is coming out.
CONTINUEDProCarManuals.comMain Menu Table of Contents s t
Page 190 of 225

If Your Engine Overheats
6. Look for any obvious coolant
leaks, such as a split radiator
hose. Everything is still extreme-
ly hot, so use caution. If you find
a leak, it must be repaired before
you continue driving (see
Towing on page 202 ).
7. If
you don't find an obvious leak,
check the coolant level in the
radiator reserve tank (see page
139). If the level is below the
MIN mark, add coolant to half-
way between the MIN and MAX
marks.
8. I f
there was no coolant in the
reserve tank, you may also have
to add coolant to the radiator. Let the engine cool down until
the temperature gauge registers
below the midpoint, or lower,
before checking the radiator. 9. Using gloves or a large heavy
cloth, turn the radiator cap
counterclockwise, without
pushing down, to the first stop.
This releases any remaining
pressure in the cooling system.
After the pressure releases, push down on the cap and turn it until
it comes off.
10.Start th e
engine and set the
heater control lever to maximum.
Add coolant to the radiator up to
the base of the filler neck. If you
do not have the proper coolant
mixture available, you can add
plain water. Remember to have
the cooling system drained and
refilled with the proper mixture as soon as you can.
11.Put the radiato
r cap back on
tightly. Run the engine and
watch the temperature gauge. If
it illuminates the red marker
again, the engine needs repair.
(See Towing on page
202.)
12.If th e
temperature stays normal,
check the coolant level in the
radiator reserve tank. If it has
gone down, add coolant to the MAX mark. Put the cap back on
tightly.
Taking Care of the Unexpected
Removing the radiator cap
while the engine is hot can
cause the coolant to spray out, seriously scalding you.
Always let the engine and radiator cool down before
removing the radiator cap.ProCarManuals.comMain Menu Table of Contents s t