Page 28 of 225
Safety Labels
These labels are in the locations shown. They warn you of potential
hazards that could cause seriousinjury. Read these labels carefully
and don't remove them.
If a label comes off or becomes
hard to read, contact your Honda
dealer for a replacement.
Driver and Passenger Safety
RADIATOR CAP
BATTERYProCarManuals.comMain Menu Table of Contents s t
Page 33 of 225

Indicator Lights
Seat Belt Reminder
Light
This indicator lights when you turn the ignition ON (II). It is a reminder
to you and your passengers to protect yourselves by fastening the
seat belts. A beeper also sounds if
you have not fastened your seat
belt.
If you do not fasten your seat belt,
the beeper will stop after a few seconds but the light stays on until
you do. Both the light and the
beeper stay off if you fasten your seat belt before turning on the
ignition.
Charging System
Light
This light indicates the battery is not being charged. It should come
on when the ignition is ON (II), and
go out after the engine starts. If
this light comes on while driving,
the battery is not being charged.
Turn to page 196 for information
about what to do.
Low Oil Pressure
Light
This indicator lights when the oil
pressure in the engine drops low
enough to cause damage. It should
light when the ignition is ON (II)
and go out after the engine starts.
If this light comes on when the
engine is running, there is a possi-
bility of serious engine damage. Safely pull to the side of the road
and shut off the engine as soon as
you can. Turn to page 195 for in-
structions and precautions on
checking the engine.
Canada
Parking Brake
and Brake
System Light
This light has two functions:
1. It lights as a reminder that you
have set the parking brake.
Driving with the parking brake
set can damage the brakes and
tires, and cause the Anti-lock
brake system to turn off (see
page 118).
2. I t
can indicate the brake fluid
level is low if it remains lit after
you release the parking brake or
comes on while driving. This is
normally due to worn brake pads.
Have your dealer check the
braking system for worn pads o r
flui d
leaks.
Instruments an d
Controls
US
BRAKEProCarManuals.comMain Menu Table of Contents s t
Page 54 of 225
Seat Adjustments, Seat Heaters
Seat-back Angle Memory
After you have adjusted the seat-
back angle, press the MEMORY
button. This retains the setting so the seat-back will return to thatposition after you tilt it forward for
rear seat access. If you do not press
the MEMORY button, the seat-
back will return to about the midpoint of its adjustment range.
You will then have to readjust the
angle to your preference.
Seat Heaters
Available only on SR 4WS model in
Canada
Both fron
t
seats are equipped with
seat heaters. The ignition must be
ON (II) to use them. Push the
heater switch to turn the power on
or off. The pilot lamp lights and
remains on while the heaters are on. Do not use the seat heaters when
the engine is off or when idling for
a long period of time. They can
drain the battery, making your car
hard to start.
Instruments and Controls
INDICATORSProCarManuals.comMain Menu Table of Contents s t
Page 79 of 225
Audio System (S)
Presetting
The preset buttons allow you to
store radio frequencies for later
selection. Each button will store
one frequency on the AM band, and
one on the FM band.
To store a frequency:
1. Select the desired band, AM or
FM.
2. Use
the TUNE or SEEK func-
tion to tune the radio to a desired
station.
3. Pic
k
the Preset button you want
for that station. Press the button
and hold it until you hear a beep.
4. Repea
t
steps 1 to 3 to store a
total of six stations each on AM
and
FM.
Once tha
t
station's frequency is
stored, simply press and release the
proper preset button to tune to it. If
you want to change any preset
button's selection, store another fre-
quency as described. The frequen-
cies you preset will be lost if your
car's battery goes dead or is discon-
nected.
Comfort and Convenience Features
TUNE BAR
SEEK SWITCH
PRESET BUTTONSProCarManuals.comMain Menu Table of Contents s t
Page 84 of 225

Audio System (Si, SR)
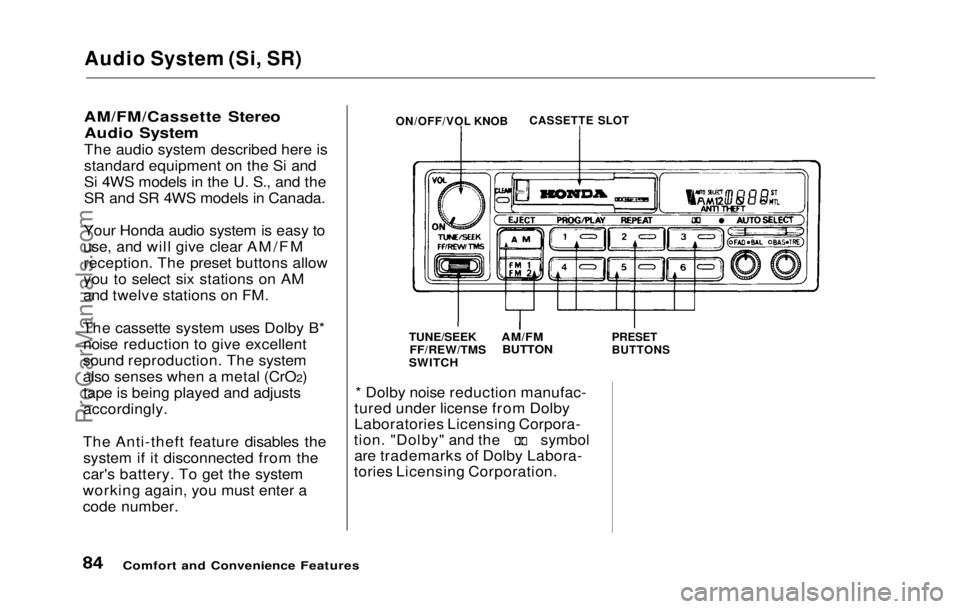
AM/FM/Cassette Stereo Audio System
The audio system described here is
standard equipment on the Si and
Si 4WS models in the U. S., and the
SR and SR 4WS models in Canada.
Your Honda audio system is easy to
use, and will give clear AM/FM reception. The preset buttons allow
you to select six stations on AM
and twelve stations on FM.
The cassette system uses Dolby B* noise reduction to give excellent
sound reproduction. The system
also senses when a metal (CrO 2)
tape is being played and adjusts
accordingly.
The Anti-theft feature disables the system if it disconnected from the
car's battery. To get the system
working again, you must enter a
code number. * Dolby noise reduction manufac-
tured under license from Dolby
Laboratories Licensing Corpora-
tion. "Dolby" and the symbol
are trademarks of Dolby Labora-
tories Licensing Corporation.
Comfort and Convenience Features
ON/OFF/VOL KNOB
CASSETTE SLOT
PRESET
BUTTONS
AM/FM
BUTTON
TUNE/SEEK
FF/REW/TMS
SWITCHProCarManuals.comMain Menu Table of Contents s t
Page 88 of 225

Audio System (Si, SR)
Presetting
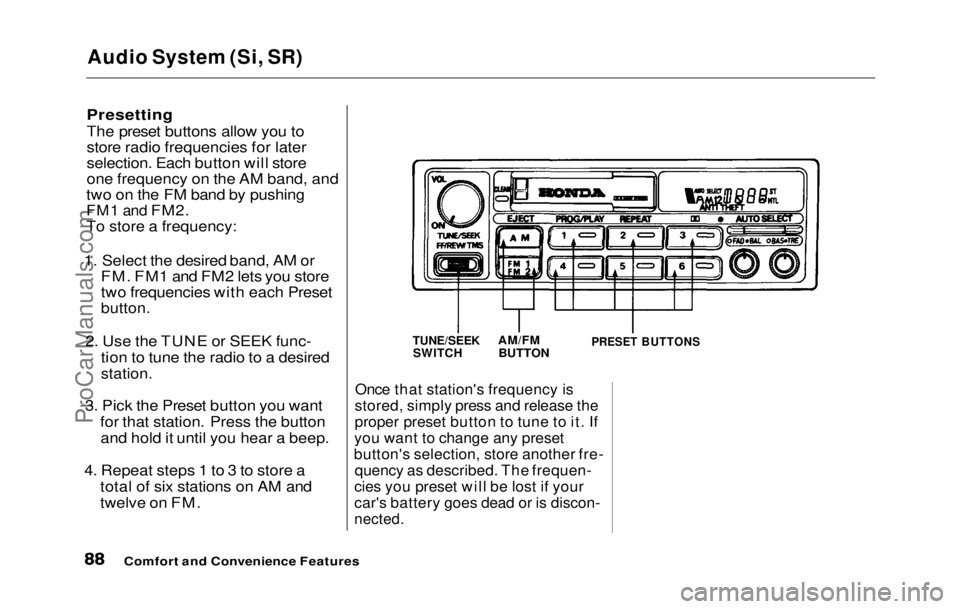
The preset buttons allow you to
store radio frequencies for later
selection. Each button will store
one frequency on the AM band, and
two on the FM band by pushing
FM1 and
FM2.
To store a frequency:
1. Select the desired band, AM or FM. FM1 and FM2 lets you store
two frequencies with each Preset
button.
2. Use the TUNE or SEEK func- tion to tune the radio to a desired
station.
3. Pick the Preset button you want for that station. Press the buttonand hold it until you hear a beep.
4. Repeat steps 1 to 3 to store a total of six stations on AM and
twelve on FM.
Once that station's frequency is
stored, simply press and release the
proper preset button to tune to it. If
you want to change any preset
button's selection, store another fre- quency as described. The frequen-
cies you preset will be lost if your
car's battery goes dead or is discon-
nected.
Comfort and Convenience Features
TUNE/SEEK
SWITCH
AM/FM
BUTTON
PRESET BUTTONSProCarManuals.comMain Menu Table of Contents s t
Page 95 of 225

Theft Protection
Theft Protection is standard on the Si and Si 4WS models in the U. S.,
and the SR and SR 4WS models in
Canada.
Your audio system is protected by a code number. The system immedi-
ately disables itself whenever the
radio/player unit is disconnected
from the battery. To make it work again, you must enter a five-digit
code with the station Preset
buttons.
Your dealer should have given you
two copies of your audio system's
code number with your car. Keep one of these copies at home, and
the other in your wallet or a con- cealed place in the car. If your car's battery is discon-
nected or goes dead, the audio
system will disable itself. The next
time you turn on the radio you will
see "Code" in the frequency display.
Use the Preset buttons to enter the
five-digit code. If entered correctly,
the radio will start to play.
You will then have to store your
favorite stations in the Preset
buttons. Your original settings
were lost when power was discon-
nected.
Comfort and Convenience FeaturesProCarManuals.comMain Menu Table of Contents s t
Page 108 of 225

Starting the Engine
5-Speed Transmission 1. Apply the parking brake.
2. In cold weather, turn off all electrical accessories to reduce
the drain on the battery.
3. Push the clutch pedal down all the way. START (III) does not
function unless the clutch pedal
is depressed.
4. Without touching the accelerator pedal, turn the ignition key to the
START (III) position. If the
engine does not start right away,
do not hold the key in START
(III) for more than 15 seconds at
a time. Pause for at least 10
seconds before trying again. 5. If the engine does not start
within 15 seconds, or starts butstalls right away, repeat step 4
with the accelerator pedal pressed half-way down. If theengine starts, release pressure on
the accelerator pedal so the
engine does not race.
6. If the
engine still does not start,
press the accelerator pedal all the
way down and hold it there while
starting i n
order to clear flooding.
As before, keep the ignition key in the START (III) position for
no more than 15 seconds. Return
to step 5 if the engine does not
start. If it starts, lift your foot off
the accelerator pedal so the
engine does not race.
Automatic Transmissio
n
1
. Apply the parking brake.
2. In cold weather, turn off all electrical accessories to reduce
the drain on the battery.
3. Make sure the shift lever is in Park. Press on the brake pedal.
4. Without touching the accelerator pedal, turn the ignition key to the
START (III) position. If the
engine does not start right away,
do not hold the key in START
(III) for more than 15 seconds at
a time. Pause for at least 10
seconds before trying again.
CONTINUED
DrivingProCarManuals.comMain Menu Table of Contents s t