1991 MITSUBISHI MONTERO engine oil
[x] Cancel search: engine oilPage 458 of 1333

with tip resting on the main bearing journal area. See Fig. 21.
Rotate crankshaft and note reading. Journal runout must not exceed
specification. Repeat procedure on all main bearing journals.
Crankshaft must be replaced if runout exceeds specification.
Fig. 21: Measuring Crankshaft Main Bearing Journal Runout - Typical
This Graphic For General Information Only
INSTALLATION
Install upper main bearing in cylinder block. Ensure lock
tab is properly located in cylinder block. Install bearings in main
bearing caps. Ensure all oil passages are aligned. Install rear seal
(if removed).
Ensure crankshaft journals are clean. Lubricate upper main
bearings with clean engine oil. Carefully install crankshaft. Check
each main bearing clearance using Plastigage method. See
MAIN & CONNECTING ROD BEARING CLEARANCE in this article.
Once clearance is checked, lubricate lower main bearing and
journals. Install main bearing caps in original location. Install rear
seal in rear main bearing cap (if removed). Some rear main bearing
caps require sealant to be applied in corners to prevent oil leakage.
Install and tighten all bolts except thrust bearing cap to
specification. Tighten thrust bearing cap bolts finger tight only.
Thrust bearing must be aligned. On most applications, crankshaft
must be moved rearward then forward. Procedure may vary with
manufacturer. Thrust bearing cap is then tighten to specification.
Ensure crankshaft rotates freely. Crankshaft end play should be
checked. See CRANKSHAFT END PLAY in this article.
CRANKSHAFT END PLAY
Dial Indicator Method
Crankshaft end play can be checked using dial indicator.
Mount dial indicator on rear of cylinder block. Position dial
indicator tip against rear of crankshaft. Ensure tip is resting
against flat surface.
Pry crankshaft rearward. Adjust dial indicator to zero.
Page 460 of 1333

CYLINDER BLOCK
* PLEASE READ THIS FIRST *
NOTE: Always refer to appropriate engine overhaul article in the
ENGINES section for complete overhaul procedures and
specifications for the vehicle being repaired.
BLOCK CLEANING
Only cast cylinder blocks should be hot tank cleaned.
Aluminum cylinder blocks should be cleaned using cold tank method.
Cylinder block is cleaned in order to remove carbon deposits, gasket
residue and water jacket scale. Remove oil galley plugs, freeze plugs
and cam bearings prior to block cleaning.
BLOCK INSPECTION
Visually inspect the block. Check suspected areas for cracks
using the Dye Penetrant inspection method. Block may be checked for
cracks using the Magnaflux method.
Cracks are most commonly found at the bottom of the
cylinders, the main bearing saddles, near expansion plugs and between
the cylinders and water jackets. Inspect lifter bores for damage.
Inspect all head bolt holes for damaged threads. Threads should be
cleaned using tap to ensure proper head bolt torque. Consult machine
shop concerning possible welding and machining (if required).
CYLINDER BORE INSPECTION
Inspect the bore for scuffing or roughness. Cylinder bore
is dimensionally checked for out-of-round and taper using dial bore
gauge. For determining out-of-round, measure cylinder parallel and
perpendicular to the block centerline. Difference in the 2 readings
is the bore out-of-round. Cylinder bore must be checked at top, middle
and bottom of piston travel area.
Bore taper is obtained by measuring bore at the top and
bottom. If wear has exceeded allowable limits, block must be honed
or bored to next available oversize piston dimension.
CYLINDER HONING
Cylinder must be properly honed to allow new piston rings to
properly seat. Cross-hatching at correct angle and depth is critical
to lubrication of cylinder walls and pistons.
A flexible drive hone and power drill are commonly used.
Drive hone must be lubricated during operation. Mix equal parts of
kerosene and SAE 20w engine oil for lubrication.
Apply lubrication to cylinder wall. Operate cylinder hone
from top to bottom of cylinder using even strokes to produce 45 degree
cross-hatch pattern on the cylinder wall. DO NOT allow cylinder hone
to extend below cylinder during operation.
Recheck bore dimension after final honing. Wash cylinder
wall with hot soapy water to remove abrasive particles. Blow dry with
compressed air. Coat cleaned cylinder walls with lubricating oil.
DECK WARPAGE
Check deck for damage or warped head sealing surface. Place
a straightedge across gasket surface of the deck. Using feeler gauge,
measure clearance at center of straightedge. Measure across width and
Page 462 of 1333

NOTE: Always refer to appropriate engine overhaul article in the
ENGINES section for complete overhaul procedures and
specifications for the vehicle being repaired.
CLEANING & INSPECTION
Clean camshaft with solvent. Ensure all oil passages are
clear. Inspect cam lobes and bearing journals for pitting, flaking or
scoring. Using micrometer, measure bearing journal O.D.
Support camshaft at each end with "V" blocks. Position dial
indicator with tip resting on center bearing journal. Rotate camshaft
and note reading. If reading exceeds specification, replace camshaft.
Check cam lobe lift by measuring base circle of camshaft
using micrometer. Measure again at 90 degrees to tip of cam lobe. Cam
lift can be determined by subtracting base circle diameter from tip of
cam lobe measurement.
Different lift dimensions are given for intake and exhaust
cam lobes. Reading must be within specifications. Replace camshaft if
cam lobes or bearing journals are not within specifications.
Inspect camshaft gear for chipped, eroded or damaged teeth.
Replace gear if damaged. On camshafts using thrust plate, measure
distance between thrust plate and camshaft shoulder. Replace thrust
plate if not within specification.
CAMSHAFT BEARINGS
Removal & Installation
Remove the camshaft rear plug. The camshaft bearing remover
is assembled with its shoulder resting on the bearing to be removed
according to manufacturer's instructions. Tighten puller nut until
bearing is removed. Remove remaining bearings, leaving front and rear
bearings until last. These bearings act as guide for camshaft bearing
remover.
To install new bearings, puller is rearranged to pull
bearings toward the center of block. Ensure all lubrication passages
of bearing are aligned with cylinder block. Coat new camshaft rear
plug with sealant. Install camshaft rear plug. Ensure plug is even
in cylinder block.
CAMSHAFT INSTALLATION
Lubricate bearing surfaces and cam lobes with ample amount of
Molykote or camshaft lubricant. Carefully install camshaft. Use care
not to damage bearing journals during installation. Install thrust
plate retaining bolts (if equipped). Tighten bolts to specification.
On overhead camshafts, install bearing caps in original location.
Tighten bolts to specification. Check end play.
CAMSHAFT END PLAY
Using dial indicator, check end play. Position dial indicator
on front of engine block. Position indicator tip against camshaft.
Push camshaft toward rear of engine and adjust indicator to zero.
Move camshaft forward and note reading. Camshaft end play
must be within specification. End play may be adjusted by relocating
gear, shimming thrust plate or replacing thrust plate depending on
manufacturer.
TIMING CHAINS & BELTS
Page 464 of 1333
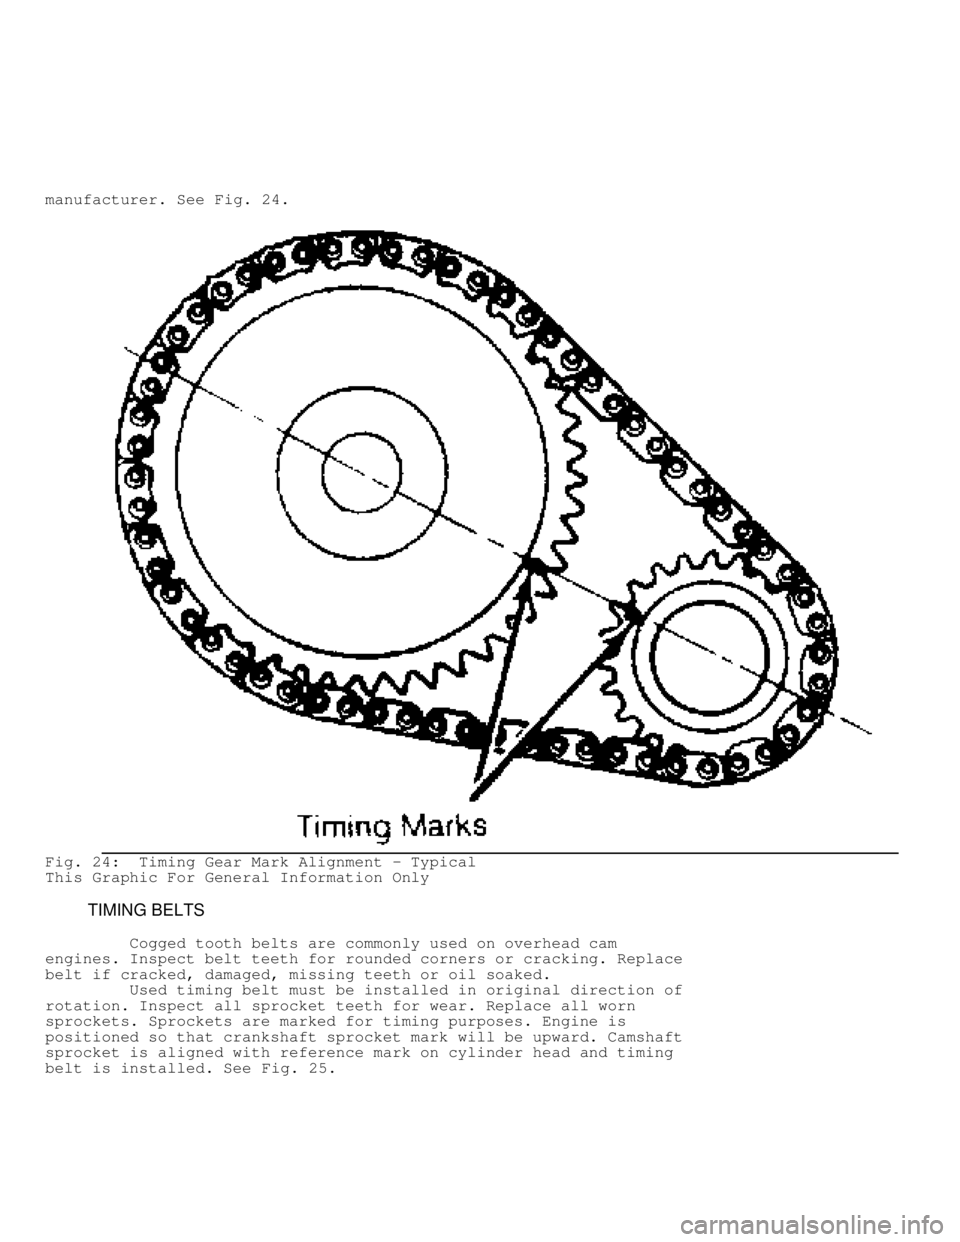
manufacturer. See Fig. 24.
Fig. 24: Timing Gear Mark Alignment - Typical
This Graphic For General Information Only
TIMING BELTS
Cogged tooth belts are commonly used on overhead cam
engines. Inspect belt teeth for rounded corners or cracking. Replace
belt if cracked, damaged, missing teeth or oil soaked.
Used timing belt must be installed in original direction of
rotation. Inspect all sprocket teeth for wear. Replace all worn
sprockets. Sprockets are marked for timing purposes. Engine is
positioned so that crankshaft sprocket mark will be upward. Camshaft
sprocket is aligned with reference mark on cylinder head and timing
belt is installed. See Fig. 25.
Page 467 of 1333
* PLEASE READ THIS FIRST *
NOTE: Always refer to appropriate engine overhaul article in the
ENGINES section for complete overhaul procedures and
specifications for the vehicle being repaired.
TIMING GEAR BACKLASH & RUNOUT
On engines where camshaft gear operates directly on
crankshaft gear, gear backlash and runout must be checked. To check
backlash, install dial indicator with tip resting on tooth of camshaft
gear. Rotate camshaft gear as far as possible. Adjust indicator to
zero. Rotate camshaft gear in opposite direction as far as possible
and note reading.
To determine timing gear runout, mount dial indicator with
tip resting on face edge of camshaft gear. Adjust indicator to zero.
Rotate camshaft gear 360 degrees and note reading. If backlash or
runout exceed specifications, replace camshaft and/or crankshaft
gear.
REAR MAIN OIL SEAL
* PLEASE READ THIS FIRST *
NOTE: Always refer to appropriate engine overhaul article in the
ENGINES section for complete overhaul procedures and
specifications for the vehicle being repaired.
INSTALLATION
One-Piece Type Seal
For one-piece type oil seal installation, coat block contact
surface of seal with sealer if seal is not factory coated. Ensure seal
surface is free of burrs. Lubricate seal lip with engine oil and press
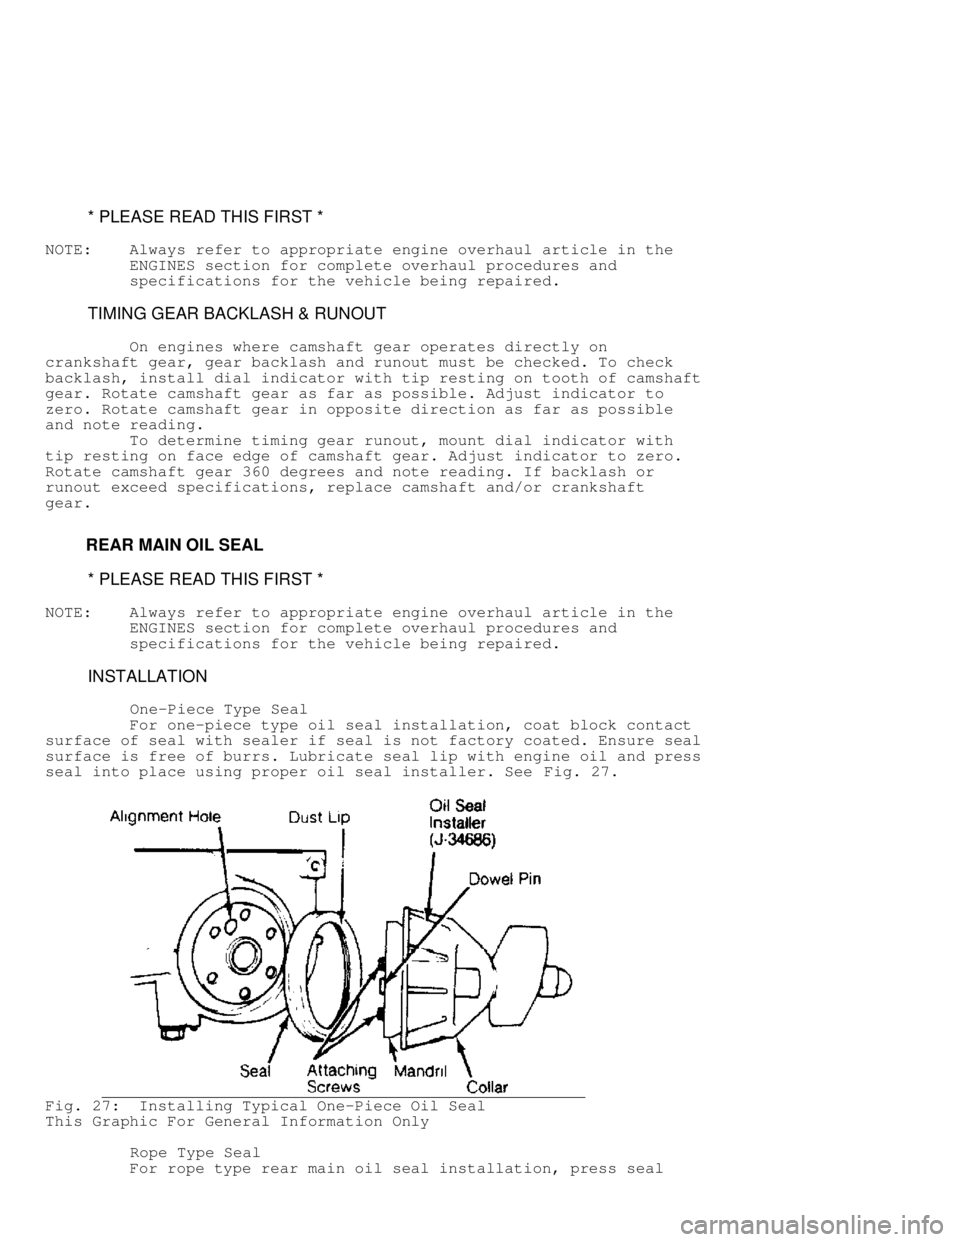
seal into place using proper oil seal installer. See Fig. 27.
Fig. 27: Installing Typical One-Piece Oil Seal
This Graphic For General Information Only
Rope Type Seal
For rope type rear main oil seal installation, press seal
Page 468 of 1333
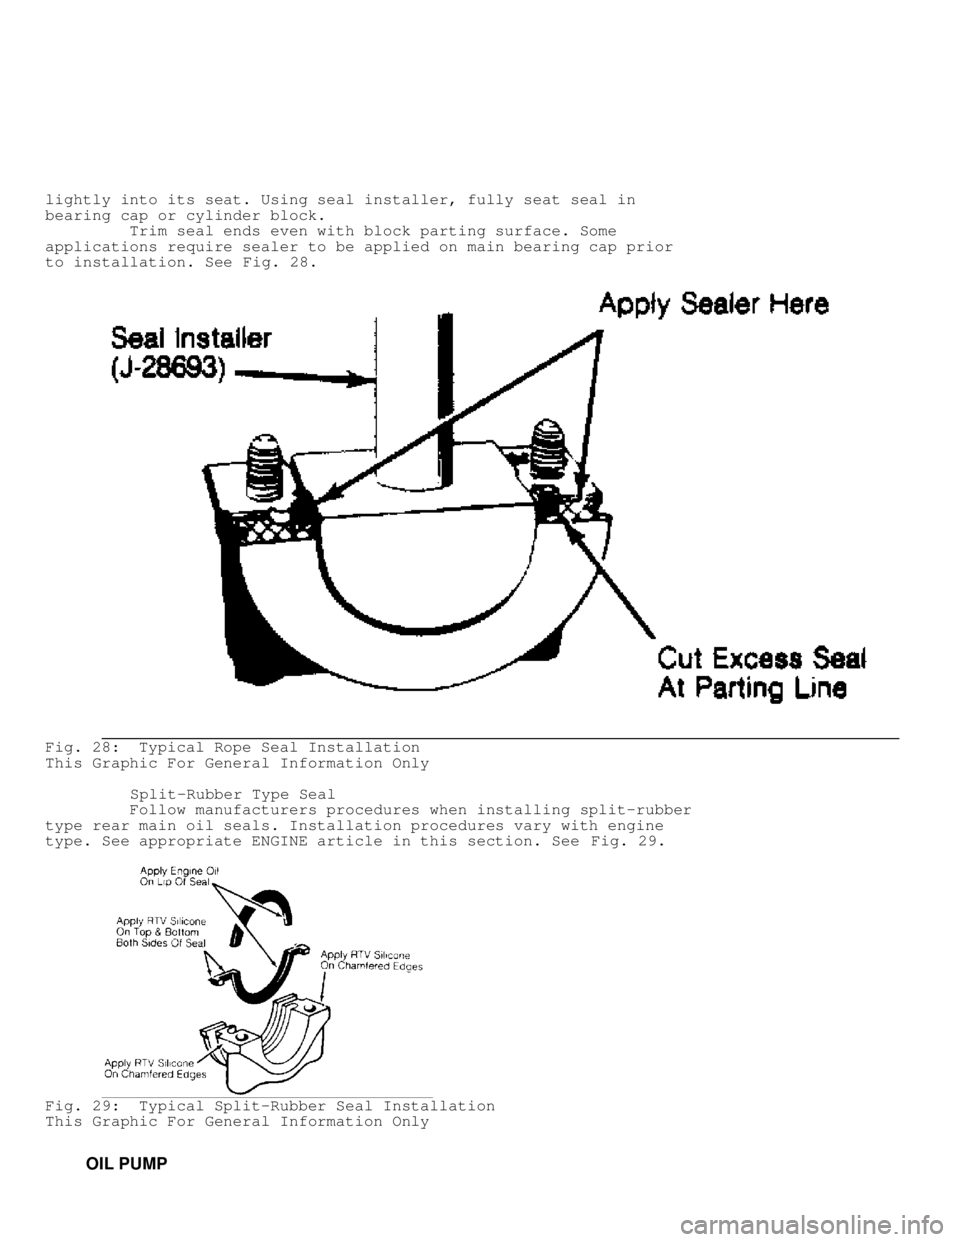
lightly into its seat. Using seal installer, fully seat seal in
bearing cap or cylinder block.
Trim seal ends even with block parting surface. Some
applications require sealer to be applied on main bearing cap prior
to installation. See Fig. 28.
Fig. 28: Typical Rope Seal Installation
This Graphic For General Information Only
Split-Rubber Type Seal
Follow manufacturers procedures when installing split-rubber
type rear main oil seals. Installation procedures vary with engine
type. See appropriate ENGINE article in this section. See Fig. 29.
Fig. 29: Typical Split-Rubber Seal Installation
This Graphic For General Information Only
OIL PUMP
Page 469 of 1333
* PLEASE READ THIS FIRST *
NOTE: Always refer to appropriate engine overhaul article in the
ENGINES section for complete overhaul procedures and
specifications for the vehicle being repaired.
ROTOR-TYPE
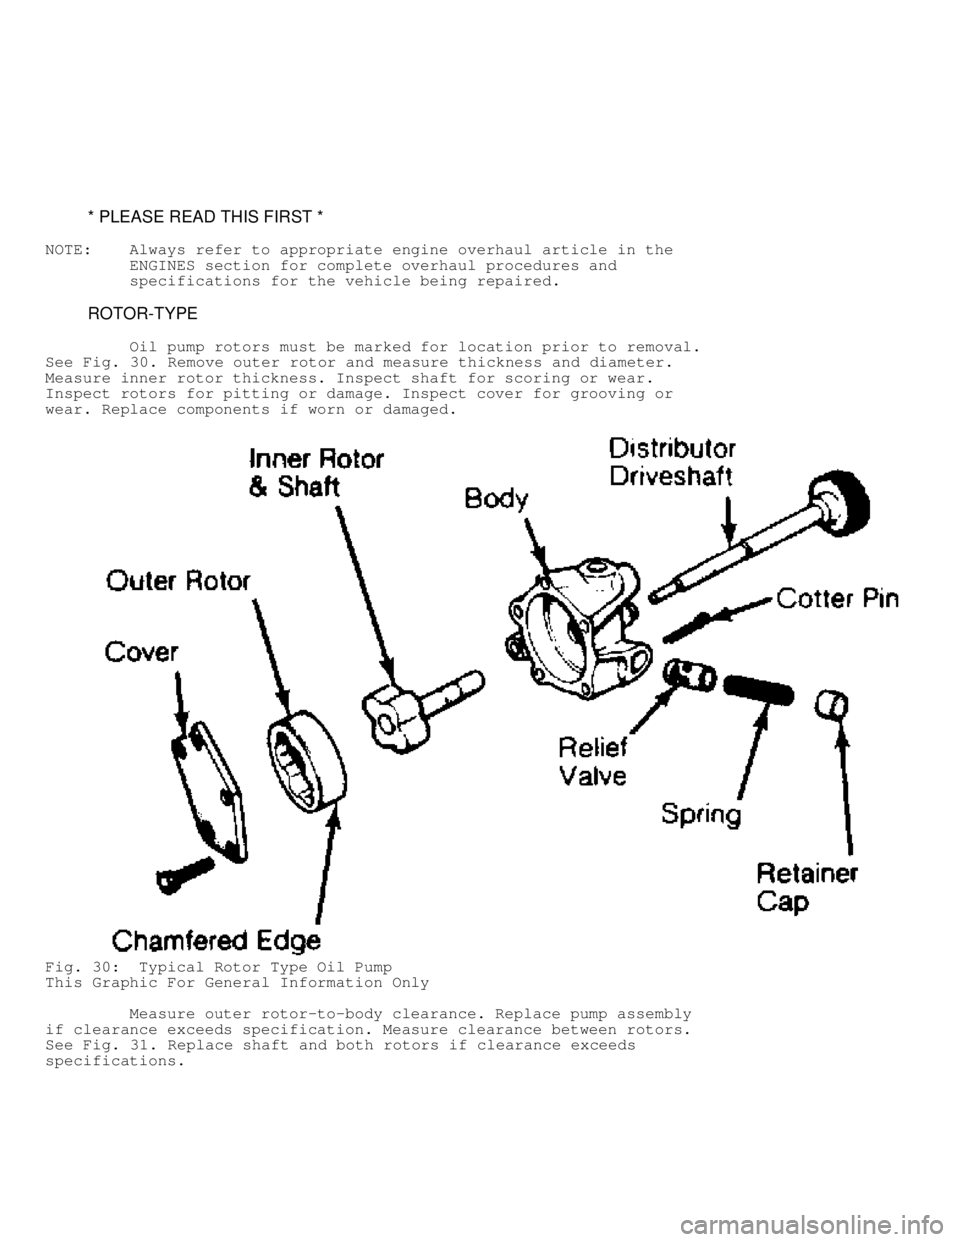
Oil pump rotors must be marked for location prior to removal.
See Fig. 30 . Remove outer rotor and measure thickness and diameter.
Measure inner rotor thickness. Inspect shaft for scoring or wear.
Inspect rotors for pitting or damage. Inspect cover for grooving or
wear. Replace components if worn or damaged.
Fig. 30: Typical Rotor Type Oil Pump
This Graphic For General Information Only
Measure outer rotor-to-body clearance. Replace pump assembly
if clearance exceeds specification. Measure clearance between rotors.
See Fig. 31 . Replace shaft and both rotors if clearance exceeds
specifications.
Page 471 of 1333
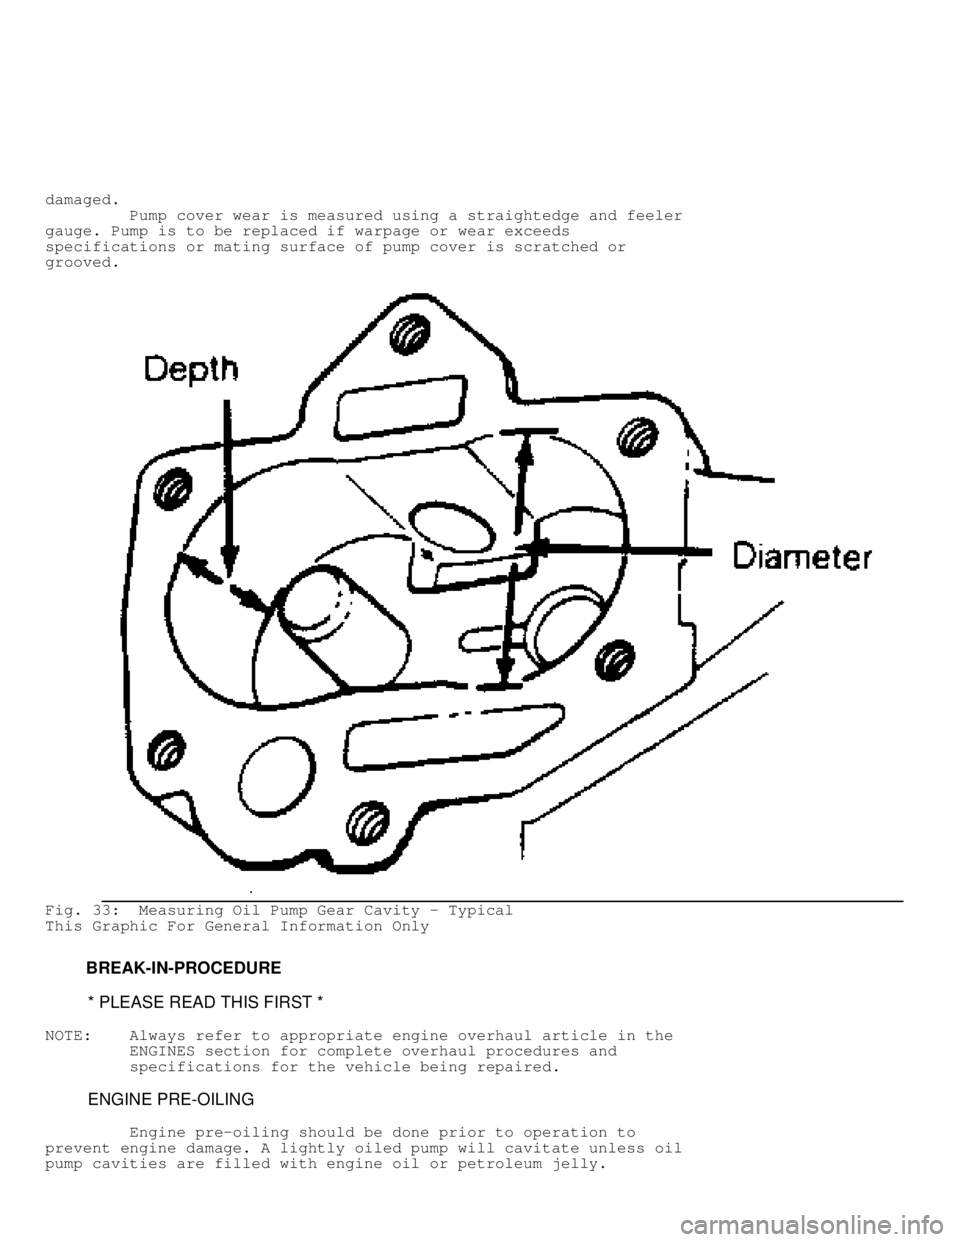
damaged.
Pump cover wear is measured using a straightedge and feeler
gauge. Pump is to be replaced if warpage or wear exceeds
specifications or mating surface of pump cover is scratched or
grooved.
Fig. 33: Measuring Oil Pump Gear Cavity - Typical
This Graphic For General Information Only
BREAK-IN-PROCEDURE
* PLEASE READ THIS FIRST *
NOTE: Always refer to appropriate engine overhaul article in the
ENGINES section for complete overhaul procedures and
specifications for the vehicle being repaired.
ENGINE PRE-OILING
Engine pre-oiling should be done prior to operation to
prevent engine damage. A lightly oiled pump will cavitate unless oil
pump cavities are filled with engine oil or petroleum jelly.