1991 MITSUBISHI ECLIPSE service
[x] Cancel search: servicePage 1142 of 1216
23-98BODY - Seat Belt
\9-14 Nms-55 Nm
7-10 ft.lbs.25-40 ft.lbs.
Pre-removal Operation0 Removal of Front Seat
(Refer to
P.23-90.)0 Removal of Quarter Trim
(Refer to
P.23-85.)
Post-installation Operationl Installation of Quarter Trim(Refer to P.23-85.)l Installation of Front Seat(Refer to P.23-90.)
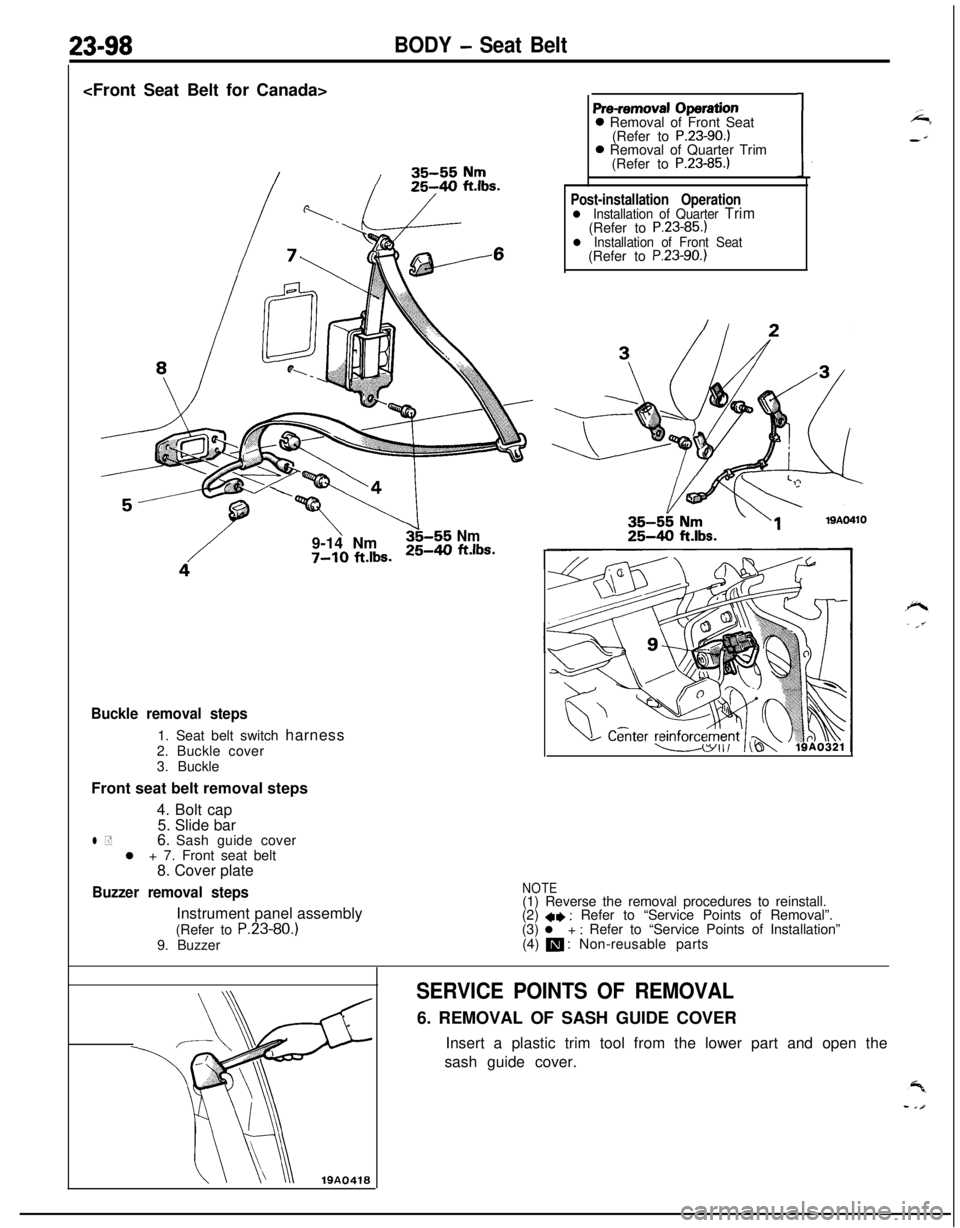
Buckle removal steps1. Seat belt switch harness
2. Buckle cover
3. Buckle
Front seat belt removal steps
4. Bolt cap
5. Slide bar
l +6. Sash guide cover
l + 7. Front seat belt
8. Cover plate
Buzzer removal stepsInstrument panel assembly
(Refer to P.23-80.)
9. BuzzerNOTE(1) Reverse the removal procedures to reinstall.
(2)
+e : Refer to “Service Points of Removal”.
(3) l + : Refer to “Service Points of Installation”
(4) m : Non-reusable parts
SERVICE POINTS OF REMOVAL6. REMOVAL OF SASH GUIDE COVER
Insert a plastic trim tool from the lower part and open the
sash guide cover.
Page 1143 of 1216
BODY - Seat Belt23-99
19AO239
I ITest bulb 2tI
I I
INSPECTION
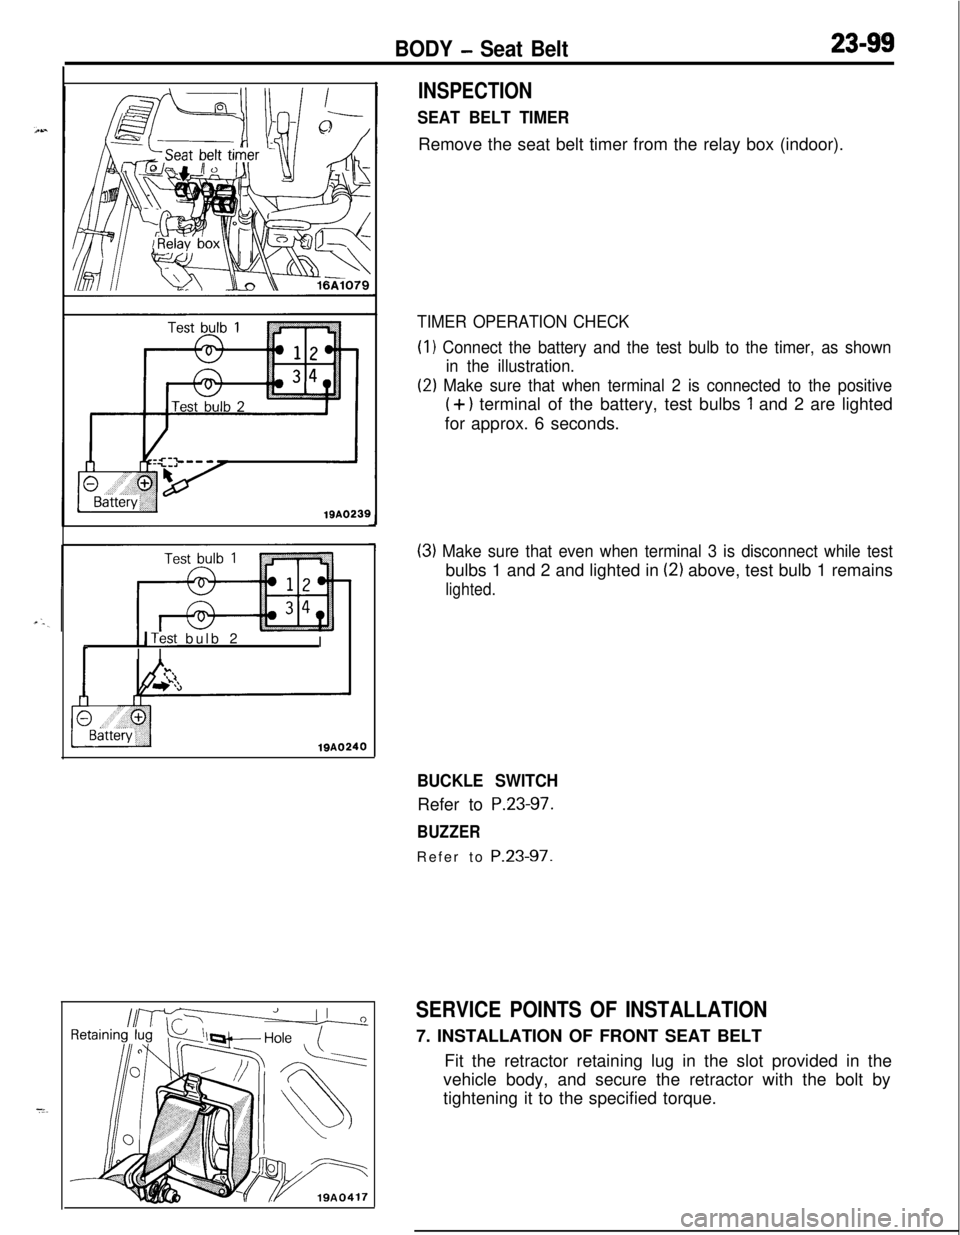
SEAT BELT TIMERRemove the seat belt timer from the relay box (indoor).
TIMER OPERATION CHECK(I
1 Connect the battery and the test bulb to the timer, as shown
in the illustration.
(2) Make sure that when terminal 2 is connected to the positive
(+) terminal of the battery, test bulbs 1 and 2 are lighted
for approx. 6 seconds.
(3) Make sure that even when terminal 3 is disconnect while testbulbs 1 and 2 and lighted in
(2) above, test bulb 1 remains
lighted.
BUCKLE SWITCHRefer to
P.23-97.
BUZZERRefer to
P.23-97.
SERVICE POINTS OF INSTALLATION7. INSTALLATION OF FRONT SEAT BELT
Fit the retractor retaining lug in the slot provided in the
vehicle body, and secure the retractor with the bolt by
tightening it to the specified torque.
Page 1144 of 1216
23-100BODY - Seat Belt
35-55 Nm
25-40 ft.lbs.
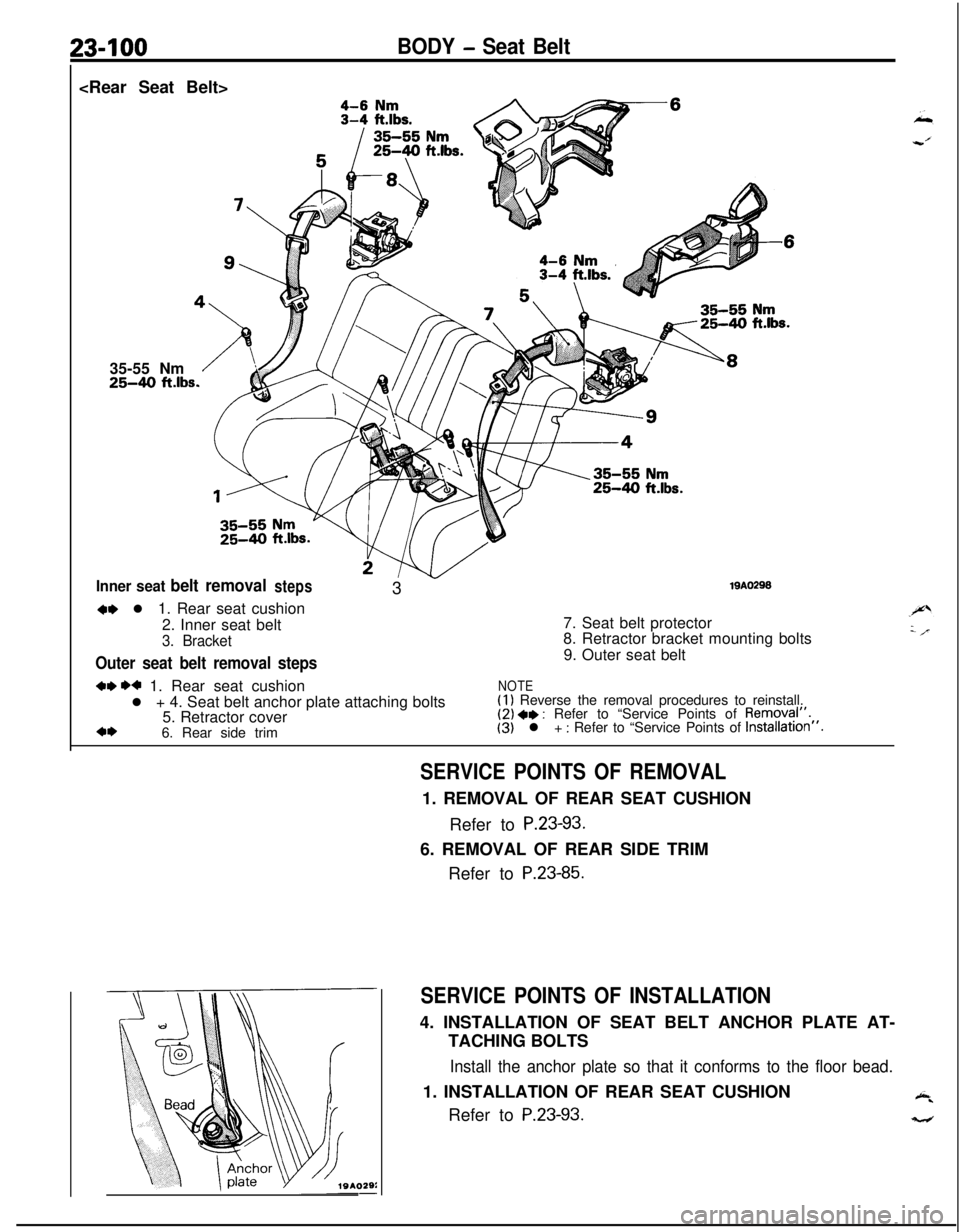
Inner seat belt removalsteps319A029S
M l 1. Rear seat cushion
2. Inner seat belt
3. Bracket
Outer seat belt removal steps7. Seat belt protector
8. Retractor bracket mounting bolts
9. Outer seat belt
w H 1. Rear seat cushionNOTEl + 4. Seat belt anchor plate attaching bolts(I 1 Reverse the removal procedures to reinstall.
5. Retractor cover(2) ** : Refer to “Service Points of Removql”.
*I)6. Rear side trim(3) l + : Refer to “Service Points of Installation”.
SERVICE POINTS OF REMOVAL1. REMOVAL OF REAR SEAT CUSHION
Refer to
P.23-93.6. REMOVAL OF REAR SIDE TRIM
Refer to
P.23-85.
SERVICE POINTS OF INSTALLATION4. INSTALLATION OF SEAT BELT ANCHOR PLATE AT-
TACHING BOLTS
Install the anchor plate so that it conforms to the floor bead.1. INSTALLATION OF REAR SEAT CUSHION
Refer to
P.23-93.
Page 1145 of 1216
24-l
HEATERS ANDAIR CONDITIONING
CONTENTSN24M--AIR CONDITIONER SWITCH
..........................30BLOWER ASSEMBLY
.....................................33
COMPRESSOR.................................................37CONDENSER AND CONDENSER FAN
MOTOR............................................................45ENGINE COOLANT TEMPERATURE
-‘-.,SWITCH............................................................51
EVAPORATOR.................................................
34
HEATERCONTROLASSEMBLY....................
26HEATER UNIT
.................................................31
REFRIGERANTLINE........................................47
RESISTOR........................................................29SAFETY PRECAUTIONS
.................................10SERVICE ADJUSTMENT PROCEDURES..
.....11Compressor Drive
Belt Adjustment
.............
23
CompressorNoise........................................24
Handling
TubingandFittings.......................22Idle-up
OperationCheck..............................25Manifold
GaugeSetInstallation..................11Performance Test
.........................................16Power Relay Check
......................................24Refrigerant Leak Repair Procedure
.............17
TestingSystemforLeaks...........................15Test Procedures
...........................................11
SPECIFICATIONS.............................................2
General Specifications..................................2
Lubricants......................................................3Sealant and Adhesives
.................................3Service Specifications
...................................2
TorqueSpecifications...................................2
TROUBLESHOOTING. . . ..a................................3
VENTILATORS(AIR INLET AND AIR OUTLET)
..,....s............. 50
VENTILATORS(INSTRUMENT PANEL)
..,...................*...........49
Page 1146 of 1216
24-2HEATERS AND AIR CONDITIONING - Specifications
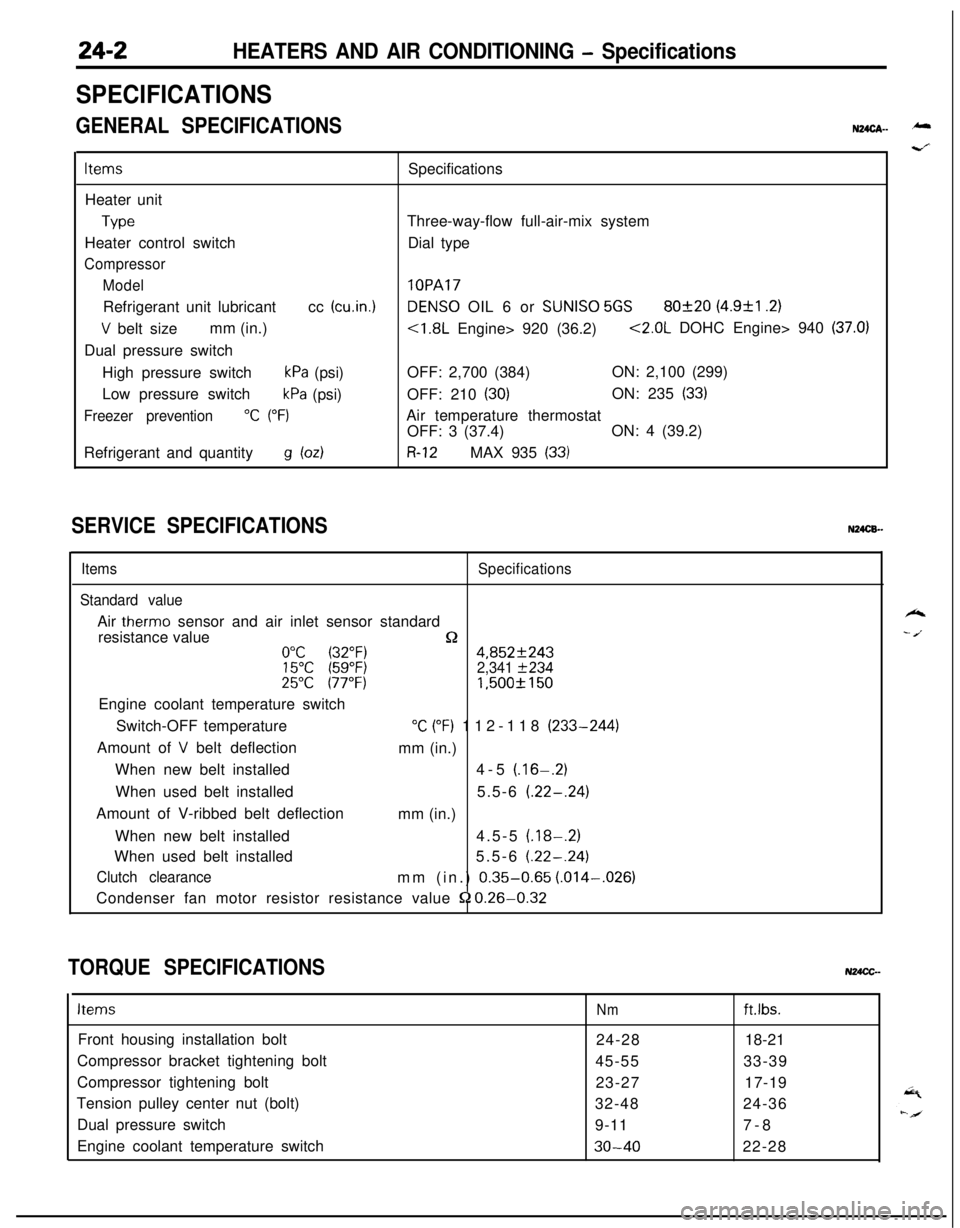
SPECIFICATIONS
GENERAL SPECIFICATIONSN24cA- -
ItemsSpecifications
Heater unit
TypeThree-way-flow full-air-mix system
Heater control switchDial type
Compressor
Model
lOPARefrigerant unit lubricantcc
(cu.in.1DENS0 OIL 6 or SUNISO 5GS80f20 (4.9&l .2)
V belt sizemm (in.)<1.8L Engine> 920 (36.2)<2.0L DOHC Engine> 940 (37.0)Dual pressure switch
High pressure switch
kPa (psi)OFF: 2,700 (384)ON: 2,100 (299)
Low pressure switch
kPa (psi)OFF: 210 (30)ON: 235 (33)
Freezer prevention“C (“F)Air temperature thermostat
OFF: 3 (37.4)ON: 4 (39.2)
Refrigerant and quantity
g bdR-12MAX 935 (33)
SERVICE SPECIFICATIONSN24CB.-
ItemsSpecifications
Standard valueAir
therm0 sensor and air inlet sensor standard
resistance value
n0°C (32°F)4,852f24315°C (59°F)2,341 f23425°C 177°F)1,500f 150Engine coolant temperature switch
Switch-OFF temperature
“C (“F) 112-118 (233-244)
Amount of
V belt deflection
mm (in.)
When new belt installed4-5
(.16-.2)When used belt installed5.5-6
(.22-.24)Amount of V-ribbed belt deflection
mm (in.)
When new belt installed4.5-5
(.18-.2)When used belt installed5.5-6
(.22-.24)
Clutch clearancemm (in.) 0.35-0.65 (.014-,026)
Condenser fan motor resistor resistance value
52 0.26-0.32
TORQUE SPECIFICATIONSN24CC-
ItemsNmft.lbs.Front housing installation bolt
24-2818-21
Compressor bracket tightening bolt
45-5533-39
Compressor tightening bolt
23-2717-19
Tension pulley center nut (bolt)
32-4824-36
Dual pressure switch
9-117-8
Engine coolant temperature switch
30-4022-28
k
- /.
Page 1148 of 1216
24-4HEATERS AND AIR CONDITIONING - Troubleshooting
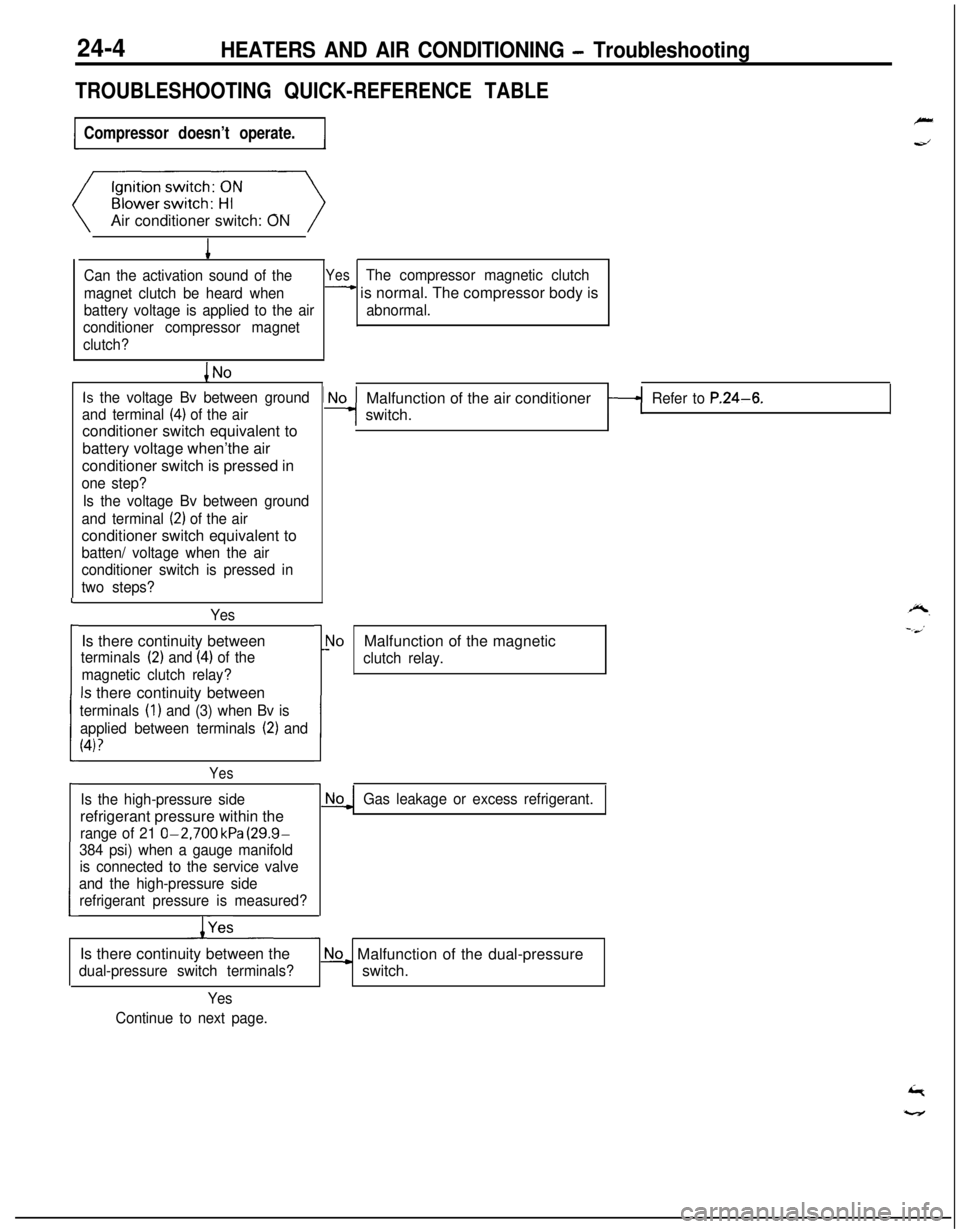
TROUBLESHOOTING QUICK-REFERENCE TABLE
Compressor doesn’t operate.Air conditioner switch: ON
1
Can the activation sound of theYesThe compressor magnetic clutch
magnet clutch be heard when
- is normal. The compressor body is
battery voltage is applied to the airabnormal.
conditioner compressor magnet
clutch?
Is the voltage Bv between ground
and terminal
(4) of the airconditioner switch equivalent to
battery voltage when’the air
conditioner switch is pressed in
one step?
Is the voltage Bv between ground
and terminal
(2) of the airconditioner switch equivalent to
batten/ voltage when the air
conditioner switch is pressed in
two steps?
YesIs there continuity between
terminals (2) and (4) of the
magnetic clutch relay?
Is there continuity between
terminals (1) and (3) when Bv is
applied between terminals
(2) and
(4)?
L
i
I
Yes
Is the high-pressure siderefrigerant pressure within the
range of 21 O-2,700 kPa (29.9-
384 psi) when a gauge manifold
is connected to the service valve
and the high-pressure side
refrigerant pressure is measured?
/YesMalfunction of the air conditioner
switch.
Refer to P.24-6.
r
1!
\loMalfunction of the magnetic
clutch relay.
Gas leakage or excess refrigerant.Is there continuity between the
dual-pressure switch terminals?
No_ Malfunction of the dual-pressure
switch.
Yes
Continue to next page.
Page 1154 of 1216
24-10HEATERS AND AIR CONDITIONING - Safety Precautions
SAFETY PRECAUTIONSN24PAAD
The refrigerant used in all air conditioner is R-l 2. It istransparent and colorless in both the liquid and
vapor state. Since it has a boiling point of
-29.8”C(-85.6”F).
at atmospheric pressure, it will be a vapor
at all normal temperatures and pressures. The vaporis heavier than air, non-flammable, and nonexplo-
sive. It is nonpoisonous except when it is in direct
contact with open flame. It
ia noncorrosive except
when combined with water. The following precau-
tions must be observed when handling
R-12.Caution
Wear safety goggles when servicing the refriger-ation system.
R-12 evaporates so rapidly at normal atmospheric
pressures and temperatures that it tends to freeze
anything it contacts. For this reason, extreme care
must be taken to prevent any liquid refrigerant from
contacting the skin and especially the eyes. Always
wear safety goggles when servicing the refrigera-
tion part of the air conditioning system. Keep a
bottle of sterile mineral oil handy when working on
the refrigeration system. Should any liquid re-
frigerant get into the eyes, use a few drops of
mineral oil to wash them out.
R-12 is rapidly
absorbed by the oil. Next splash the eyes with
plenty of cold water. Call your doctor immediately
even though irritation has ceased after treatment.
Caution
Do not heat
R-12 above 40°C (104°F).In most instances, moderate heat is required to
bring the pressure of the refrigerant in its container
above the pressure of the system when charging or
adding refrigerant. A bucket or large pan of hot
water not over
40°C (104°F) is all the heat required
for this purpose. Do not heat the refrigerant contain-
er with a blow torch or any other means that would
raise temperature and pressure above this tempera-ture. Do not weld or steam clean on or near the
system components or refrigerant lines.
Caution
Keep
R-12 containers upright when charging the
system.When metering
R-12 into the refrigeration system,
keep the supply tank or cans in an upright position. Ifthe refrigerant container is on its side or upside
down, liquid refrigerant will enter the system and
damage the compressor.Caution
Always work in a well-ventilated room.
‘irrGood ventilation is vital in the working area. Always
discharge the refrigerant into the service bay ex-
haust system or outside the building. Large quanti-
ties of refrigerant vapor in a small, poorly ventilated
room can displace the air and cause suffocation.
Although
R-12 vapor is normally nonpoisonous,
contact with an open flame can cause the vapor to
become very poisonous. Do not discharge large
quantities of refrigerant in an area having an open
flame. A poisonous gas is produced when using theflame-type leak detector. Avoid inhaling the fumes
from the leak detector.
Caution
Do not allow liquid refrigerant to touch bright
metal.
Refrigerant will tarnish bright metal and chrome
surfaces, and in combination with moisture can
severely corrode all metal surfaces.
R-12 Refrigerant Bundling
Refrigerant Recycling
R-12 refrigerant is a chloro-floro-carbon (CFC) that
can contribute to the depletion of the ozone layer in
the upper atmosphere.A
Ozone filters out harmful radiation from the sun.
- -/.To assist in protecting the ozone layer, Mitsubishi
Motors Corporation
recomends that a R-12 re-
frigerant recycling device that meets SAE standard
J1991 be used.
Contact an automotive service equipment supplier
for refrigerant recycling equipment that is available
in your area.
Refer to the operating instructions provided with therecycling equipment for proper operation.
Page 1155 of 1216
HEATERS AND AIR CONDITIONING - Service Adjustment Procedures 24-I 1
SERVICE ADJUSTMENT PROCEDURES
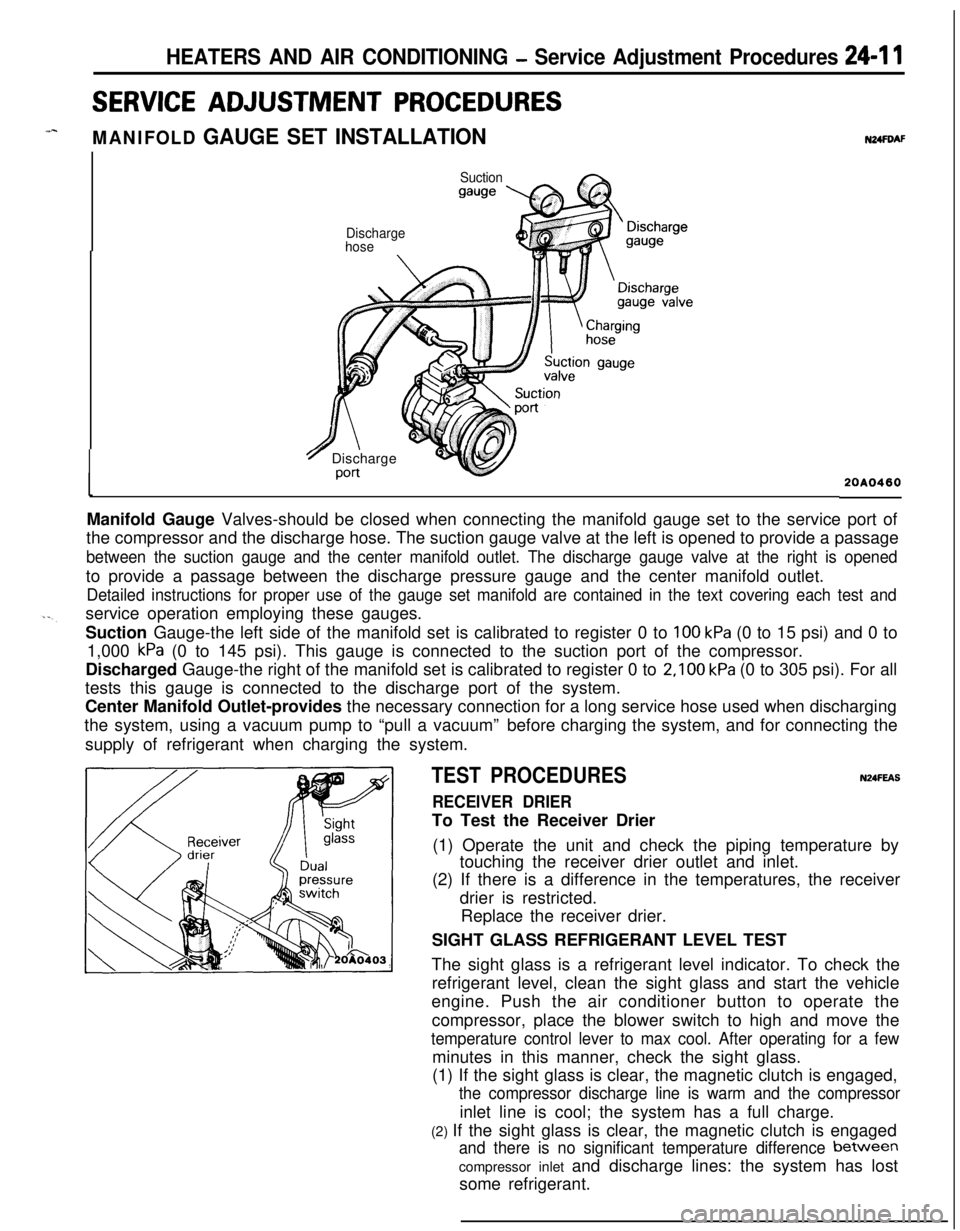
MANIFOLD GAUGE SET INSTALLATION
Suction
gauge
N24FDAF
Discharge
hose
7 Discharge
Port20A0460Manifold Gauge Valves-should be closed when connecting the manifold gauge set to the service port of
the compressor and the discharge hose. The suction gauge valve at the left is opened to provide a passage
between the suction gauge and the center manifold outlet. The discharge gauge valve at the right is openedto provide a passage between the discharge pressure gauge and the center manifold outlet.
Detailed instructions for proper use of the gauge set manifold are contained in the text covering each test andservice operation employing these gauges.
Suction Gauge-the left side of the manifold set is calibrated to register 0 to
100 kPa (0 to 15 psi) and 0 to
1,000
kPa (0 to 145 psi). This gauge is connected to the suction port of the compressor.
Discharged Gauge-the right of the manifold set is calibrated to register 0 to
2,100 kPa (0 to 305 psi). For all
tests this gauge is connected to the discharge port of the system.
Center Manifold Outlet-provides the necessary connection for a long service hose used when discharging
the system, using a vacuum pump to “pull a vacuum”before charging the system, and for connecting the
supply of refrigerant when charging the system.
TEST PROCEDURESN24FEAS
RECEIVER DRIERTo Test the Receiver Drier
(1) Operate the unit and check the piping temperature by
touching the receiver drier outlet and inlet.
(2) If there is a difference in the temperatures, the receiver
drier is restricted.
Replace the receiver drier.
SIGHT GLASS REFRIGERANT LEVEL TEST
The sight glass is a refrigerant level indicator. To check the
refrigerant level, clean the sight glass and start the vehicle
engine. Push the air conditioner button to operate the
compressor, place the blower switch to high and move the
temperature control lever to max cool. After operating for a fewminutes in this manner, check the sight glass.
(1) If the sight glass is clear, the magnetic clutch is engaged,
the compressor discharge line is warm and the compressorinlet line is cool; the system has a full charge.
(2) If the sight glass is clear, the magnetic clutch is engaged
and there is no significant temperature difference between
compressor inlet and discharge lines: the system has lost
some refrigerant.