Page 1174 of 1216

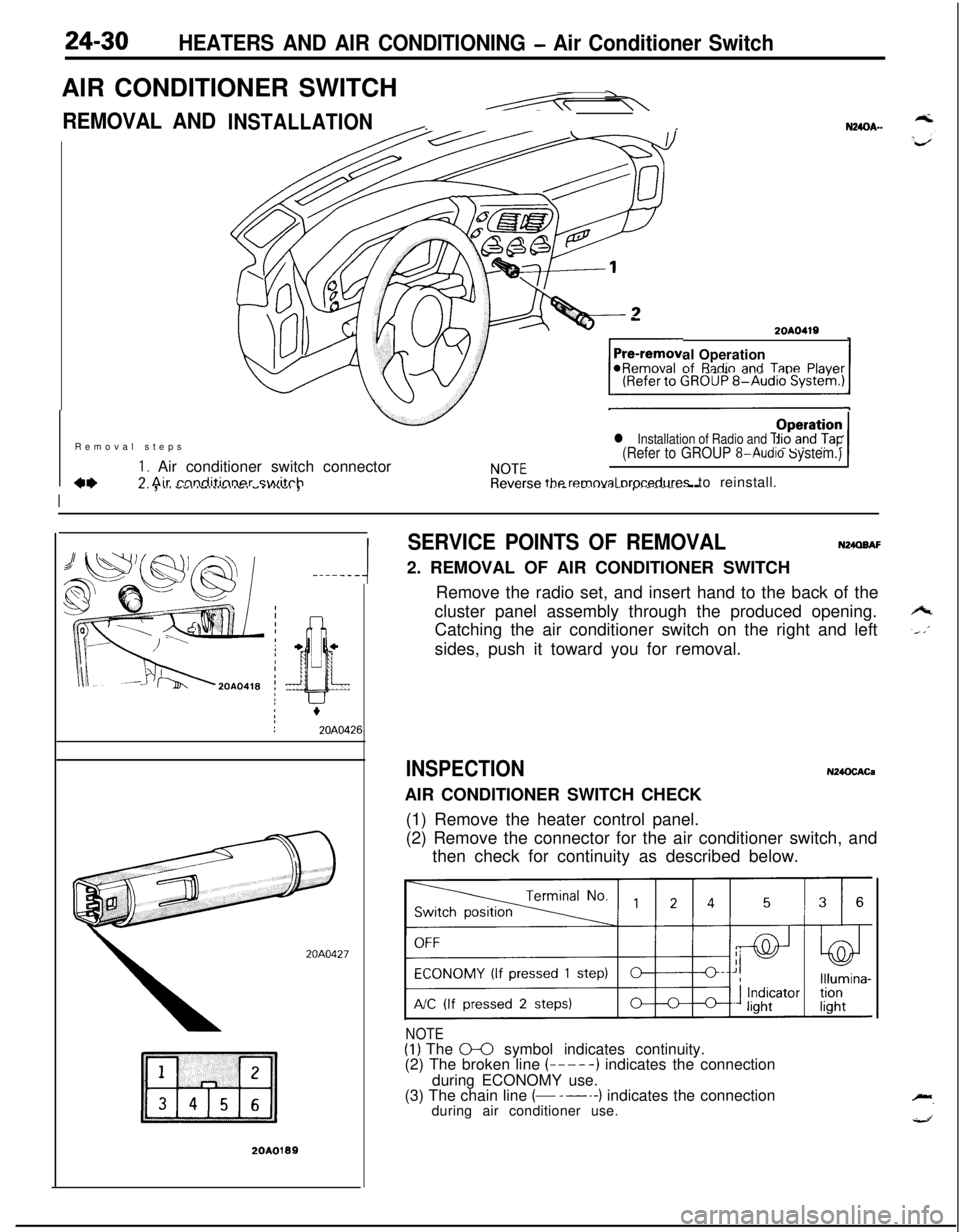
24-30HEATERS AND AIR CONDITIONING - Air Conditioner SwitchAIR CONDITIONER SWITCH
REMOVAL AND--N24OA..INSTALLATION
-2OAO419al Operationof
R;tdio and TanePlaver@Removal -..--._ _.-.-, -Removal steps
I. Air conditioner switch connectorCL7 Air rnnditinner switch
l Installation of Radio and Tape Player(Refer to GROUP 8-Audio System.)
NOTEOperation /Reverse
removal orocedures to reinstall.
I
77-. , .,a -.,a ,-,..-,.-. -.....,. ,.._._.__ _..- .-...-.-.r----- --
-----A
20A0427
20A0199
SERVICE POINTS OF REMOVALN24QBAF2. REMOVAL OF AIR CONDITIONER SWITCH
Remove the radio set, and insert hand to the back of the
cluster panel assembly through the produced opening.
Catching the air conditioner switch on the right and left
sides, push it toward you for removal.
INSPECTIONN24OCACaAIR CONDITIONER SWITCH CHECK
(1) Remove the heater control panel.
(2) Remove the connector for the air conditioner switch, and
then check for continuity as described below.
NOTE(1) The 0-0 symbol indicates continuity.
(2) The broken line (-----) indicates the connection
during ECONOMY use.
(3) The chain line
(- -----) indicates the connection
during air conditioner use.
Page 1180 of 1216
24-36HEATERS AND AIR CONDITIONING - Evaporator
SERVICE POINTS OF DISASSEMBLY3. REMOVAL OF CLIPS
N24nFAERemove the clips with a flat-blade. screwdriver covered
with a shop towel to prevent damage to case surfaces.
2OAO323
Expansivalve
ClipRubber insulator2OAO324
O-ring13. REMOVAL OF EXPANSION VALVE
Loosen the flare nut by using two wrenches. (for both the
inlet and outlet.)SERVICE POINTS OF REASSEMBLYN24nNAJ13. APPLICATION OF COMPRESSOR OIL TO EXPANSION
VALVE AND O-RINGS
Apply compressor oil to the O-rings and expansion valve ofthe evaporator assembly.
Page 1182 of 1216

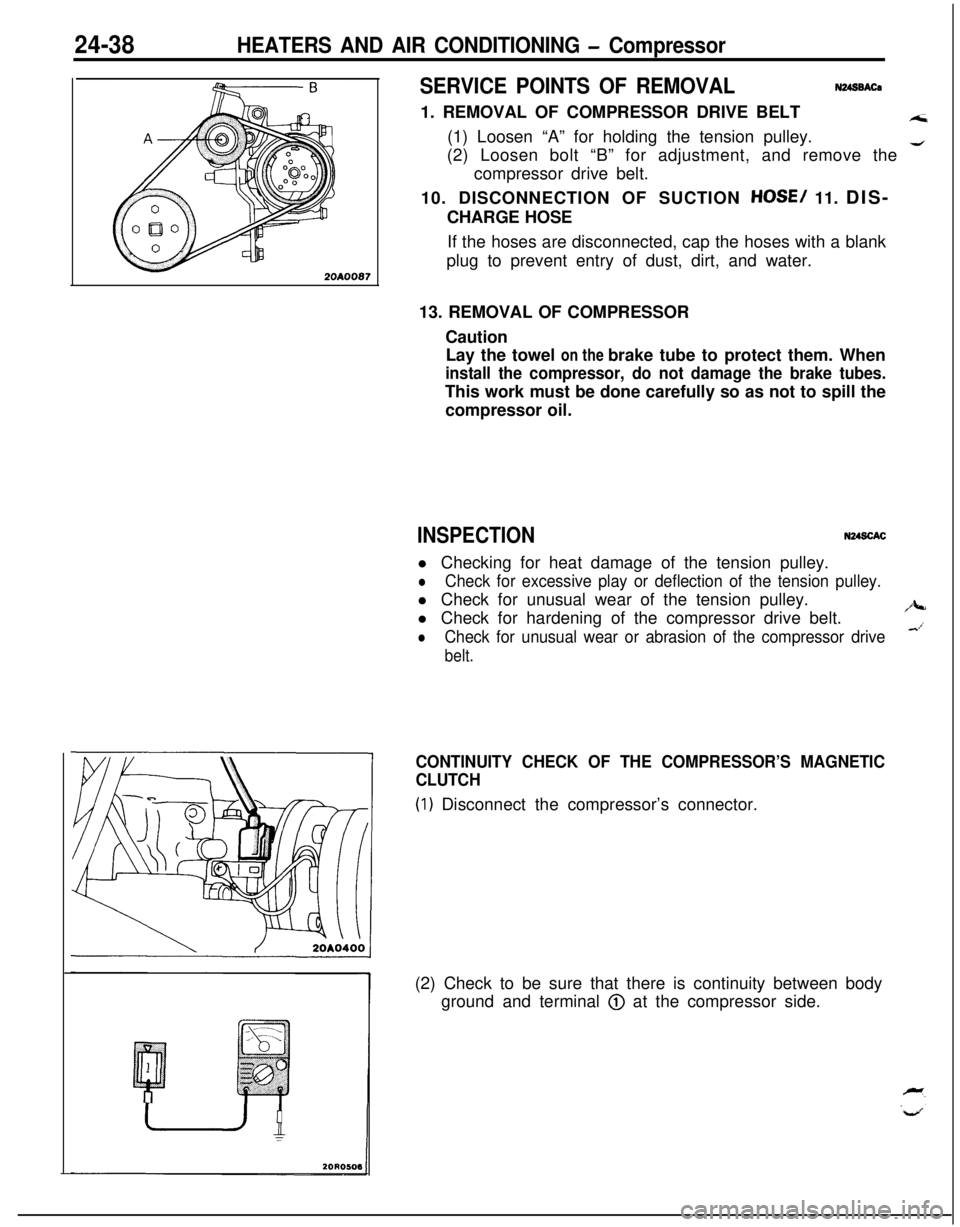
24-38HEATERS AND AIR CONDITIONING - Compressor
2OAOO87
SERVICE POINTS OF REMOVALN248BACa1. REMOVAL OF COMPRESSOR DRIVE BELT
A;i(1) Loosen “A” for holding the tension pulley.
(2) Loosen bolt “B” for adjustment, and remove the
4compressor drive belt.
10. DISCONNECTION OF SUCTION
HOSE/ 11. DIS-
CHARGE HOSE
If the hoses are disconnected, cap the hoses with a blank
plug to prevent entry of dust, dirt, and water.
13. REMOVAL OF COMPRESSOR
Caution
Lay the towel on the brake tube to protect them. When
install the compressor, do not damage the brake tubes.This work must be done carefully so as not to spill the
compressor oil.
INSPECTIONN248CACl Checking for heat damage of the tension pulley.
lCheck for excessive play or deflection of the tension pulley.l Check for unusual wear of the tension pulley.
l Check for hardening of the compressor drive belt.
/J+-
lCheck for unusual wear or abrasion of the compressor drive&’
belt.
CONTINUITY CHECK OF THE COMPRESSOR’S MAGNETIC
CLUTCH
(1) Disconnect the compressor’s connector.
(2) Check to be sure that there is continuity between body
ground and terminal
@ at the compressor side.
Page 1189 of 1216

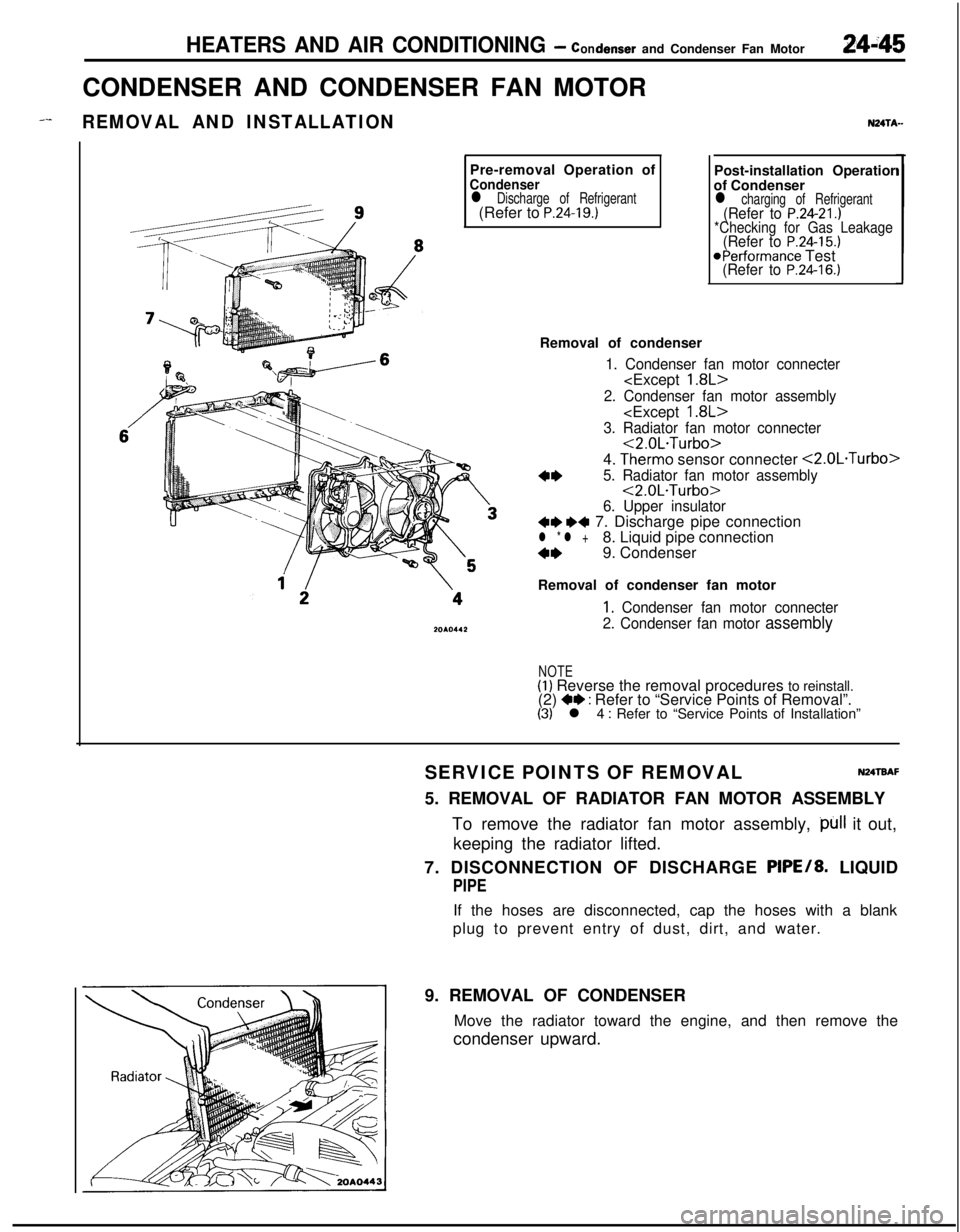
HEATERS AND AIR CONDITIONING - condenser and Condenser Fan Motor24i45CONDENSER AND CONDENSER FAN MOTOR
_--REMOVAL AND INSTALLATIONPre-removal Operation of
Condenserl Discharge of Refrigerant(Refer to P.24-19.)
NZITA-Post-installation Operatior
of Condenser
l charging of Refrigerant(Refer to P.24-21.)*Checking for Gas Leakage(Refer to P.24-15.)@Performance Test(Refer to P.24-16.)Removal of condenser
1. Condenser fan motor connecter
2. Condenser fan motor assembly
3. Radiator fan motor connecter<2.0L.Turbo>
4.
Therm0 sensor connecter <2.0L.Turbo>
4*5. Radiator fan motor assembly<2.0L.Turbo>
6. Upper insulator+e ~~ 7. Discharge pipe connectionl * l +8. Liquid pipe connection
4*9. Condenser
Removal of condenser fan motor
1, Condenser fan motor connecter
2. Condenser fan motor
assembly
NOTE(1) Reverse the removal procedures to reinstall.
(2) +e : Refer to “Service Points of Removal”.(3) l 4 : Refer to “Service Points of Installation”
SERVICE POINTS OF REMOVAL
N24TBAF5. REMOVAL OF RADIATOR FAN MOTOR ASSEMBLY
To remove the radiator fan motor assembly,
)~ll it out,
keeping the radiator lifted.
7. DISCONNECTION OF DISCHARGE PIPE/8. LIQUID
PIPEIf the hoses are disconnected, cap the hoses with a blank
plug to prevent entry of dust, dirt, and water.
9. REMOVAL OF CONDENSER
Move the radiator toward the engine, and then remove the
condenser upward.