Page 699 of 1216

MANUAL TRANSAXLE - Specifications
SPECIFICATIQNS
3ENERAL SPECIFICATIONS
ItemsModel
Applicable engine
TypeGear ratio
1 st2nd3rd
4th5th
Reverse
Final reduction ratio
Speedometer gear ratio (driven/drive)
Oil quantityliters (qts.)
SERVICE SPECIFICATIONShl22CBA
”
.,NZlCA-ASpecifications
1TF5M22-1
-VFWF5M22-2-VPZV
46374G63-DOHC
5-speed transaxle5-speed transaxle
floor shiftfloor shift
3.363
3.363
1.947
1.9471.285
1.285
0.9390.939
0.756
0.7563.0833.083
4.3224.322
29136291361.8 (1.9)1.8 (1.9)
F5M33-2-SPA!4G63-DOHC (Turbo)5-speed
trzinsaxlefloor shift.-~,3.090
1.833
1.217
0.888
0.7413.166
4.153
291362.2 (2.3)
ItemsStandard value
Transaxle
Input shaft end play
Input shaft front bearing end play
Input shaft rear bearing end play
Intermediate gear bearing end play
Intermediate gear preload
Output shaft preload
Differential
Differential case preload
Differential pinion backlash
LimitSpecifications
o-0.05 (O-.002)
0.01-0.12 (.0004-.005)
0.01-0.09 (.0004-.004)
0.01-0.14 (.0004-,006)
0.05-0.10 (.002-.004)
0.05-0.10 (.002-.004)
0.05-0.10 (.002-.004)
0.025-0.150 LOO1 -.006)mm (in.)
Synchronizer ring and clutch gear clearance0.5 (.02)
Page 703 of 1216

MANUAL TRANSAXLE - Specifications
Part name
Spacer
(For adjustment of differential case preload)
Spacer
(For adjustment of differential pinion backlash)
TORQUE SPECIFICATIONSThickness mm (in.)
1.22 f.0480)
1.25 (.0492)
0.75-0.82
(.0295-.0323)
0.83-0.92
(.0327-.0362)
0.93- 1 .oo
(.0366-.0394)
1.01-1.08
(.0398-.0425)
1.09-1.16
(.0429-.0457)Identification
symbol
GM
-
-
-
-Part No.
MA180862MA1
80866MA1 80875MA1 86876
Items
Nm
Shift lever to lever (A)
19-28
Lever (A) to bracket assembly
17-26
Drain plug
30-35Filler plug
30-35Starter motor mounting bolt
27-34
Transaxle bracket
60-80Shift lever knob
4.5-7.5
Shift cable and select cable to body9-14
Shift lever assembly to body
9-14
Automatic seat belt guide ring attaching bolt17-26
Clutch release cylinder mounting bolt
15-22
Clutch tube to transaxle assembly
15-22
Transaxle mount bracket to transaxle
60-80Shift cable and select cable to transaxle15-22
Under cover
9-13
Transaxle mounting bolt [12 mm (.47 in.) diameter
bolt143-55
Transaxle mounting bolt [IO mm (.40 in.) diameter
bolt130-35Transaxle mounting bolt
[8 mm (.31 in.) diameter bolt]IO-12Tie rod end to knuckle
24-35
Lower arm ball joint to knuckle
60-72Bell housing cover
IO-123ear cover bolt
15-223ackup light switch
30-35
loppet plug30-42
jpeedometer sleeve bolt3.0-5.0nput shaft lock nut
140-160ntermediate lock nut
gear
140-160
3everse idler gear shaft bolt
43-55
rransaxle case tightening bolt
35-42
stopper bracket bolt
15-22
qestrict ball assembly30-35
ft.lbs.
13-2012-18
22-25
22-25
20-2543-58
3-5
7-10
7-1012-19
11-16
11-1643-58
11-16
7-1032-39
22-25
7-9
17-25
43-52
7-9
11-1522-25
22-302.5-3.5
102-I 15
102-11532-39
26-3011-15
22-25
Page 704 of 1216

MANUAL TRANSAXLE - Specifications
ItemsNm
ftlbs.Reverse shift lever assembly attaching bolt
15-2211-15
Bearing retainer bolt15-2211-15
Differential drivegear
bolt
130-14094-101Interlock plate bolt
20-2715-19
Select lever assemblymountingbolt15-2211-15
LUBRICANTS
NZlCD-A
ItemsManual transaxle oil
Drive shaft oil seal lipSpecified lubricant
MOPAR Hypoid gear oil or equivalent
API classification GL-4 or higher
MOPAR Hypoid gear oil or equivalent
API classification GL-4 or higherQuantity lit. (qts.)
1.8 (1.9) 2.2 (2.3)’
As required
Shift lever bushingMOPAR Front Wheel Bearing Grease
Part No. 3837794 or equivalentAs required
SEALANTS AND ADHESIVES
NZlCE-A
IItemsSpecified sealants and adhesivesITransaxle case-clutch housing mating surfacesMitsubishi genuine Part No.
MD997740 or equivalent
Transaxle case-rear cover mating surfaces
Differential drive gear bolts
Bearing retainer screw (flush head screw)MOPAR Part
No.4318031 or MOPAR Part No.4318032or equivalent
Air breather
IMOPAR Part
No.4318025 or equivalent
Page 711 of 1216

MANUAL TRANSAXLE - Transaxle Contid
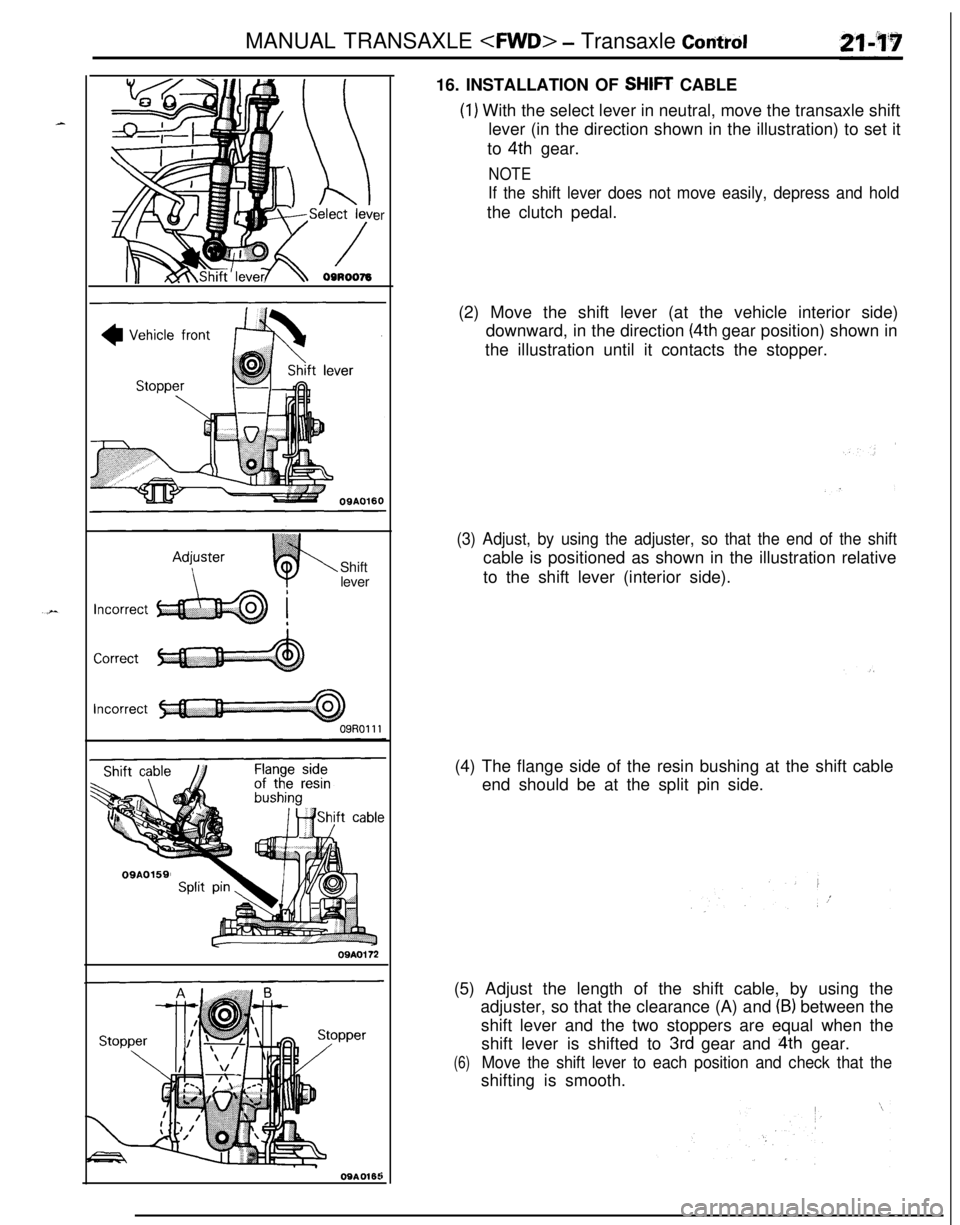
erShift
lever
09A0159
09A016t16. INSTALLATION OF
SHIFT CABLE
(1) With the select lever in neutral, move the transaxle shift
lever (in the direction shown in the illustration) to set it
to
4th gear.
NOTE
If the shift lever does not move easily, depress and holdthe clutch pedal.
(2) Move the shift lever (at the vehicle interior side)
downward, in the direction
(4th gear position) shown in
the illustration until it contacts the stopper.
(3) Adjust, by using the adjuster, so that the end of the shiftcable is positioned as shown in the illustration relative
to the shift lever (interior side).
(4) The flange side of the resin bushing at the shift cable
end should be at the split pin side.
(5) Adjust the length of the shift cable, by using the
adjuster, so that the clearance (A) and
(B) between the
shift lever and the two stoppers are equal when the
shift lever is shifted to
3rd gear and 4th gear.
(6)Move the shift lever to each position and check that theshifting is smooth.
Page 713 of 1216

MANUAL TRANSAXLE - Transaxle21-19
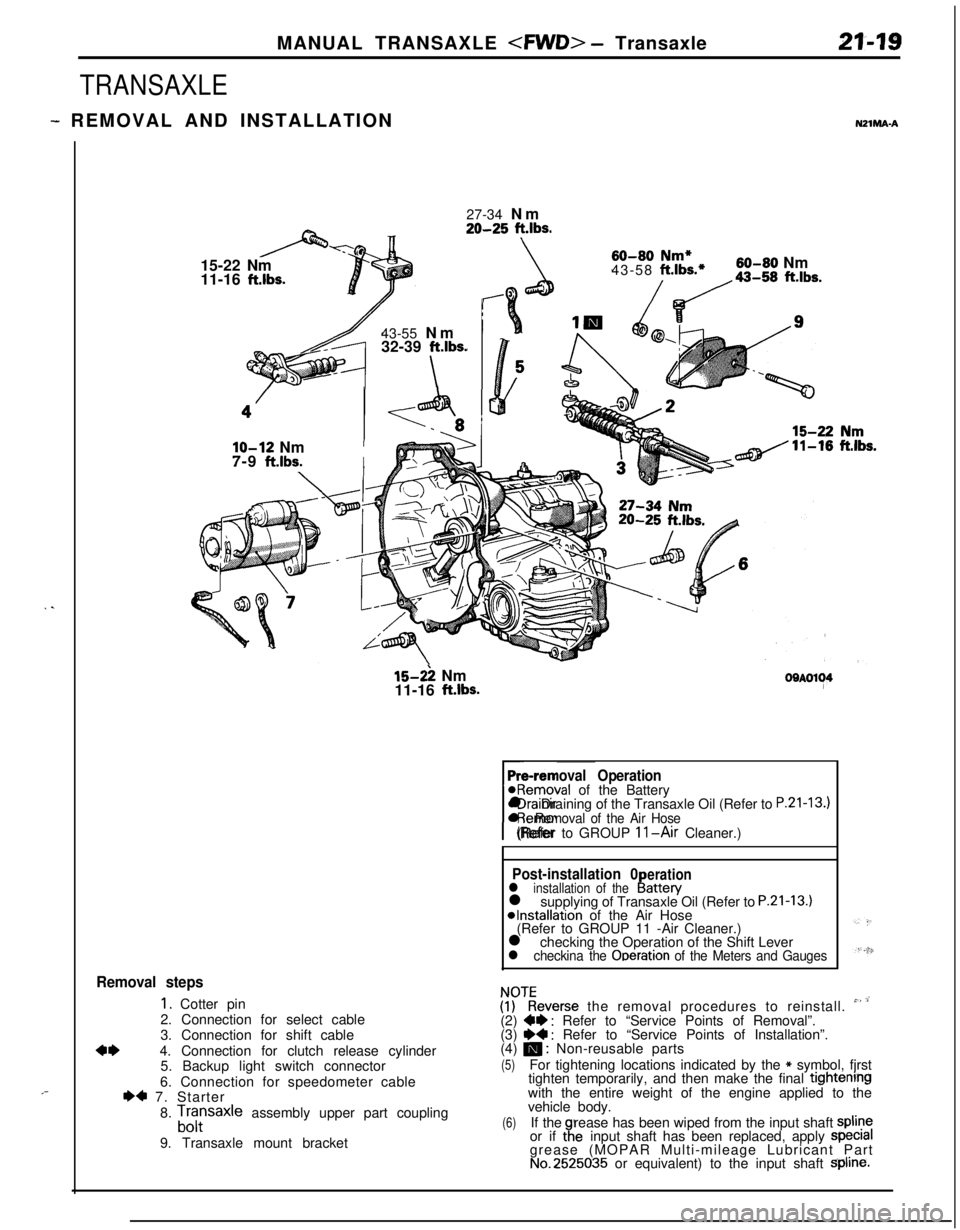
TRANSAXLE
- REMOVAL AND INSTALLATIONNZlMA-A
. .
,-27-34 Nm
20-25 ft.lbs.15-22 Nm
11-16
ft.lbs.43-55 Nm
32-39
ft.lbs.
\
60-80 Nm*43-58 ft.lbs.*60-80 Nm
/da-,, ft.lbs.
lo-12 NmI7-9
ft.lbs.I
15-2: Nm
11-16 ft.lbs.OOAOl~4
Pre-removal Operation@Removal of the Battery
rl Draining of the Transaxle Oil (Refer to
P.21-13.)l Removal of the Air Hose(Refer to GROUP 11-Air Cleaner.)
Post-installation 0erationl installation of theI!attery
l supplying of Transaxle Oil (Refer to P.21-13.)*Installation of the Air Hose
(Refer to GROUP 11 -Air Cleaner.)
l checking the Operation of the Shift Lever
l checkina the Ooeration of the Meters and Gauges
Removal steps
1. Cotter pin
2. Connection for select cable
3. Connection for shift cable
4*4. Connection for clutch release cylinder
5. Backup light switch connector
6. Connection for speedometer cable
I)* 7. Starter
8.
Lfrsaxle assembly upper part coupling
9. Transaxle mount bracket
ZKeverse the removal procedures to reinstall. ” ’(2) W : Refer to “Service Points of Removal”.
(3) ~~ : Refer to “Service Points of Installation”.
(4) m : Non-reusable parts
(5)For tightening locations indicated by the * symbol, fjrst
tighten temporarily, and then make the final tightenrngwith the entire weight of the engine applied to the
vehicle body.
(6)If therease has been wiped from the input shaft spline
or if taeinput shaft has been replaced, apply specralgrease (MOPAR Multi-mileage Lubricant Part
No.2525035 or equivalent) to the input shaft Spline.
Page 715 of 1216

MANUAL TRANSAXLE - Transaxle’
---
-..
2) ’TransaxlellK611
SERVICE POINTS OF REMOVALNlZMBAR4. DISCONNECTION OF CLUTCH ‘RELEASE CYLINDER
FROM TRANSAXLE ASSEMBLY
Remove the clutch release cylinder and clutch oil line
bracket installation bolt, and then secure at the
! body side
without disconnecting the oil line coupling.
”
10. REMOVAL OF UNDER COVER
Lift the vehicle before removing the under cover.
12. DISCONNECTION OF TIE ROD END FROM KNUCKLE
Using the special tool, disconnect the tie rod end from the
knuckle.Caution
1. Be sure to tie the cord of the special tool to the
nearby part.
2. Loose the nut but do not remove it.
14. DISCONNECTION OF LOWER ARM BALL JOINT
Using the special tool, disconnect the lower arm ball joint
from the knuckle.
Caution
1. Be sure to tie the cord of the special tool to the
nearby part.
2. Loose the nut but do not remove it.
I15. DISCONNECTION OF DRIVE SHAFT
(1)
Insert a pry bar between the transaxle case and the
drive shaft, and then pry the drive shaft
~from the
transaxle.Caution
1. Do not pull on the drive shaft; doing so will
damage the inboard joint; be sure to use the pry
bar.2. Do not insert the pry bar so deep as to damaged
the oil seal.
(2) Keep the removed drive shaft as far away from the
transaxle case as possible, and secure (by using rope,
etc.) the joints to the body so that it does not fall.
Page 719 of 1216
MANUAL TRANSAXLE - Transaxle Assembly
2i &
15-22 Nm50 11-15 ft.lbs.
Disassembly steps
l +49. Bolt50. Screw
51. Bearing retainer
+e l + 52.Intermediate gear assemblyl + 53.Input shaft assembly54. Output shaft assembly
55. Differential gear assembly
56. Bearing outer race57. Oil guide
58. Bearing outer race
59. Bearing outer race
l 4 60. Oil seal
W 61. Oil seal
62. Magnet
63. Magnet holder
64. Clutch housing assembly
NOTE(1) Reverse the disassembly procedures to reassemble.(2) ~~ : Refer to “Service Points of Disassembly”.(3) e+ : Refer to “Service Points of Reassembly”.
(4) m : Non-reusable parts
21421
Page 720 of 1216
21-26 MANUAL TRANSAXLE - Transaxle Assembly
SERVICE POINTS OF DISASSEMBLY
14. REMOVAL OF SPRING PINIMD99801 9\I
NZlMFARRemove the spring pin using the special tool.
Bolt10 mm
15.116. REMOVAL OF LOCK NUTS(1) Unstake lock nuts of the input shaft and intermediate
gear.(2) Shift the transmission in reverse using the control lever
and select lever.
(3) install the special tool onto the input shaft.
(4) Screw a bolt [IO mm] into the hole on the periphery of
clutch housing and attach a spinner handle to the
special tool.
(5) Remove the lock nut, while using the bolt as a spinner
handle stopper.45./46.
REMOVAL OF SPRING PINS
Remove the spring pins for 1 st-2nd and 3rd-4th speed shiftforks using the pin punch.