Page 1128 of 1216
Page 1130 of 1216

23-86BODY - Trims
-55 Nm
Qi----- %40 ft.lbs.
>
u.u19AO300
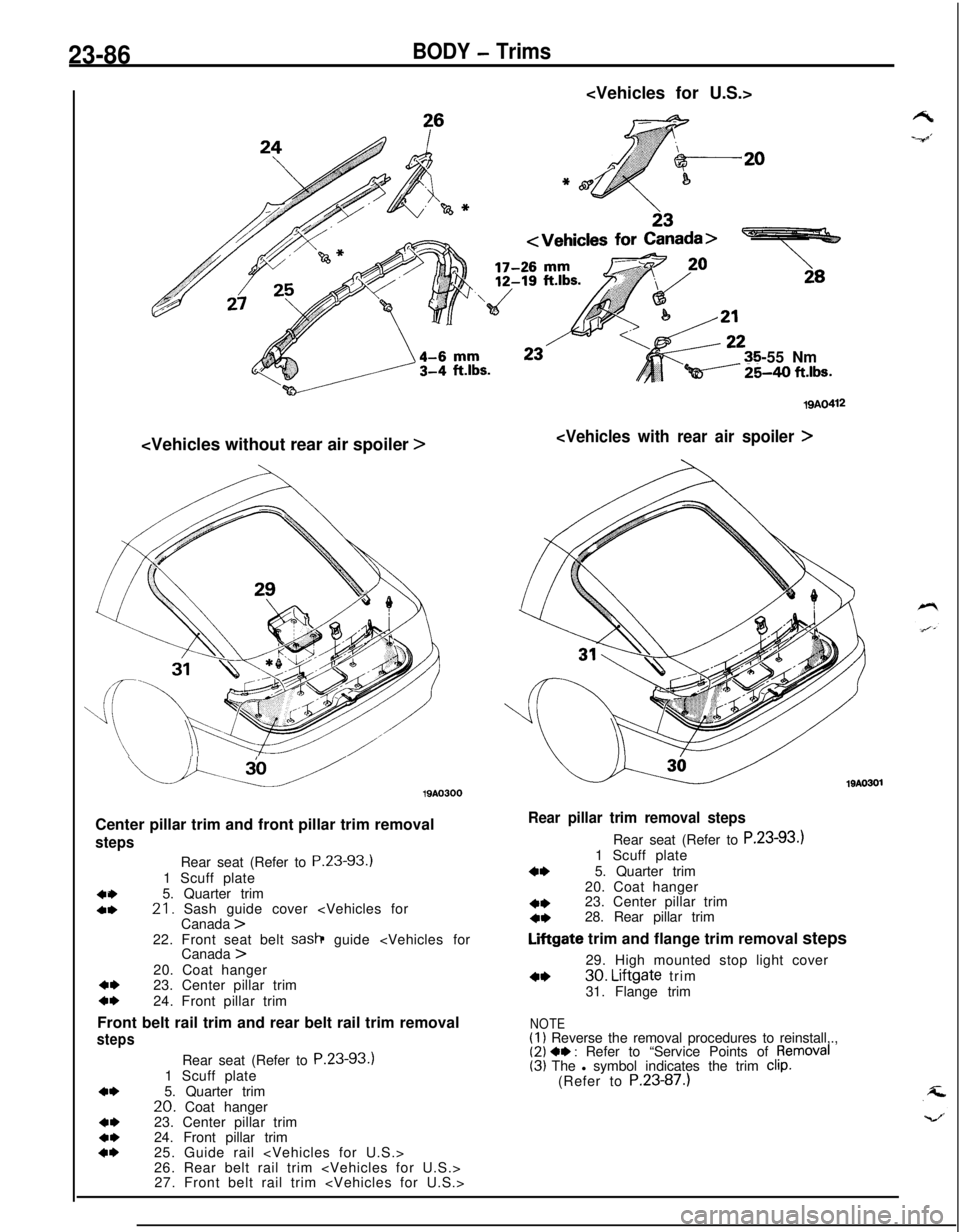
Center pillar trim and front pillar trim removal
steps
404,Rear seat (Refer to P.23-93.)
1 Scuff plate
5. Quarter trim21. Sash guide cover
Canada >22. Front seat belt sash guide
Canada >20. Coat hanger
4,23. Center pillar trimc*24. Front pillar trim
Front belt rail trim and rear belt rail trim removal
steps
4*
4,4*4*Rear seat (Refer to P.23-93.)
1 Scuff plate
5. Quarter trim
20. Coat hanger
23. Center pillar trim
24. Front pillar trim
25. Guide rail
26. Rear belt rail trim
27. Front belt rail trim
19AO412
19AO301
Rear pillar trim removal stepsRear seat (Refer to P.23-93.)
1 Scuff plate
4*5. Quarter trim
20. Coat hanger
4*23. Center pillar trim4*28. Rear pillar trim
Liftgate trim and flange trim removal steps
29. High mounted stop light cover
4*30. Liftgate trim
31. Flange trim
NOTE(1) Reverse the removal procedures to reinstall,.,(2) 4, : Refer to “Service Points of pemoval(3) The l symbol indicates the trim clip.(Refer to P.23-87.)
Page 1132 of 1216
23-88BODY - Trims
Vehicles for U.S.Vehicles for CanadaI
I/IlQA028!
Vehicles for Ca16. REMOVAL OF REAR SIDE TRIM
(1) Remove the cargo room light on the rear side trim LH.).
(2) Remove the rear side trim mounting screws and clips.
(3) Slowly pulling the rear side trim toward you, remove the
clip mounting area on the back of the rear side trim, andremove the rear side trim.
21. REMOVAL OF SASH GUIDE COVER
Refer to
P.23-98.23.REMOVAL OF CENTER PILLAR TRIM
Using the plastic trim tool, remove the clip mounting areas
on the back of the center pillar trim, and remove the center
pillar trim.24.REMOVAL OF FRONT PILLAR TRIM
Using the plastic trim tool, remove the clip mounting areas
and Velcro areas
> on the back of the
front pillar trim, and remove the front pillar trim.25.REMOVAL OF GUIDE RAIL
Refer to
P.23-94.28.REMOVAL OF REAR PILLAR TRIM
Using the plastic trim tool, remove the clip mounting areas
on the back of the rear pillar trim, and remove the rear pillar
trim.
Page 1133 of 1216
BODY - Trims/Headlining23-89
HEADLINING
PEMOVAL AND INSTALLATION
Pm-removal Operationl Removal of Center Pillar Trim
(Refer to
P.23-85.)l Removal of Front Pillar Trim
(Refer to
P.23-85.)l Removal of Guide Rail
(Refer to
P.23-94.)
Post-installation Operation0 Installation of Guide Rail
(Refer to P.23-94.)l Installation of Front Pillar Trim
(Refer to
P.23-85.)l Installation of Center Pillar Trim
(Refer to
P.23-85.)
Vehicles without sunroof
Vehicles with sunroof
3O.REMOVAL OF LIFTGATE TRIM
Using the plastic trim tool, remove the clip mounting areas
on the back of the liftgate, and remove the liftgate.
Removal steps
1.2.Dome lightSunvisor3.Sunshade
4*4. Roof lid glass
5.Headlining trim
6, Sunmf headlining trim
7. CYlps
8. Headlining
9. Trim retainer
19A0314
N23UDAX
NOTE(I l Reverse the removal procedures to reinsta\\;,(2) +e : Refer to“Service Points of Removal
Page 1143 of 1216
BODY - Seat Belt23-99
19AO239
I ITest bulb 2tI
I I
INSPECTION
SEAT BELT TIMERRemove the seat belt timer from the relay box (indoor).
TIMER OPERATION CHECK(I
1 Connect the battery and the test bulb to the timer, as shown
in the illustration.
(2) Make sure that when terminal 2 is connected to the positive
(+) terminal of the battery, test bulbs 1 and 2 are lighted
for approx. 6 seconds.
(3) Make sure that even when terminal 3 is disconnect while testbulbs 1 and 2 and lighted in
(2) above, test bulb 1 remains
lighted.
BUCKLE SWITCHRefer to
P.23-97.
BUZZERRefer to
P.23-97.
SERVICE POINTS OF INSTALLATION7. INSTALLATION OF FRONT SEAT BELT
Fit the retractor retaining lug in the slot provided in the
vehicle body, and secure the retractor with the bolt by
tightening it to the specified torque.
Page 1159 of 1216

HEATERS AND AIR CONDITIONING - Service Adjustment Procedures 24-15
Liquid
line
\Liquid lineI
ILiquid lineHigh pressure
hose2010439
detector torch
Electric leakAdetector tester
2OUO338
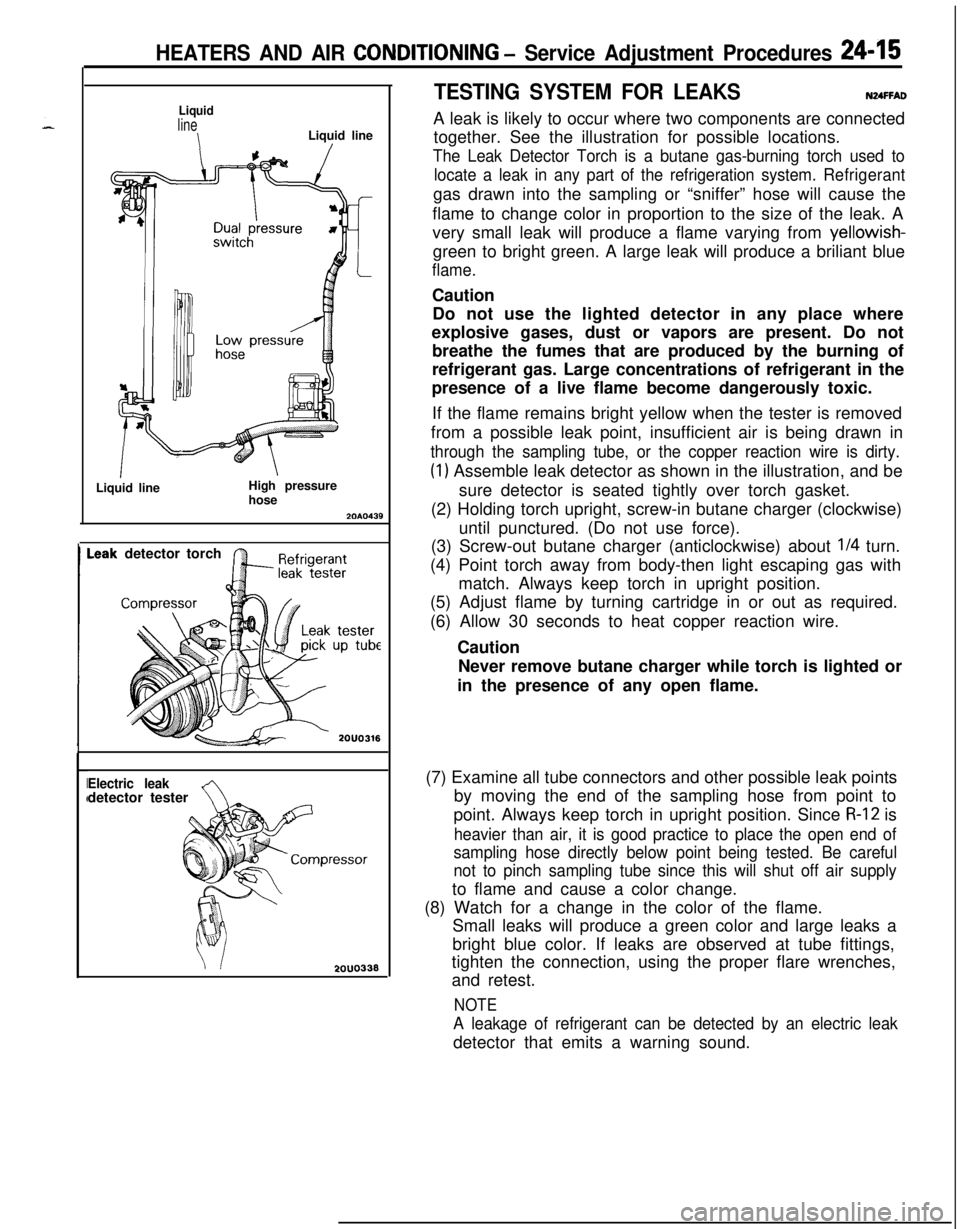
TESTING SYSTEM FOR LEAKSNUFFADA leak is likely to occur where two components are connected
together. See the illustration for possible locations.
The Leak Detector Torch is a butane gas-burning torch used to
locate a leak in any part of the refrigeration system.Refrigerantgas drawn into the sampling or “sniffer” hose will cause the
flame to change color in proportion to the size of the leak. A
very small leak will produce a flame varying from yellowish-
green to bright green. A large leak will produce a briliant blue
flame.Caution
Do not use the lighted detector in any place where
explosive gases, dust or vapors are present. Do not
breathe the fumes that are produced by the burning of
refrigerant gas. Large concentrations of refrigerant in the
presence of a live flame become dangerously toxic.
If the flame remains bright yellow when the tester is removed
from a possible leak point, insufficient air is being drawn in
through the sampling tube, or the copper reaction wire is dirty.
(1) Assemble leak detector as shown in the illustration, and be
sure detector is seated tightly over torch gasket.
(2) Holding torch upright, screw-in butane charger (clockwise)
until punctured. (Do not use force).
(3) Screw-out butane charger (anticlockwise) about
l/4 turn.
(4) Point torch away from body-then light escaping gas with
match. Always keep torch in upright position.
(5) Adjust flame by turning cartridge in or out as required.
(6) Allow 30 seconds to heat copper reaction wire.
Caution
Never remove butane charger while torch is lighted or
in the presence of any open flame.
(7) Examine all tube connectors and other possible leak points
by moving the end of the sampling hose from point to
point. Always keep torch in upright position. Since
R-12 is
heavier than air, it is good practice to place the open end of
sampling hose directly below point being tested. Be careful
not to pinch sampling tube since this will shut off air supplyto flame and cause a color change.
(8) Watch for a change in the color of the flame.
Small leaks will produce a green color and large leaks a
bright blue color. If leaks are observed at tube fittings,
tighten the connection, using the proper flare wrenches,
and retest.
NOTE
A leakage of refrigerant can be detected by an electric leakdetector that emits a warning sound.
Page 1160 of 1216

24-16 HEATERS AND AIR CONDITIONING - Service Adjustment Procedures
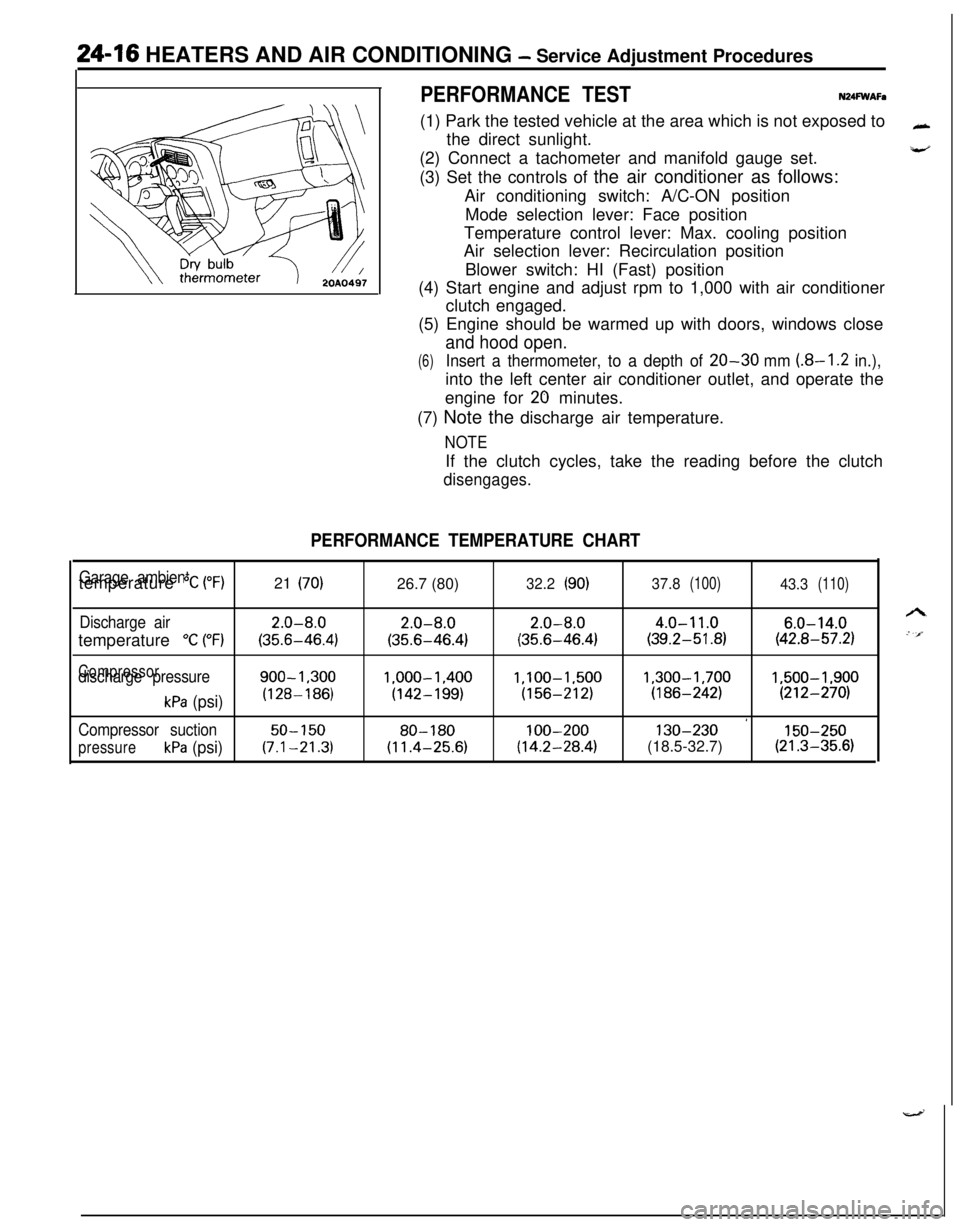
PERFORMANCE TESTN24FWAFa(1) Park the tested vehicle at the area which is not exposed to
the direct sunlight.
(2) Connect a tachometer and manifold gauge set.
(3) Set the controls of the air conditioner as follows:
Air conditioning switch: A/C-ON position
Mode selection lever: Face position
Temperature control lever: Max. cooling position
Air selection lever: Recirculation position
Blower switch: HI (Fast) position
(4) Start engine and adjust rpm to 1,000 with air conditioner
clutch engaged.
(5) Engine should be warmed up with doors, windows close
and hood open.
(6)Insert a thermometer, to a depth of 20-30 mm (8-I .2 in.),into the left center air conditioner outlet, and operate the
engine for
20 minutes.
(7) Note the discharge air temperature.
NOTEIf the clutch cycles, take the reading before the clutch
disengages.
PERFORMANCE TEMPERATURE CHART
Garage ambienttemperature “C (“F)21 (70)26.7 (80)32.2(90)37.8(100)43.3(110)
Discharge air2.0-8.02.0-8.02.0-8.04.0-11.06.0-14.0temperature
“C (“F)(35.6-46.4)(35.6-46.4)(35.6-46.4)(39.2-51.8)(42.8-57.2)
Compressordischarge pressure900-1.3001.000-1.400l,lOO-1,5001,300-1,7001,500-1,900
kPa (psi)(128-186)(142-199)(156-212)(186-242)(212-270)
’Compressor suction50-15080-180100-200130-230150-250
pressurekPa (psi)(7.1-21.3)(11.4-25.6)(14.2-28.4)(18.5-32.7)(21.3-35.6)
Page 1162 of 1216

24-18 HEATERS AND AIR CONDITIONING - Service Adjustment Procedures
(5) Screw a can of R-12 to the opened manifold valve. Be sure
gasket is in place and in good condition. Tighten refrigerantcan and manifold locking nut to insure a good seal. Do not
overtighten 8 to
11 Nm (6 to 8 ft.lbs.) is sufficient if gasket
is in good condition.
(6) Turn manifold valve (above the refrigerant can) completely
clockwise to puncture the can. This closes the valve and
seals the refrigerant in the can.
Caution
Never heat small cans of refrigerant over
40°C (104°F)as they may explode.
(7) Place the refrigerant in a large pan of water heated to 52°C
(104°F). Place pan of water containing the refrigerant can
on an accurate scale so the amount of refrigerant added
can be weighed. Open the refrigerant manifold valve.
(8) Purge all air from test hoses. Air in the system will be
trapped in the condenser causing abnormally high dis-
charge pressures and interfering with condensing of the
refrigerant.(9) Slightly loosen both test hoses at the gauge set manifold.
Tighten the hoses as soon as the air is purged.
(10)Slightly loosen charging hose connection at gauge set
manifold. This will purge air from the charging hose.
Tighten connection as soon as air is purged.
(I l)With vehicle windows open and hood up, operate engine at1,500 rpm and jump the low pressure switch terminals
located on the receiver drier so the clutch will remain
engaged.
(12)Place air conditioner control on air conditioner and place theblower switch on high.
(13)lf necessary, block the condenser to maintain a discharge
pressure of 1,422 to 1,520
kPa (206 to 220 psi). System
must be charged through the evaporator suction service
ports as follows:
(a) Slowly open the suction service gauge valve.
Meter flow of refrigerant by adjusting, the suciton
service gauge valve so that pressure registered at the
suction service gauge does not exceed 345 kPa (50 psi).Keep refrigerant container upright.
(b) Add refrigerant gas until there is no foam visible at the
sight glass.
Add an additional
170 g (6 oz.)
(c) Close the suction gauge valve.
CautionToo much refrigerant in the system can cause
abnormally high discharge pressures. Care must beused so that the exact recommended amount or
refrigerant is added after foam clears in the sight
glass.(d) Close dispensing manifold valve. Remove test hoses
and adapters from the service ports of compressor,
install protective caps at service ports and reconnect
wiring.(e) Check system performance.
(P.24- 16.)
e
. i”
A
i-4