Page 1688 of 4087

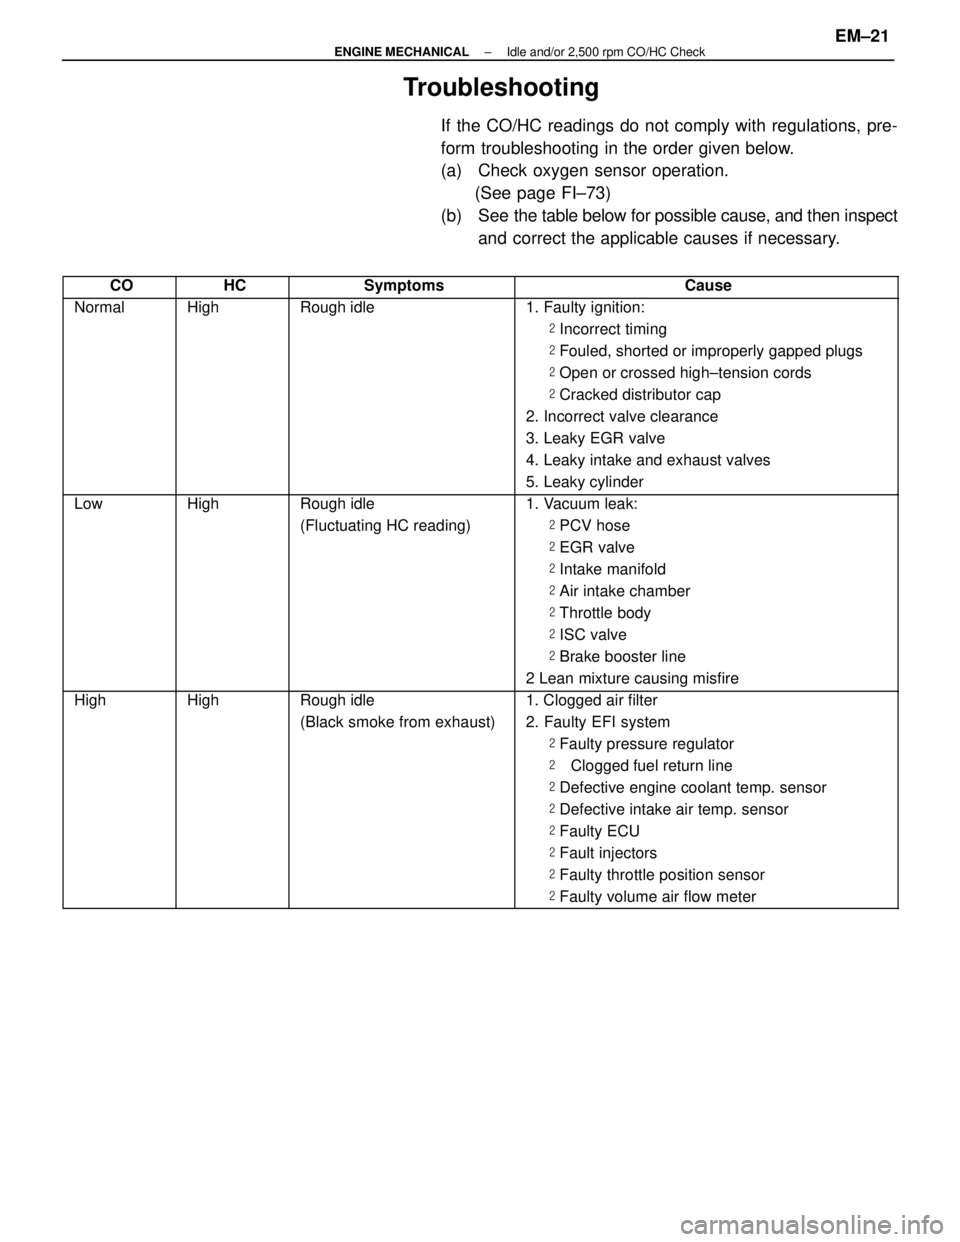
Troubleshooting
If the CO/HC readings do not comply with regulations, pre-
form troubleshooting in the order given below.
(a) Check oxygen sensor operation.(See page FI±73)
(b) See the table below for possible cause, and then inspect
and correct the applicable causes if necessary.
������ ������CO����� �����HC����������� �����������Symptoms����������������� �����������������Cause
������ ������Normal����� �����High����������� �����������Rough idle����������������� �����������������1. Faulty ignition:
������ ����������� ���������������� ���������������������������� ������������������ Incorrect timing
������ ����������� ���������������� ���������������������������� ������������������ Fouled, shorted or improperly gapped plugs
���������������������������������������� Open or crossed high±tension cords������ ����������� ���������������� ���������������������������� ������������������ Cracked distributor cap������ ����������� ���������������� ���������������������������� �����������������2. Incorrect valve clearance������ ����������� ���������������� ���������������������������� �����������������3. Leaky EGR valve������ ����������� ���������������� ���������������������������� �����������������4. Leaky intake and exhaust valves
������ ����������� ���������������� ���������������������������� �����������������5. Leaky cylinder
������ ������Low����� �����High����������� �����������Rough idle����������������� �����������������1. Vacuum leak:
������ ����������� ���������������� �����������(Fluctuating HC reading)����������������� ������������������ PCV hose
������ ����������� ���������������� ���������������������������� ������������������ EGR valve
������ ����������� ���������������� ���������������������������� ������������������ Intake manifold
������ ����������� ���������������� ���������������������������� ������������������ Air intake chamber
���������������������������������������� Throttle body������ ����������� ���������������� ���������������������������� ������������������ ISC valve������ ����������� ���������������� ���������������������������� ������������������ Brake booster line������ ����������� ���������������� ���������������������������� �����������������2 Lean mixture causing misfire������ ������High����� �����High����������� �����������Rough idle����������������� �����������������1. Clogged air filter
������ ����������� ���������������� �����������(Black smoke from exhaust)����������������� �����������������2. Faulty EFI system
������ ����������� ���������������� ���������������������������� ������������������ Faulty pressure regulator
������ ����������� ���������������� ���������������������������� ������������������� Clogged fuel return line
������ ����������� ���������������� ���������������������������� ������������������ Defective engine coolant temp. sensor
������ ����������� ���������������� ���������������������������� ������������������ Defective intake air temp. sensor
������ ����������� ���������������� ���������������������������� ������������������ Faulty ECU
���������������������������������������� Fault injectors������ ����������� ���������������� ���������������������������� ������������������ Faulty throttle position sensor������ ����������� ���������������� ���������������������������� ������������������ Faulty volume air flow meter
±
ENGINE MECHANICAL Idle and/or 2,500 rpm CO/HC CheckEM±21
WhereEverybodyKnowsYourName
Page 1689 of 4087

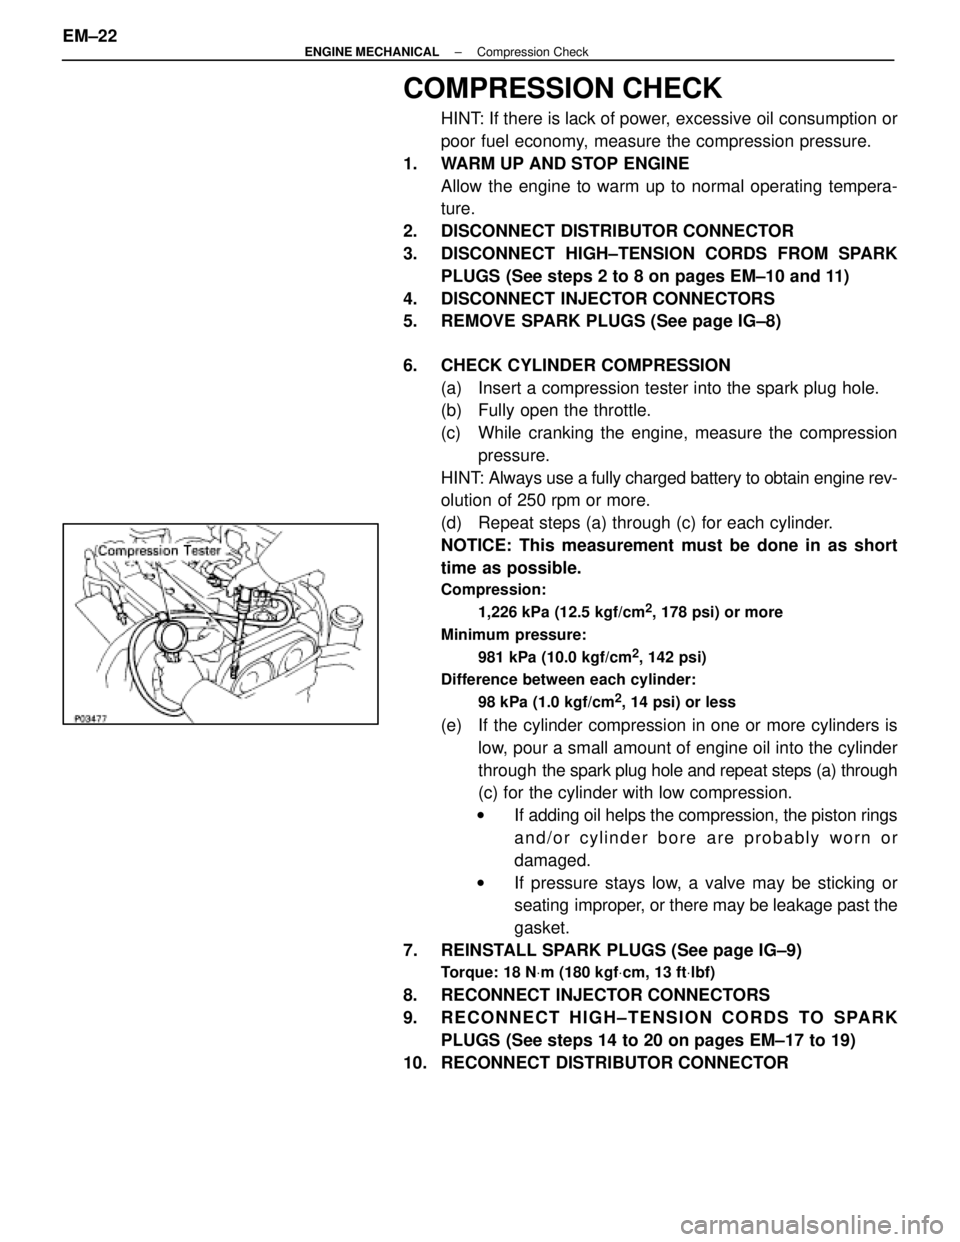
COMPRESSION CHECK
HINT: If there is lack of power, excessive oil consumption or
poor fuel economy, measure the compression pressure.
1. WARM UP AND STOP ENGINE Allow the engine to warm up to normal operating tempera-
ture.
2. DISCONNECT DISTRIBUTOR CONNECTOR
3. DISCONNECT HIGH±TENSION CORDS FROM SPARK PLUGS (See steps 2 to 8 on pages EM±10 and 11)
4. DISCONNECT INJECTOR CONNECTORS
5. REMOVE SPARK PLUGS (See page IG±8)
6. CHECK CYLINDER COMPRESSION (a) Insert a compression tester into the spark plug hole.
(b) Fully open the throttle.
(c) While cranking the engine, measure the compressionpressure.
HINT: Always use a fully charged battery to obtain engine rev-
olution of 250 rpm or more.
(d) Repeat steps (a) through (c) for each cylinder.
NOTICE: This measurement must be done in as short
time as possible.
Compression:
1,226 kPa (12.5 kgf/cm
2, 178 psi) or more
Minimum pressure: 981 kPa (10.0 kgf/cm
2, 142 psi)
Difference between each cylinder:
98 kPa (1.0 kgf/cm
2, 14 psi) or less
(e) If the cylinder compression in one or more cylinders islow, pour a small amount of engine oil into the cylinder
through the spark plug hole and repeat steps (a) through
(c) for the cylinder with low compression.
w If adding oil helps the compression, the piston rings
and/or cylinder bore are probably worn or
damaged.
w If pressure stays low, a valve may be sticking or
seating improper, or there may be leakage past the
gasket.
7. REINSTALL SPARK PLUGS (See page IG±9)
Torque: 18 N Vm (180 kgf Vcm, 13 ft Vlbf)
8. RECONNECT INJECTOR CONNECTORS
9. RECONNECT HIGH±TENSION CORDS TO SPARK
PLUGS (See steps 14 to 20 on pages EM±17 to 19)
10. RECONNECT DISTRIBUTOR CONNECTOR
EM±22
±
ENGINE MECHANICAL Compression Check
WhereEverybodyKnowsYourName
Page 1690 of 4087
TIMING BELT
COMPONENTS
±
ENGINE MECHANICAL Timing BeltEM±23
WhereEverybodyKnowsYourName
Page 1691 of 4087

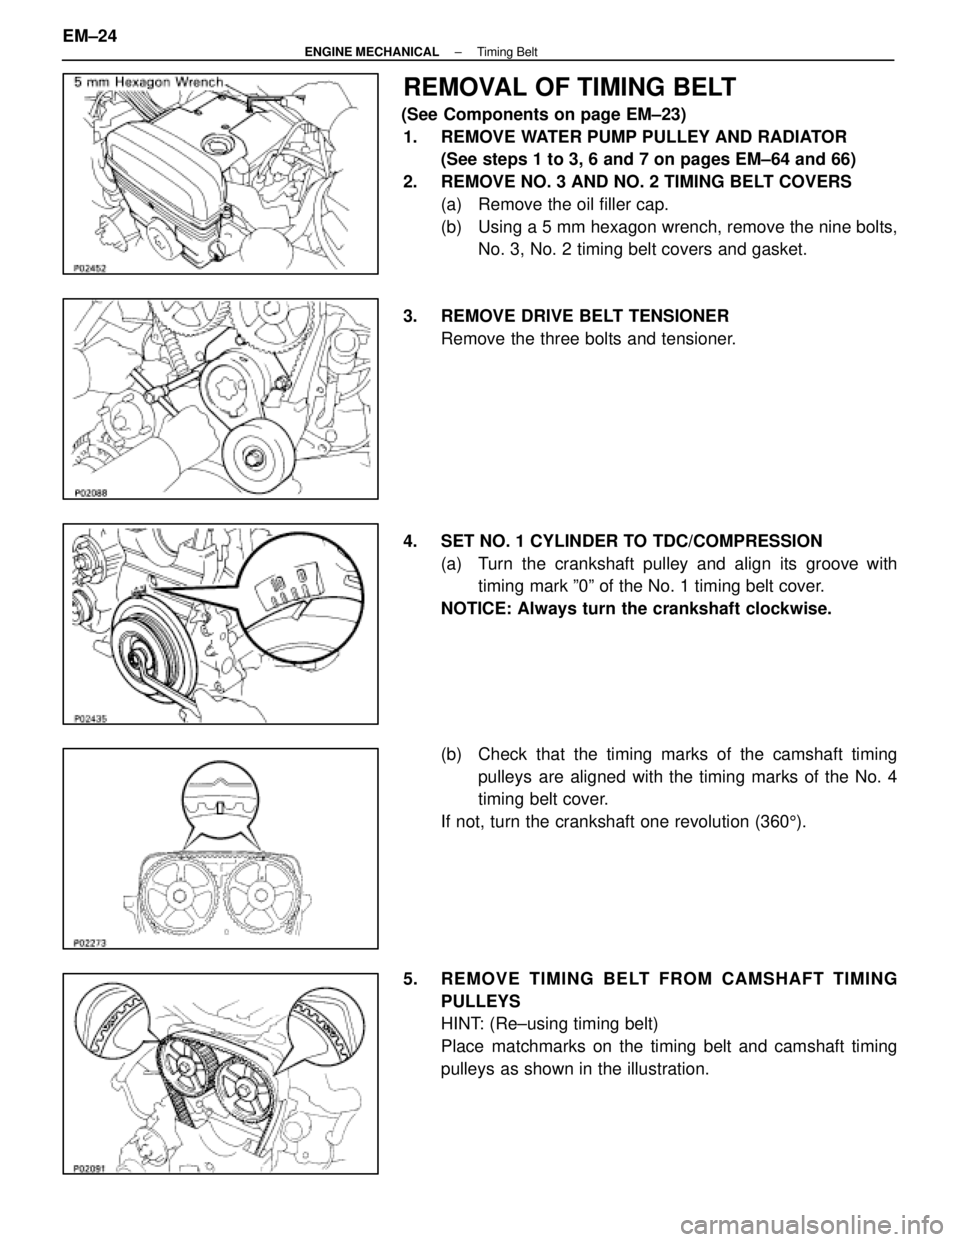
REMOVAL OF TIMING BELT
(See Components on page EM±23)1. REMOVE WATER PUMP PULLEY AND RADIATOR (See steps 1 to 3, 6 and 7 on pages EM±64 and 66)
2. REMOVE NO. 3 AND NO. 2 TIMING BELT COVERS (a) Remove the oil filler cap.
(b) Using a 5 mm hexagon wrench, remove the nine bolts,No. 3, No. 2 timing belt covers and gasket.
3. REMOVE DRIVE BELT TENSIONER Remove the three bolts and tensioner.
4. SET NO. 1 CYLINDER TO TDC/COMPRESSION (a) Turn the crankshaft pulley and align its groove withtiming mark º0º of the No. 1 timing belt cover.
NOTICE: Always turn the crankshaft clockwise.
(b) Check that the timing marks of the camshaft timing pulleys are aligned with the timing marks of the No. 4
timing belt cover.
If not, turn the crankshaft one revolution (360 5).
5. REMOVE TIMING BELT FROM CAMSHAFT TIMING PULLEYS
HINT: (Re±using timing belt)
Place matchmarks on the timing belt and camshaft timing
pulleys as shown in the illustration.
EM±24
±
ENGINE MECHANICAL Timing Belt
WhereEverybodyKnowsYourName
Page 1692 of 4087
(a) Alternately loosen the two bolts, and remove them, thetensioner and dust boot.
(b) Disconnect the timing belt from the camshaft timing pulleys.
6. REMOVE CAMSHAFT TIMING PULLEYS Using SST, remove the bolt for the timing pulley. Remove
both timing pulleys.
SST 09278±54012
7. REMOVE CRANKSHAFT PULLEY (a) Using SST to hold the crankshaft pulley, loosen thepulley mounting bolt.
SST 09213±54015 (91651±60855) and 09330±00021
(b) Remove SST and pulley bolt.
(c) Using SST, remove the pulley.
SST 09213±31021
±
ENGINE MECHANICAL Timing BeltEM±25
WhereEverybodyKnowsYourName
Page 1693 of 4087
8. REMOVE NO. 1 TIMING BELT COVERRemove the five bolts, timing belt cover and two gaskets.
9. REMOVE TIMING BELT GUIDE
10. REMOVE TIMING BELT HINT (When re±using timing belt): Draw an arrow on the tim-
ing belt in the direction of engine revolution, and place match-
marks on the timing belt and crankshaft timing pulley.
11. REMOVE IDLER PULLEY Using a 10 mm hexagon wrench, remove the pivot bolt, plate
washer and idler pulley.
12. REMOVE CRANKSHAFT TIMING PULLEY If the pulley cannot be removed by hand, use SST to remove
the crankshaft timing pulley.
SST 09213±60017 (09213±00020, 09213±00030,09213±00040, 09213±00050)
EM±26
±
ENGINE MECHANICAL Timing Belt
WhereEverybodyKnowsYourName
Page 1694 of 4087
INSPECTION OF TIMING BELT
COMPONENTS
1. INSPECT TIMING BELTNOTICE:w Do not bend, twist or turn the timing belt inside
out.
w Do not allow the timing belt to come into contact
with oil, water or steam.
w Do not make use of timing belt tension when
installing or removing the mount bolt of the
camshaft timing pulley.
If there are any defects as shown in the illustrations, check
the following points:
(a) Premature parting
w Check for proper installation.
w Check the timing cover gasket for damage and
proper installation.
(b) If the belt teeth are cracked or damaged, check to see if either the camshaft or water pump is locked.
(c) If there is noticeable wear or cracks on the belt face, check to see if there are nicks on the side of the idler
pulley lock.
(d) If there is wear or damage on only one side of the belt, check the belt guide and the alignment of each pulley.
±
ENGINE MECHANICAL Timing BeltEM±27
WhereEverybodyKnowsYourName
Page 1695 of 4087
(e) If there is noticeable wear on the belt teeth, check thetiming cover for damage, correct gasket installation and
foreign material on the pulley teeth.
If necessary, replace the timing belt.
2. INSPECT IDLER PULLEY Check the turning smoothness of the idler pulley.
If necessary, replace the idler pulley.
3. INSPECT DRIVE BELT TENSIONER Check the turning smoothness of the tensioner.
If necessary, replace the tensioner.
4. INSPECT TIMING BELT TENSIONER (a) Visually check tensioner for oil leakage.
HINT: It is normal for a tensioner to show a small trance of oil
on the pushrod seal.
However, if there is an outright oil leak, the tensioner must be
replaced.
(b) Hold the tensioner with both hands, and push the push rod firmly against the floor or wall to check that it doesn't
move.
If the push rod moves, replace the tensioner.
EM±28
±
ENGINE MECHANICAL Timing Belt
WhereEverybodyKnowsYourName