Page 1491 of 4087
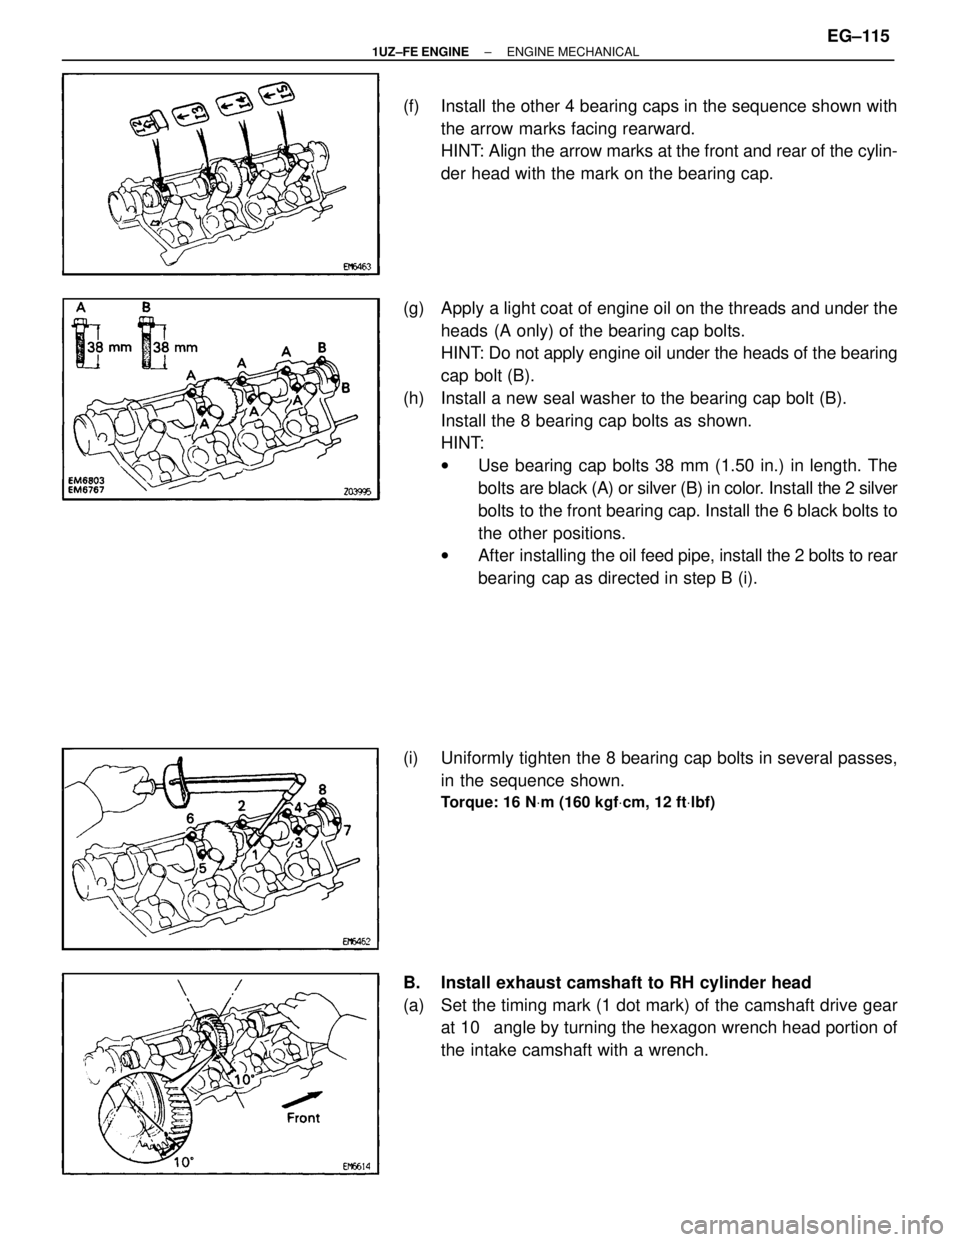
(f) Install the other 4 bearing caps in the sequence shown withthe arrow marks facing rearward.
HINT: Align the arrow marks at the front and rear of the cylin-
der head with the mark on the bearing cap.
(g) Apply a light coat of engine oil on the threads and under the heads (A only) of the bearing cap bolts.
HINT: Do not apply engine oil under the heads of the bearing
cap bolt (B).
(h) Install a new seal washer to the bearing cap bolt (B). Install the 8 bearing cap bolts as shown.
HINT:
wUse bearing cap bolts 38 mm (1.50 in.) in length. The
bolts are black (A) or silver (B) in color. Install the 2 silver
bolts to the front bearing cap. Install the 6 black bolts to
the other positions.
w After installing the oil feed pipe, install the 2 bolts to rear
bearing cap as directed in step B (i).
(i) Uniformly tighten the 8 bearing cap bolts in several passes, in the sequence shown.
Torque: 16 N Vm (160 kgf Vcm, 12 ft Vlbf)
B. Install exhaust camshaft to RH cylinder head
(a) Set the timing mark (1 dot mark) of the camshaft drive gear
at 10 � angle by turning the hexagon wrench head portion of
the intake camshaft with a wrench.
±
1UZ±FE ENGINE ENGINE MECHANICALEG±115
WhereEverybodyKnowsYourName
Page 1492 of 4087
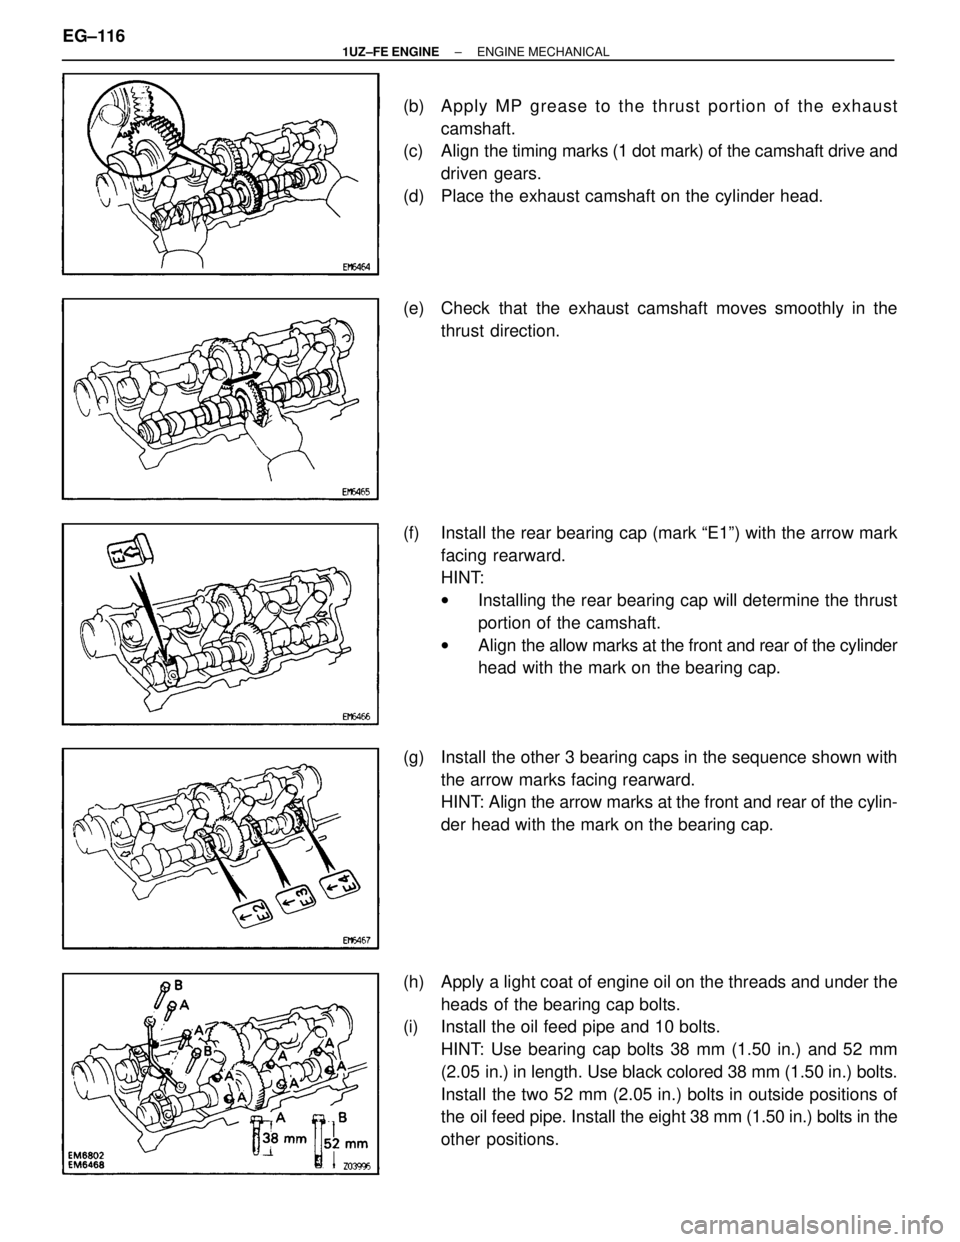
(b) Apply MP grease to the thrust portion of the exhaustcamshaft.
(c) Align the timing marks (1 dot mark) of the camshaft drive and
driven gears.
(d) Place the exhaust camshaft on the cylinder head.
(e) Check that the exhaust camshaft moves smoothly in the thrust direction.
(f) Install the rear bearing cap (mark ªE1º) with the arrow mark facing rearward.
HINT:
wInstalling the rear bearing cap will determine the thrust
portion of the camshaft.
w Align the allow marks at the front and rear of the cylinder
head with the mark on the bearing cap.
(g) Install the other 3 bearing caps in the sequence shown with the arrow marks facing rearward.
HINT: Align the arrow marks at the front and rear of the cylin-
der head with the mark on the bearing cap.
(h) Apply a light coat of engine oil on the threads and under the heads of the bearing cap bolts.
(i) Install the oil feed pipe and 10 bolts.
HINT: Use bearing cap bolts 38 mm (1.50 in.) and 52 mm
(2.05 in.) in length. Use black colored 38 mm (1.50 in.) bolts.
Install the two 52 mm (2.05 in.) bolts in outside positions of
the oil feed pipe. Install the eight 38 mm (1.50 in.) bolts in the
other positions.
EG±116
±
1UZ±FE ENGINE ENGINE MECHANICAL
WhereEverybodyKnowsYourName
Page 1494 of 4087
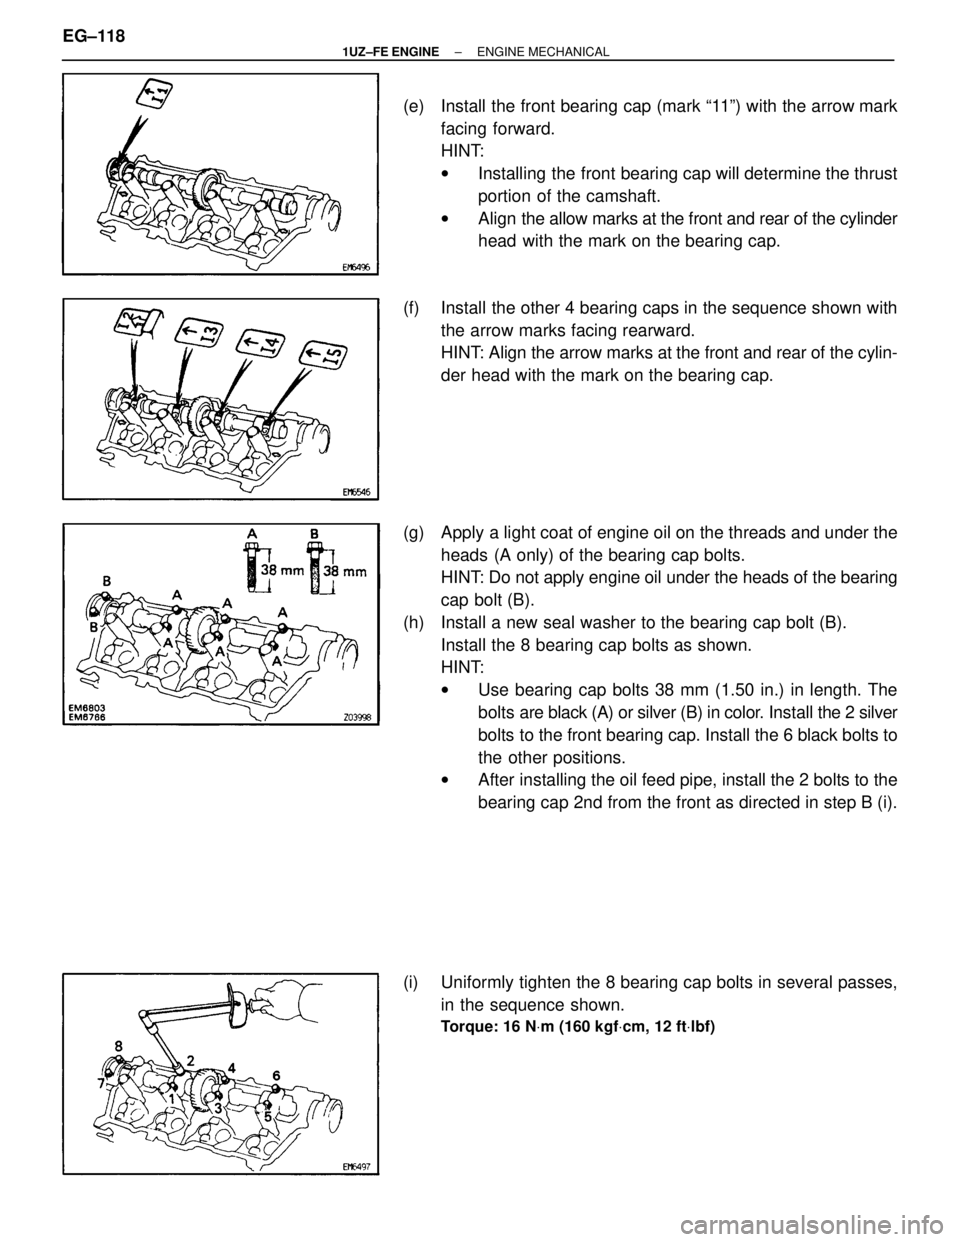
(e) Install the front bearing cap (mark ª11º) with the arrow markfacing forward.
HINT:
wInstalling the front bearing cap will determine the thrust
portion of the camshaft.
w Align the allow marks at the front and rear of the cylinder
head with the mark on the bearing cap.
(f) Install the other 4 bearing caps in the sequence shown with the arrow marks facing rearward.
HINT: Align the arrow marks at the front and rear of the cylin-
der head with the mark on the bearing cap.
(g) Apply a light coat of engine oil on the threads and under the heads (A only) of the bearing cap bolts.
HINT: Do not apply engine oil under the heads of the bearing
cap bolt (B).
(h) Install a new seal washer to the bearing cap bolt (B). Install the 8 bearing cap bolts as shown.
HINT:
wUse bearing cap bolts 38 mm (1.50 in.) in length. The
bolts are black (A) or silver (B) in color. Install the 2 silver
bolts to the front bearing cap. Install the 6 black bolts to
the other positions.
w After installing the oil feed pipe, install the 2 bolts to the
bearing cap 2nd from the front as directed in step B (i).
(i) Uniformly tighten the 8 bearing cap bolts in several passes, in the sequence shown.
Torque: 16 N Vm (160 kgf Vcm, 12 ft Vlbf)
EG±118±
1UZ±FE ENGINE ENGINE MECHANICAL
WhereEverybodyKnowsYourName
Page 1496 of 4087
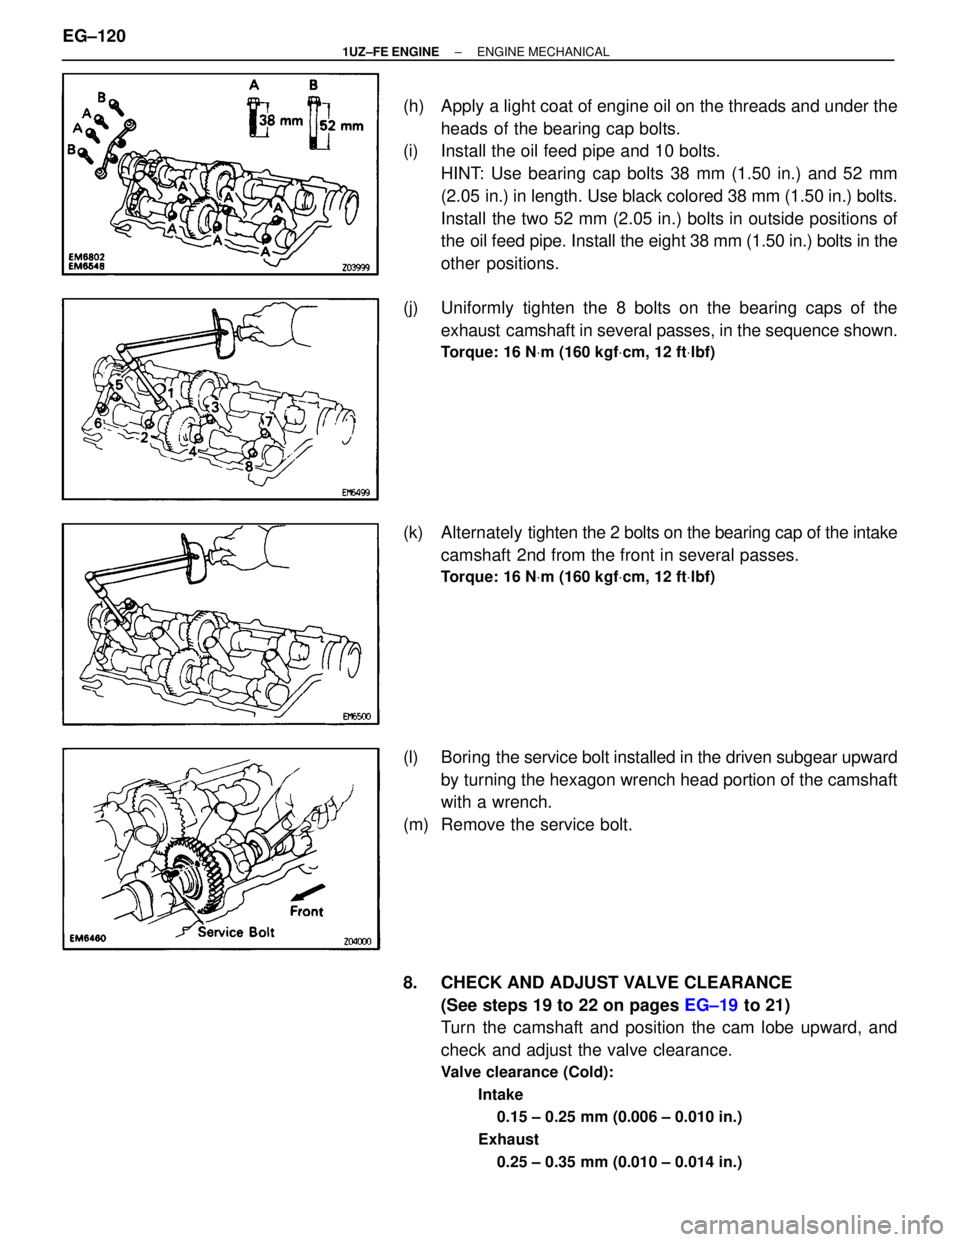
(h) Apply a light coat of engine oil on the threads and under theheads of the bearing cap bolts.
(i) Install the oil feed pipe and 10 bolts.
HINT: Use bearing cap bolts 38 mm (1.50 in.) and 52 mm
(2.05 in.) in length. Use black colored 38 mm (1.50 in.) bolts.
Install the two 52 mm (2.05 in.) bolts in outside positions of
the oil feed pipe. Install the eight 38 mm (1.50 in.) bolts in the
other positions.
(j) Uniformly tighten the 8 bolts on the bearing caps of the exhaust camshaft in several passes, in the sequence shown.
Torque: 16 N Vm (160 kgf Vcm, 12 ft Vlbf)
(k) Alternately ti ghten the 2 bolts on the bearing cap of the intake
camshaft 2nd from the front in several passes.
Torque: 16 N Vm (160 kgf Vcm, 12 ft Vlbf)
(l) Boring the service bolt installed in the driven subgear upward
by turning the hexagon wrench head portion of the camshaft
with a wrench.
(m) Remove the service bolt.
8. CHECK AND ADJUST VALVE CLEARANCE (See steps 19 to 22 on pages EG±19 to 21)
Turn the camshaft and position the cam lobe upward, and
check and adjust the valve clearance.
Valve clearance (Cold):
Intake0.15 ± 0.25 mm (0.006 ± 0.010 in.)
Exhaust 0.25 ± 0.35 mm (0.010 ± 0.014 in.)
EG±120±
1UZ±FE ENGINE ENGINE MECHANICAL
WhereEverybodyKnowsYourName
Page 1497 of 4087
EG22W±02
9. INSTALL CAMSHAFT OIL SEALS
(a) Apply MP grease to a new oil seal lip.
(b) Using SST and a hammer, tap in the 2 oil sealsSST 09223±46011
10. INSTALL SEMI±CIRCULAR PLUGS
(a) Remove any old packing (FIPG) material.
(b) Apply seal packing to the semi±circular plug grooves.
Seal packing: Part No. 08826±00080 or equivalent
(c) Install the 4 semi±circular plugs to the cylinder heads.
±
1UZ±FE ENGINE ENGINE MECHANICALEG±121
WhereEverybodyKnowsYourName
Page 1499 of 4087
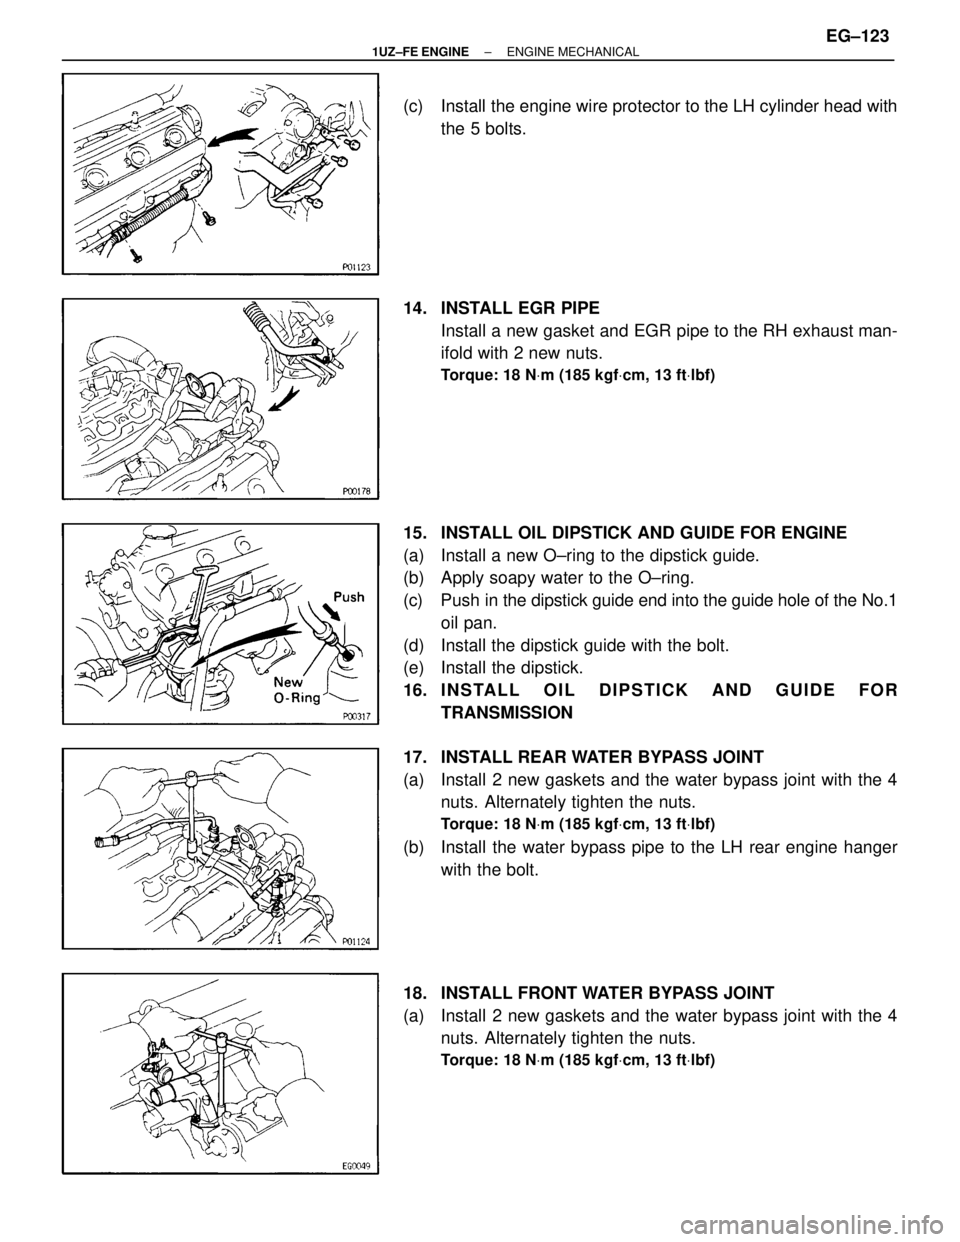
(c) Install the engine wire protector to the LH cylinder head withthe 5 bolts.
14. INSTALL EGR PIPE Install a new gasket and EGR pipe to the RH exhaust man-
ifold with 2 new nuts.
Torque: 18 N Vm (185 kgf Vcm, 13 ft Vlbf)
15. INSTALL OIL DIPSTICK AND GUIDE FOR ENGINE
(a) Install a new O±ring to the dipstick guide.
(b) Apply soapy water to the O±ring.
(c) Push in the dipstick guide end into the guide hole of the No.1
oil pan.
(d) Install the dipstick guide with the bolt.
(e) Install the dipstick.
16. I N S TA L L O I L D I P S T I C K A N D G U I D E F O R TRANSMISSION
17. INSTALL REAR WATER BYPASS JOINT
(a) Install 2 new gaskets and the water bypass joint with the 4 nuts. Alternately tighten the nuts.
Torque: 18 N Vm (185 kgf Vcm, 13 ft Vlbf)
(b) Install the water bypass pipe to the LH rear engine hanger
with the bolt.
18. INSTALL FRONT WATER BYPASS JOINT
(a) Install 2 new gaskets and the water bypass joint with the 4 nuts. Alternately tighten the nuts.
Torque: 18 N Vm (185 kgf Vcm, 13 ft Vlbf)
±
1UZ±FE ENGINE ENGINE MECHANICALEG±123
WhereEverybodyKnowsYourName
Page 1509 of 4087

36. INSTALL TIMING BELT REAR PLATESInstall the rear plate with the 2 bolts. Install the 2 rear plates.
Torque: 7.8 N Vm (80 kgf Vcm, 69 in. Vlbf)
37. INSTALL WATER INLET AND INLET HOUSING
(a) Remove any old packing (FIPG) material and be careful not
to drop any oil on the contact surfaces of the water inlet
housing and water pump.
wUsing a razor blade and gasket scraper, remove all the
old packing (FIPG) material from the gasket surfaces
and sealing groove.
w Thoroughly clean all components to remove all the
loose material.
w Using a non±residue solvent, clean both sealing
surfaces.
(b) Apply seal packing to the sealing groove of water inlet
housing as shown in the illustration.
Seal packing:
Part No. 08826±00100 or equivalent
wInstall a nozzle that has been cut to a 2±3 mm (0.08±0
12 in.) opening.
w Parts must be assembled within 5 minutes of
application. Otherwise the material must be removed
and reapplied.
w Immediately remove nozzle from the tube and reinstall
cap.
(c) Install a new O±ring to the water inlet housing.
(d) Apply soapy water on the O±ring.
(e) Push the water inlet housing end into the water pump hole.
(f) Install the water inlet and housing assembly with the 2 bolts. Alternately tighten the bolts.
Torque: 18 N Vm (185 kgf Vcm, 13 ft Vlbf)
HINT: Use bolts 25 mm (0.98 in.) in length.
±
1UZ±FE ENGINE ENGINE MECHANICALEG±133
WhereEverybodyKnowsYourName
Page 1510 of 4087
(g) Connect the water bypass hose to the IAC valve.
38. INSTALL RH IGNITION COIL
(a) Install the ignition coil with the 2 bolts.
(b) Connect the ignition coil connector.
39. CONNECT CONTROL CABLES TO THROTTLE BODYConnect the following cables:
(1) Accelerator cable
(2) Transmission throttle control cable
(3) Cruise control actuator cable
40. INSTALL THROTTLE BODY COVER
(a) Install the thro ttle body cover and hose clamp with the cap nut
and 2 bolts.
(b) Install the EVAP hose to the hose clamp.
41. INSTALL POWER STEERING (PS) PUMP
(a) Install the PS pump with the nut and 3 bolts. Alternately tighten the bolts and nut.
Torque:
39 NVm (400 kgf Vcm, 29 ft Vlbf) for bolt
43 N Vm (440 kgf Vcm, 32 ft Vlbf) for nut
EG±134±
1UZ±FE ENGINE ENGINE MECHANICAL
WhereEverybodyKnowsYourName