1991 LEXUS SC400 traction control
[x] Cancel search: traction controlPage 1 of 4087

ABBREVIATIONS USED IN THIS
MANUAL
ABS Anti±Lock Brake System J/B Junction Block
A/C Air Conditioner LED Light Emitting Diode
ALR Automatic Locking Retractor LH Left±Hand
APPROX. Approximation LHD Left±Hand Drive
A/T, ATM Automatic Transmission LLC Long Life Coolant (Year Around Coolant)
ATF Automatic Transmission Fluid Max. Maximum
BTDC Before Top Dead Center Min. Minimum
BVSV Bimetal Vacuum Switching Valve MP Multipurpose
CALIF. Vehicles Sold in California N Neutral
CB Circuit Breaker OD, O/D Overdrive
DOHC Double Over Head Cam O/S Oversize
DP Dash Pot P & BV Proportioning and Bypass Valve
ECT Electronic Controlled Transmission PCV Positive Crankcase Ventilation
ECU Electronic Controlled Unit PS Power Steering
EFI Electronic Fuel Injection RH Right±Hand
EGR Exhaust Gas Recirculation RL Rear Left
ELR Emergency Locking Retractor RR Rear Right
EPR Evaporator Pressure Regulator RR, Rr Rear
ESA Electronic Spark Advance SRS Supplemental Restraint System
EVAP Evaporative (Emission Control) SSM Special Service Materials
EX Exhaust (manifold, valve) SST Special Service Tools
Ex. Except STD Standard
FIPG Formed in Place Gasket SW Switch
FL Front Left TDC Top Dead Center
FL Fusible Link TDCL Total Diagnostic Communication Link
FPU Fuel Pressure Up Temp. Temperature
FR Front Right TRAC Traction Control System
FR, Fr Front TWC Three±Way Catalyst
HAC High Altitude Compensation VSV Vacuum Switching Valve
IG Ignition VTV Vacuum Transmitting Valve
IN Intake (manifold, valve) w/ With
INT Intermittent w/o Without
ISC Idle Speed Control
IN±34±
INTRODUCTION Abbreviations Used in This Manual
WhereEverybodyKnowsYourName
Page 9 of 4087

12. Observe the following precautions to avoid damage to theparts:
(a) Do not open the cover or case of the ECU unless
absolutely necessary (If the IC terminals are touched, the
IC may be destroyed by static electricity.).
(b) To pull apart electrical connectors, pull on the connectoritself, not the wires (See page BE±2).
(c) Be careful not to drop electrical components, such as sensors or relays. It they are dropped on a hard floor,
they should be replaced and not reused.
(d) When checking continuity at the wire connector, insert the tester probe carefully to prevent terminals from
bending.
(e) To disconnect vacuum hoses, pull on the end, not the middle of the hose.
(f) When steam cleaning an engine, protect the distributor,
coil and air filter from water.
(g) Ne ve r use an imp a ct wre n ch to re mo ve or in sta ll temperature switches or temperature sensors.
(h) When using a vacuum gauge, never force the hose onto
a connector that is too large. Use a step±down adapter
instead. Once the hose has been stretched, it may leak.
13. Tag hoses before disconnecting them: (a) When disconnecting vacuum hoses, use tags to identify
how they should be reconnected.
(b) After completing a job, double check that the vacuum hoses are properly connected. A label under the hood
shows the proper layout.
14. Installation of wheels The wheel assemblies are of the uni±directional type and
must be rotated only between the front and rear as illustrated.
Wheels are marked with turning direction indicators.
When installing the wheels, check the marks carefully and
install the wheel correctly.
15. Bleeding of traction control system When repairing the brake master cylinder or TRAC system,
bleed the air out of the TRAC system (See page BR±7).
CAUTION: Since the fluid is under high pressure, it could
spray out with great force, so be careful.
IN±6
±
INTRODUCTION General Repair Instructions
WhereEverybodyKnowsYourName
Page 10 of 4087

TOTAL DIAGNOSTIC
COMMUNICATION LINK (TDCL)
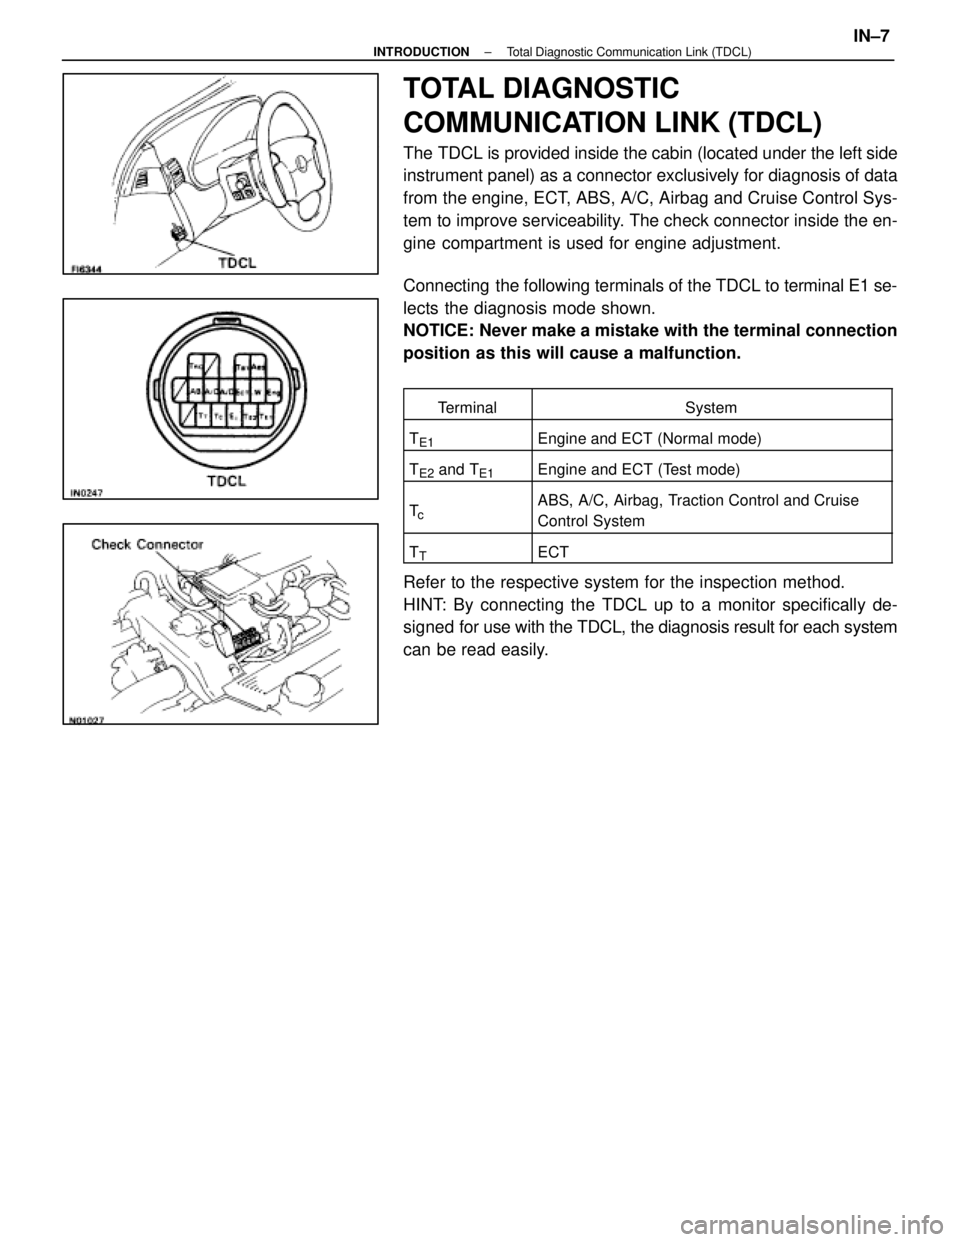
The TDCL is provided inside the cabin (located under the left side
instrument panel) as a connector exclusively for diagnosis of data
from the engine, ECT, ABS, A/C, Airbag and Cruise Control Sys-
tem to improve serviceability. The check connector inside the en-
gine compartment is used for engine adjustment.
Connecting the following terminals of the TDCL to terminal E1 se-
lects the diagnosis mode shown.
NOTICE: Never make a mistake with the terminal connection
position as this will cause a malfunction.
TerminalSystem
TE1Engine and ECT (Normal mode)
TE2 and TE1Engine and ECT (Test mode)
TcABS, A/C, Airbag, Traction Control and Cruise
Control System
TTECT
Refer to the respective system for the inspection method.
HINT: By connecting the TDCL up to a monitor specifically de-
signed for use with the TDCL, the diagnosis result for each system
can be read easily.
±
INTRODUCTION Total Diagnostic Communication Link (TDCL)IN±7
WhereEverybodyKnowsYourName
Page 16 of 4087

PRECAUTIONS FOR VEHICLES
EQUIPPED WITH TRACTION
CONTROL (TRAC) SYSTEM
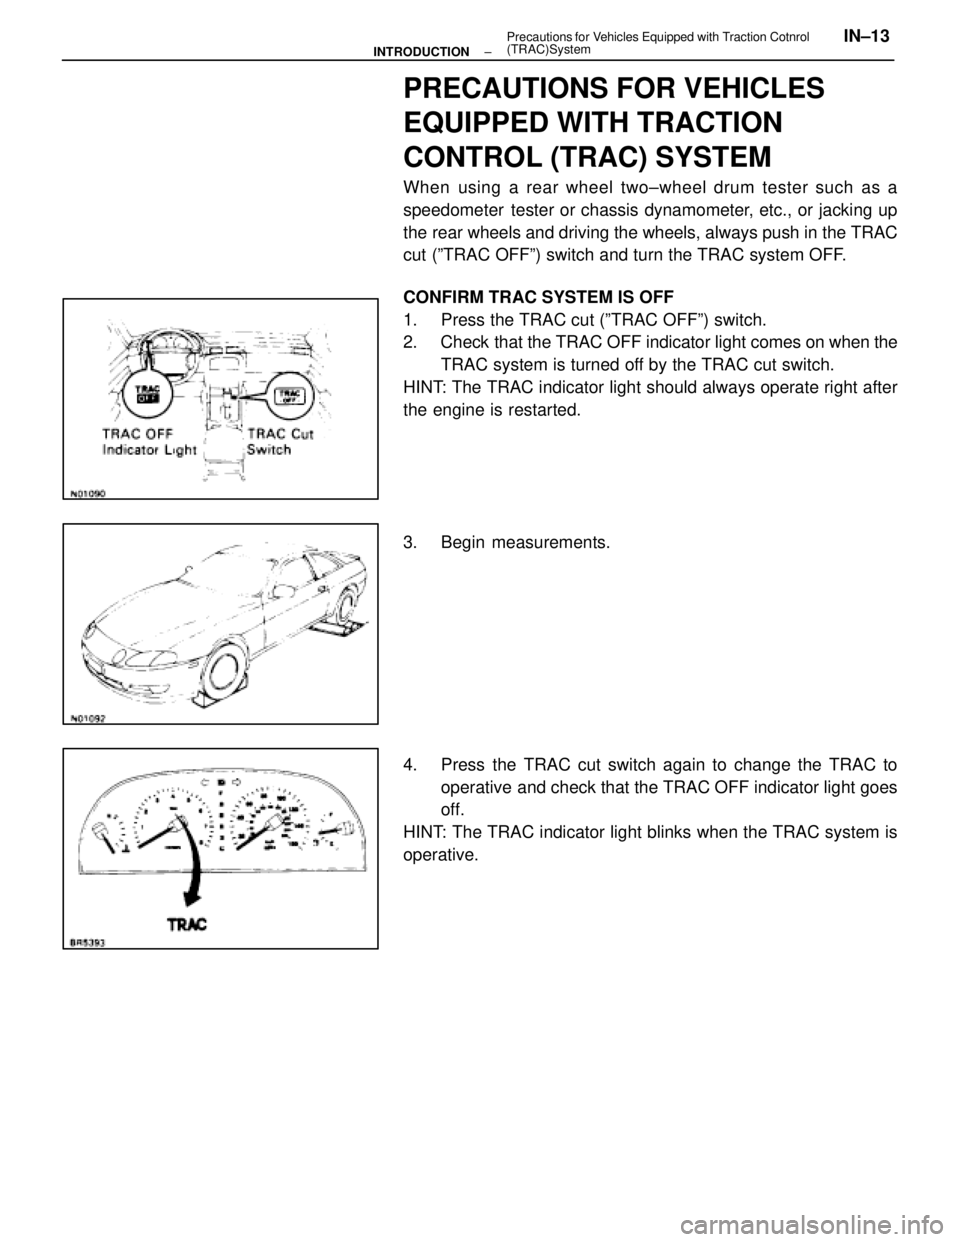
When using a rear wheel two±wheel drum tester such as a
speedometer tester or chassis dynamometer, etc., or jacking up
the rear wheels and driving the wheels, always push in the TRAC
cut (ºTRAC OFFº) switch and turn the TRAC system OFF.
CONFIRM TRAC SYSTEM IS OFF
1. Press the TRAC cut (ºTRAC OFFº) switch.
2. Check that the TRAC OFF indicator light comes on when the
TRAC system is turned off by the TRAC cut switch.
HINT: The TRAC indicator light should always operate right after
the engine is restarted.
3. Begin measurements.
4. Press the TRAC cut switch again to change the TRAC to operative and check that the TRAC OFF indicator light goes
off.
HINT: The TRAC indicator light blinks when the TRAC system is
operative.
±
INTRODUCTION Precautions for V
ehicles Equipped with Traction Cotnrol
(TRAC)SystemIN±13
WhereEverybodyKnowsYourName
Page 18 of 4087

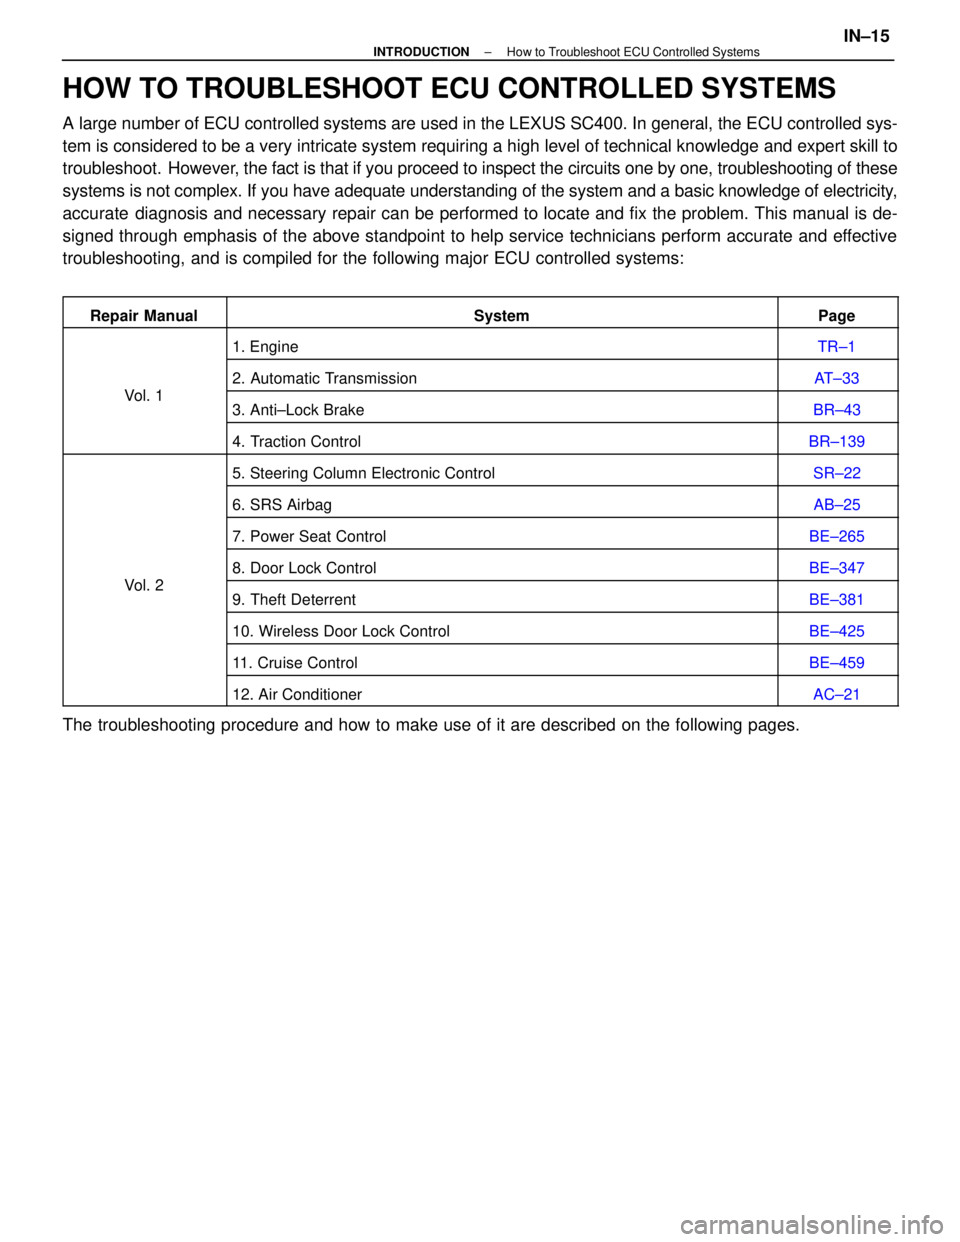
HOW TO TROUBLESHOOT ECU CONTROLLED SYSTEMS
A large number of ECU controlled systems are used in the LEXUS SC400. In \
general, the ECU controlled sys-
tem is considered to be a very intricate system requiring a high level o\
f technical knowledge and expert skill to
troubleshoot. However, the fact is that if you proceed to inspect the circuits one by one, trou\
bleshooting of these
systems is not complex. If you have adequate understanding of the system\
and a basic knowledge of electricity,
accurate diagnosis and necessary repair can be performed to locate and fix the p\
roblem. This manual is de-
signed through emphasis of the above standpoint to help service technici\
ans perform accurate and effective
troubleshooting, and is compiled for the following major ECU controlled \
systems:
Repair ManualSystemPage
1. EngineTR±1
Vl1
2. Automatic TransmissionAT±33
Vol. 13. Anti±Lock BrakeBR±43
4. Traction ControlBR±139
5. Steering Column Electronic ControlSR±22
6. SRS AirbagAB±25
7. Power Seat ControlBE±265
Vl2
8. Door Lock ControlBE±347
Vol. 29. Theft DeterrentBE±381
10. Wireless Door Lock ControlBE±425
11. Cruise ControlBE±459
12. Air ConditionerAC±21
The troubleshooting procedure and how to make use of it are described on\
the following pages.
±
INTRODUCTION How to Troubleshoot ECU Controlled SystemsIN±15
WhereEverybodyKnowsYourName
Page 21 of 4087
![LEXUS SC400 1991 Service Repair Manual
[2] SYMPTOM CONFIRMATION AND DIAGNOSTIC CODE CHECK
The diagnostic system in the LEXUS SC400 fulfills various functions. The fi\
rst function is the Diagnostic Code
Check in which a malfunction in the LEXUS SC400 1991 Service Repair Manual
[2] SYMPTOM CONFIRMATION AND DIAGNOSTIC CODE CHECK
The diagnostic system in the LEXUS SC400 fulfills various functions. The fi\
rst function is the Diagnostic Code
Check in which a malfunction in the](/manual-img/36/57051/w960_57051-20.png)
[2] SYMPTOM CONFIRMATION AND DIAGNOSTIC CODE CHECK
The diagnostic system in the LEXUS SC400 fulfills various functions. The fi\
rst function is the Diagnostic Code
Check in which a malfunction in the signal circuits to the ECU is stored\
in code in the ECU memory at the time
of occurrence, to be output by the technician during troubleshooting. Anot\
her function is the Input Signal Check
which checks if the signals from various switches are sent to the ECU correct\
ly.
The air conditioner system has an Actuator Check function whereby the ECU a\
utomatically operates the actua-
tors of the damper and blowermotor, etc. to check the operation. The cruise control system has a Cancel Si\
gnal
Check function which memorizes and displays what sort of signal it was that l\
ast cancelled the cruise control.
By using these check functions, the problem areas can be narrowed down qui\
ckly and troubleshooting can be
performed effectively. Diagnostic functions are incorporated in the following systems in the \
LEXUS SC400.
SystemDiagnostic CodeCheckInput Signal Check(Sensor Check)Other Diagnosis Function
Engine (with Test Mode)
Automatic Transmission (with Test Mode)
Anti±Lock Brake
Traction Control (Option)
SRS Airbag
Power Seat (only vehicles with memory function)
Wireless Door Lock Control
Cruise Control Cancel Signal
Check
Air Conditioner Actuator Check
In diagnostic code check, it is very important to determine whether the pr\
oblem indicated by the diagnostic code
is still occurring or occurred in the past but returned to normal at pre\
sent. In addition, it must be checked in the
problem sym ptom check whether the malfunction indicated by the diagnostic code is d\
irectly related to the prob-
lem symptom or not. For this reason, the diagnostic codes should be chec\
ked before and after the symptom
confirmation to determine the current conditions, as shown in the table below. If this is not done, it may, depend-
ing on the case, result in unnecessary troubleshooting for normally oper\
ating systems, thus making it more diffi-
cult to locate the problem, or in repairs not pertinent to the problem. Ther\
efore, always follow the procedure in
correct order and perform the diagnostic code check.
DIAGNOSTIC CODE CHECK PROCEDURE
IN±18±
INTRODUCTION How to Troubleshoot ECU Controlled Systems
WhereEverybodyKnowsYourName
Page 910 of 4087

TRAC PUMP AND ACCUMULATOR
TRAC PUMP AND ACCUMULATOR
REMOVAL AND INSTALLATION
BR0F9±03
Remove and install the part, as shown.
MAIN POINTS OF REMOVAL AND
INSTALLATION
1. DRAIN OUT HIGH PRESSURE FLUID
(a) Connect a vinyl tube to the TRAC actuator bleeder plug, then
loosen the bleeder plug.
(b) When the fluid has flowed out, tighten the bleeder plug.
CAUTION: Since the fluid is under high pressure, it could
spray out with great force, so be careful.
2. DISCONNECT AND CONNECT BRAKE LINE Using SST, disconnect and connect the brake line from/to the
accumulator.
SST 09751±36011
Torque: 15 N Vm (155 kgf Vcm, 11 ft Vlbf)
3. BLEED BRAKE SYSTEM AND TRAC SYSTEM
(See page BR±8)
BR±162
±
BRAKE SYSTEM TRACTION CONTROL SYSTEM (TRAC)
WhereEverybodyKnowsYourName
Page 911 of 4087

TRAC PUMP AND ACCUMULATOR
DISASSEMBLY AND ASSEMBLY
BR0FA±03
Disassemble and assemble the parts, as shown.
MAIN POINT
DISPOSAL METHOD OF TRAC ACCUMULATOR
(a) Loosen the gas plug about 2 turns to a position where the gas
can leak out.
(b) After confirming that all the gas has been drained out remove
the gas plug and dispose of the accumulator.
HINT: If the gas does not leak out even after the gas plug has
been loosened 2 turns, repeat the operation, turning the gas
plug a half turn to the left or right.
±
BRAKE SYSTEM TRACTION CONTROL SYSTEM (TRAC)BR±163
WhereEverybodyKnowsYourName