Page 2530 of 4087

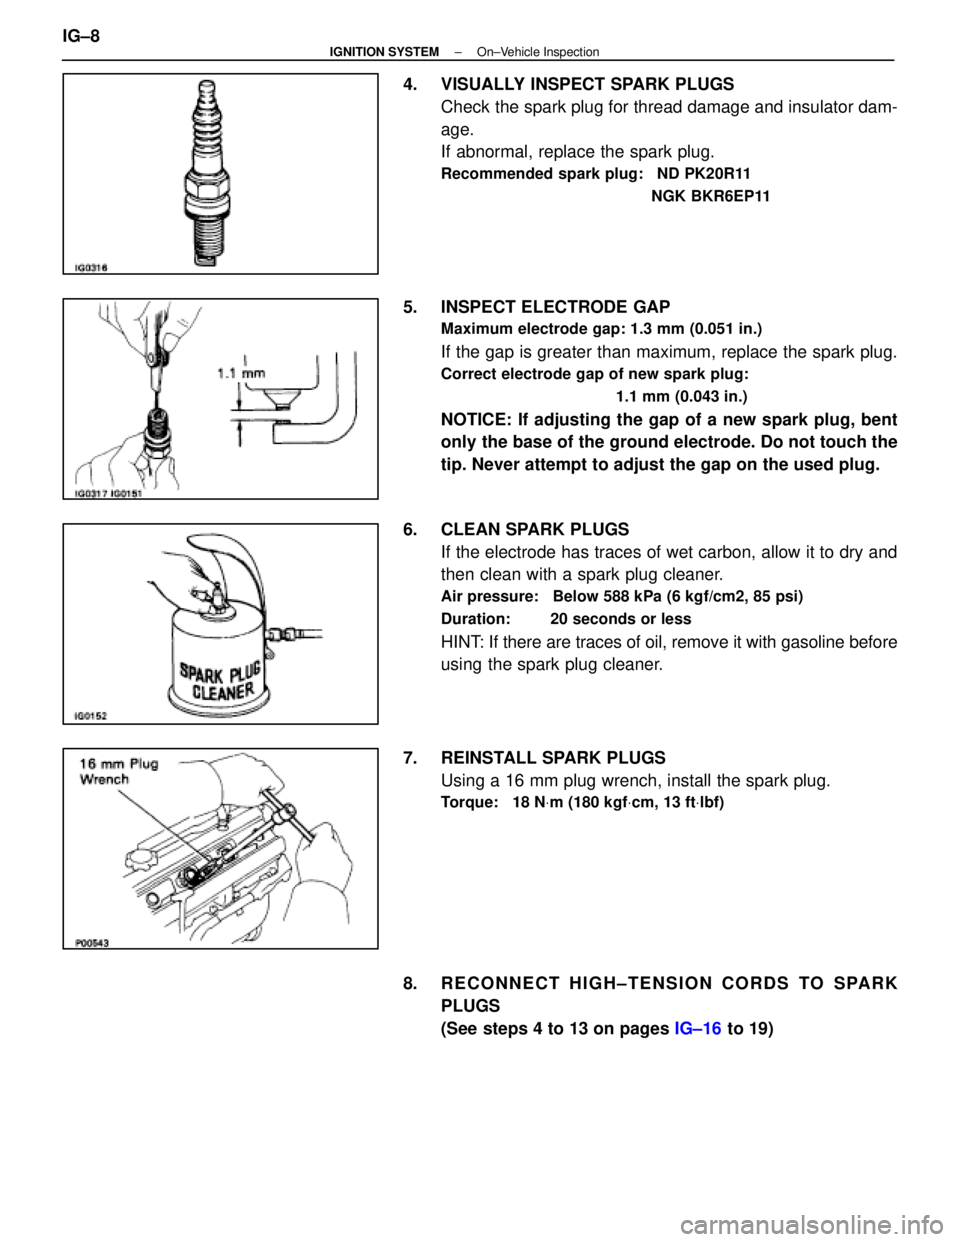
4. VISUALLY INSPECT SPARK PLUGSCheck the spark plug for thread damage and insulator dam-
age.
If abnormal, replace the spark plug.
Recommended spark plug: ND PK20R11
NGK BKR6EP11
5. INSPECT ELECTRODE GAP
Maximum electrode gap: 1.3 mm (0.051 in.)
If the gap is greater than maximum, replace the spark plug.
Correct electrode gap of new spark plug:1.1 mm (0.043 in.)
NOTICE: If adjusting the gap of a new spark plug, bent
only the base of the ground electrode. Do not touch the
tip. Never attempt to adjust the gap on the used plug.
6. CLEAN SPARK PLUGS If the electrode has traces of wet carbon, allow it to dry and
then clean with a spark plug cleaner.
Air pressure: Below 588 kPa (6 kgf/cm2, 85 psi)
Duration: 20 seconds or less
HINT: If there are traces of oil, remove it with gasoline before
using the spark plug cleaner.
7. REINSTALL SPARK PLUGS Using a 16 mm plug wrench, install the spark plug.
Torque: 18 N Vm (180 kgf Vcm, 13 ft Vlbf)
8. RECONNECT HIGH±TENSION CORDS TO SPARK
PLUGS
(See steps 4 to 13 on pages IG±16 to 19)
IG±8
±
IGNITION SYSTEM On±Vehicle Inspection
WhereEverybodyKnowsYourName
Page 2531 of 4087
INSPECTION OF IGNITION COIL
1. (RH IGNITION COIL)REMOVE IGNITION COIL (See page IG±21)
2. (LH IGNITION COIL)
DISCONNECT IGNITION COIL CONNECTOR AND HIGH±
TENSION CORD FROM IGNITION COIL
3. INSPECT PRIMARY COIL RESISTANCE Using an ohmmeter, measure the resistance between posi-
tive (+) and negative (±) terminals.
Primary coil resistance (Cold): 0.40±0.50 �
If the resistance is not as specified, replace the ignition coil.
4. INSPECT SECONDARY COIL RESISTANCE Using an ohmmeter, measure the resistance between posi-
tive (+) and high±tension terminals.
Secondary coil resistance (Cold): 10.0±14.0 k �
If the resistance is not as specified, replace the ignition coil.
5. (RH IGNITION COIL) REINSTALL IGNITION COIL (See page IG±22)
6. (LH IGNITION COIL) RECONNECT IGNITION COIL CONNECTOR AND HIGH±
TENSION CORD FROM IGNITION COIL
±
IGNITION SYSTEM On±Vehicle InspectionIG±9
WhereEverybodyKnowsYourName
Page 2532 of 4087

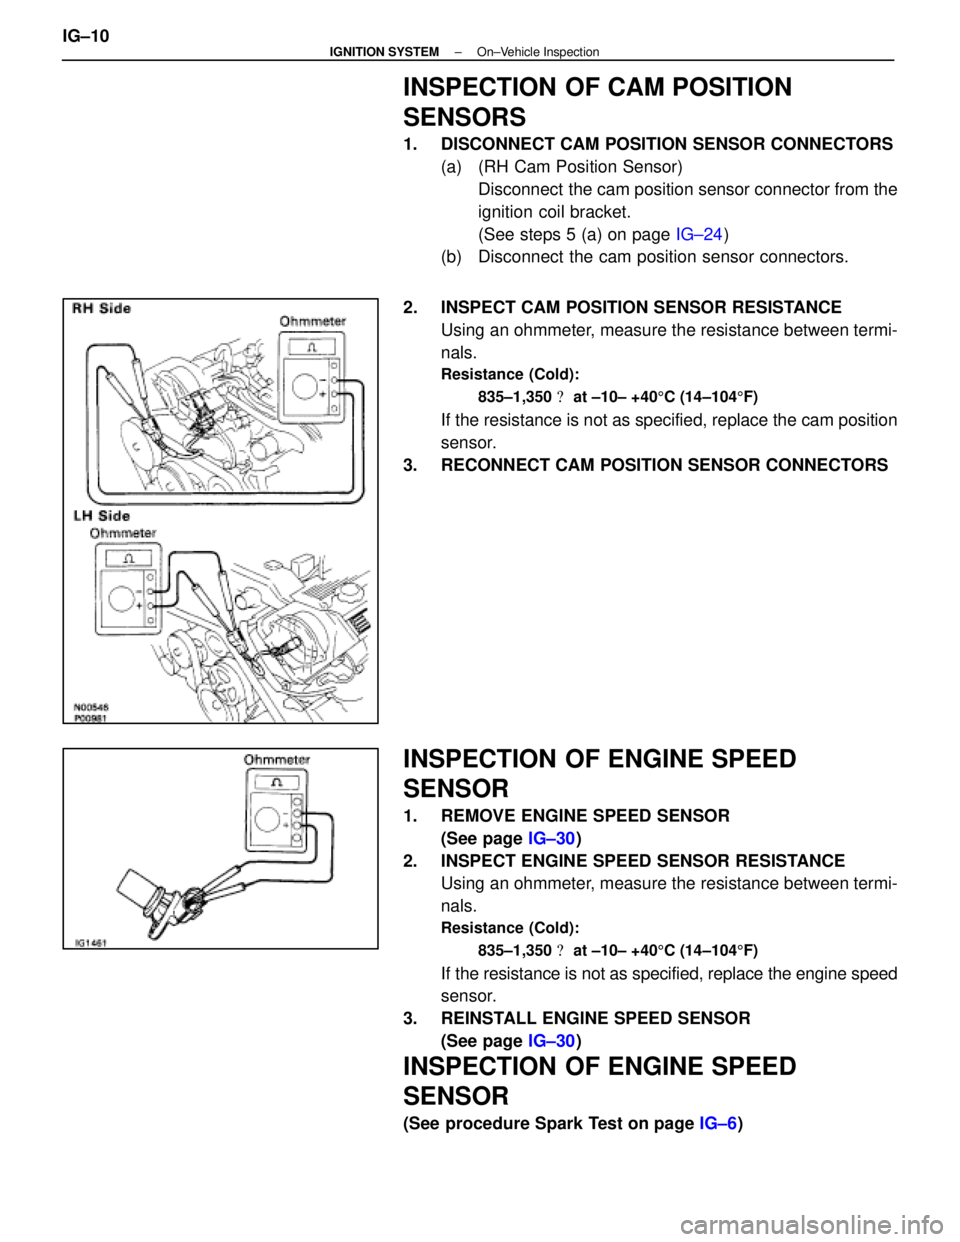
INSPECTION OF CAM POSITION
SENSORS
1. DISCONNECT CAM POSITION SENSOR CONNECTORS(a) (RH Cam Position Sensor)Disconnect the cam position sensor connector from the
ignition coil bracket.
(See steps 5 (a) on page IG±24)
(b) Disconnect the cam position sensor connectors.
2. INSPECT CAM POSITION SENSOR RESISTANCE Using an ohmmeter, measure the resistance between termi-
nals.
Resistance (Cold):
835±1,350 � at ±10± +40 5C (14±104 5F)
If the resistance is not as specified, replace the cam position
sensor.
3. RECONNECT CAM POSITION SENSOR CONNECTORS
INSPECTION OF ENGINE SPEED
SENSOR
1. REMOVE ENGINE SPEED SENSOR (See page IG±30)
2. INSPECT ENGINE SPEED SENSOR RESISTANCE Using an ohmmeter, measure the resistance between termi-
nals.
Resistance (Cold):
835±1,350 � at ±10± +40 5C (14±104 5F)
If the resistance is not as specified, replace the engine speed
sensor.
3. REINSTALL ENGINE SPEED SENSOR (See page IG±30)
INSPECTION OF ENGINE SPEED
SENSOR
(See procedure Spark Test on page IG±6)
IG±10
±
IGNITION SYSTEM On±Vehicle Inspection
WhereEverybodyKnowsYourName
Page 2536 of 4087

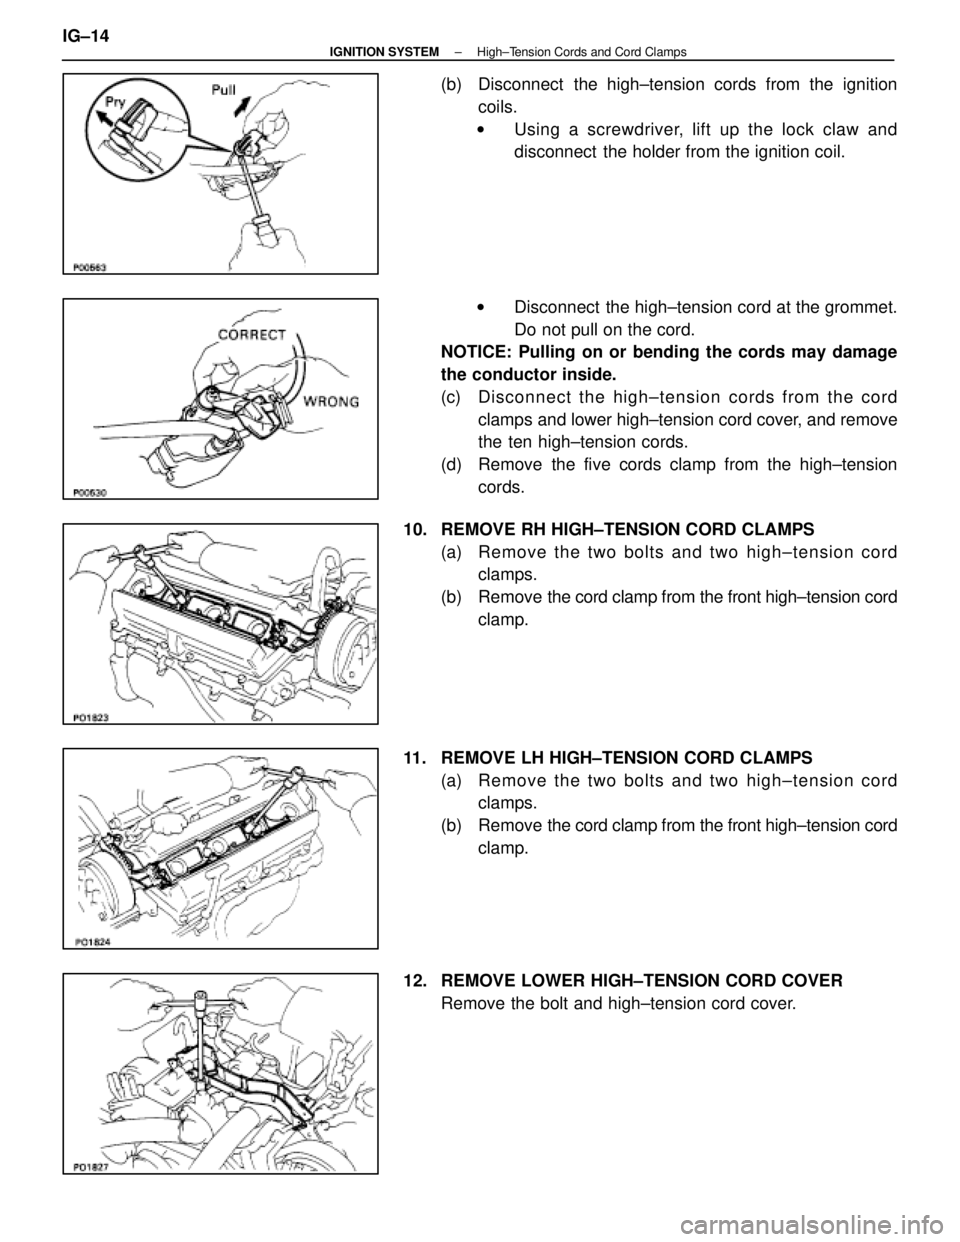
(b) Disconnect the high±tension cords from the ignitioncoils.
w Using a screwdriver, lift up the lock claw and
disconnect the holder from the ignition coil.
w Disconnect the high±tension cord at the grommet.
Do not pull on the cord.
NOTICE: Pulling on or bending the cords may damage
the conductor inside.
(c) Disc onnect the high±tension cords from the cord
clamps and lower high±tension cord cover, and remove
the ten high±tension cords.
(d) Remove the five cords clamp from the high±tension cords.
10. REMOVE RH HIGH±TENSION CORD CLAMPS (a) Re mo ve th e two bo lts an d two hi gh±tension cord
clamps.
(b) Remove the cord clamp from the front high±tension cord clamp.
11. REMOVE LH HIGH±TENSION CORD CLAMPS (a) Re mo ve th e two bo lts an d two hi gh±tension cord
clamps.
(b) Remove the cord clamp from the front high±tension cord clamp.
12. REMOVE LOWER HIGH±TENSION CORD COVER Remove the bolt and high±tension cord cover.
IG±14
±
IGNITION SYSTEM High±Tension Cords and Cord Clamps
WhereEverybodyKnowsYourName
Page 2538 of 4087
4. INSTALL HIGH±TENSION CORDS(a) Connect the high±tension cords to the spark plugs anddistributor caps.
(b) Secure the high±tension cords with the cord clamps as
shown in the illustration.
(b) Connect the high±tension cords to the ignition coils.w Insert the grommet portion into the terminal hole of
the ignition coil.
IG±16
±
IGNITION SYSTEM High±Tension Cords and Cord Clamps
WhereEverybodyKnowsYourName
Page 2539 of 4087
wAlign the spline of the ignition coil with the spline of
the holder, and slide on the holder.
NOTICE: Check that holder is correctly installed to the
grommet and ignition coil as shown in the illustration. w Check that the lock claw of the holder is engaged
by lightly pulling the holder.
5. INSTALL RH NO.3 TIMING BELT COVER (a) Install the three gaskets to the timing belt cover.
(b) Fit portion A of the timing belt cover, matching it with the
lower high±tension cord cover.
(c) Install the timing belt cover with the three bolts.
±
IGNITION SYSTEM High±Tension Cords and Cord ClampsIG±17
WhereEverybodyKnowsYourName
Page 2542 of 4087
IGNITION COILS
COMPONENTS FOR REMOVAL AND
INSTALLATION
IG±20±
IGNITION SYSTEM Ignition Coils
WhereEverybodyKnowsYourName
Page 2543 of 4087

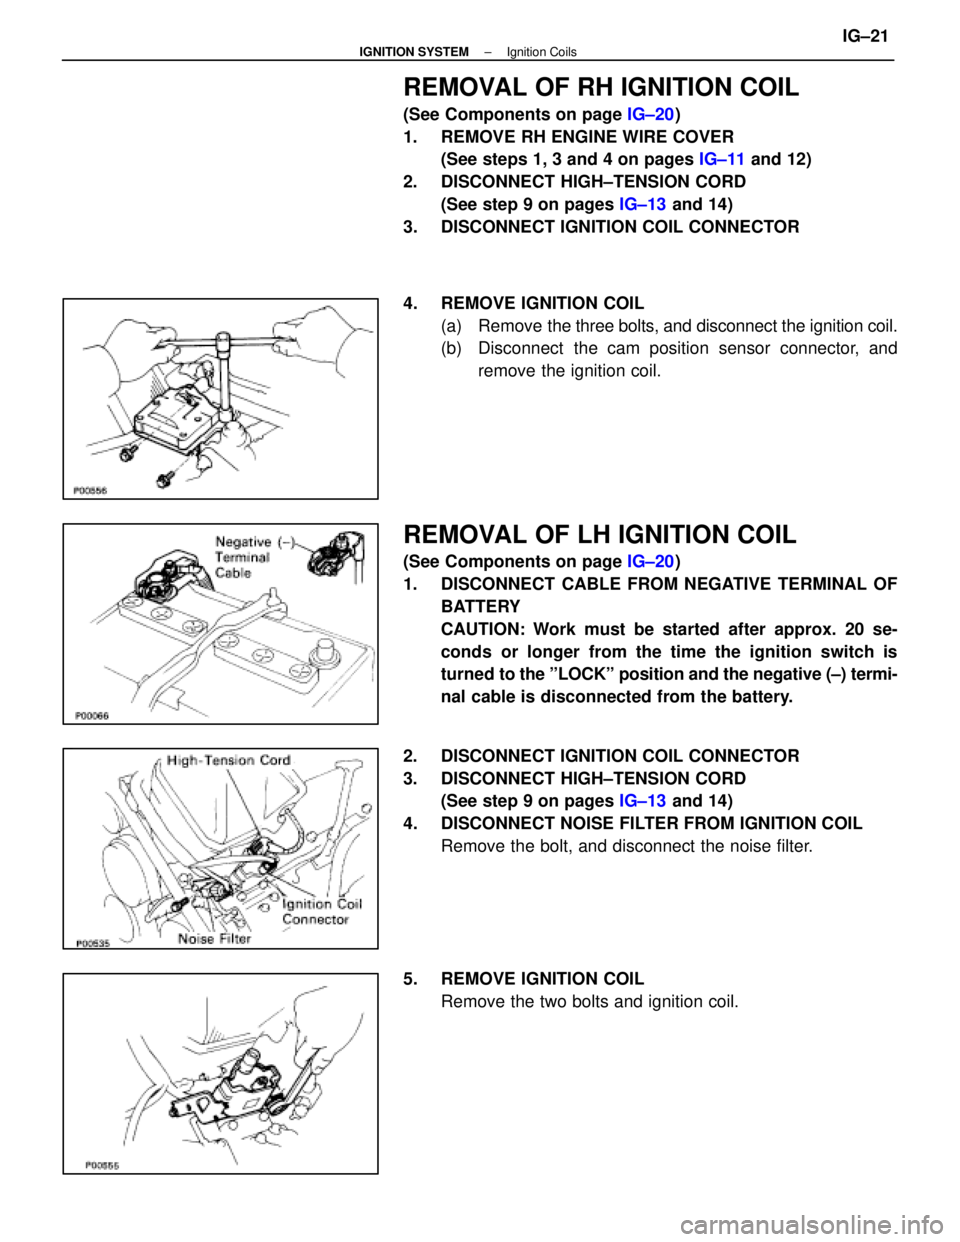
REMOVAL OF RH IGNITION COIL
(See Components on page IG±20)
1. REMOVE RH ENGINE WIRE COVER (See steps 1, 3 and 4 on pages IG±11 and 12)
2. DISCONNECT HIGH±TENSION CORD (See step 9 on pages IG±13 and 14)
3. DISCONNECT IGNITION COIL CONNECTOR
4. REMOVE IGNITION COIL (a) Remove the three bolts, and disconnect the ignition coil.
(b) Disconnect the cam position sensor connector, and
remove the ignition coil.
REMOVAL OF LH IGNITION COIL
(See Components on page IG±20)
1. DISCONNECT CABLE FROM NEGATIVE TERMINAL OF BATTERY
CAUTION: Work must be started after approx. 20 se-
conds or longer from the time the ignition switch is
turned to the ºLOCKº position and the negative (±) termi-
nal cable is disconnected from the battery.
2. DISCONNECT IGNITION COIL CONNECTOR
3. DISCONNECT HIGH±TENSION CORD (See step 9 on pages IG±13 and 14)
4. DISCONNECT NOISE FILTER FROM IGNITION COIL Remove the bolt, and disconnect the noise filter.
5. REMOVE IGNITION COIL Remove the two bolts and ignition coil.
±
IGNITION SYSTEM Ignition CoilsIG±21
WhereEverybodyKnowsYourName