Page 2147 of 4087

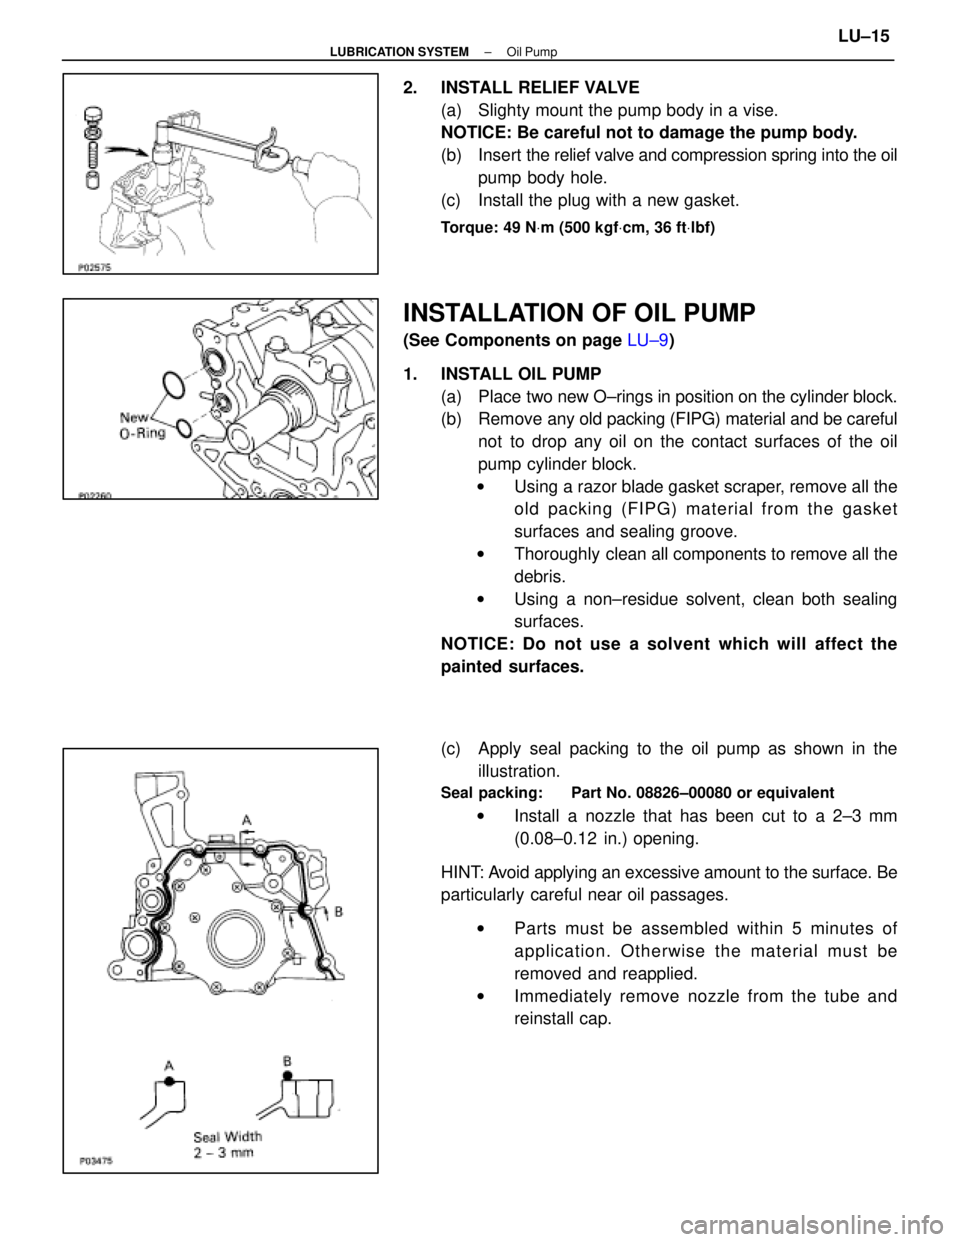
2. INSTALL RELIEF VALVE(a) Slighty mount the pump body in a vise.
NOTICE: Be careful not to damage the pump body.
(b) Insert the relief valve and compression spring into the oil
pump body hole.
(c) Install the plug with a new gasket.
Torque: 49 N Vm (500 kgf Vcm, 36 ft Vlbf)
INSTALLATION OF OIL PUMP
(See Components on page LU±9)
1. INSTALL OIL PUMP (a) Place two new O±rings in position on the cylinder block.
(b) Remove any old packing (FIPG) material and be careful
not to drop any oil on the contact surfaces of the oil
pump cylinder block.
w Using a razor blade gasket scraper, remove all the
old packing (FIPG) material from the gasket
surfaces and sealing groove.
w Thoroughly clean all components to remove all the
debris.
w Using a non±residue solvent, clean both sealing
surfaces.
NOTICE: Do not use a solvent which will affect the
painted surfaces.
(c) Apply seal packing to the oil pump as shown in the illustration.
Seal packing: Part No. 08826±00080 or equivalent
w Install a nozzle that has been cut to a 2±3 mm
(0.08±0.12 in.) opening.
HINT: Avoid applying an excessive amount to the surface. Be
particularly careful near oil passages. w Parts must be assembled within 5 minutes of
application. Otherwise the material must be
removed and reapplied.
w Immediately remove nozzle from the tube and
reinstall cap.
±
LUBRICATION SYSTEM Oil PumpLU±15
WhereEverybodyKnowsYourName
Page 2148 of 4087

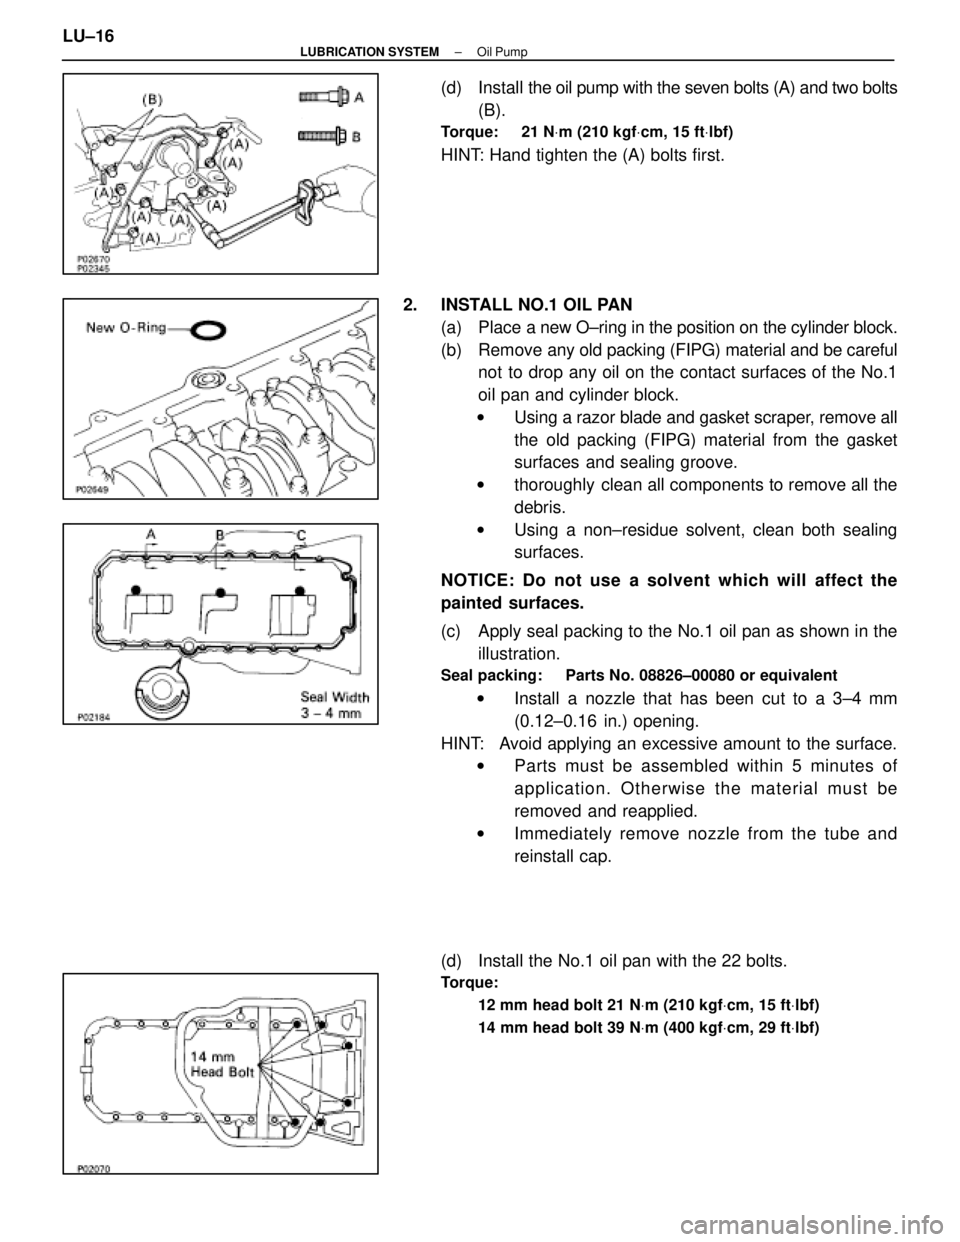
(d) Install the oil pump with the seven bolts (A) and two bolts
(B).
Torque: 21 N Vm (210 kgf Vcm, 15 ft Vlbf)
HINT: Hand tighten the (A) bolts first.
2. INSTALL NO.1 OIL PAN (a) Place a new O±ring in the position on the cylinder block.
(b) Remove any old packing (FIPG) material and be careful not to drop any oil on the contact surfaces of the No.1
oil pan and cylinder block.
w Using a razor blade and gasket scraper, remove all
the old packing (FIPG) material from the gasket
surfaces and sealing groove.
w thoroughly clean all components to remove all the
debris.
w Using a non±residue solvent, clean both sealing
surfaces.
NOTICE: Do not use a solvent which will affect the
painted surfaces.
(c) Apply seal packing to the No.1 oil pan as shown in the illustration.
Seal packing: Parts No. 08826±00080 or equivalent
w Install a nozzle that has been cut to a 3±4 mm
(0.12±0.16 in.) opening.
HINT: Avoid applying an excessive amount to the surface. w Parts must be assembled within 5 minutes of
application. Otherwise the material must be
removed and reapplied.
w Immediately remove nozzle from the tube and
reinstall cap.
(d) Install the No.1 oil pan with the 22 bolts.
Torque: 12 mm head bolt 21 N Vm (210 kgf Vcm, 15 ft Vlbf)
14 mm head bolt 39 N Vm (400 kgf Vcm, 29 ft Vlbf)
LU±16±
LUBRICATION SYSTEM Oil Pump
WhereEverybodyKnowsYourName
Page 2149 of 4087

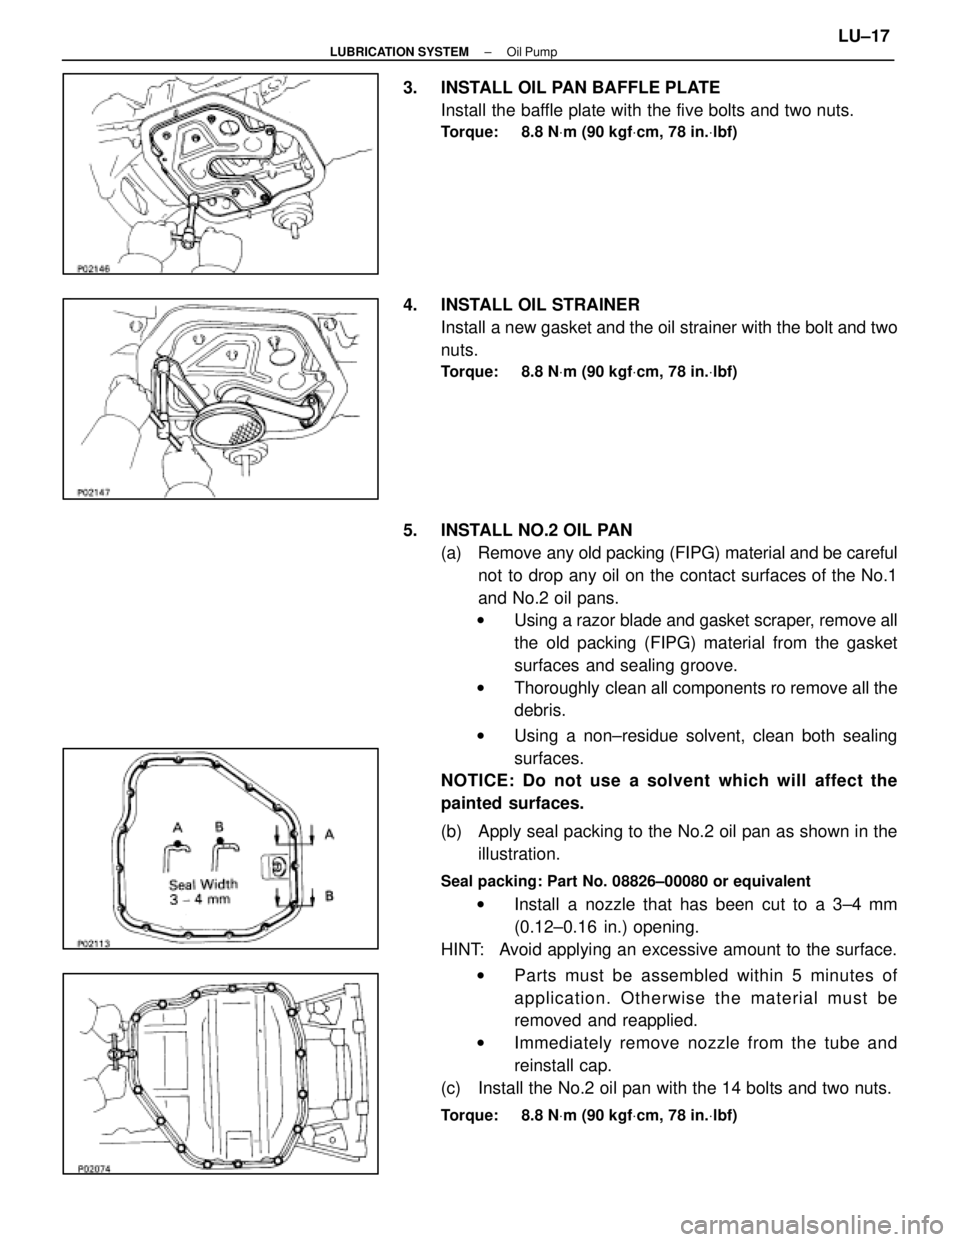
3. INSTALL OIL PAN BAFFLE PLATEInstall the baffle plate with the five bolts and two nuts.
Torque: 8.8 N Vm (90 kgf Vcm, 78 in. Vlbf)
4. INSTALL OIL STRAINER
Install a new gasket and the oil strainer with the bolt and two
nuts.
Torque: 8.8 N Vm (90 kgf Vcm, 78 in. Vlbf)
5. INSTALL NO.2 OIL PAN
(a) Remove any old packing (FIPG) material and be carefulnot to drop any oil on the contact surfaces of the No.1
and No.2 oil pans.
w Using a razor blade and gasket scraper, remove all
the old packing (FIPG) material from the gasket
surfaces and sealing groove.
w Thoroughly clean all components ro remove all the
debris.
w Using a non±residue solvent, clean both sealing
surfaces.
NOTICE: Do not use a solvent which will affect the
painted surfaces.
(b) Apply seal packing to the No.2 oil pan as shown in the
illustration.
Seal packing: Part No. 08826±00080 or equivalent
w Install a nozzle that has been cut to a 3±4 mm
(0.12±0.16 in.) opening.
HINT: Avoid applying an excessive amount to the surface.
w Parts must be assembled within 5 minutes of
application. Otherwise the material must be
removed and reapplied.
w Immediately remove nozzle from the tube and
reinstall cap.
(c) Install the No.2 oil pan with the 14 bolts and two nuts.
Torque: 8.8 N Vm (90 kgf Vcm, 78 in. Vlbf)
±
LUBRICATION SYSTEM Oil PumpLU±17
WhereEverybodyKnowsYourName
Page 2150 of 4087
6. INSTALL OIL LEVEL SENSOR(a) Install a new gasket to the level sensor.
(b) Install the level sensor with the four bolts.
Torque: 5.4 N Vm (55 kgf Vcm, 48 in. Vlbf)
(c) Connect the level sensor connector.
7. INSTALL OIL DIPSTICK GUIDE AND DIPSTICK (a) Install a new O±ring on the dipstick guide.
(b) Apply soapy water on the O±ring.
(c) Push in the dipstick guide into the guide hole of the No.1
oil pan.
(d) Install the guide with the mounting bolt.
8. INSTALL CRANKSHAFT TIMING PULLEY AND IDLER PULLEY
(See steps 1 and 2 on page EM±29)
9. INSTALL TIMING BELT (See steps 3 to 14 on pages EM±29 to 33)
10. REMOVE ENGINE STAND FROM ENGINE
11. ASSEMBLE ENGINE AND TRANSMISSION (See page EM±103)
12. INSTALL ENGINE WITH TRANSMISSION (See pages EM±104 to 112)
LU±18
±
LUBRICATION SYSTEM Oil Pump
WhereEverybodyKnowsYourName
Page 2154 of 4087
V04535
(4) Also applicable to drum lining for parking brake. For other usage condit\
ions, refer to SCHEDULE B.
(5) Check for leakage.
(6) Check for oil leaks from steering gear housing.
(7) Applicable only when operating mainly on rough, muddy roads. The applicable parts \
are listed below. Forother usage conditions, refer to SCHEDULE B.
�Front and rear suspension member to cross body.
� Bolts for seat installation.
±
MAINTENANCE (1UZ ± FE)MA±3
WhereEverybodyKnowsYourName
Page 2155 of 4087
MA033±0C
SCHEDULE B
CONDITIONS:
Conditions others than those listed for SCHEDULE A.Maintenance operation: A = Check and adjust if necessary. R = Replace, change or lubricate.
I = Inspect and correct or replace if necessary.
V04409
� mark indicates maintenance which is part of the warranty conditions for\
the Emission Control Systems.
The warranty period is in accordance with the owner's guide or the warranty booklet.
( � : California and New York specification vehicles only)
(1) Includes inspection of fuel tank band and vaper vent system.
(2) Also applicable to drum lining for parking brake.
(3) Check for leakage.
(4) Check for oil leaks from steering gear housing.
(5) The applicable parts are listed below. �Front and rear suspension member to cross body.
� Bolts for seat installation.
MA±4
±
MAINTENANCE (1UZ ± FE)
WhereEverybodyKnowsYourName
Page 2156 of 4087

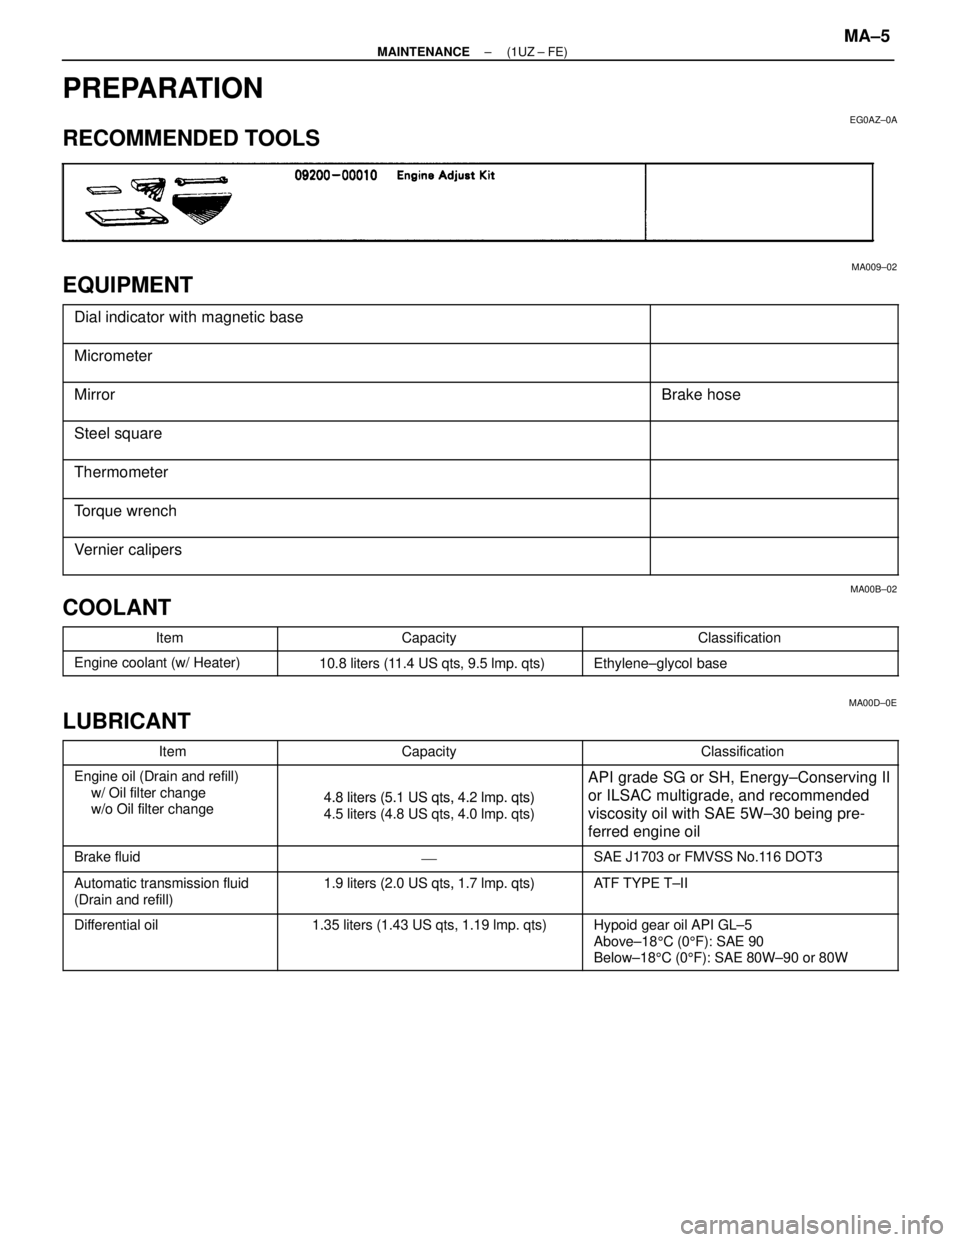
PREPARATION
EG0AZ±0A
RECOMMENDED TOOLS
MA009±02
EQUIPMENT
������������������\
������� �
������������������\
������
������������������\
�������Dial indicator with magnetic base������������ �
�����������
������������
������������������\
������� ������������������\
�������Micrometer
������������������\
������� �
������������������\
������
������������������\
�������MirrorBrake hose
������������������\
������� �
������������������\
������
������������������\
�������
Steel square
������������������\
������� ������������������\
�������Thermometer
������������������\
������� �
������������������\
������
������������������\
�������Torque wrench
������������������\
������� ������������������\
�������Vernier calipers
MA00B±02
COOLANT���������� �
���������Item
�������������� �
�������������Capacity
�������������� �
�������������Classification���������� �
���������
����������Engine coolant (w/ Heater)10.8 liters (11.4 US qts, 9.5 lmp. qts)Ethylene±glycol base
MA00D±0E
LUBRICANT
���������� ����������Item�������������� ��������������Capacity�������������� ��������������Classification���������� �
���������
����������Engine oil (Drain and refill)
w/ Oil filter change
/ Oil filt h
�������������� �
�������������
��������������4.8 liters (5.1 US qts, 4.2 lmp. qts)
�������������� �
�������������
��������������API grade SG or SH, Energy±Conserving II
or ILSAC multigrade, and recommended
���������� �
���������
����������
g
w/o Oil filter change�������������� �
�������������
��������������
4.8 liters (5.1 US qts, 4.2 lm. qts)
4.5 liters (4.8 US qts, 4.0 lmp. qts)�������������� �
�������������
��������������
or ILSAC multigrade, and recommended
viscosity oil with SAE 5W±30 being pre-
ferred engine oil
���������� ����������Brake fluid�������������� ���������������������������� ��������������SAE J1703 or FMVSS No.116 DOT3
���������� ����������Automatic transmission fluid�������������� ��������������1.9 liters (2.0 US qts, 1.7 lmp. qts)�������������� ��������������ATF TYPE T±II
����������
Automatic transmission fluid
(Drain and refill)��������������
1.9 liters (2.0 US qts, 1.7 lm . qts)
��������������
AT F TYPE TII
���������� �
���������
�
���������
����������
Differential oil�������������� �
�������������
�
�������������
��������������
1.35 liters (1.43 US qts, 1.19 lmp. qts)�������������� �
�������������
�
�������������
��������������
Hypoid gear oil API GL±5
Above±18
5C (0 5F): SAE 90
Below±18 5C (0 5F): SAE 80W±90 or 80W
±
MAINTENANCE (1UZ ± FE)MA±5
WhereEverybodyKnowsYourName
Page 2158 of 4087
wAfter installing a drive belt, check that it fits properly in
the ribbed grooves.
w Check by hand to confirm that the belt has not slipped
out of the groove on the bottom of the pulley.
3. INSPECT AIR FILTER
(a) Open the air cleaner cap.
(b) Remove the air filter.
(c) Visually check that the air filter is not excessively damaged or oily.
If necessary, replace the air filter.
(d) Clean the air filter with compressed air. First blow from the inside thoroughly, then blow off from the
outside of the air filter.
(e) Reinstall the air filter and air cleaner cap.
4. REPLACE AIR FILTER Replace the air filter with a new one.
±
MAINTENANCE (1UZ ± FE)MA±7
WhereEverybodyKnowsYourName