Page 745 of 4087

NGOK
NG
OK
1
2
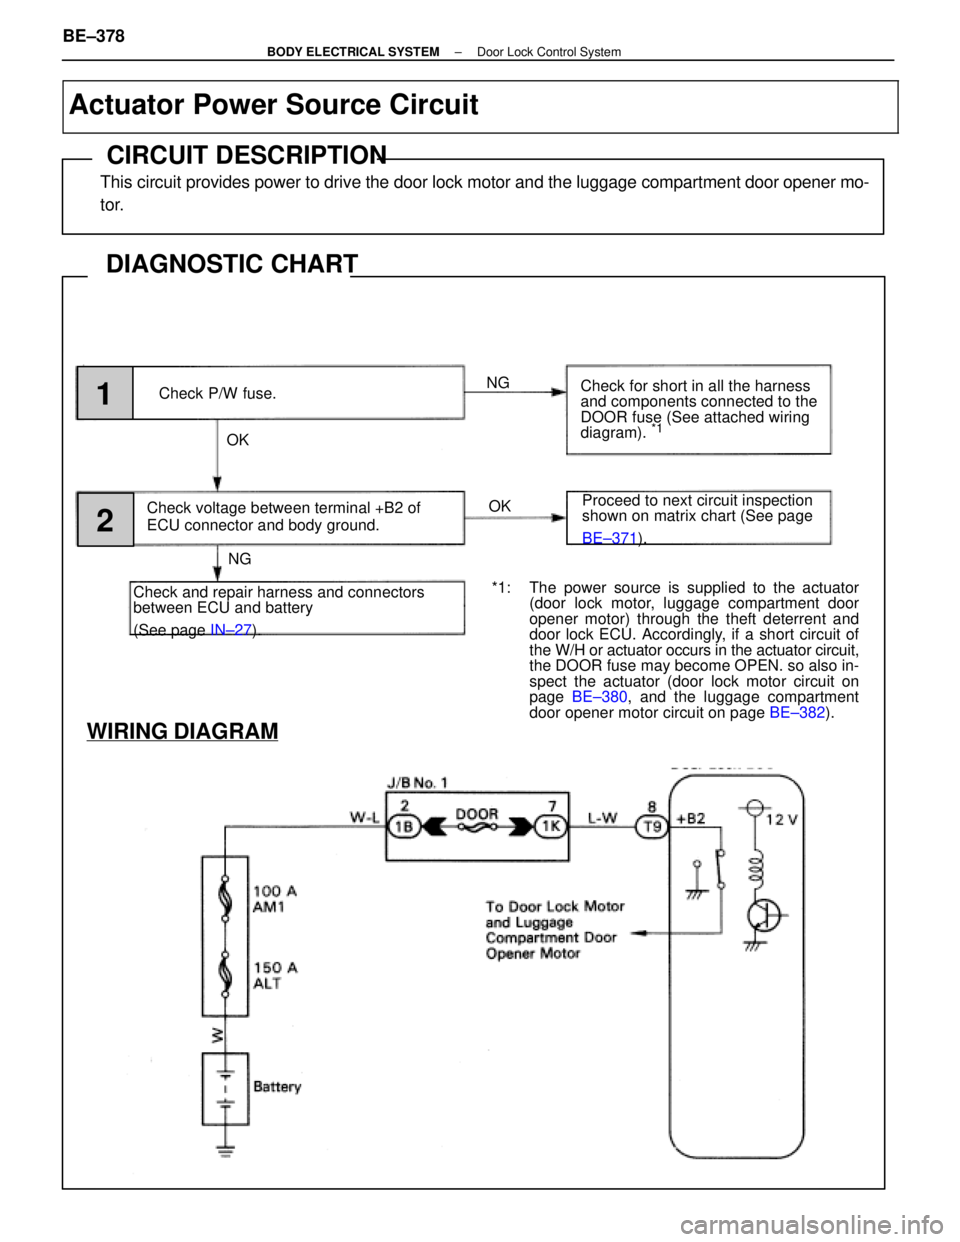
Check P/W fuse.
Check voltage between terminal +B2 of
ECU connector and body ground.
Check and repair harness and connectors
between ECU and battery
(See page IN±27). Check for short in all the harness
and components connected to the
DOOR fuse (See attached wiring
diagram).
*1
Proceed to next circuit inspection
shown on matrix chart (See page
BE±371
).
WIRING DIAGRAM
*1: The power source is supplied to the actuator
(door lock motor, luggage compartment door
opener motor) through the theft deterrent and
door lock ECU. Accordingly, if a short circuit of
the W/H or actuator occurs in the actuator circuit,
the DOOR fuse may become OPEN. so also in-
spect the actuator (door lock motor circuit on
page BE±380 , and the luggage compartment
door opener motor circuit on page BE±382).
Actuator Power Source Circuit
CIRCUIT DESCRIPTION
This circuit provides power to drive the door lock motor and the luggage com\
partment door opener mo-
tor.
DIAGNOSTIC CHART
BE±378±
BODY ELECTRICAL SYSTEM Door Lock Control System
WhereEverybodyKnowsYourName
Page 784 of 4087

WIRING DIAGRAM
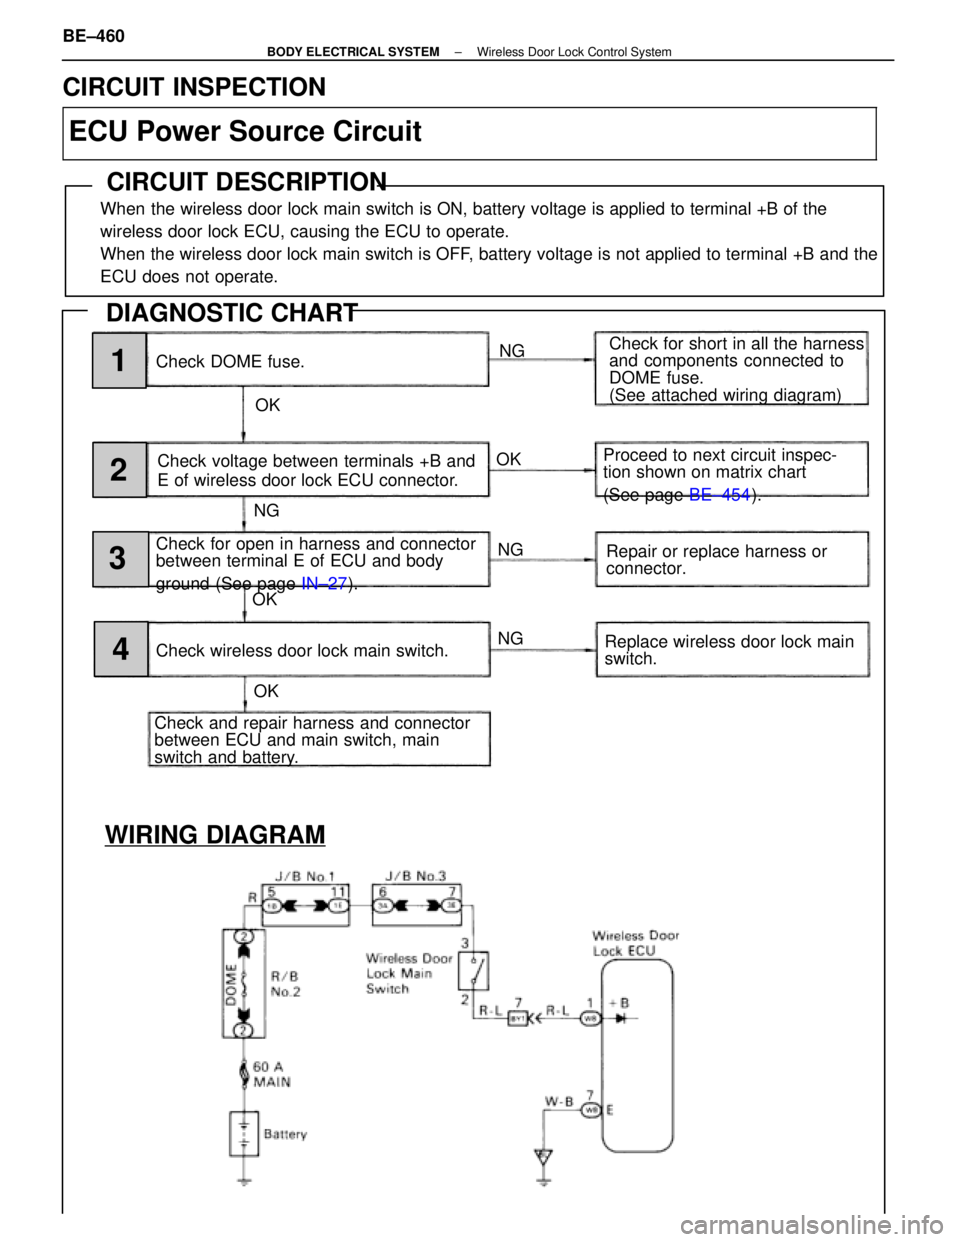
Check DOME fuse.NG
OK Check for short in all the harness
and components connected to
DOME fuse.
(See attached wiring diagram)
Check voltage between terminals +B and
E of wireless door lock ECU connector.
Check for open in harness and connector
between terminal E of ECU and body
ground (See page IN±27).
Check and repair harness and connector
between ECU and main switch, main
switch and battery. Check wireless door lock main switch. Proceed to next circuit inspec-
tion shown on matrix chart
(See page
BE±454).
Repair or replace harness or
connector.
Replace wireless door lock main
switch.
NG
NG
NG
OK
OK OK1
2
3
4
CIRCUIT INSPECTION
ECU Power Source Circuit
CIRCUIT DESCRIPTION
When the wireless door lock main switch is ON, battery voltage is applied to\
terminal +B of the
wireless door lock ECU, causing the ECU to operate.
When the wireless door lock main switch is OFF, battery voltage is not applied to terminal +B and the
ECU does not operate.
DIAGNOSTIC CHART
BE±460±
BODY ELECTRICAL SYSTEM Wireless Door Lock Control System
WhereEverybodyKnowsYourName
Page 785 of 4087

OKNG
NGOK
OKNG
OKNG
INSPECTION PROCEDURE
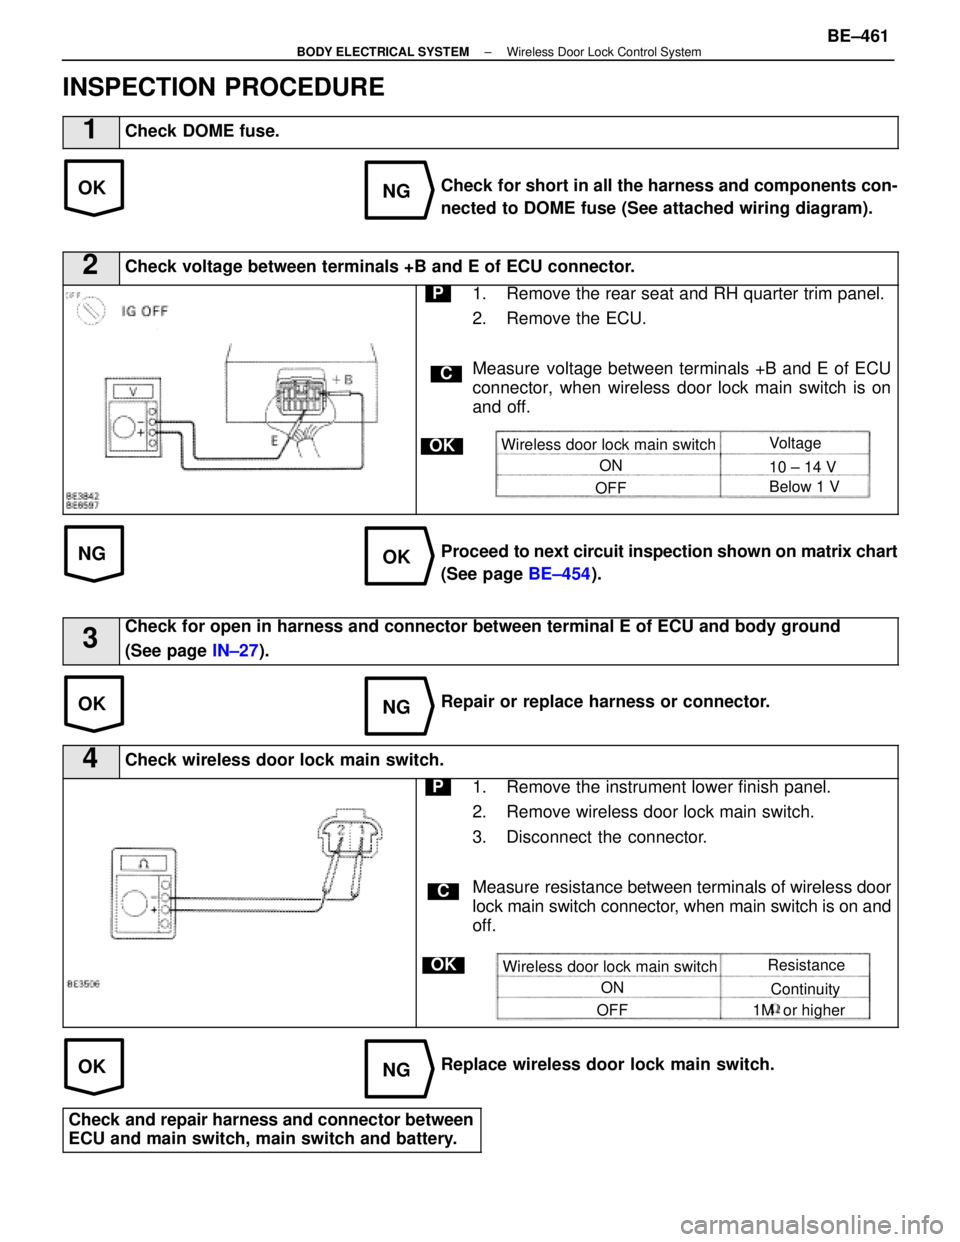
1Check DOME fuse.
Check for short in all the harness and components con-
nected to DOME fuse (See attached wiring diagram).
2Check voltage between terminals +B and E of ECU connector.
C
OK
P1. Remove the rear seat and RH quarter trim panel.
2. Remove the ECU.
Measure voltage between terminals +B and E of ECU
connector, when wireless door lock main switch is on
and off.
Wireless door lock main switchON
OFF Voltage
10 ± 14 V
Below 1 V
Proceed to
next circuit inspection shown on matrix chart
(See page BE±454).
3Check for open in harness and connector between terminal E of ECU and bo\
dy ground
(See page IN±27).
Repair or replace harness or connector.
4Check wireless door lock main switch.
C
OK
P1. Remove the instrument lower finish panel.
2. Remove wireless door lock main switch.
3. Disconnect the connector.
Measure resistance between terminals of wireless door
lock main switch connector, when main switch is on and
off.
Wireless door lock main switch
ON
OFF Resistance
Continuity
1M or higher
Replace wireless door lock main switch.
Check and repair harness and connector between
ECU and main switch, main switch and battery.
±
BODY ELECTRICAL SYSTEM Wireless Door Lock Control SystemBE±461
WhereEverybodyKnowsYourName
Page 816 of 4087

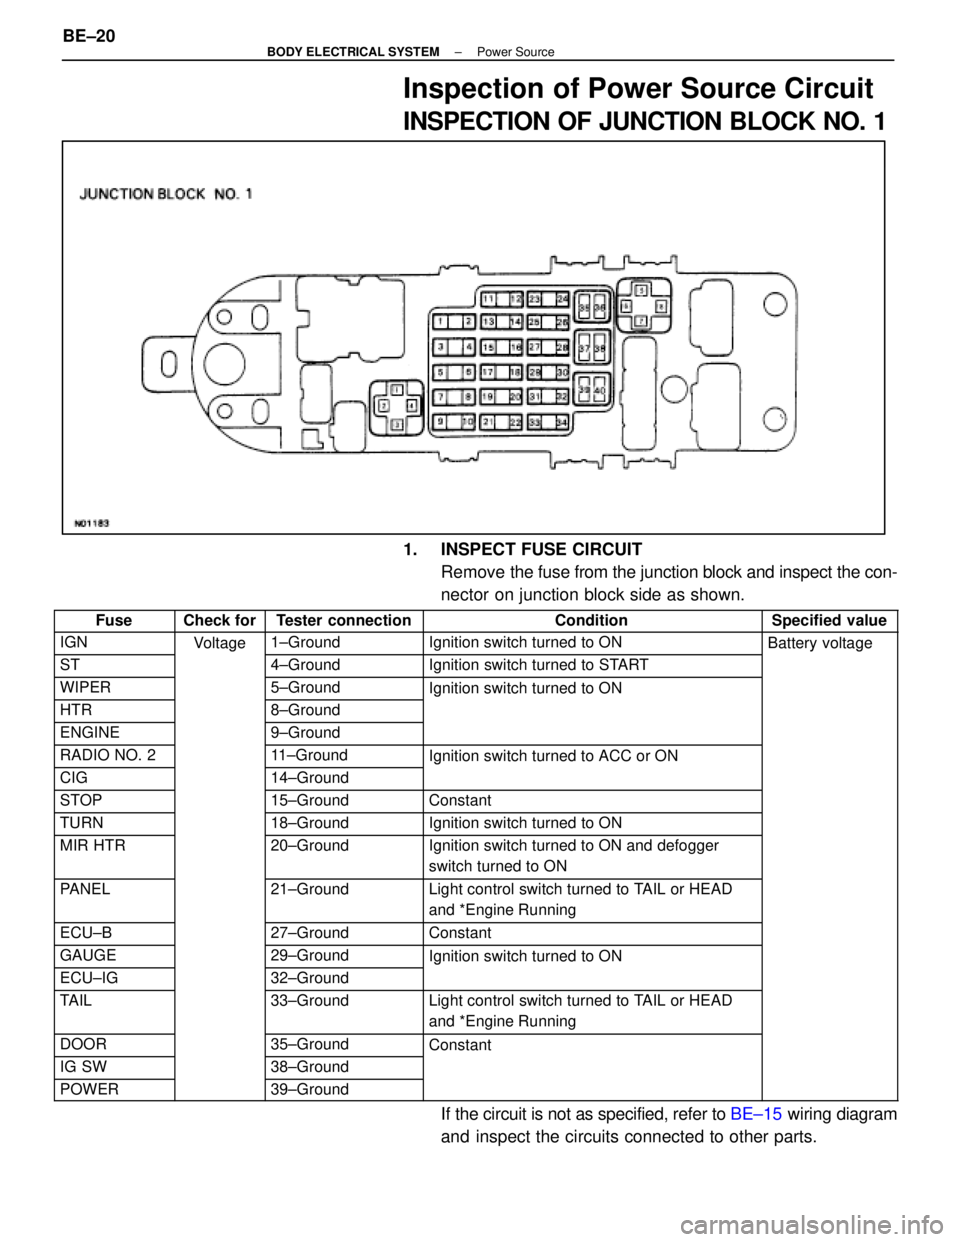
Inspection of Power Source Circuit
INSPECTION OF JUNCTION BLOCK NO. 1
1. INSPECT FUSE CIRCUITRemove the fuse from the junction block and inspect the con-
nector on junction block side as shown.
FuseCheck forTester connectionConditionSpecified value
IGNVoltage1±GroundIgnition switch turned to ONBattery voltage
ST
g
4±GroundIgnition switch turned to START
yg
WIPER5±GroundIgnition switch turned to ON
HTR8±Ground
g
ENGINE9±Ground
RADIO NO. 211±GroundIgnition switch turned to ACC or ON
CIG14±Ground
g
STOP15±GroundConstant
TURN18±GroundIgnition switch turned to ON
MIR HTR20±GroundIgnition switch turned to ON and defogger
switch turned to ON
PANEL21±GroundLight control switch turned to TAIL or HEAD
and *Engine Running
ECU±B27±GroundConstant
GAUGE29±GroundIgnition switch turned to ON
ECU±IG32±Ground
g
TAIL33±GroundLight control switch turned to TAIL or HEAD
and *Engine Running
DOOR35±GroundConstant
IG SW38±Ground
POWER39±Ground
If the circuit is not as specified, refer to BE±15 wiring diagram
and inspect the circuits connected to other parts.
BE±20
±
BODY ELECTRICAL SYSTEM Power Source
WhereEverybodyKnowsYourName
Page 817 of 4087
2. INSPECT RELAY CIRCUITRemove the relay from the junction block and inspect the
connector on junction block side as shown.
RelayCheck forTester connectionConditionSpecified value
TAILVoltage(1)±GroundConstantBattery voltage
(4)±Ground
P/W MAIN(6)±Ground
If the circuit is not as specified, refer to BE±15 wiring diagram
and inspect the circuits connected to other parts.
INSPECTION OF RELAY BLOCK NO. 2
1. INSPECT FUSE CIRCUIT Remove the fuse from the relay block and inspect the con-
nector on relay block side as shown.
FuseCheck forTester ConnectionConditionSpecified value
ABS NO. 1Voltage2±GroundConstantBattery voltage
AM14±Ground
ALT5±Ground
MAIN7±Ground
AM29±Ground
ABS NO. 211±Ground
INT13±Ground
±
BODY ELECTRICAL SYSTEM Power SourceBE±21
WhereEverybodyKnowsYourName
Page 818 of 4087

FuseCheck forTester ConnectionConditionSpecified value
HTRVoltage(15)±GroundConstantBattery voltage
DEF(17)±Ground
DOME(24)±Ground
EFI(26)±Ground
HAZ±HORN(28)±Ground
RADIO NO. 1(30)±Ground
TEL(32)±Ground
ALT±S(34)±Ground
TRAC(36)±Ground
HEAD (RH±LWR)(38)±GroundLight control switch turned to TAIL or
HEAD (LH±LWR)(40)±GroundHEAD and *ENGINE running
HEAD (RH±UPR)(44)±GroundLight control switch turned to HEAD and
HEAD (LH±UPR)(46)±Grounddimmer switch turned to HI or FLASH
If the circuit is not as specified, refer to BE±15 wiring diagram
and inspect the circuits connected to other parts.
2. INSPECT RELAY CIRCUIT Remove the relay from the relay block and inspect the con-
nector on relay block side as shown.
RelayCheck forTester connectionConditionSpecified value
EFIVoltage(4)±GroundConstantBattery voltage
ST(10)±Ground
(11)±Ground
DIM(15)±GroundLight control switch turned to TAIL or HEAD
(16)±Groundand *Engine running
IG2(18)±GroundConstant
HTR(24)±Ground
(25)±Ground
H±LP(28)±Ground
(30)±Ground
DEF(34)±Ground
(35)±Ground
If the circuit is not as specified, refer to BE±15 wiring diagram
and inspect circuits connected to other parts.
BE±22
±
BODY ELECTRICAL SYSTEM Power Source
WhereEverybodyKnowsYourName
Page 819 of 4087
INSPECTION OF RELAY BLOCK NO. 4
AND NO. 5 RELAY BLOCK
1. INSPECT FUSE CIRCUITRemove the fuse from the relay block and inspect the con-
nector on relay block side as shown.
FuseCheck forTester connectionConditionSpecified value
STHTRVoltage2±GroundIgnition Switch Turn to ONBattery voltage
If the circuit is not as specified, refer to BE±15 wiring diagram
and inspect the circuits connected to other parts.
2. INSPECT RELAY CIRCUIT
Remove the relay from the relay block and inspect the con-
nector on junction block side as shown.
RelayCheck forTester connectionConditionSpecified value
HORNVoltage(8)±GroundConstantBattery voltage
IG MAIN(9)±Ground
(13)±GroundContinuity
CRNRNG LP(14)±GroundIgnition Switch Turned to ONBattery voltage
(15)±Ground
±
BODY ELECTRICAL SYSTEM Power SourceBE±23
WhereEverybodyKnowsYourName
Page 821 of 4087
IGNITION SWITCH
Description
The ignition switch is supplied with power from the battery via a fusible l\
ink. Power is supplied to each fuse
and relay according to the position of the switch, whether ªCCº ``ONº or ªSTARTº. The key unlock warning
switch, which detects the set condition of the key, is built into this switch.
Parts Location
Wiring and Connector Diagrams
±
BODY ELECTRICAL SYSTEM Ignition SwitchBE±25
WhereEverybodyKnowsYourName