Page 1729 of 4087
35. INSTALL LH IGNITION COIL(a) Install the ignition coil with the two bolts.
(b) Connect the following connectors and cord:(1) Ignition coil connector
(2) Noise filter connector
(3) High±tension cord
36. INSTALL INTAKE AIR CONNECTOR (a) Connect the end portions of the intake air connector tothe throttle body and air cleaner hose.
(b) Tighten the two hose clamps.
(c) Install the bolt holding the intake air connector to the cylinder head cover.
(d) Connect the following hoses: (1) Air hose to ISC valve
(2) Air hose (from PS air control valve) to intake air connector
EM±56
±
ENGINE MECHANICAL Timing Belt
WhereEverybodyKnowsYourName
Page 1822 of 4087

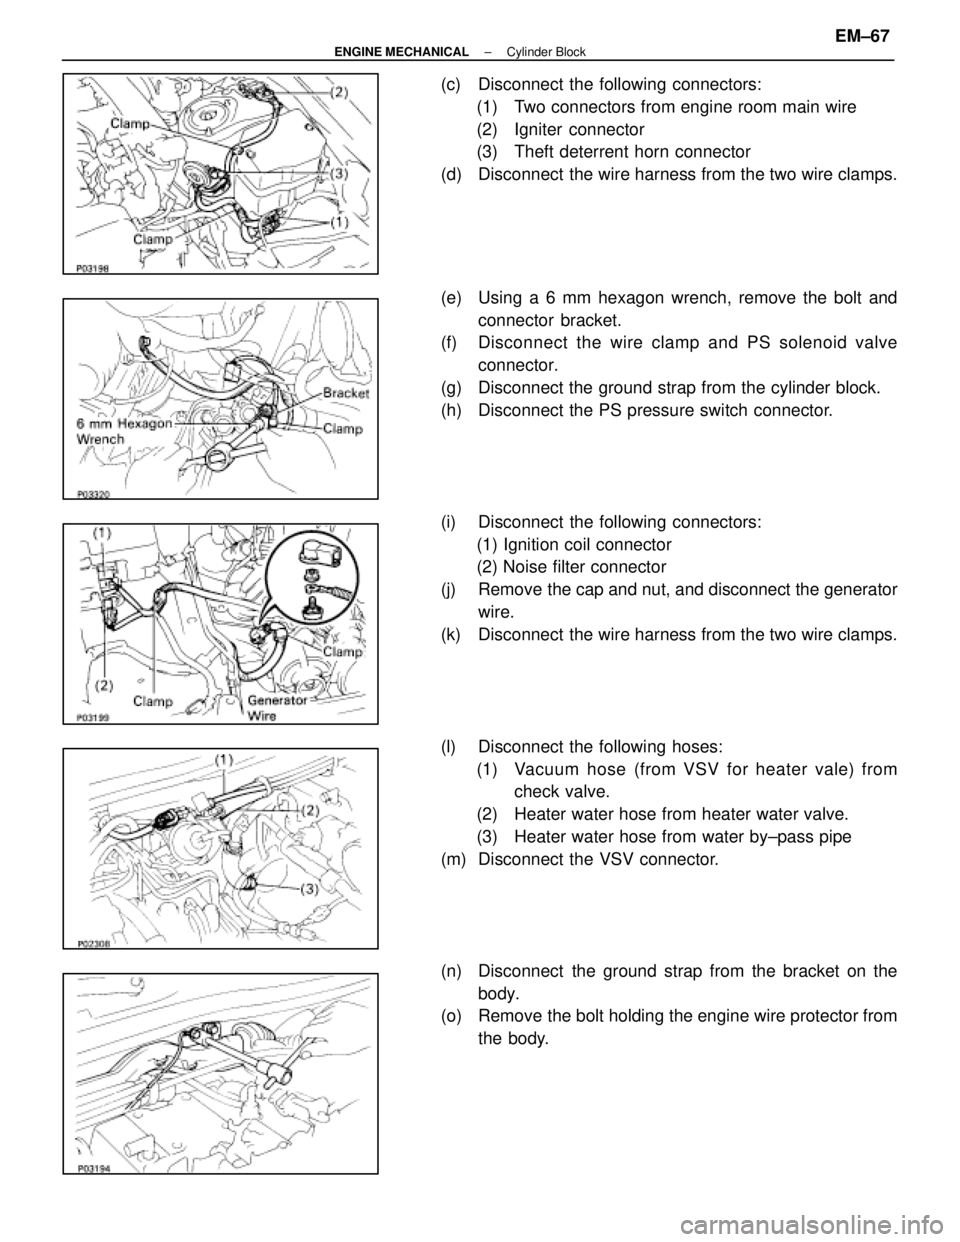
(c) Disconnect the following connectors:(1) Two connectors from engine room main wire
(2) Igniter connector
(3) Theft deterrent horn connector
(d) Disconnect the wire harness from the two wire clamps.
(e) Using a 6 mm hexagon wrench, remove the bolt and connector bracket.
(f) Disc onnect the wire clamp and PS solenoid valve
connector.
(g) Disconnect the ground strap from the cylinder block.
(h) Disconnect the PS pressure switch connector.
(i) Disconnect the following connectors: (1) Ignition coil connector
(2) Noise filter connector
(j) Remove the cap and nut, and disconnect the generator wire.
(k) Disconnect the wire harness from the two wire clamps.
(l) Disconnect the following hoses: (1) Vacuum hose (from VSV for heater vale) from check valve.
(2) Heater water hose from heater water valve.
(3) Heater water hose from water by±pass pipe
(m) Disconnect the VSV connector.
(n) Disconnect the ground strap from the bracket on the body.
(o) Remove the bolt holding the engine wire protector from
the body.
±
ENGINE MECHANICAL Cylinder BlockEM±67
WhereEverybodyKnowsYourName
Page 1831 of 4087
PREPARATION FOR DISASSEMBLY
(See Components on pages EM±74 and 75)1. (M/T) REMOVE FLYWHEEL
2. (A/T) REMOVE DRIVE PLATE
Remove the eight bolts, two spacers and drive plate.
3. INSTALL ENGINE TO ENGINE STAND FOR DISASSEMBLY
4. REMOVE GENERATOR
5. REMOVE THROTTLE BODY WITH INTAKE AIR CONNECTOR (See pages EM±10 to 11)
6. REMOVE TIMING BELT AND PULLEYS (See pages EM±24 to 26)
7. REMOVE WATER PUMP AND BY±PASS HOSE
8. REMOVE FUEL PRESSURE PULSATION DAMPER
9. REMOVE CYLINDER HEAD (See pages EM±36 to 40)
10. REMOVE FUEL PIPE SUPPORT
11. REMOVE OIL PRESSURE SWITCH AND KNOCK SENSORS
SST 09816±30010
12. REMOVE LH ENGINE MOUNTING BRACKET
13. REMOVE RH ENGINE MOUNTING BRACKET
14. REMOVE OIL FILTER BRACKET (a) Remove the union bolt and oil filter bracket.
(b) Remove the gasket from the union bolt.
(c) Remove the O±ring from the oil filter bracket.
15. REMOVE OIL PUMP (See page LU±10)
EM±76
±
ENGINE MECHANICAL Cylinder Block
WhereEverybodyKnowsYourName
Page 1855 of 4087
(c) Install the retainer with the six bolts.
Torque: 5.9 NVm (60 kgf Vcm, 52 in. Vlbf)
POST ASSEMBLY
(See Components on page EM±75)
1. INSTALL OIL PUMP (See page LU±15)
2. INSTALL OIL FILTER BRACKET
(a) Place a new O±ring in position on the oil filter bracket.
(b) Install a new gasket to the union bolt.
(c) Install the oil filter bracket with the union bolt.
Torque: 88 N Vm (900 kgf Vcm, 65 ft Vlbf)
3. INSTALL LH ENGINE MOUNTING BRACKET
Install the mounting bracket with the four bolts.
Torque: 58 N Vm (590 kgf Vcm, 43 ft Vlbf)
HINT: The LH mounting bracket is marked ºLF±Zº.
4. INSTALL RH ENGINE MOUNTING BRACKET Install the mounting bracket with the four bolts.
Torque: 58 N Vm (590 kgf Vcm, 43 ft Vlbf)
HINT: The RH mounting bracket is marked ºRR±Zº.
EM±100
±
ENGINE MECHANICAL Cylinder Block
WhereEverybodyKnowsYourName
Page 1864 of 4087

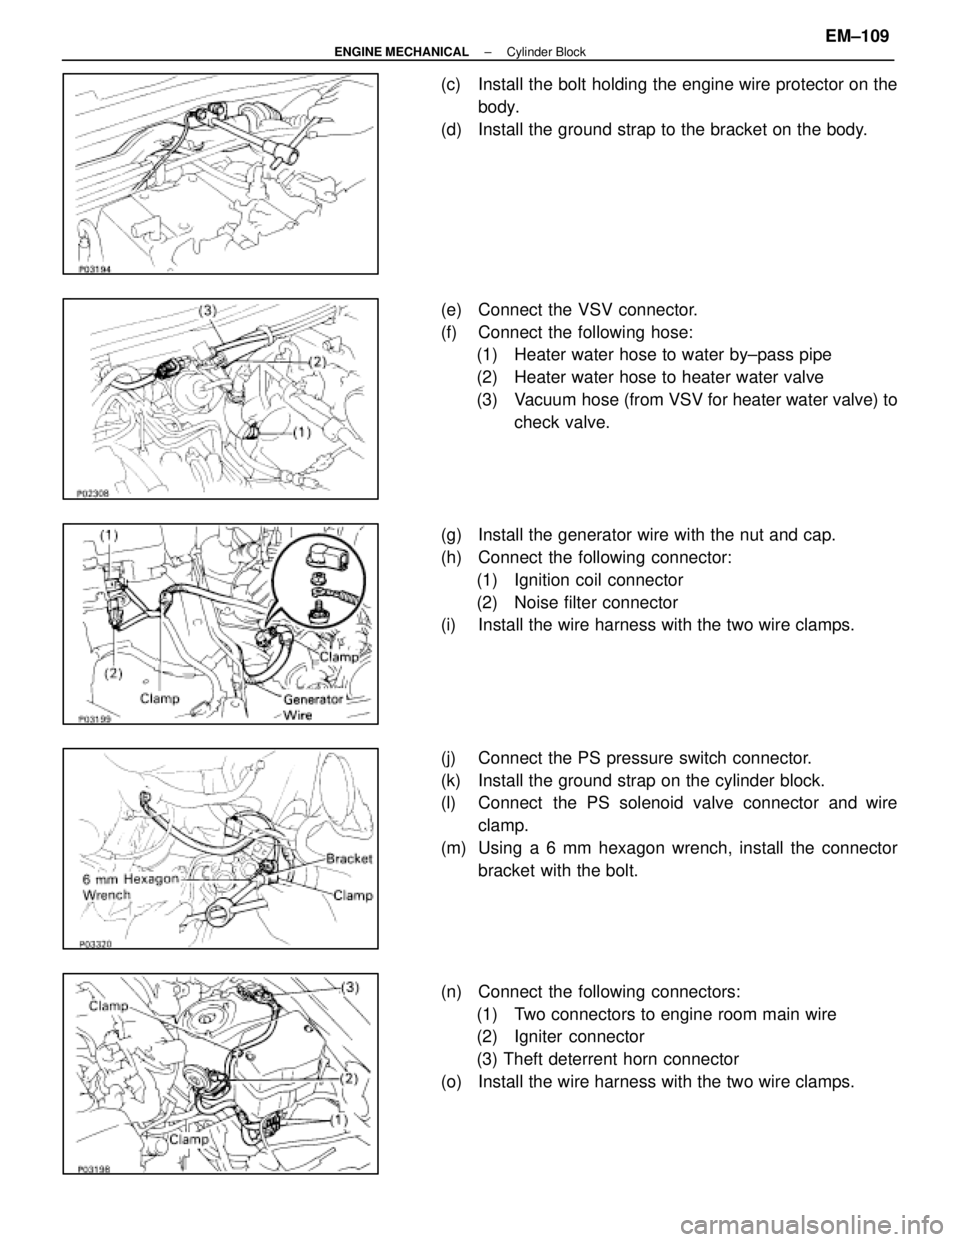
(c) Install the bolt holding the engine wire protector on thebody.
(d) Install the ground strap to the bracket on the body.
(e) Connect the VSV connector.
(f) Connect the following hose: (1) Heater water hose to water by±pass pipe
(2) Heater water hose to heater water valve
(3) Vacuum hose (from VSV for heater water valve) to
check valve.
(g) Install the generator wire with the nut and cap.
(h) Connect the following connector: (1) Ignition coil connector
(2) Noise filter connector
(i) Install the wire harness with the two wire clamps.
(j) Connect the PS pressure switch connector.
(k) Install the ground strap on the cylinder block.
(l) Connect the PS solenoid valve connector and wire
clamp.
(m) Using a 6 mm hexagon wrench, install the connector bracket with the bolt.
(n) Connect the following connectors: (1) Two connectors to engine room main wire
(2) Igniter connector
(3) Theft deterrent horn connector
(o) Install the wire harness with the two wire clamps.
±
ENGINE MECHANICAL Cylinder BlockEM±109
WhereEverybodyKnowsYourName
Page 1872 of 4087

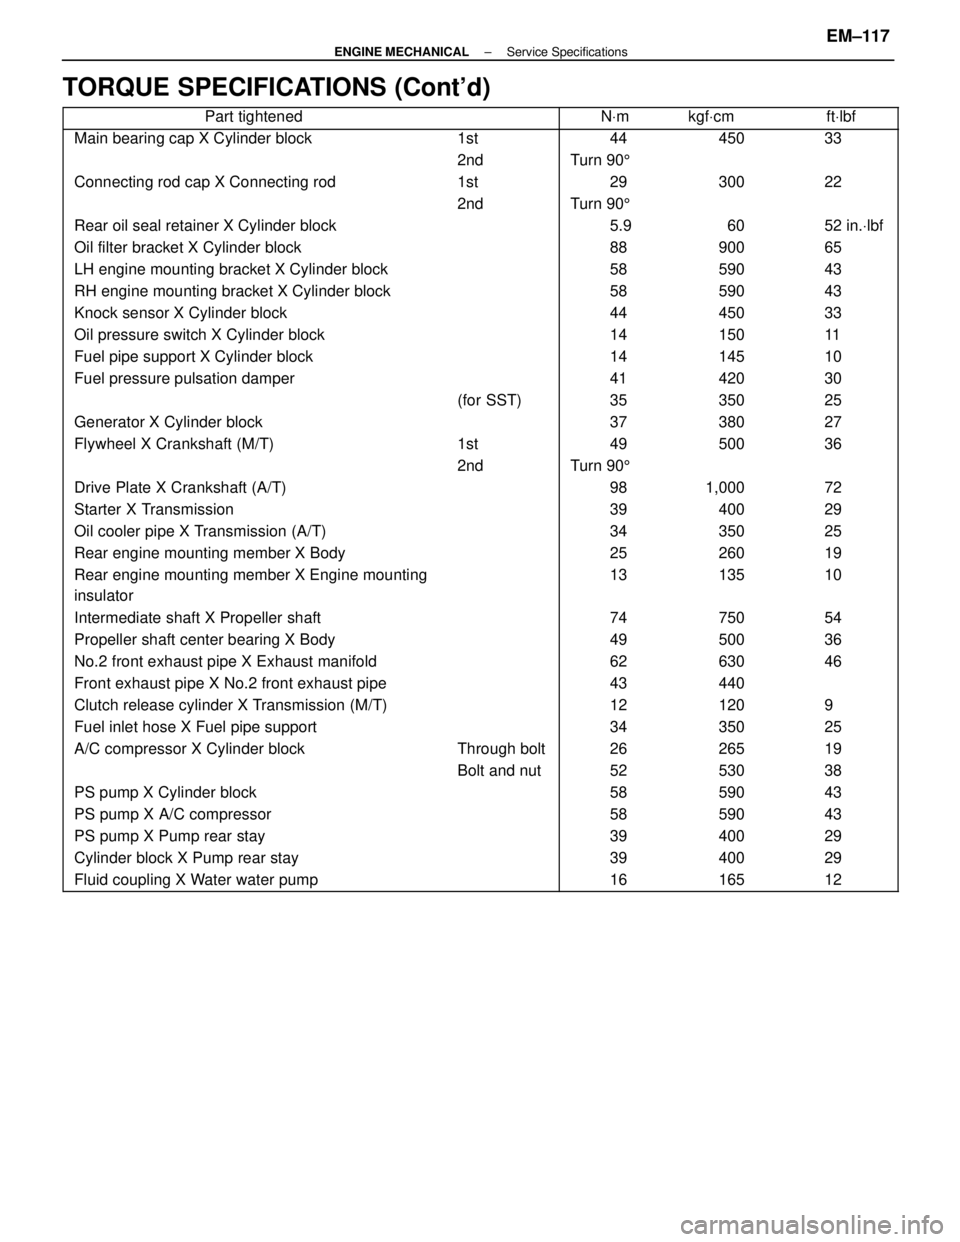
TORQUE SPECIFICATIONS (Cont'd)
����������������� �����������������Part tightened������ ����������� �����NVm������ ������kgf Vcm������ ������ft Vlbf
����������������� �����������������Main bearing cap X Cylinder block������ ������1st����� �����44������ ������450������ ������33
����������������� ����������������������� ������2nd����� �����Turn 90 5������ ������������ ������
����������������� �����������������Connecting rod cap X Connecting rod������ ������1st����� �����29������ ������300������ ������22
�����������������������2nd�����Turn 905����������������������������� �����������������Rear oil seal retainer X Cylinder block������ ����������� �����5.9������ ������60������ ������52 in.Vlbf����������������� �����������������Oil filter bracket X Cylinder block������ ����������� �����88������ ������900������ ������65����������������� �����������������LH engine mounting bracket X Cylinder block������ ����������� �����58������ ������590������ ������43����������������� �����������������RH engine mounting bracket X Cylinder block������ ����������� �����58������ ������590������ ������43
����������������� �����������������Knock sensor X Cylinder block������ ����������� �����44������ ������450������ ������33
����������������� �����������������Oil pressure switch X Cylinder block������ ����������� �����14������ ������150������ ������11
����������������� �����������������Fuel pipe support X Cylinder block������ ����������� �����14������ ������145������ ������10
����������������� �����������������Fuel pressure pulsation damper������ ����������� �����41������ ������420������ ������30
����������������� ����������������������� ������(for SST)����� �����35������ ������350������ ������25
����������������� �����������������Generator X Cylinder block������ ����������� �����37������ ������380������ ������27
�����������������Flywheel X Crankshaft (M/T)������1st�����49������500������36����������������� ����������������������� ������2nd����� �����Turn 90 5������ ������������ ������
����������������� �����������������Drive Plate X Crankshaft (A/T)������ ����������� �����98������ ������1,000������ ������72����������������� �����������������Starter X Transmission������ ����������� �����39������ ������400������ ������29����������������� �����������������Oil cooler pipe X Transmission (A/T)������ ����������� �����34������ ������350������ ������25
����������������� �����������������Rear engine mounting member X Body������ ����������� �����25������ ������260������ ������19
����������������� �
����������������
�����������������
Rear engine mounting member X Engine mounting
insulator������ �
�����
������
����� �
����
�����
13������ �
�����
������
135������ �
�����
������
10
����������������� �����������������Intermediate shaft X Propeller shaft������ ����������� �����74������ ������750������ ������54
����������������� �����������������Propeller shaft center bearing X Body������ ����������� �����49������ ������500������ ������36
�����������������No.2 front exhaust pipe X Exhaust manifold�����������62������630������46����������������� �����������������Front exhaust pipe X No.2 front exhaust pipe������ ����������� �����43������ ������440������ ������
����������������� �����������������Clutch release cylinder X Transmission (M/T)������ ����������� �����12������ ������120������ ������9����������������� �����������������Fuel inlet hose X Fuel pipe support������ ����������� �����34������ ������350������ ������25����������������� �����������������A/C compressor X Cylinder block������ ������Through bolt����� �����26������ ������265������ ������19
����������������� ����������������������� ������Bolt and nut����� �����52������ ������530������ ������38
����������������� �����������������PS pump X Cylinder block������ ����������� �����58������ ������590������ ������43
����������������� �����������������PS pump X A/C compressor������ ����������� �����58������ ������590������ ������43
����������������� �����������������PS pump X Pump rear stay������ ����������� �����39������ ������400������ ������29
����������������� �����������������Cylinder block X Pump rear stay������ ����������� �����39������ ������400������ ������29
����������������� �����������������Fluid coupling X Water water pump������ ����������� �����16������ ������165������ ������12
±
ENGINE MECHANICAL Service SpecificationsEM±117
WhereEverybodyKnowsYourName
Page 2109 of 4087

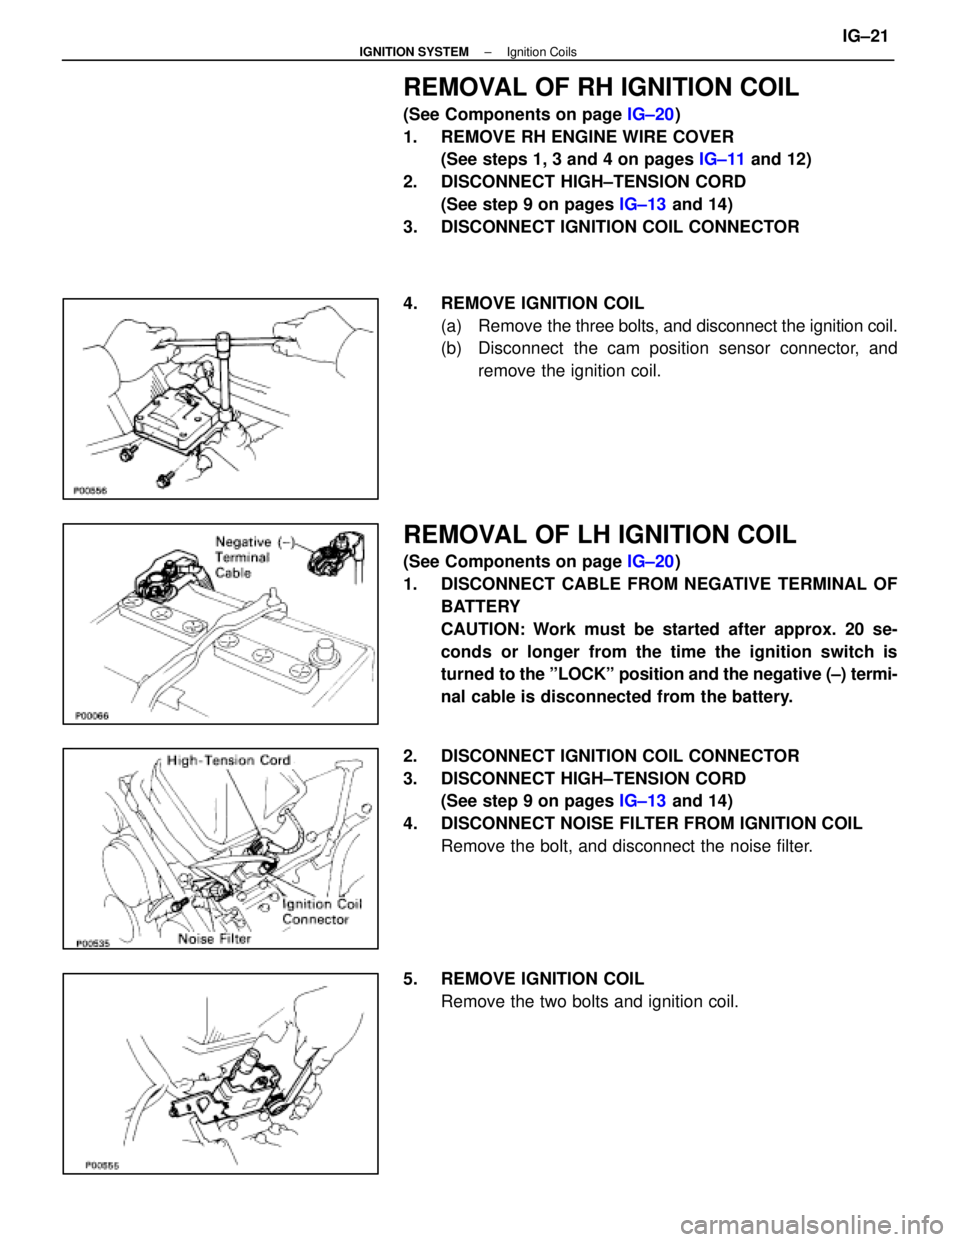
REMOVAL OF RH IGNITION COIL
(See Components on page IG±20)
1. REMOVE RH ENGINE WIRE COVER (See steps 1, 3 and 4 on pages IG±11 and 12)
2. DISCONNECT HIGH±TENSION CORD (See step 9 on pages IG±13 and 14)
3. DISCONNECT IGNITION COIL CONNECTOR
4. REMOVE IGNITION COIL (a) Remove the three bolts, and disconnect the ignition coil.
(b) Disconnect the cam position sensor connector, and
remove the ignition coil.
REMOVAL OF LH IGNITION COIL
(See Components on page IG±20)
1. DISCONNECT CABLE FROM NEGATIVE TERMINAL OF BATTERY
CAUTION: Work must be started after approx. 20 se-
conds or longer from the time the ignition switch is
turned to the ºLOCKº position and the negative (±) termi-
nal cable is disconnected from the battery.
2. DISCONNECT IGNITION COIL CONNECTOR
3. DISCONNECT HIGH±TENSION CORD (See step 9 on pages IG±13 and 14)
4. DISCONNECT NOISE FILTER FROM IGNITION COIL Remove the bolt, and disconnect the noise filter.
5. REMOVE IGNITION COIL Remove the two bolts and ignition coil.
±
IGNITION SYSTEM Ignition CoilsIG±21
WhereEverybodyKnowsYourName
Page 2110 of 4087
INSTALLATION OF RH IGNITION COIL
(See Components on page IG±20)
1. INSTALL IGNITION COIL (a) Install the ignition coil with the three bolts.
(b) Install the cam position sensor connector to the ignition
coil bracket.
2. CONNECT IGNITION COIL CONNECTOR
3. CONNECT HIGH±TENSION CORD
(See step 4 on pages IG±16 and 17)
4. INSTALL RH ENGINE WIRE COVER (See steps 8, 10, 12 and 13 on pages IG±11 and 12)
INSTALLATION OF LH IGNITION COIL
(See Components on page IG±20)
1. INSTALL IGNITION COIL Install the ignition coil with the two bolts.
2. INSTALL NOISE FILTER TO IGNITION COIL Install the noise filter with the bolt.
3. CONNECT HIGH±TENSION CORD
(See step 4 on pages IG±16 and 17)
4. CONNECT IGNITION COIL CONNECTOR
5. CONNECT CABLE TO NEGATIVE TERMINAL OF BATTERY
IG±22
±
IGNITION SYSTEM Ignition Coils
WhereEverybodyKnowsYourName