Page 25 of 136
![HONDA CIVIC 1991 Owners Manual
Seat Belts (cont'd)
[Sedan]
Installation of Child Seat
All child restraint systems are designed to be secured by lap belts or
the lap belt portion of a lap-shoulder belt. The automatic shoulder](/manual-img/13/57901/w960_57901-24.png "HONDA CIVIC 1991 Owners Manual
Seat Belts (cont'd)
[Sedan]
Installation of Child Seat
All child restraint systems are designed to be secured by lap belts or
the lap belt portion of a lap-shoulder belt. The automatic shoulder")
Seat Belts (cont'd)
[Sedan]
Installation of Child Seat
All child restraint systems are designed to be secured by lap belts or
the lap belt portion of a lap-shoulder belt. The automatic shoulder belt system at the front passenger seat should not be used to
secure the child restraint system. If a child seat must be installed on
the front seat, place the shoulder portion of the belt behind the child seat and secure the child seat with the lap belt only.
Children could be endangered in a crash, if their child restraints are
not properly secured. Follow the child seat manufacturer's
instructions when installing the seat.
Your Honda automobile is equipped with attachment pointsspecifically for a rear seat mounted child restraint system which
uses a top tether.
The tether attachment points are located on the rear tray, just behind the rear seat-back.
When the child restraint system is not in use, remove it from the
car or secure it with the seat belt to keep it from becoming aprojectile in the event of an accident.
NOTE:
See your Honda dealer for installation of the child restraint system.ProCarManuals.comMain Menu s t
Page 26 of 136
Pregnant Women
A pregnant woman should use the shoulder and lap belts to help lessen the chance of injury and/or the amount of injury in anaccident.
It is desirable that a pregnant woman ask her doctor at each
medical check-up if she can drive, and also ask about the most
appropriate way of wearing the lap/shoulder belt.Lap belts should be worn as low and snugly as possible over the
hips.
Inspection
All parts of the seat belts, including the belt fabric, should beregularly inspected for fraying, loosening, wear and other damage.Keep the belts in good condition at all times to reduce the chance of
being injured in an accident, and to minimize any injuries that dooccur. Make sure the buckles, retractors, tongue plates, guides and
anchors all work properly.
Don't let anything get inside the buckle or the retractor; it could
cause latch or retractor failure.
Cleaning
The belts should always be kept clean and dry; wet or damp belts can cause rewinding problems. To clean the belts, pull them all the
way out of their retractors and use warm water and a mild soap;
then let them air-dry fully extended, in the shade, with the carwindows open.
Never bleach, dye or clean the belts with chemical solvents; itwill weaken the fabric. Do not remove the seat belts from the car to wash them.
Replacement
Replace the seat belt if:
1. The belting is cut, punctured, burned, etc.
2.The buckle or retractor does not work properly.
3. It was being worn at the time of a collision (also check for deformation damage at all seat belt anchor points).
4. Its condition is questionable.ProCarManuals.comMain Menu s t
Page 31 of 136
Warning and Indicator Lights (cont'd)
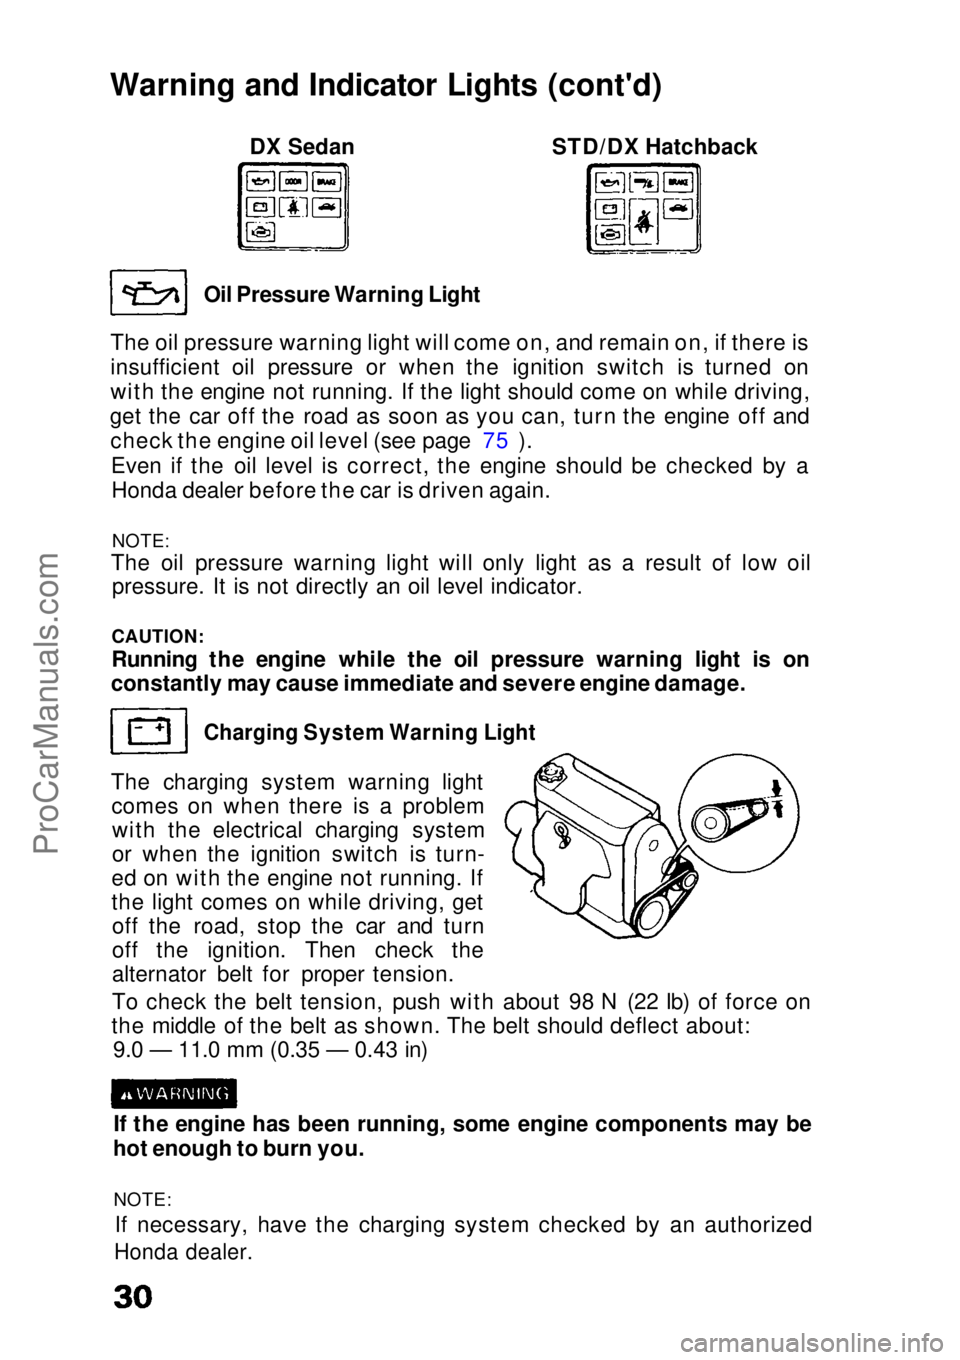
DX Sedan STD/DX Hatchback
Oil Pressure Warning Light
The oil pressure warning light will come on, and remain on, if there is
insufficient oil pressure or when the ignition switch is turned on
with the engine not running. If the light should come on while driving,
get the car off the road as soon as you can, turn the engine off and check the engine oil level (see page 75 ).
Even if the oil level is correct, the engine should be checked by aHonda dealer before the car is driven again.
NOTE:
The oil pressure warning light will only light as a result of low oil
pressure. It is not directly an oil level indicator.
CAUTION:
Running the engine while the oil pressure warning light is on
constantly may cause immediate and severe engine damage.
Charging System Warning Light
The charging system warning light comes on when there is a problemwith the electrical charging system
or when the ignition switch is turn-
ed on with the engine not running. If
the light comes on while driving, get off the road, stop the car and turn
off the ignition. Then check the
alternator belt for proper tension.
To check the belt tension, push with about 98 N (22 Ib) of force on
the middle of the belt as shown. The belt should deflect about: 9.0 — 11.0 mm (0.35 — 0.43 in)
If the engine has been running, some engine components may be
hot enough to burn you.
NOTE: If necessary, have the charging system checked by an authorized
Honda dealer.ProCarManuals.comMain Menu s t
Page 32 of 136
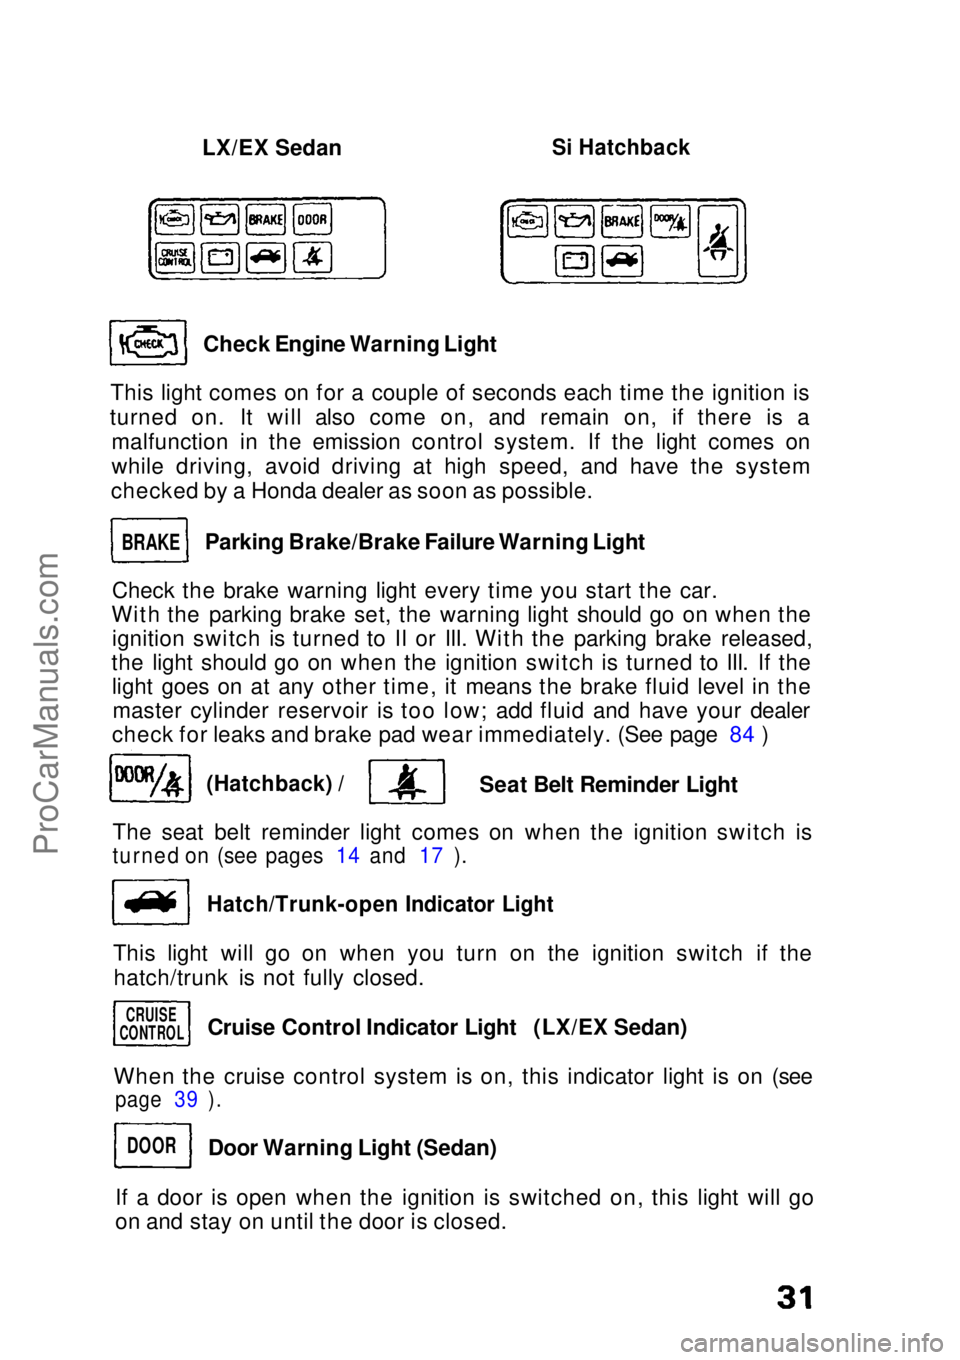
LX/EX Sedan
Si Hatchback
Check Engine Warning Light
This light comes on for a couple of seconds each time the ignition is
turned on. It will also come on, and remain on, if there is a malfunction in the emission control system. If the light comes on
while driving, avoid driving at high speed, and have the system
checked by a Honda dealer as soon as possible.
Parking Brake/Brake Failure Warning Light
Check the brake warning light every time you start the car.
With the parking brake set, the warning light should go on when the ignition switch is turned to II or III. With the parking brake released,
the light should go on when the ignition switch is turned to III. If the light goes on at any other time, it means the brake fluid level in themaster cylinder reservoir is too low; add fluid and have your dealer
check for leaks and brake pad wear immediately. (See page 84 )
(Hatchback) /
Seat Belt Reminder Light
The seat belt reminder light comes on when the ignition switch is
turned on (see pages 14 and 17 ).
Hatch/Trunk-open Indicator Light
This light will go on when you turn on the ignition switch if the hatch/trunk is not fully closed.
When the cruise control system is on, this indicator light is on (see
page 39 ).
If a door is open when the ignition is switched on, this light will go
on and stay on until the door is closed.
BRAKE
CRUISE
CONTROL
DOOR
Cruise Control Indicator Light (LX/EX Sedan)
Door Warning Light (Sedan)ProCarManuals.comMain Menu s t
Page 60 of 136
Safety Items
Before driving away, check that: The doors are closed properly.
The mirrors are properly adjusted, and the windows clean.
The driver and passengers are wearing properly adjusted seat
belts.
The head restraints are properly adjusted.
The warning and indicator lights are operating properly. The brake pedal feels normal.
All luggage and cargo is secured.
Nothing is interfering with the driver's feet or blocking vision to
the rear.
While driving remember to: Always drive defensively; expect the unexpected.Reduce your speed during night hours and bad weather.Follow at a safe distance; don't tailgate. Get off the highway when you are tired; stop and take a rest.
When stopping for repairs: Park the car well off the road.
Turn on the hazard warning flasher. Use flares or other warning devices to warn other motorists.
After parking your car: Apply the parking brake and shift to first gear if equipped with
manual transmission, or PARK on automatic transmission equip-ped cars.
Make sure the sunroof and windows are closed and the doors are
locked.
If parked on a hill:
1. Turn the front wheels away from the curb if facing uphill.
2. Turn the front wheels toward the curb if facing downhill.
Never leave children unattended in a parked car. Take your keys.ProCarManuals.comMain Menu s t
Page 69 of 136
Check the following items at each fuel stop:
1. Engine oil level.
2. Radiator coolant level.
Check the following items periodically: 1. Brakes: for braking efficiency, brake pedal travel and hydraulic
fluid level.
2. Lights: for operation of headlights, taillights, side marker lights, stoplights, turn signals and back-up lights.
3. Tires: for correct pressures (including spare); inspect for cuts and uneven or excessive wear. Rotate every 7,500 miles (12,000 km)
in the pattern shown on page 97.
4. Steering: for excessive play or vibration while driving. 5. Exhaust system: for leaks or loose mounts.
6. Wipers: for operation of windshield wipers and washer, and condition of wiper blades.
7. Seat belts: for condition of fabric and buckles, and operation of the restraint mechanism.
8. Battery condition.
9. Clutch adjustment (clutch pedal free travel).
(cont'd)ProCarManuals.comMain Menu s t
Page 90 of 136
Fuse Replacement
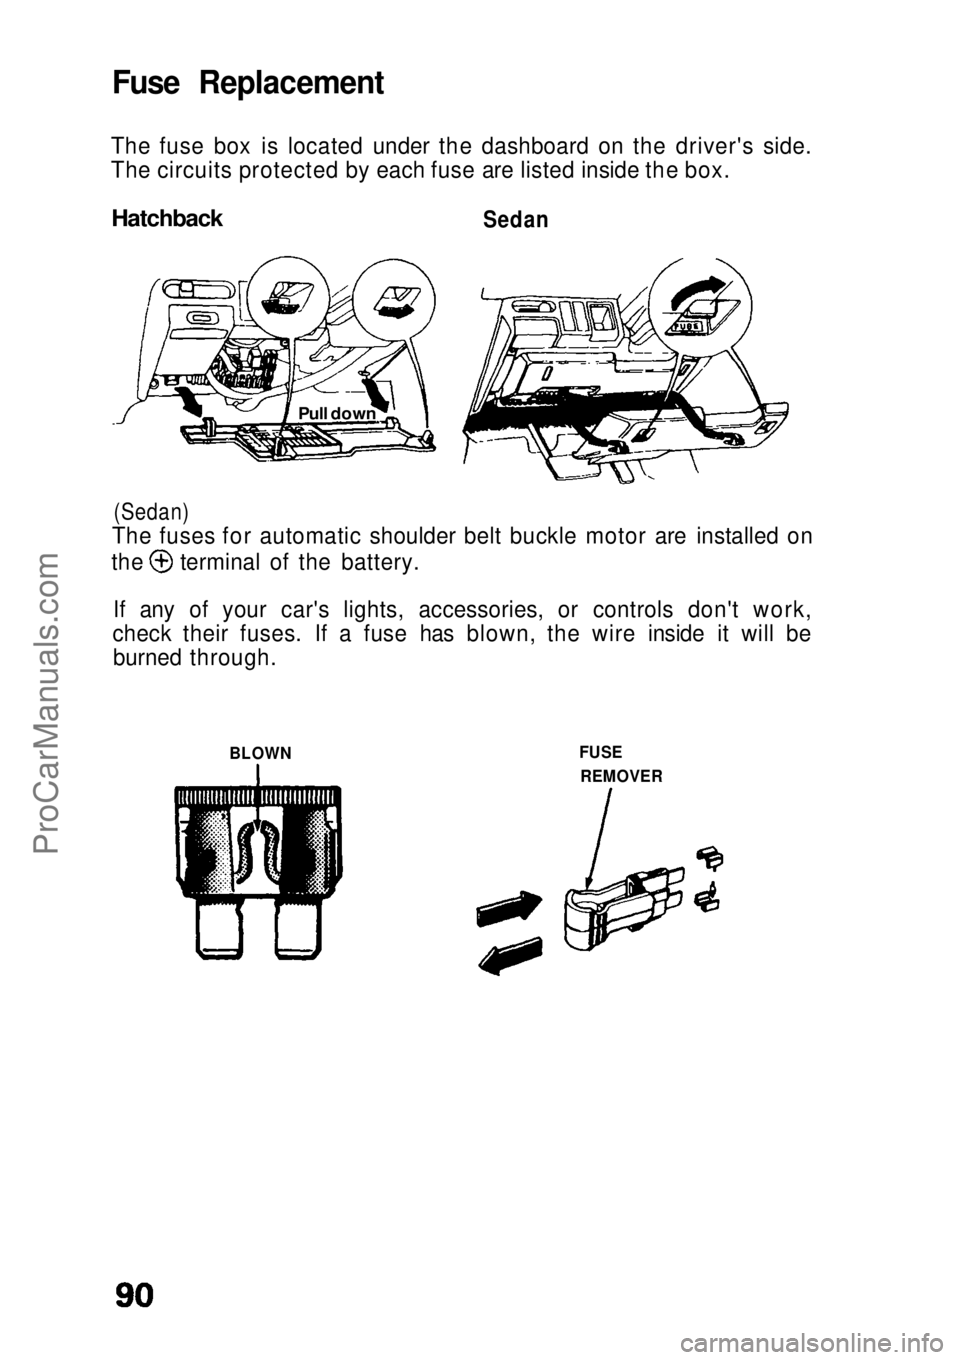
The fuse box is located under the dashboard on the driver's side.
The circuits protected by each fuse are listed inside the box.
Hatchback
Sedan
(Sedan)
The fuses for automatic shoulder belt buckle motor are installed on the terminal of the battery.
If any of your car's lights, accessories, or controls don't work,
check their fuses. If a fuse has blown, the wire inside it will be burned through.
BLOWN FUSE
REMOVER
Pull downProCarManuals.comMain Menu s t
Page 98 of 136
Air Conditioner Care
Condenser and Radiator
Check the engine radiator and the air conditioner condenser (in front
of the radiator) for accumulated dirt, insects or leaves. Carefully brush or hose them off to assure maximum cooling performance.
CAUTION:
Radiator and condenser fins are very thin and easily damaged; do
not bend them with the high water pressure or brush.
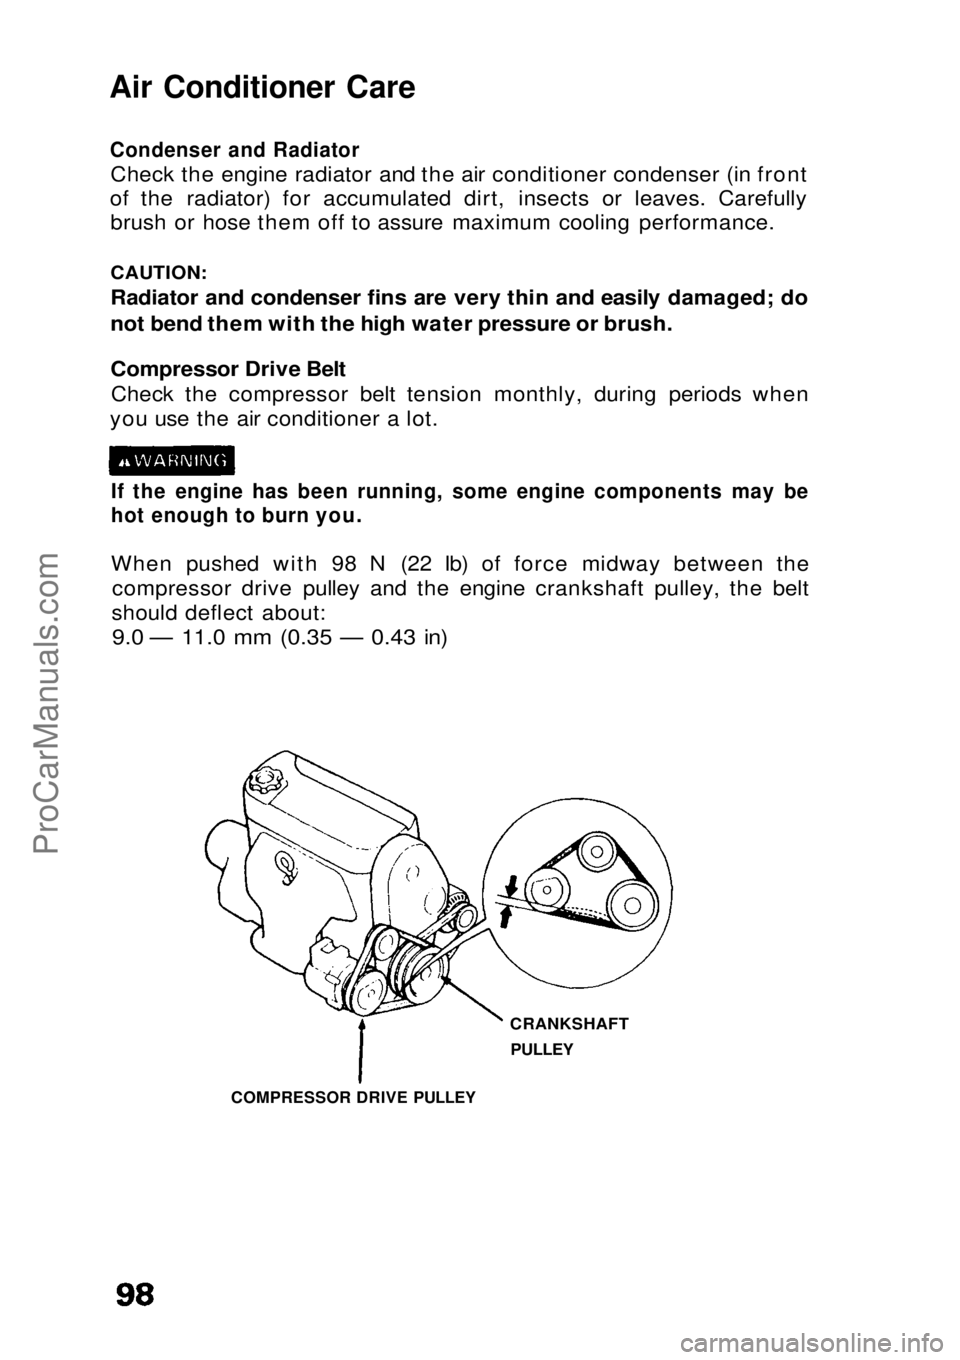
Compressor Drive Belt
Check the compressor belt tension monthly, during periods when
you use the air conditioner a lot.
If the engine has been running, some engine components may be
hot enough to burn you.
When pushed with 98 N (22 Ib) of force midway between thecompressor drive pulley and the engine crankshaft pulley, the belt
should deflect about:
9.0 — 11.0 mm (0.35 — 0.43 in)
CRANKSHAFTPULLEY
COMPRESSOR DRIVE PULLEYProCarManuals.comMain Menu s t