1991 HONDA CIVIC brake fluid
[x] Cancel search: brake fluidPage 32 of 136
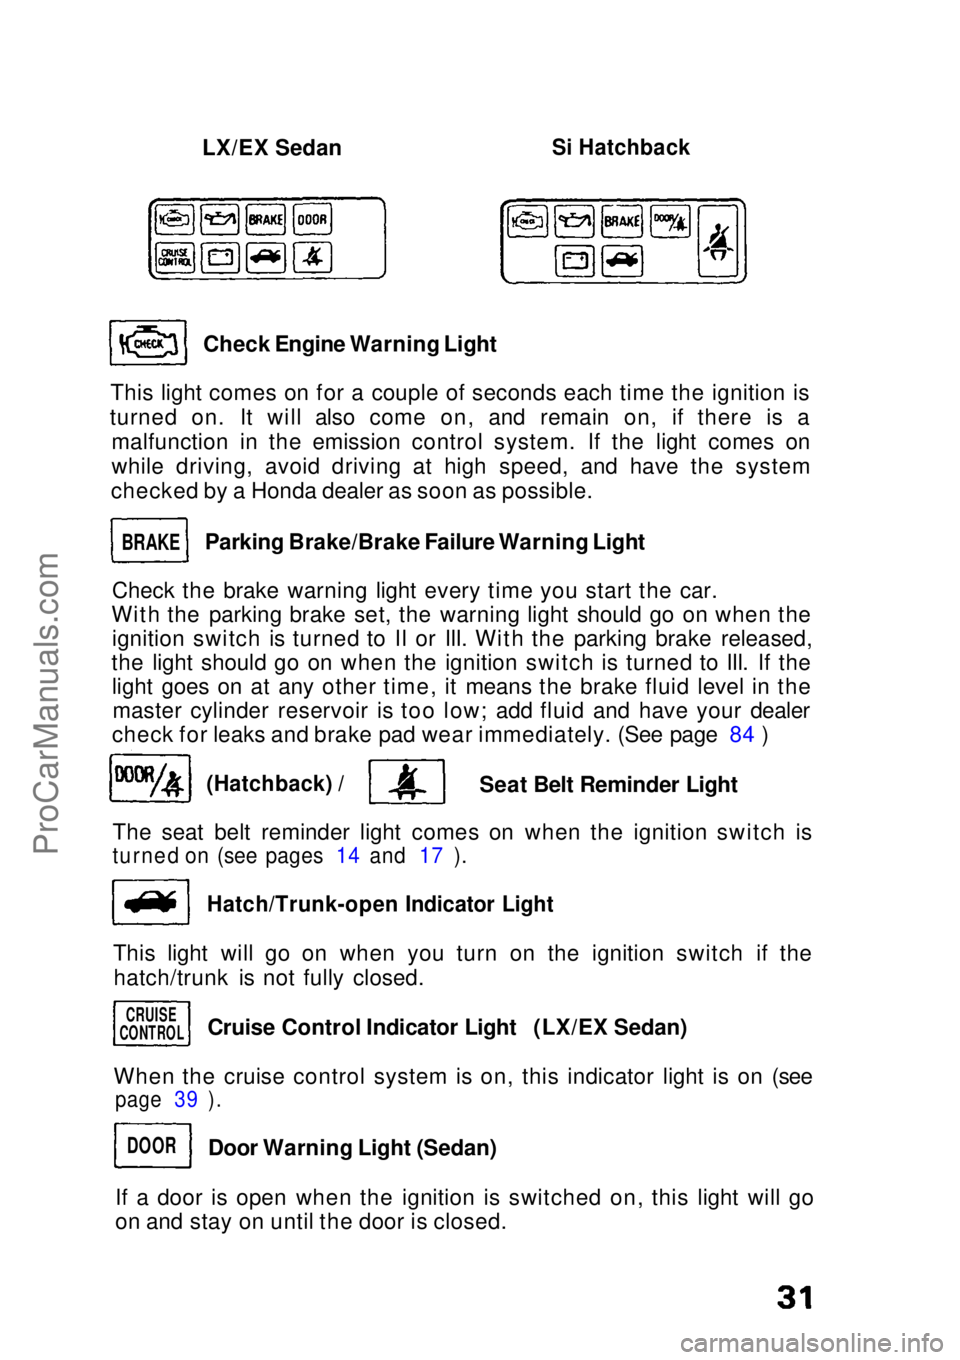
LX/EX Sedan
Si Hatchback
Check Engine Warning Light
This light comes on for a couple of seconds each time the ignition is
turned on. It will also come on, and remain on, if there is a malfunction in the emission control system. If the light comes on
while driving, avoid driving at high speed, and have the system
checked by a Honda dealer as soon as possible.
Parking Brake/Brake Failure Warning Light
Check the brake warning light every time you start the car.
With the parking brake set, the warning light should go on when the ignition switch is turned to II or III. With the parking brake released,
the light should go on when the ignition switch is turned to III. If the light goes on at any other time, it means the brake fluid level in themaster cylinder reservoir is too low; add fluid and have your dealer
check for leaks and brake pad wear immediately. (See page 84 )
(Hatchback) /
Seat Belt Reminder Light
The seat belt reminder light comes on when the ignition switch is
turned on (see pages 14 and 17 ).
Hatch/Trunk-open Indicator Light
This light will go on when you turn on the ignition switch if the hatch/trunk is not fully closed.
When the cruise control system is on, this indicator light is on (see
page 39 ).
If a door is open when the ignition is switched on, this light will go
on and stay on until the door is closed.
BRAKE
CRUISE
CONTROL
DOOR
Cruise Control Indicator Light (LX/EX Sedan)
Door Warning Light (Sedan)ProCarManuals.comMain Menu s t
Page 69 of 136

Check the following items at each fuel stop:
1. Engine oil level.
2. Radiator coolant level.
Check the following items periodically: 1. Brakes: for braking efficiency, brake pedal travel and hydraulic
fluid level.
2. Lights: for operation of headlights, taillights, side marker lights, stoplights, turn signals and back-up lights.
3. Tires: for correct pressures (including spare); inspect for cuts and uneven or excessive wear. Rotate every 7,500 miles (12,000 km)
in the pattern shown on page 97.
4. Steering: for excessive play or vibration while driving. 5. Exhaust system: for leaks or loose mounts.
6. Wipers: for operation of windshield wipers and washer, and condition of wiper blades.
7. Seat belts: for condition of fabric and buckles, and operation of the restraint mechanism.
8. Battery condition.
9. Clutch adjustment (clutch pedal free travel).
(cont'd)ProCarManuals.comMain Menu s t
Page 74 of 136
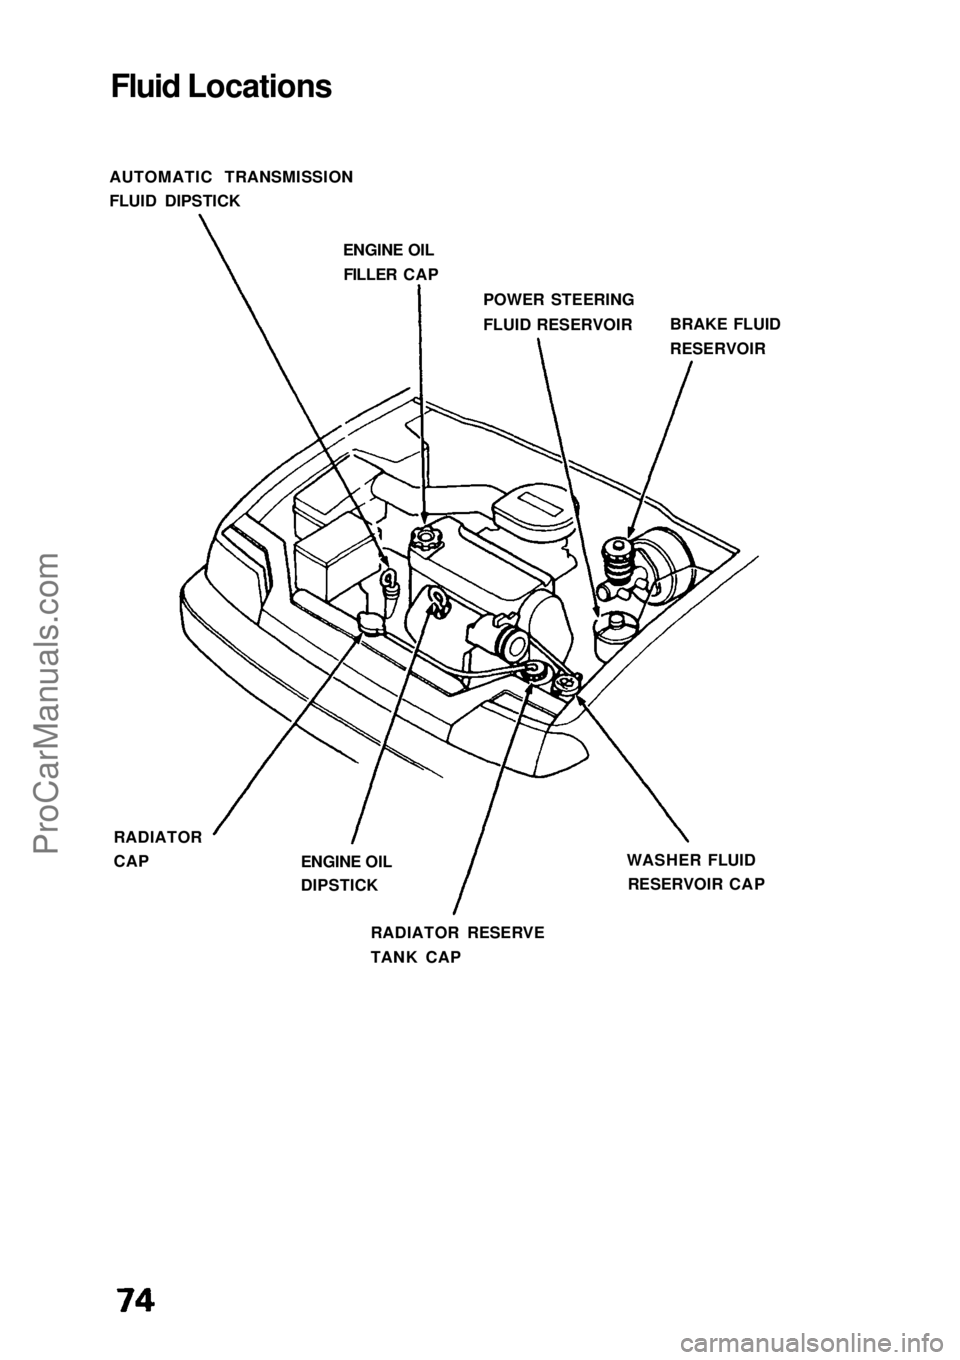
Fluid Locations
AUTOMATIC TRANSMISSION
FLUID DIPSTICK ENGINE OILFILLER CAP
POWER STEERING
FLUID RESERVOIR
RADIATOR
CAP WASHER FLUID
RESERVOIR CAP
RADIATOR RESERVE
TANK CAP BRAKE FLUID
RESERVOIR
ENGINE OIL
DIPSTICKProCarManuals.comMain Menu s t
Page 83 of 136
Brakes
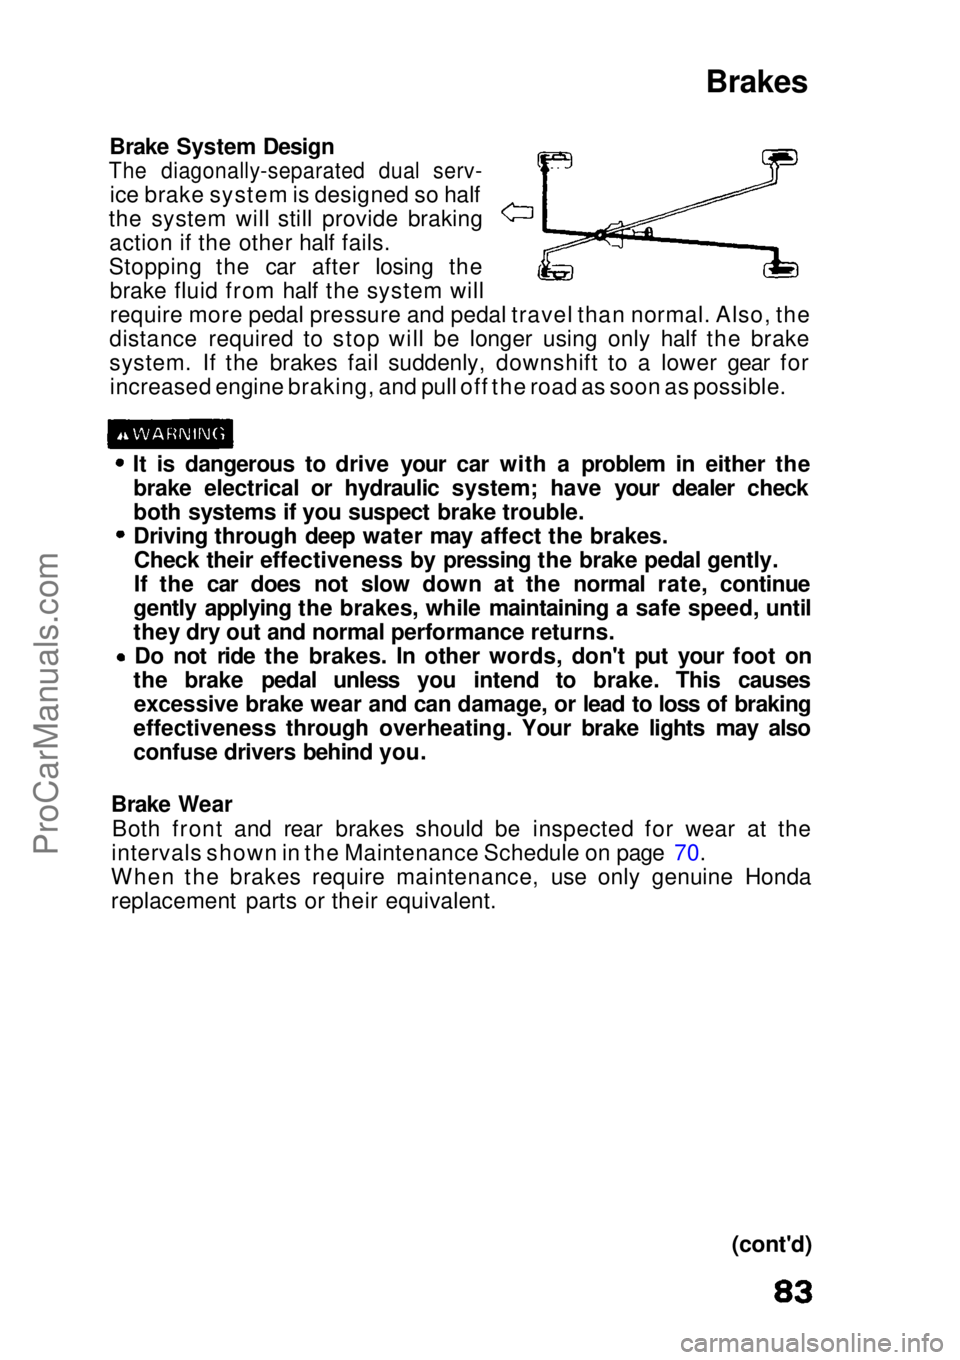
Brake System Design
The diagonally-separated dual serv-
ice brake system is designed so half
the system will still provide braking action if the other half fails.
Stopping the car after losing the brake fluid from half the system will
require more pedal pressure and pedal travel than normal. Also, the
distance required to stop will be longer using only half the brake
system. If the brakes fail suddenly, downshift to a lower gear for increased engine braking, and pull off the road as soon as possible.
It is dangerous to drive your car with a problem in either thebrake electrical or hydraulic system; have your dealer check
both systems if you suspect brake trouble.
Driving through deep water may affect the brakes.Check their effectiveness by pressing the brake pedal gently.
If the car does not slow down at the normal rate, continue
gently applying the brakes, while maintaining a safe speed, until
they dry out and normal performance returns. Do not ride the brakes. In other words, don't put your foot on
the brake pedal unless you intend to brake. This causes excessive brake wear and can damage, or lead to loss of braking
effectiveness through overheating. Your brake lights may also
confuse drivers behind you.
Brake Wear Both front and rear brakes should be inspected for wear at the
intervals shown in the Maintenance Schedule on page 70.
When the brakes require maintenance, use only genuine Honda
replacement parts or their equivalent.
(cont'd)ProCarManuals.comMain Menu s t
Page 84 of 136
Brakes (cont'd)
Front Brake Wear Indicators
Your car is equipped with audible front brake wear indicators. When
the brake pads wear to point that they should be replaced, they will make a "screeching" sound when the wheels are rolling and when
the brakes are applied.
NOTE:
Due to some driving habits or climates, brakes may "squeal" when
you first apply them or when you have them partially applied; this is normal, and does not indicate excessive wear. The wear indicator
makes a "screeching" sound while the brakes are applied.
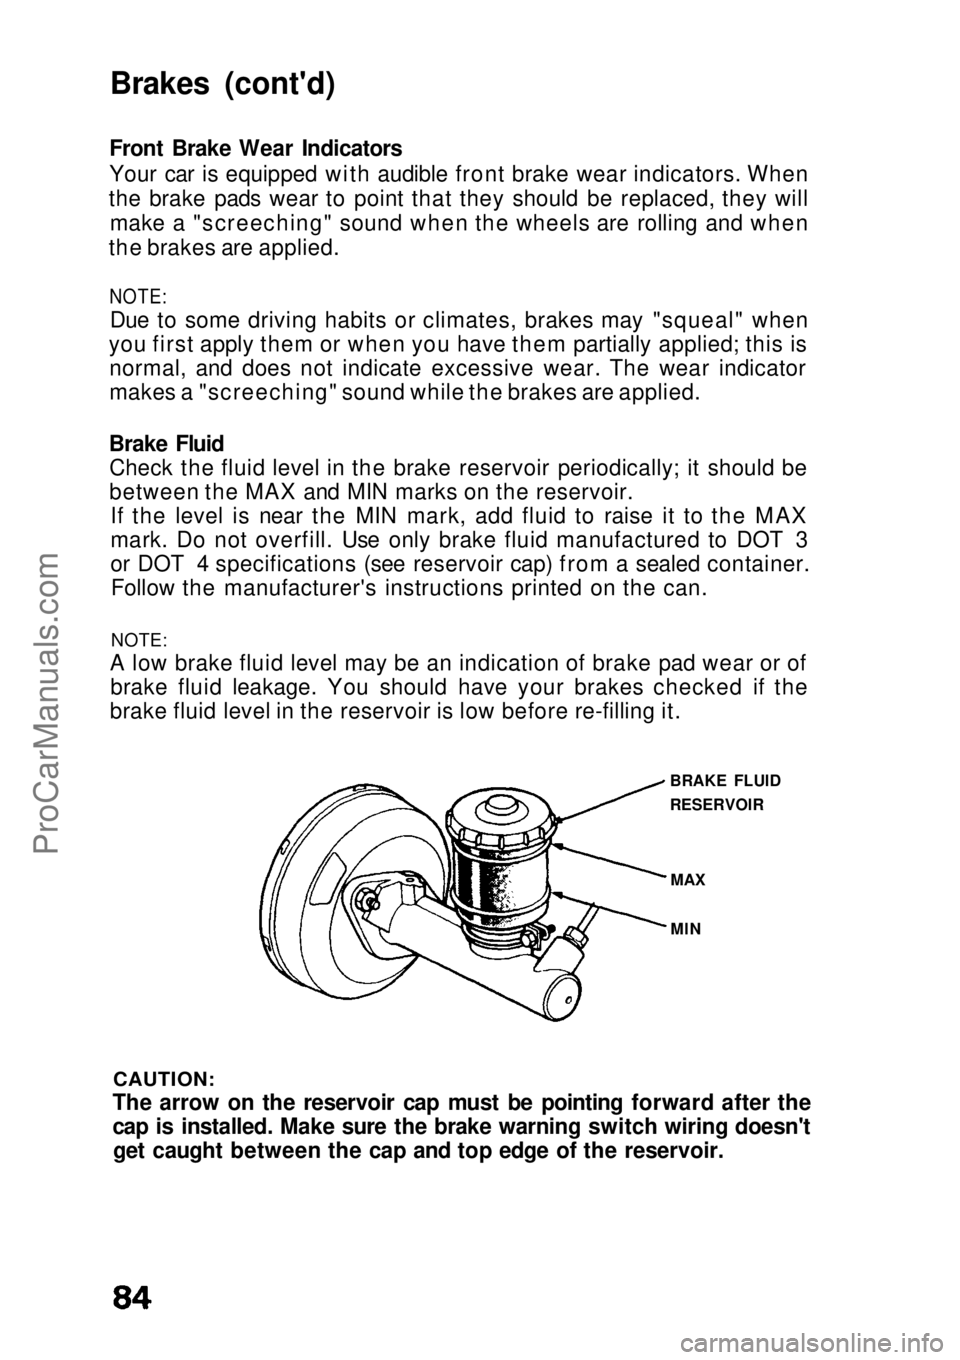
Brake Fluid Check the fluid level in the brake reservoir periodically; it should be
between the MAX and MIN marks on the reservoir. If the level is near the MIN mark, add fluid to raise it to the MAX
mark. Do not overfill. Use only brake fluid manufactured to DOT 3
or DOT 4 specifications (see reservoir cap) from a sealed container.Follow the manufacturer's instructions printed on the can.
NOTE:
A low brake fluid level may be an indication of brake pad wear or of brake fluid leakage. You should have your brakes checked if the
brake fluid level in the reservoir is low before re-filling it.
BRAKE FLUID
RESERVOIR
CAUTION:
The arrow on the reservoir cap must be pointing forward after the
cap is installed. Make sure the brake warning switch wiring doesn't get caught between the cap and top edge of the reservoir. MAX
MINProCarManuals.comMain Menu s t
Page 110 of 136
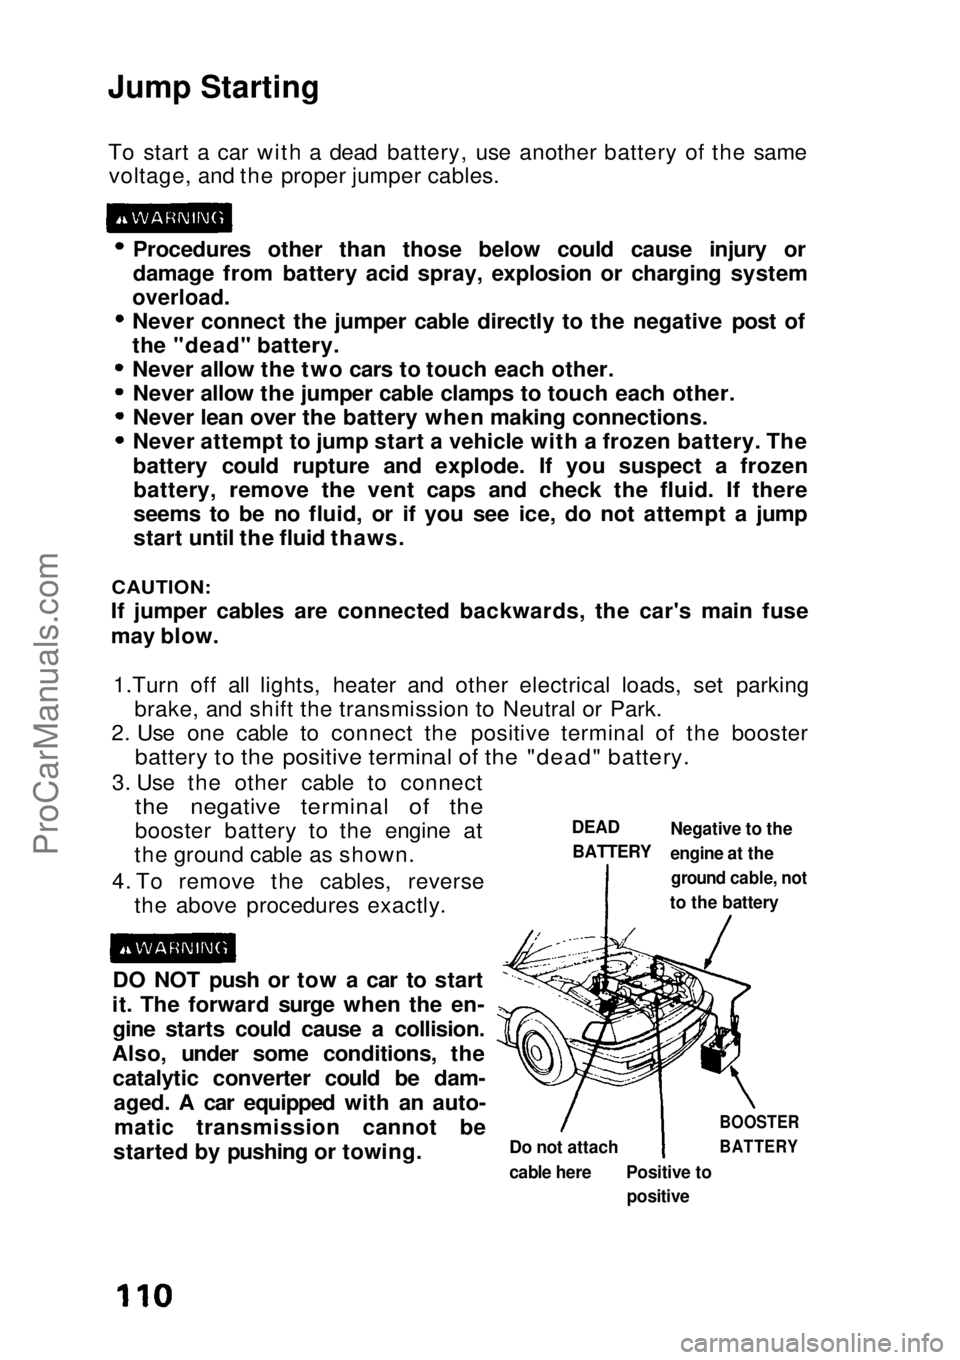
Jump Starting
To start a car with a dead battery, use another battery of the samevoltage, and the proper jumper cables.
Procedures other than those below could cause injury or
damage from battery acid spray, explosion or charging system
overload.
Never connect the jumper cable directly to the negative post of
the "dead" battery.
Never allow the two cars to touch each other. Never allow the jumper cable clamps to touch each other.
Never lean over the battery when making connections.
Never attempt to jump start a vehicle with a frozen battery. The
battery could rupture and explode. If you suspect a frozenbattery, remove the vent caps and check the fluid. If there
seems to be no fluid, or if you see ice, do not attempt a jump
start until the fluid thaws.
CAUTION:
If jumper cables are connected backwards, the car's main fuse
may blow.
1.Turn off all lights, heater and other electrical loads, set parking brake, and shift the transmission to Neutral or Park.
2. Use one cable to connect the positive terminal of the booster
battery to the positive terminal of the "dead" battery.
3. Use the other cable to connect
the negative terminal of the
booster battery to the engine at
the ground cable as shown.
4. To remove the cables, reverse the above procedures exactly.
DO NOT push or tow a car to start
it. The forward surge when the en- gine starts could cause a collision.
Also, under some conditions, the catalytic converter could be dam- aged. A car equipped with an auto-matic transmission cannot be
started by pushing or towing.
DEAD
BATTERY
Negative to the
engine at the
ground cable, not
to the battery
Do not attach
cable here
Positive to
positive
BOOSTER
BATTERYProCarManuals.comMain Menu s t
Page 129 of 136
Index
Battery
Charging System Warning Light.............................................. 30
Jump Starting ........................ 110
Maintenance............................. 89
Specification (Hatchback).... 116
Specification (Sedan)............ 119
Beeper System Fasten Seat Belt Beeper(Sedan).................................. 11
(Hatcback)............................ 15
Belts, Seat............. See "Seat Belts"
Body Repair.................................. 102
Brake Warning Light...................... 31 Brakes
Brake Failure Warning Light.... 31
Brake Fluid................................ 84
Brake System Design.............. 83
Brake Wear Indicators............. 84
Parking Brake........................... 42
Parking Brake Warning Light.. 31
Break-in Period................................. 2
Bulb
Replacement............................
92
Specification (Hatchback)....
117
Specification (Sedan)............
120
Buzzer........... See
"Beeper System"
Capacities (Hatchback)............... 115 Capacities (Sedan)....................... 118
Care and Cleaning.......................... 99
Catalytic Converter..................... 126 Certification Label....................... 121
Chains, Tires...................................
95
Check Engine
Warning Light......... 31
Child Proof Door Locks...................
5
Child Restraint
System................. 21
Cigarette Lighter............................ 44
Clock............................................... 42
Clutch Pedal Adjustment.............. 61
Compact Spare Tire.................... 104
Coolant Temperature Gauge ........
28
Cooling (with
A/C).........................
49
Cooling System..............................
80
Crankcase Emission Control
System................................... 124
Cruise Control Operation.................................. 39
Indicator.................................... 31
Defogger........................................ 34
Defroster........................................ 51
Doors
Child Proof Door Locks............. 5
Locks........................................... 3
Power Locks.............................. 4
Emergency
Changing a Flat Tire............... 105
Hazard Warning System ......... 37If Your Car Gets Stuck.......... 112
Jump Starting........................ 110
Shoulder Belt Buckle............. 113
Towing.................................... 111
Warning and Indicator Lights.. 29
Emission Controls........................ 124
Engine
Coolant...................................... 80
Coolant Temperature Gauge... 28
Exhaust Controls................... 125Identification Number............ 12
1
Oil and
Filter.............................. 76
OH Pressure Warning Light..... 30
Specification (Hatchback).... 116
Air Conditioner
Operation.................................. 47
Service...................................... 98
Air Filter.......................................... 86
Air Pressure, Tires......................... 94
Antifreeze.. See "Radiator Coolant" Anti-theft Steering Column Lock System ..................................... 57
Appearance Care........................ 100
Ashtrays......................................... 44
Automatic Seat Belt...................... 10
Automatic Transmission
Driving Technique.................... 66
Fluid........................................... 79
Operation.................................. 64
(cont'd)ProCarManuals.comMain Menu s t
Page 131 of 136
Maintenance
Non-Scheduled MaintenanceRecord................................... 72
Scheduled Maintenance Record................................... 71
Schedule................................... 68
Severe Driving Conditions...... 72
Manual Transmission Clutch Pedal Adjustment........ 61
Maximum Allowable Speeds.. 63
Oil...............................................
78
Recommended Shift
Speeds.. 62
Shifting......................................
61
Meters, Gauges..........
See "Gauges"
Mirrors Power Mirrors.......................... 35
Rearview Mirrors..................... 35
Octane Rating, Gasoline. See "Fuel"
Odometer........................................ 28
Oil
Engine Oil.................................. 75
Fluid Locations......................... 74
Oil Pressure Warning Light..... 30
Power Steering Fluid................ 85
Transmission Oil/Fluid.............. 78
Operation In Foreign Countries..... 55
Panel Brightness Control............... 37
Parking Brake................................. 42
Passive Belt.................................... 10
PGM-FI
System.................................... 125
Power Door Locks................................. 4
Mirrors...................................... 35
Steering..................................... 85
Windows.................................. 43
Pregnant Women........................... 25
Pressures, Tire Inflation................ 94
Preventive Service...................... 102 Radiator Coolant............................ 80
Rear Seat.......................................... 8
Rearview Mirrors........................... 35
Rear Window Defogger................ 34Rear Window Wiper...................... 34Reminder Lights .................. See "Warning Lights"
Replacement
Air Filter.................................... 86
Bulb............................................ 92
Engine Oil.................................. 76
Fuel Filter.................................. 86
Fuse...........................................90
Oil Filter..................................... 76
Radiator Coolant...................... 82
Spark Plugs............................... 87
Tire............................................ 94
Wiper Blades............................. 88
Rust Prevention........................... 101
Safety Defects, Reporting.......... 128
Safety Items................................... 59
Seats
Adjustment................................. 6
Head Restraints.......................... 7
Seat Belt Reminder Light
and Beeper (Sedan).................. 14
Seat Belt Reminder Light and Beeper (Hatchback).......... 17
Seat Belts Anchor Points (Hatchback)..... 22
Anchor Points (Sedan)............ 24
Automatic Belt......................... 10
Buckling the Front Seat Belts (Sedan)............... 11
Buckling the Front Seat Belts (Hatchback)....... 15
Buckling the Rear Seat Belts .. 19
Child Restraint.......................... 21
Cleaning..................................... 25
Fasten Seat Belt Reminder Light and Beeper (Sedan).............. 14
Fasten Seat Belt Reminder Light and Beeper (Hatchback)...... 17
(cont'd)
Numbers, Identification............... 121ProCarManuals.comMain Menu s t