1990 VOLVO 240 tow
[x] Cancel search: towPage 2 of 143
Volvo 1990 240 Model
You should be familiar with the information in the first two chapters be\
fore you operate the car.
Information contained in the balance of the manual is extremely useful a\
nd should be studied shortly
after operating the vehicle for the first time. The manual is structured\
so that it can be used for reference.
It should thus be kept in the car for ready access.
All information, illustrations and specifications contained in this manu\
al are based on the latest product
information available at the time of publication. Volvo reserves the rig\
ht to make model changes at any
time, or to change specifications or design, without notice and without \
incurring obligation.
Introduction to the manual 2
Before you drive 7
This section provides a detailed description of the vehicle's instrument\
s and controls.
Operating the car 41
This section contains items such as starting the engine, operating gear \
selector, towing trailers.
Service and maintenance 53
An investment which will pay dividends in the form of improved reliabili\
ty, durability, and resale value.
Specifications 97
All specifications are subject to change without notice. Consult your Vo\
lvo dealer for information.
Should you require more detailed information please contact your Volvo d\
ealer. pg. 2 This manual deals with the operation and care of your Volvo
Welcome to the world-wide family of Volvo owners. We trust that you will\
enjoy many years of safe
driving in your Volvo, an automobile designed with your safety and comfo\
rt in mind. To ensure your
satisfaction with this vehicle, we encourage you to familiarize yourself\
with the equipment descriptions,
operating instructions, and maintenance requirements/recommendations in \
this manual. We also urge
you and your passengers to wear seat belts at all times in this (or any\
other) automobile. And of course,
please do not operate a vehicle if you may be affected by alcohol, medic\
ation, or any impairment that
could hinder your ability to drive.
Your Volvo is designed to meet all applicable safety and emission standa\
rds, as evidenced by the
certification labels attached to the door opening sheet metal and on the\
left wheel housing in the engine
file:///K|/ownersdocs/1990/1990_240/90240_00.htm (2 of 4)12/30/2006 8:\
25:01 AM
Page 11 of 143

Volvo 1990 240 Model
Brake failure warning light (red)
If the light comes on while driving and the brake
pedal can be depressed further than normal, it is an
indication that one of the brake circuits is not
functioning. Stop immediately, open engine hood
and check brake fluid level (see section "Brake fluid,
power steering").
Reservoir empty: do NOT drive. Tow car to shop for
check/repair of brake system. Reservoir not empty:
proceed immediately and with caution to a Volvo
dealer for an inspection of the brake system.
Canadian models are equipped with this warning
light:
pg. 12 Service reminder light, Clock, Ambient temperature gauge
Supplemental Restraint System (SRS)
If the light comes on (or stays on after the vehicle has started), the\
SRS diagnostic system has detected a
fault. Take the car to an authorized Volvo dealer for an inspection of t\
he system. See the SRS section for
more information.
Service reminder light
This light will come on at 5,000 mile (8,000 km) intervals. It is a re\
minder to the driver that the 5,000
mile (8,000 km) service interval has been exceeded. The light will sta\
y on 2 minutes after start until
reset by the servicing dealer.
Check Engine warning light
file:///K|/ownersdocs/1990/1990_240/90240_02.htm (2 of 4)12/30/2006 8:\
25:02 AM
Page 15 of 143
Volvo 1990 240 Model
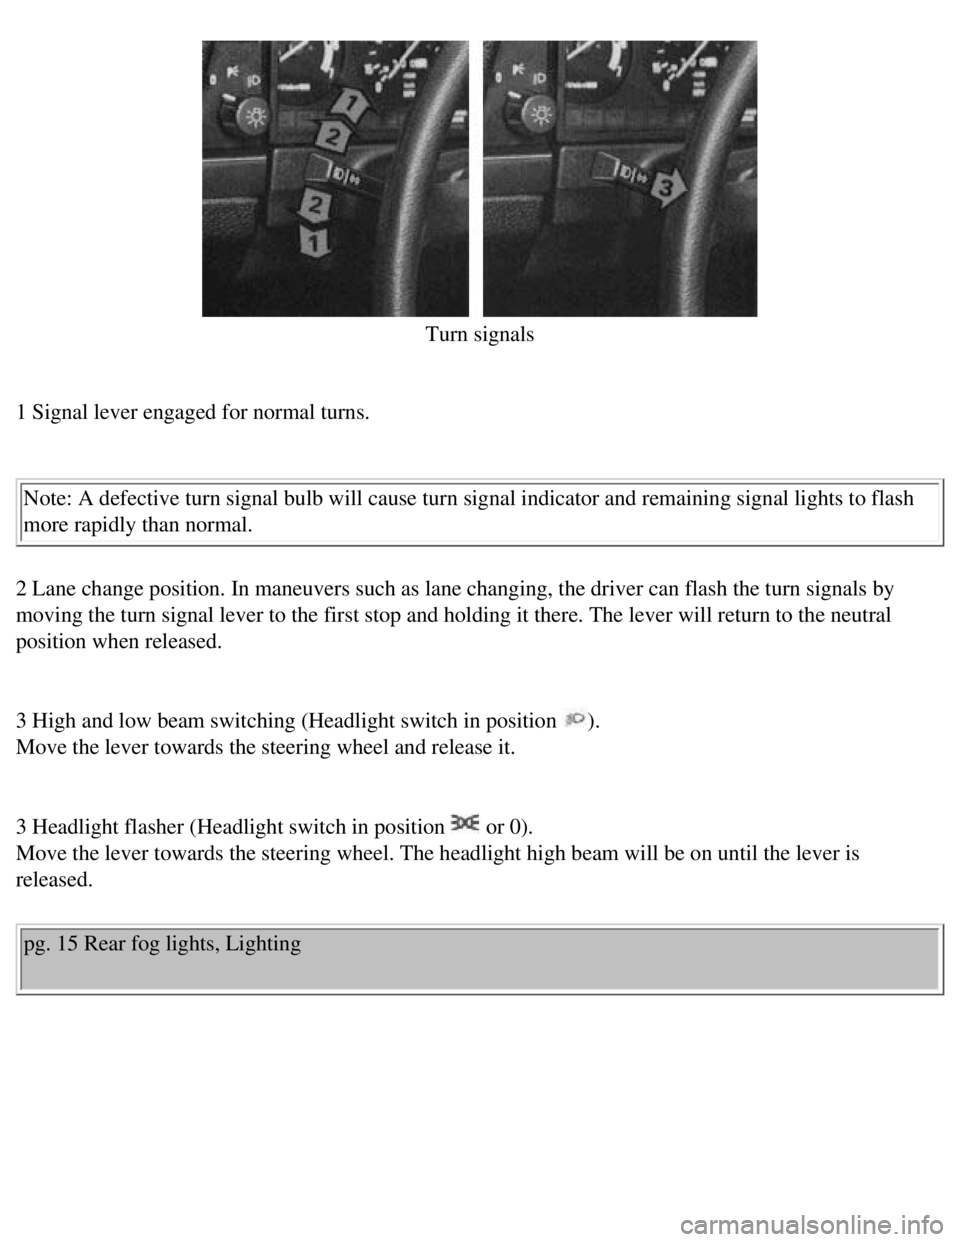
Turn signals
1 Signal lever engaged for normal turns.
Note: A defective turn signal bulb will cause turn signal indicator and \
remaining signal lights to flash
more rapidly than normal.
2 Lane change position. In maneuvers such as lane changing, the driver c\
an flash the turn signals by
moving the turn signal lever to the first stop and holding it there. The\
lever will return to the neutral
position when released.
3 High and low beam switching (Headlight switch in position
).
Move the lever towards the steering wheel and release it.
3 Headlight flasher (Headlight switch in position
or 0).
Move the lever towards the steering wheel. The headlight high beam will \
be on until the lever is
released.
pg. 15 Rear fog lights, Lighting
file:///K|/ownersdocs/1990/1990_240/90240_03.htm (2 of 7)12/30/2006 8:\
25:02 AM
Page 16 of 143
Volvo 1990 240 Model
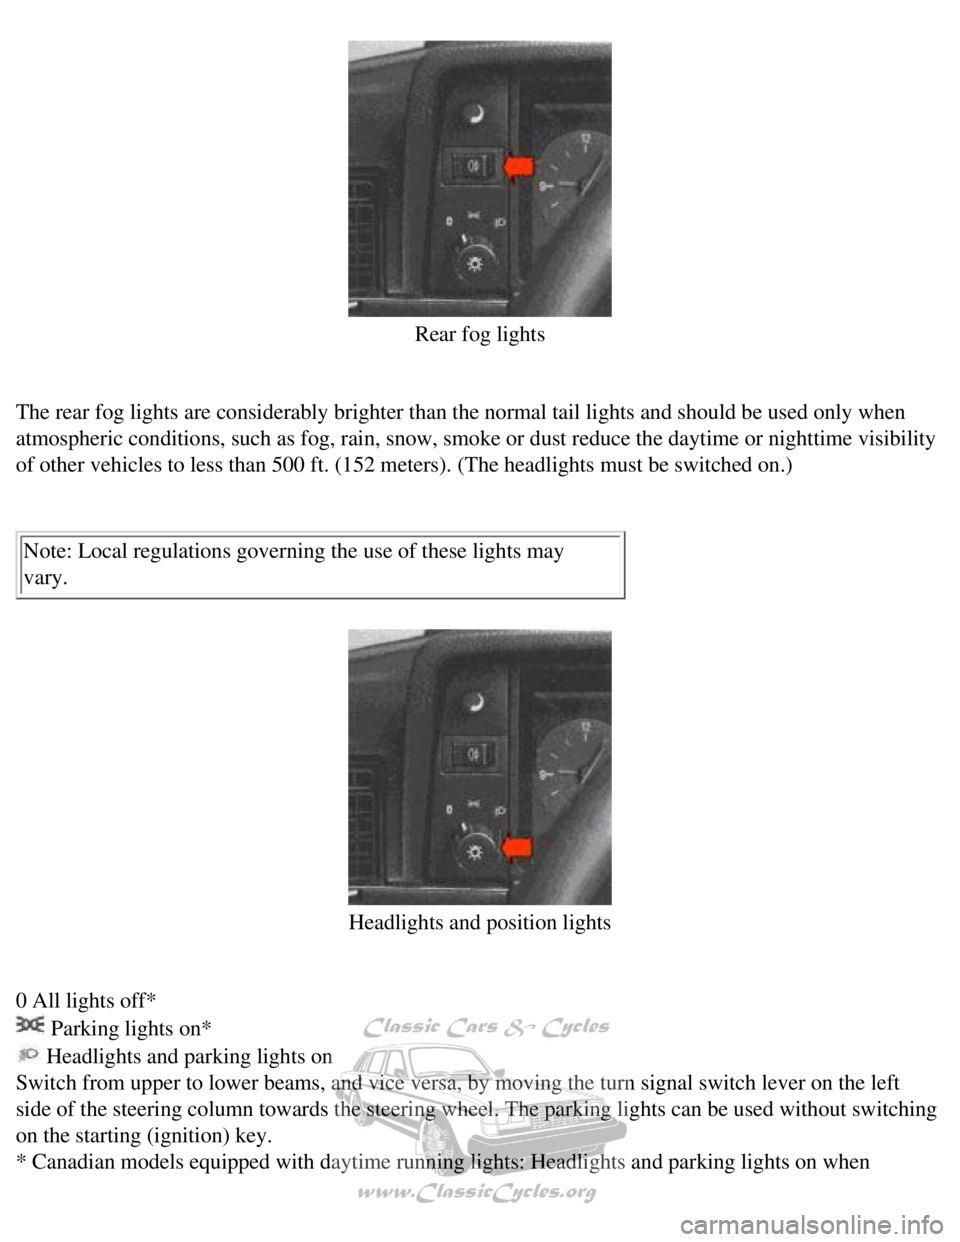
Rear fog lights
The rear fog lights are considerably brighter than the normal tail light\
s and should be used only when
atmospheric conditions, such as fog, rain, snow, smoke or dust reduce th\
e daytime or nighttime visibility
of other vehicles to less than 500 ft. (152 meters). (The headlights \
must be switched on.)
Note: Local regulations governing the use of these lights may
vary.
Headlights and position lights
0 All lights off*
Parking lights on*
Headlights and parking lights on
Switch from upper to lower beams, and vice versa, by moving the turn sig\
nal switch lever on the left
side of the steering column towards the steering wheel. The parking ligh\
ts can be used without switching
on the starting (ignition) key.
* Canadian models equipped with daytime running lights: Headlights and p\
arking lights on when
file:///K|/ownersdocs/1990/1990_240/90240_03.htm (3 of 7)12/30/2006 8:\
25:02 AM
Page 29 of 143
Volvo 1990 240 Model
How to use the air conditioner:
1
Fan
Position 4 for rapid cooling.
2 AIR COND
Start the air conditioning compressor by turning the control knob clockw\
ise toward MAX.
For rapid cooling, position the knob into the orange range beyond MAX. A\
fter desired temperature is
reached re-position the control knob into the blue range.
At cruising speeds, the knob should be kept within the blue range. If it\
remains in the orange range, icing
may occur resulting in decreased cooling capacity.
3
Recirculation
Push in for rapid cooling and during high humidity conditions.
4 TEMP
When using the air conditioner for cooling, the TEMP control should be s\
et to COOL position, fully left.
Use the AIR COND control to regulate the temperature.
To obtain rapid cooling, all windows must be closed and buttons
and out. Cool air will then be
discharged through the four dash outlets which should be fully open.
Note: For rapid removal of condensation from inside glass surfaces, the \
air conditioner can be
switched on even when not required for interior cooling. The air conditi\
oner will dehumidify the air
inside the vehicle.
Have your Volvo dealer check the system for correct operation yearly. Th\
e air conditioning system
should be operated periodically to ensure trouble-free performance year \
round.
pg. 25 Audio systems
Operating instructions
file:///K|/ownersdocs/1990/1990_240/90240_05.htm (4 of 6)12/30/2006 8:\
25:03 AM
Page 51 of 143

Volvo 1990 240 Model
pg. 41 Operating the car
42Service inspection
42Break-in period
43Driving economy, shift indicator light
44Starting the engine
45Manual transmission
46Automatic transmission
48Emergency towing
49Towing information
50Trailer hauling
51Automatic transmission, brake system
52Catalytic converter
pg. 42 Break-in period, Service inspection
A new car should be broken-in!
Manual transmission
During the break-in period do not exceed the following speeds*:
First 600 miles (1,000 km)
1st gear 20
mph
(30 km/h)
2nd
gear 30
mph
(50 km/h)
file:///K|/ownersdocs/1990/1990_240/90240_09.htm (1 of 6)12/30/2006 8:\
25:05 AM
Page 54 of 143

Volvo 1990 240 Model
l Avoid using automatic transmission kick-down feature unless necessary.
Other factors which decrease gas mileage are:
l Worn or dirty spark plugs
l Incorrect spark plug gap
l Dirty air filter
l Incorrect valve clearance
l Incorrect idle speed
l Dirty engine oil and clogged oil filter
l Dragging brakes
l Incorrect front end alignment
l Low tire pressure
Shift indicator light
(manual transmission models only)
The Volvo shift indicator light (S.I.L.) is a device designed to help \
you get even better gas mileage from
your Volvo car. Studies have shown that the best fuel economy is obtaine\
d by shifting gears at low
engine rpm and high relative engine load. The Volvo S.I.L. is calibrated\
to show you when to shift for
improved mileage without sacrificing smooth acceleration .
Use of the S.I.L. is simple. Shift to next higher gear as soon as the li\
ght comes on. You may find after
using the S.I.L. for some time that your natural shifting rhythm will ad\
apt to the S.I.L.'s suggestion.
Some drivers may even shift before the light comes on.
Obviously, there will be times when you need to shift later than the lig\
ht would indicate (for example,
when climbing hills or trailer towing). Using the light regularly, howe\
ver, should result in a mileage
improvement of six percent or more, depending on how you normally drive.\
Programming instructions for shift indicator
If the current supply to the control unit is cut (battery disconnected)\
, the control unit will have to be re-
programmed as the control unit memory will be erased.
Drive the car in each gear (first gear not necessary) for approximatel\
y 8 seconds.
The gear change indicator light will flicker once (0.5 seconds), as ea\
ch gear is programmed.
file:///K|/ownersdocs/1990/1990_240/90240_09.htm (4 of 6)12/30/2006 8:\
25:05 AM
Page 60 of 143
Volvo 1990 240 Model
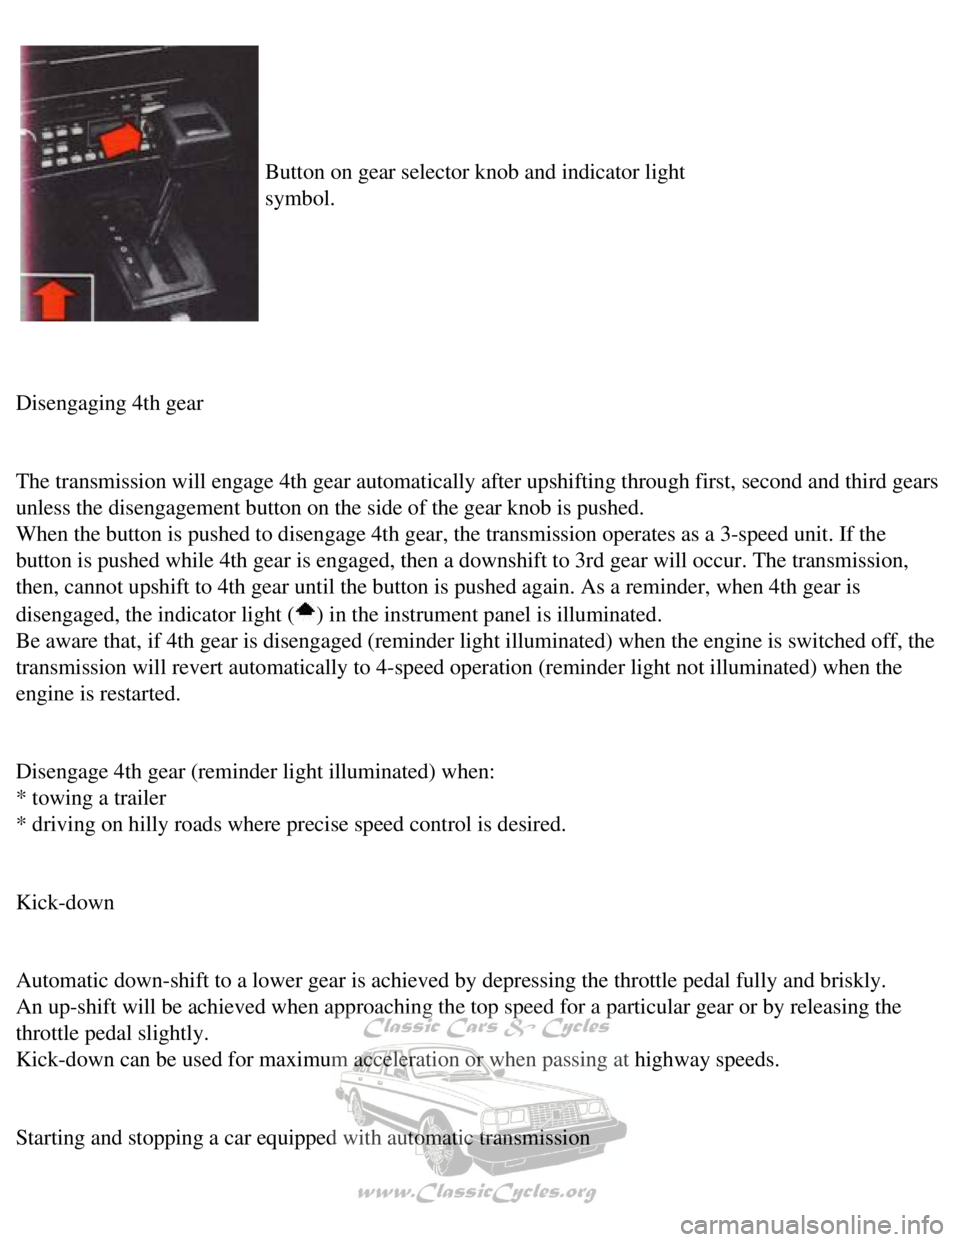
Button on gear selector knob and indicator light
symbol.
Disengaging 4th gear
The transmission will engage 4th gear automatically after upshifting thr\
ough first, second and third gears
unless the disengagement button on the side of the gear knob is pushed. \
When the button is pushed to disengage 4th gear, the transmission operat\
es as a 3-speed unit. If the
button is pushed while 4th gear is engaged, then a downshift to 3rd gear\
will occur. The transmission,
then, cannot upshift to 4th gear until the button is pushed again. As a \
reminder, when 4th gear is
disengaged, the indicator light (
) in the instrument panel is illuminated.
Be aware that, if 4th gear is disengaged (reminder light illuminated) \
when the engine is switched off, the
transmission will revert automatically to 4-speed operation (reminder l\
ight not illuminated) when the
engine is restarted.
Disengage 4th gear (reminder light illuminated) when:
* towing a trailer
* driving on hilly roads where precise speed control is desired.
Kick-down
Automatic down-shift to a lower gear is achieved by depressing the throt\
tle pedal fully and briskly.
An up-shift will be achieved when approaching the top speed for a partic\
ular gear or by releasing the
throttle pedal slightly.
Kick-down can be used for maximum acceleration or when passing at highwa\
y speeds.
Starting and stopping a car equipped with automatic transmission
file:///K|/ownersdocs/1990/1990_240/90240_10.htm (4 of 7)12/30/2006 8:\
25:05 AM