1990 VOLKSWAGEN CORRADO fuel cap
[x] Cancel search: fuel capPage 293 of 906

1.8L 4-CYL 8-VALVE & 1.8L 4-CYL 16-VALVE
Article Text (p. 2)
1990 Volkswagen Corrado
For Volkswagen Technical Site: http://vw.belcom.ru
Copyright © 1998 Mitchell Repair Information Company, LLC
Thursday, March 23, 2000 09:40PM
NOTE: Match mark engine mounts to ensure original alignment is
achieved after installation. On vehicles with A/C and power
steering, remove components with hoses attached and secure
out of way.
ENGINE R & I (EXCEPT FOX)
REMOVAL (EXCEPT FOX)
1) Disconnect and remove battery. Open fuel tank fill cap and
radiator cap. Remove intake air duct. On 16-valve engines, remove
intake manifold assembly. On vehicles with A/C, remove trim panel and
lower apron. Remove condenser from crossmember and radiator. Remove
all duct work. Mark and disconnect A/C and cooling fan electrical
connectors. Remove accessory belts.
2) On Golf, GTI and Jetta models, leave A/C hoses attached
and remove A/C compressor. Pivot A/C condenser and compressor to side
of vehicle and secure.
3) On Cabriolet and Scirocco models, remove alternator and
timing belt cover. Remove 3 A/C bracket Allen head bolts behind timing
belt cover. Remove A/C bracket support brace. Remove A/C compressor
bracket bolts. Leave hoses attached and secure A/C compressor with
bracket out of way.
4) On all models, open heater controls. Remove cooling hose
from thermostat housing flange and drain coolant. Remove flange. Mark
and remove all cooling system hoses (as necessary).
5) On Golf, GTI and Jetta models, remove grille from radiator
support. Disconnect electrical connectors at radiator support. Remove
radiator-to-support bolts. Remove radiator support using care not
damage headlights. Remove radiator, fan and shroud assembly.
6) On all models, remove axle shafts from transaxle. See FWD
AXLE SHAFTS article in the DRIVE AXLES section. Mark and disconnect
shift linkage and speedometer cable. Mark and remove electrical
connectors and vacuum hoses (as necessary). Disconnect throttle,
cruise and kickdown cables (if equipped). Leave fuel lines connected
and remove cold start injector and warm-up regulator.
7) Remove fuel injectors and install protective caps and
plugs. Remove rear engine mount. Remove complete transaxle mount. On
Cabriolet models, remove right front tire assembly. Remove right and
left engine mount through bolts.
8) On all models, install engine sling on engine lift hooks.
Carefully raise engine and transaxle out of vehicle. Separate
transaxle from engine (if necessary).
INSTALLATION
1) To install, reverse removal procedure. Engine alignment
adjustment is necessary whenever engine is removed or mounts are
loosened. To adjust, loosen through bolt on engine mount "A". Loosen
transmission transaxle mount "B" bolts. Loosen front engine mount and
bracket. See Fig. 2.
2) Lightly rock engine and transaxle to allow position to
Page 294 of 906

1.8L 4-CYL 8-VALVE & 1.8L 4-CYL 16-VALVE
Article Text (p. 3)
1990 Volkswagen Corrado
For Volkswagen Technical Site: http://vw.belcom.ru
Copyright © 1998 Mitchell Repair Information Company, LLC
Thursday, March 23, 2000 09:40PM
shift as necessary. Evenly tighten mount bolts in reverse order of
loosening. Fill fluids to proper level. Adjust clutch pedal (if
equipped). Tighten all bolts and nuts to specifications.
ENGINE R & I (FOX)
REMOVAL (FOX)
1) Disconnect negative battery cable. Open heater valve,
coolant expansion tank and drain radiator through lower radiator hose.
Mark and disconnect all heater hoses. Disconnect electric cooling fan
and thermo switch. Remove lower and side radiator mounting bolts.
Remove fan, shroud and radiator. Remove M/T clutch cable (if
equipped).
2) Mark and disconnect electrical wiring and vacuum hoses (as
necessary). Disconnect throttle, cruise and kickdown linkage (if
equipped). Remove fuel injectors and install protective caps and
plugs. Leave fuel lines attached and remove cold start valve. Remove
charcoal canister and set aside.
3) Remove 3 upper engine-to-transaxle bolts. Remove intake
air duct. Remove left and right engine mount nuts. Disconnect and
remove starter assembly. Remove 2 lower engine-to-transaxle bolts.
Remove transaxle inspection cover plate. Disconnect exhaust inlet pipe
support and separate inlet pipe from exhaust manifold.
4) Support transaxle. Attach engine sling to engine lifting
hooks. Raise engine/transaxle until engine clears engine mounts.
Ensure transaxle is supported. Remove remaining engine-to-transaxle
bolts. Lift and separate engine from vehicle without transaxle.
INSTALLATION
Lubricate transaxle main shaft splines and contact area
between clutch release bearing and clutch pressure plate with MoS2
grease. DO NOT lubricate guide sleeve for clutch release bearing. To
complete installation, reverse removal procedure. DO NOT reuse self-
locking nuts. Ensure engine mounts are installed to original location.
Tighten engine mounts and subframe bolts with engine running at idle.
Page 373 of 906

AA - USING THIS SECTION (GENERAL HELP INFORMATION)
Article Text (p. 2)
1990 Volkswagen Corrado
For Volkswagen Technical Site: http://vw.belcom.ru
Copyright © 1998 Mitchell Repair Information Company, LLC
Thursday, March 23, 2000 09:41PM
If you want "TUNE-UP" type information, see D - ADJUSTMENTS
for the adjustment procedures. If you are familiar with the
procedures, but need a quick way to find the specification, go to C -
TUNE-UP SPECS or C - SPECIFICATIONS for the specifications pertaining
to the vehicle.
When diagnosing driveability problems, first go to F - BASIC
TESTING. This article is here to help eliminate wasted diagnostic
time. If the basic systems are working properly, go to G - TESTS W/
CODES.
If the vehicle still is having a driveability problem or if
the vehicle has no self-diagnostic system, go to H - TESTS W/O CODES.
This article will help you diagnose the problem by symptom, locate the
symptom exhibited by the vehicle, and inspect or test the items which
may be causing the problem.
After finding which specific system or component requires
testing, use the I - SYS/COMP TESTS article to tests the systems and
components. We have also included (when available) pin voltage charts
and sensor range charts. These can be found in J - PIN VOLTAGE CHARTS
and K - SENSOR RANGE CHARTS.
Also included in this section are wiring diagrams and vacuum
diagrams. These can be found in L - WIRING DIAGRAMS and M - VACUUM
DIAGRAMS.
When all diagnostic tests have been performed and the problem
has been discovered, it may be necessary to replace or overhaul the
defective part. This information can be found in
N - REMOVE/INSTALL/OHAUL.
The content of each of these articles is outlined below. As a
summary of the driveability diagnosis, see ROUTINE OUTLINE in this
article.
A - ENGINE/VIN ID
This article shows how to identify the model and engine by
its Vehicle Identification Number (VIN). A model coverage chart shows
each model and engine, the fuel system, ignition system and engine
code. The engine serial number locations are also included in this
article.
B - EMISSION APPLICATION
These charts identify the emission systems and sub-systems
applicable to each model and engine combination.
C - TUNE-UP SPECS
This is a collection of quick-reference type specifications.
This article is helpful when you are familiar with proper adjustment
procedures and only need specifications. Included in this section are:
* Battery specifications.
* Fluid capacities.
Page 374 of 906

AA - USING THIS SECTION (GENERAL HELP INFORMATION)
Article Text (p. 3)
1990 Volkswagen Corrado
For Volkswagen Technical Site: http://vw.belcom.ru
Copyright © 1998 Mitchell Repair Information Company, LLC
Thursday, March 23, 2000 09:41PM
* Replacement intervals.
* Belt adjustment.
* Engine Compression.
* Valve clearance.
* Valve Arrangement.
* Ignition coil specifications.
* High tension wire resistance.
* Spark plug type and gap.
* Firing order.
* Ignition timing.
* Fuel pump performance and injector resistance specifications
* Slow and fast idle speed and mixture specifications.
* Carbon monoxide (CO) level specifications.
* Throttle position sensor/switch specifications.
C - SPECIFICATIONS
This is a collection of quick-reference type specifications.
This article is helpful when you are familiar with proper adjustment
procedures and only need specifications. Included in this section are:
* Battery specifications.
* Fluid capacities.
* Replacement intervals.
* Belt adjustment.
* Engine Compression.
* Valve clearance.
* Valve Arrangement.
* Ignition coil specifications.
* High tension wire resistance.
* Spark plug type and gap.
* Firing order.
* Ignition timing.
* Fuel pump performance and injector resistance specifications
* Slow and fast idle speed and mixture specifications.
* Carbon monoxide (CO) level specifications.
* Throttle position sensor/switch specifications.
D - ADJUSTMENTS
This article contains the information that use to be included
in the TUNE-UP section. Checking and adjusting valves, spark plugs,
spark plug wires, base ignition timing and idle speed are found in
this section. Use this article for routine maintenance. Also, if you
have a driveability problem, ensure all on-vehicle adjustments are
correct before proceeding with any diagnosis.
E - THEORY/OPERATION
Page 380 of 906

ABBREVIATIONS
Article Text (p. 3)
1990 Volkswagen Corrado
For Volkswagen Technical Site: http://vw.belcom.ru
Copyright © 1998 Mitchell Repair Information Company, LLC
Thursday, March 23, 2000 09:42PM³CBVV ³Carburetor Bowl Vent Valve ³
³cc
³Cubic Centimeter ³
³CCC
³Computer Command Control ³
³CCD
³Computer Controlled Dwell ³
³CCM
³Central Control Module ³
³CCO
³Converter Clutch Override ³
³CCOT
³Cycling Clutch Orifice Tube ³
³CCW
³Counterclockwise ³
³CDI
³Capacitor Discharge Ignition ³
³CEC
³Computerized Engine Control ³
³CFI
³Central Fuel Injection ³
³CID
³Cubic Inch Displacement ³
³CID
³Cylinder Identification sensor ³
³CIS
³Continuous Injection System ³
³CIS-E
³Continuous Injection System-Electronic ³
³CKT
³Circuit ³
³CLR
³Clear ³
³CNG
³Compressed Natural Gas ³
³CO
³Carbon Monoxide ³
³CO2
³Carbon Dioxide ³
³CONV
³Convertible ³
³CP
³Canister Purge ³
³CPA
³Connector Position Assurance ³
³CPS
³Crank Position Sensor ³
³CTS
³Coolant Temperature Sensor ³
³CV
³Check Valve or Constant Velocity ³
³CVC
³Constant Vacuum Control ³
³CW
³Clockwise ³
³CYL or Cyl.
³Cylinder ³
³Calif.
³California ³
³Carb.
³Carburetor ³
³Chrg.
³Charging ³
³Circ.
³Circuit ³
³Cntrl.
³Control ³
³Comp.
³Compressor or Compartment ³
³Conn.
³Connector ³
³Cont.
³Continued ³
³Conv.
³Convertible or Converter ³
³Cu. In.
³Cubic Inch ³
³Cyl.
³Cylinder ³
ÀÄÄÄÄÄÄÄÄÄÄÄÄÄÄÄÄÄÁÄÄÄÄÄÄÄÄÄÄÄÄÄÄÄÄÄÄÄÄÄÄÄÄÄÄÄÄÄÄÄÄÄÄÄÄÄÄÄÄÄÄÄÄÄÄÄÄÄÄÙ "D" ABBREVIATION TABLE
"D" ABBREVIATION TABLE
ÚÄÄÄÄÄÄÄÄÄÄÄÄÄÄÄÄÄÂÄÄÄÄÄÄÄÄÄÄÄÄÄÄÄÄÄÄÄÄÄÄÄÄÄÄÄÄÄÄÄÄÄÄÄÄÄÄÄÄÄÄÄÄÄÄÄÄÄÄ¿
³ABBREVIATION
³DEFINITION ³
ÃÄÄÄÄÄÄÄÄÄÄÄÄÄÄÄÄÄÅÄÄÄÄÄÄÄÄÄÄÄÄÄÄÄÄÄÄÄÄÄÄÄÄÄÄÄÄÄÄÄÄÄÄÄÄÄÄÄÄÄÄÄÄÄÄÄÄÄÄ´
³"D"
³Drive ³
³DBC
³Dual Bed Catalyst ³
³DC
³Direct Current or Discharge ³
³DDD
³Dual Diaphragm Distributor ³
Page 392 of 906

ABBREVIATIONS
Article Text (p. 3)
1990 Volkswagen Corrado
For Volkswagen Technical Site: http://vw.belcom.ru
Copyright © 1998 Mitchell Repair Information Company, LLC
Thursday, March 23, 2000 09:42PM³CBD ³Closed Bowl Distributor ³
³CBVV
³Carburetor Bowl Vent Valve ³
³cc
³Cubic Centimeter ³
³CCC
³Computer Command Control ³
³CCD
³Computer Controlled Dwell ³
³CCM
³Central Control Module ³
³CCO
³Converter Clutch Override ³
³CCOT
³Cycling Clutch Orifice Tube ³
³CCW
³Counterclockwise ³
³CDI
³Capacitor Discharge Ignition ³
³CEC
³Computerized Engine Control ³
³CFI
³Central Fuel Injection ³
³CID
³Cubic Inch Displacement ³
³CID
³Cylinder Identification sensor ³
³CIS
³Continuous Injection System ³
³CIS-E
³Continuous Injection System-Electronic ³
³CKT
³Circuit ³
³CLR
³Clear ³
³CNG
³Compressed Natural Gas ³
³CO
³Carbon Monoxide ³
³CO2
³Carbon Dioxide ³
³CONV
³Convertible ³
³CP
³Canister Purge ³
³CPA
³Connector Position Assurance ³
³CPS
³Crank Position Sensor ³
³CTS
³Coolant Temperature Sensor ³
³CV
³Check Valve or Constant Velocity ³
³CVC
³Constant Vacuum Control ³
³CW
³Clockwise ³
³CYL or Cyl.
³Cylinder ³
³Calif.
³California ³
³Carb.
³Carburetor ³
³Chrg.
³Charging ³
³Circ.
³Circuit ³
³Cntrl.
³Control ³
³Comp.
³Compressor or Compartment ³
³Conn.
³Connector ³
³Cont.
³Continued ³
³Conv.
³Convertible or Converter ³
³Cu. In.
³Cubic Inch ³
³Cyl.
³Cylinder ³
ÀÄÄÄÄÄÄÄÄÄÄÄÄÄÄÄÄÄÁÄÄÄÄÄÄÄÄÄÄÄÄÄÄÄÄÄÄÄÄÄÄÄÄÄÄÄÄÄÄÄÄÄÄÄÄÄÄÄÄÄÄÄÄÄÄÄÄÄÄÙ "D" ABBREVIATION TABLE
"D" ABBREVIATION TABLE
ÚÄÄÄÄÄÄÄÄÄÄÄÄÄÄÄÄÄÂÄÄÄÄÄÄÄÄÄÄÄÄÄÄÄÄÄÄÄÄÄÄÄÄÄÄÄÄÄÄÄÄÄÄÄÄÄÄÄÄÄÄÄÄÄÄÄÄÄÄ¿
³ABBREVIATION
³DEFINITION ³
ÃÄÄÄÄÄÄÄÄÄÄÄÄÄÄÄÄÄÅÄÄÄÄÄÄÄÄÄÄÄÄÄÄÄÄÄÄÄÄÄÄÄÄÄÄÄÄÄÄÄÄÄÄÄÄÄÄÄÄÄÄÄÄÄÄÄÄÄÄ´
³"D"
³Drive ³
³DBC
³Dual Bed Catalyst ³
³DC
³Direct Current or Discharge ³
Page 430 of 906

C - SPECIFICATIONS
Article Text (p. 2)
1990 Volkswagen Corrado
For Volkswagen Technical Site: http://vw.belcom.ru
Copyright © 1998 Mitchell Repair Information Company, LLC
Thursday, March 23, 2000 09:43PM
All Other Models .................................. 4.3 (4.1)
Man. Transaxle (SAE 80W-90/API GL-4)
Fox ............................................... 1.8 (1.7)
Vanagon ........................................... 3.2 (3.0)
All Other Models .................................. 2.1 (2.0)
(1) - Refill capacity.ÄÄÄÄÄÄÄÄÄÄÄÄÄÄÄÄÄÄÄÄÄÄÄÄÄÄÄÄÄÄÄÄÄÄÄÄÄÄÄÄÄÄÄÄÄÄÄÄÄÄÄÄÄÄÄÄÄÄÄÄÄÄÄÄÄ BELT ADJUSTMENT TABLE
BELT ADJUSTMENT TABLE
ÄÄÄÄÄÄÄÄÄÄÄÄÄÄÄÄÄÄÄÄÄÄÄÄÄÄÄÄÄÄÄÄÄÄÄÄÄÄÄÄÄÄÄÄÄÄÄÄÄÄÄÄÄÄÄÄÄÄÄÄÄÄÄÄÄApplication (1) Deflection In. (mm)
All Models (Except Vanagon)
Alternator
New ........................................... (2) 5/64 (2)
Old .............................................. 13/64 (5)
A/C Compressor
New ............................................... 3/8 (10)
Old ............................................... 3/8 (10)
Power Steering
New ............................................... 5/64 (2)
Old .............................................. 13/64 (5)
Vanagon
Alternator ................................. 3/8-9/16 (10-15)
A/C Compressor ..................................... 3/8 (10)
(1) - Deflection is with 22 lbs. (10 kg) pressure applied midway
on longest belt run.
(2) - Use 3/8" (10 mm) on models with A/C.
ÄÄÄÄÄÄÄÄÄÄÄÄÄÄÄÄÄÄÄÄÄÄÄÄÄÄÄÄÄÄÄÄÄÄÄÄÄÄÄÄÄÄÄÄÄÄÄÄÄÄÄÄÄÄÄÄÄÄÄÄÄÄÄÄÄ REPLACEMENT INTERVALS TABLE
REPLACEMENT INTERVALS TABLE
ÄÄÄÄÄÄÄÄÄÄÄÄÄÄÄÄÄÄÄÄÄÄÄÄÄÄÄÄÄÄÄÄÄÄÄÄÄÄÄÄÄÄÄÄÄÄÄÄÄÄÄÄÄÄÄÄÄÄÄÄÄÄÄÄÄComponent Interval (Miles)
Air Filter ............................................. 30,000
Coolant ................................................ 30,000
Fuel Filter (1) ........................................ 15,000
Oil & Filter ............................................. 7500
Spark Plugs ............................................ 30,000
(1) - Discard mini-fuel at 1000-mile maintenance interval.
Install new copper gaskets.
ÄÄÄÄÄÄÄÄÄÄÄÄÄÄÄÄÄÄÄÄÄÄÄÄÄÄÄÄÄÄÄÄÄÄÄÄÄÄÄÄÄÄÄÄÄÄÄÄÄÄÄÄÄÄÄÄÄÄÄÄÄÄÄÄÄ
Page 441 of 906
D - ADJUSTMENTS
Article Text (p. 4)
1990 Volkswagen Corrado
For Volkswagen Technical Site: http://vw.belcom.ru
Copyright © 1998 Mitchell Repair Information Company, LLC
Thursday, March 23, 2000 09:43PM
059" (1.5 mm) restrictor into hole in intake air boot. If vehicle is
not equipped with this type of connector, use Plug (026 133 382D) with
.059" (1.5 mm) orifice. Adjust idle speed if not within specification.
See IDLE SPEED & CO LEVEL table.
6) Connect fuel pressure gauge and ensure system fuel
pressure is correct. See FUEL SYSTEM in F - BASIC TESTING article.
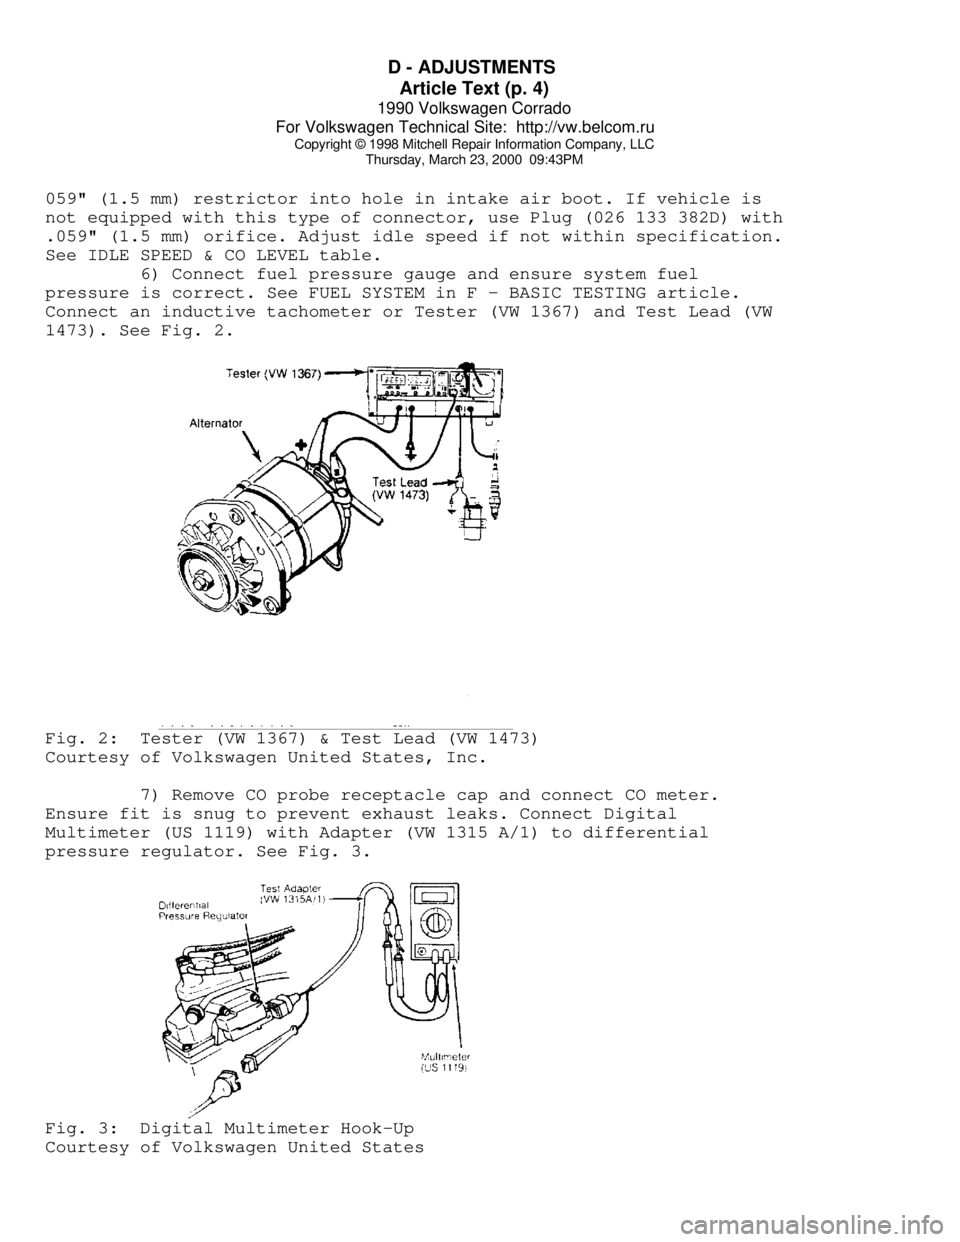
Connect an inductive tachometer or Tester (VW 1367) and Test Lead (VW
1473). See Fig. 2.Fig. 2: Tester (VW 1367) & Test Lead (VW 1473)
Courtesy of Volkswagen United States, Inc.
7) Remove CO probe receptacle cap and connect CO meter.
Ensure fit is snug to prevent exhaust leaks. Connect Digital
Multimeter (US 1119) with Adapter (VW 1315 A/1) to differential
pressure regulator. See Fig. 3.Fig. 3: Digital Multimeter Hook-Up
Courtesy of Volkswagen United States