1990 HONDA PRELUDE brake fluid
[x] Cancel search: brake fluidPage 23 of 143

Charging System Warning Light
The charging system warning light comes on when there is a problem with the electrical charging system or when the ignition
switch is turned on with the engine not running. If the light comes
on while driving, stop the car and check to see if the alternator belt is loose or broken.
To check the belt tension, stop the engine and push with about 98N (22 Ib) of force on the middle of the belt as shown. The belt should
deflect about:
10
—
12 mm (0.4
—
0.5 in) If the engine has been running,
some engine components may
be hot enough to burn you. Keep hands away from the
radiator fan. The fan may start
automatically without warning
and run for up to 15 minutes,
even after the engine is turned
off.
NOTE:
If necessary, have the charging system checked by an authorized
Honda dealer.
Check Engine Warning Light
This light comes on for a couple of seconds each time the ignition is
turned on. It will also come on, and remain on, if there is a
malfunction in the emission control system. If the light comes on
while driving, avoid driving at high speed, and have the system checked by a Honda dealer as soon as possible.
Parking Brake/Brake Failure Warning Light
Check the brake warning light every time you start the car.
With the parking brake set, the warning light should go on when the
ignition switch is turned to II or III, With the parking brake released,
the light should go on when the ignition switch is turned to III. If the light goes on at any other time, it means the brake fluid level in the
master cylinder reservoir is too low ; add fluid and have your dealer
check for leaks and brake pad wear immediately. See page 99. BRAKE
(cont'd)ProCarManuals.comMain Menu t s
Page 72 of 143

Towing a Trailer (cont'd)
Hitches
Use only a hitch recommended by your Honda dealer. The hitch
should be bolted securely to the car and installed by a qualified
technician. Do not use a hitch designed for temporary installation
and never use one that attaches only to the bumper.
Trailer Brakes and safety chains
The Honda Automobile Division recommends that trailers equippedwith brakes, should conform to any applicable federal and stateregulations, When using a trailer equipped with electric brakes, a
trailer brake controller that connects to the car's electrical system is recommended. Installing a brake controller that connects to the car's
brake hydraulic system could result in brake fluid contamination or
leaks, A safety chain must always be used between the car and the
trailer. Leave sufficient slack in the chain so that it does not bind in
sharp turns. The chain should cross under the trailer tongue to prevent the tongue from dropping to the ground.
Tires
Make sure your car's are properly inflated. Adjust tire pressure
to the recommended tire pressure indicated on the label attached to
the edge of the driver's door.The trailer tires should be of the proper size, load rating and inflated to the pressure recommended
by the trailer manufacturer.
Trailer Lights
Trailer light must comply with federal, state and local regulations. See your local recreation vehicle dealer or rental agency for the
correct type of lighting and wiring for your trailer, Check for correct
operation of the turn signals and stop lights each time you hitch up.
CAUTION:
Connections to your car's electrical system should be made by
your Honda dealer or a qualified electrician.Improper installation
may damage your vehicle's electrical system and cause a
malfunction of the lights.
ProCarManuals.comMain Menu t s
Page 75 of 143

CAUTION:
Before starting out, check the operation of the lights and all car/
trailer connections. After driving a short distance, stop and
recheck the lights and connections.
Reversing is difficult and requires practice. While backing-up,
the trailer may pivot off-course. To correct for this, grip the bottom of the steering wheel and move your hand to the left to
move the trailer to the left, or to the right to move the trailer to
the right. Turn the steering wheel a little at a time, and keep the
speed very low. Have someon e guide you when backing.
To help
prevent overheating of the brakes, shift into a lower
gear to make use of engine braking before descending steep or
long grades. Do not make sudden downshifts. Pay strict attention to the coolant temperature gauge when
going up hills. Because of the added load of the trailer, your car's
engine may overheat on hot days. Turning off the air conditioner
will reduce the load on the cooling system.
On cars equipped with automatic transmission. —Do not hold the car stationary on an incline by using the accelerator pedal; this can cause the transmission fluid tooverheat. Instead, use the handbrake or footbrake.
—When towing trailers, avoid high transmission fluid temperatures (caused by the transmission frequently shiftingbetween 3rd and 4th gears) by driving in S3.
NOTE:
Be sure to check state and local laws concerning maximum speed or
other driving restrictions for cars towing trailers. If you are driving
across several states, check each state's requirements before
leaving home, because restrictions may vary.
Parking with a Trailer
Whenever parking your car on an incline with a trailer attached, first
place and seat chocks at each wheel of the car and trailer. This is in
addition to the normal parking preparations of firmly applying the parking brake and placing the transmission in first or reverse
(manual transmission) or P (automatic transmission).
CAUTION:
Parking on an incline is not recommended and should be done only
if it cannot be avoided. Follow all precautions mentioned above
and turn the wheels to point towards a curb if facing downhill,
away from a curb if facing uphill. When leaving an inclined parking place, move the car slightly to unseat the chocks. Then while
keeping the foot brakes firmly applied, have an assistant remove
the chocks.ProCarManuals.comMain Menu t s
Page 77 of 143

Check the following items at each fuel stop:
1. Engine oil level.
2. Radiator coolant level.
Check the following items periodically: 1. Brakes: for braking efficiency, brake pedal travel and hydraulic fluid level.
2. Lights: for operation of headlights, taillights, side marker lights, stoplights, turn signals and back-up lights.
3. Tires: for correct pressures (including spare); inspect for cuts and uneven or excessive wear. Rotate every 7,500 miles (12,000 km)
in the pattern shown on page 107.
4. Steering: for excessive play or vibration while driving. 5. Exhaust system: for leaks or loose mounts.
6. Wipers: for operation of windshield wipers and washer, and condition of wiper blades.
7. Seat belts: for condition of fabric and buckles, and operation of the restraint mechanism.
8. Battery condition.
(cont'd)ProCarManuals.comMain Menu t s
Page 82 of 143

Fluid Locations
AUTOMATIC TRANSMISSIONFLUID DIPSTICK
POWER STEERING
FLUID RESERVOIR
ANTI LOCK BRAKE
FLUID RESERVOIR (Si with ALB) ENGINE OIL
FILLER CAP
CLUTCH FLUID
RESERVOIR (Manual Transmission Only)
RADIATOR
RESERVE
TANK CAP
RADIATOR
CAP ENGINE OIL
DIPSTICK WASHER FLUID
RESERVOIR BRAKE FLUID
RESERVOIRProCarManuals.comMain Menu t s
Page 96 of 143

Fuel Filters/Clutch Fluid
Fuel Filters
(2.0 S)
There are two fuel filters in your car; the main filter is located near
the left side of the fuel tank and an auxiliary filter is at the left side
of the air filter in the engine compartment. Both should be replaced at 60,000 miles (96,000 km) or 48 months,
whichever comes first, or any time you suspect contaminated gas
may have clogged them.
For easier access to the main filter, remove the left rear wheel to
inspect or replace the filter.
The fuel filter is located in the engine compartment, on the right
center of the firewall. It should be replaced at 60,000 miles (96,000km) or 48 months whichever comes first, or any time you suspect
contaminated gas may have clogged it.
CAUTION:
Because the fuel system is under pressure, the filter should be
replaced only by a qualified Honda technician.
CLUTCH FLUID
RESERVOIR
Clutch Fluid
Check the fluid level in the clutchreservoir periodically; it should be
between the MAX and MIN marks
on the reservoir.
If the level is near the MIN mark, add
fluid to raise it to the MAX mark. Do not overfill. Use only brake fluid
manufactured to DOT 3 or DOT 4
specifications from a sealed
container. Follow the manufacturer's instructions printed on the can.
NOTE:
A low clutch fluid level may be an indication of clutch fluid leakage.
You should have your clutch checked if the clutch fluid level in the reservoir is low.
When removing the rear wheel, use safety stands to support the
car.
AUXILIARYFILTER
(2.0 Si,Si)
MAIN FILTERProCarManuals.comMain Menu t s
Page 99 of 143

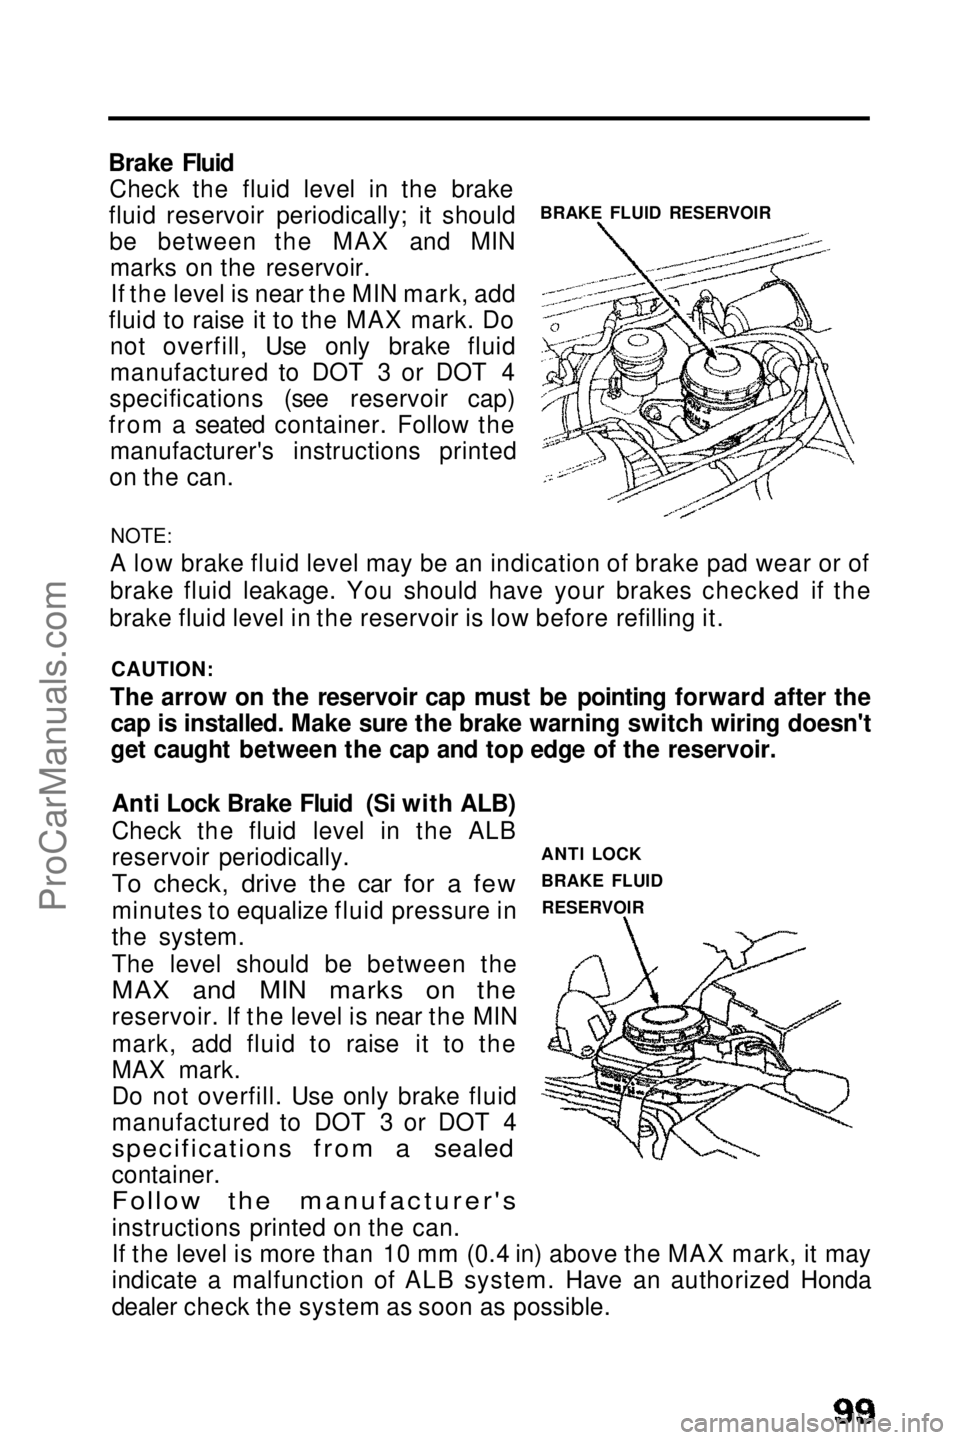
BRAKE FLUID RESERVOIR
Brake Fluid
Check the fluid level in the brake
fluid reservoir periodically; it should be between the MAX and MINmarks on the reservoir.If the level is near the MIN mark, add
fluid to raise it to the MAX mark. Do not overfill, Use only brake fluid
manufactured to DOT 3 or DOT 4
specifications (see reservoir cap)
from a seated container. Follow the manufacturer's instructions printed
on the can.
NOTE:
A low brake fluid level may be an indication of brake pad wear or of
brake fluid leakage. You should have your brakes checked if the
brake fluid level in the reservoir is low before refilling it.
CAUTION:
The arrow on the reservoir cap must be pointing forward after the cap is installed. Make sure the brake warning switch wiring doesn't
get caught between the cap and top edge of the reservoir.
ANTI LOCK
BRAKE FLUIDRESERVOIR
Anti Lock Brake Fluid (Si with ALB)
Check the fluid level in the ALB
reservoir periodically.
To check, drive the car for a few
minutes to equalize fluid pressure in
the system.
The level should be between the
MAX and MIN marks on the
reservoir. If the level is near the MIN
mark, add fluid to raise it to the
MAX mark.
Do not overfill. Use only brake fluid
manufactured to DOT 3 or DOT 4
specifications from a sealed
container.
Follow the manufacturer's
instructions printed on the can.
If the level is more than 10 mm (0.4 in) above the MAX mark, it may
indicate a malfunction of ALB system. Have an authorized Honda
dealer check the system as soon as possible.ProCarManuals.comMain Menu t s
Page 119 of 143

Jump Starting
To start a car with a dead battery, use another battery of the same voltage, and the proper jumper cables. Procedures other than those below could cause injury or
damage from battery acid spray, explosion or charging system
overload.
Never connect the jumper cable directly to the negative post of
the "dead" battery.
Never allow the two cars to touch each other.
Never allow the jumper cable clamps to touch each other.
Never lean over the battery when making connections.
Never attempt to jump start a vehicle with a frozen battery. The
battery could rupture and explode. If you suspect a frozen
battery, remove the vent caps and check the fluid. If there
seems to be no fluid, or if you see ice, do not attempt a jump
start until the fluid thaws.
CAUTION:
If jumper cables are connected backwards, the car's main fuse
may blow.
1.Turn off all lights, heater and other electrical loads, set parking
brake, and
shift transmission to Neutral or Park.
2. Use one cable to connect the positive terminal of the booster battery to the positive terminal of the "dead" battery.
(cont'd)
Do not attach cable here
DEAD BATTERY
Positive to positive
Negative to the engine, not to the battery
BOOSTER BATTERYProCarManuals.comMain Menu t s