Page 20 of 1164

PRE-DELIVERY INSPECTION
PRE-DELIVERY INSPECTION
PRE-DELIVERY INSPECTION TABLE
Following items may be done at any time prior to delivery to your customer.
INSPECT and ADJUST, if necessary, the following items to
the specifications:
0 Glass, exterior bright metal and paint for damage
Cl Wheel lug nuts, and locks (if equipped)
88-118 N.m (9-12 m-kg, 65-87 ft-lb)
q All weatherstrips for damage or detachment
0 Operation of hood release and lock
0 Operation of trunk lid, rear hatch, and fuel lid opener
Cl With trunk open, check for spare jack, tire, tools, and
fasteners securing these items in place.
Cl Door operation and alignment
Cl Headlight aim
INSTALL the following parts:
Cl Wheel caps or rings (if equipped)
q Outside rearview mirror(s)
1 UNDER HOOD-ENGINE OFF )
INSPECT and ADJUST, if necessary, the following items to
the specifications:
0 Fuel, coolant and hydraulic lines, fittings, connections and
components for leaks
Cl Engine oil level
0 Power steering fluid level
0 Brake and clutch master cylinder fluid level
El Windshield washer reservoir fluid level
Cl Radiator coolant level
Cl Tightness of battery terminals
Cl Manual transaxle oil level
riizmiq
INSTALL the following parts:
Cl Rubber stopper for inside rearview mirror
CHECK operation of the following items:
0 Seat controls (sliding and reclining) and head restraint
Cl Folding rear seat
0 Door locks, including childproof door locks (if equipped)
Seat belts and warning system
Cl Ignition switch and steering lock
0 Inhibitor switch (ATX only)
U Starter interlock switch (clutch pedal, MTX only)
Cl All lights, including warning and indicator lamps
Cl Sound warning system
Cl Horn, wipers and washers (front and rear, if equipped)
0 Audio system (if equipped) 0 Cigarette lighter and clock
0 Sunroof (if equipped)
II Remote control outside rearview mirrors (if equipped)
Cl Power windows (if equipped)
q Heater, defroster and air conditioner at various mode
selections (if equipped)
CHECK the following items:
Cl Presence of spare fuse
0 Upholstery and interior finish
CHECK and ADJUST, if necessary, the following items:
0 Pedal height and free play of brake and clutch pedal
Pedal height mm (in) Free play mm (in)
0 Parking brake
5-7 notches/98 N (10 kg, 22lb)
UNDER HOOD-ENGINE RUNNING AT
OPERATING TEMPERATURE
CHECK the following items:
q Automatic transaxle fluid level
[I
CHECK the following items:
Cl Underside fuel, coolant and hydraulic lines, fittings, con-
nections and components for leaks
0 Tires for cuts or bruises
0 Steering linkage, suspension, exhaust system and all un-
derside hardware for looseness or damage
[I
CHECK the following items:
0 Brake operation
0 Clutch operation
Cl Steering control
Cl Operation of gauges
q Squeaks, rattles or unusual noise
Cl Emergency locking retractors
0 Cruise control system (if equipped)
1 AFTER ROAD TEST (
CHECK for necessary owner information materials.
Following items must be done just before the delivery to your customer.
q Load test battery and charge if necessary
1 Volts 1 0 Install fuses for accessories
i.. _
0 Adjust tire pressure to the specification
Load test result cl Remove seat and floor mat protective covers
(Refer to door label) 0 Vacuum and clean interior of vehicle
0 Clean outside of vehicle q Inspect installation of option parts with invoice
23UOAX-002
A-2
Page 769 of 1164
TRUNK LID S
TRUNK LID
COMPONENTS
Removal / Installation
1. Disconnect the negative battery cable.
2. Remove in the order shown in the figure, referring to
Removal Note.
3. Install in the reverse order of removal, referrina to Installation Note.
m-kg, 69-95 in-lb)
1. Lid lock protector 6. High-mount stoplight (Interior mounted)
2. Trunk ooener cable Removal / Installation . . . . . . . . . . . . . . . . . . . . . Section T
3. Rear harness
4. Trunk lid
Adjustment Note . . . . . . . . . . . . . . . . . . . . . . . . . page S-34
5. Balance spring
Removal Note.. . . . . . . . . . . . . . . page S-34
Installation Note . .._. ._._.._.____...r..__ page S-34
Adjustment Note.. . . . . . . . . page S-34 7. Rear package trim
Removal / Installation . . . . . . . . . . . . . . . . . . page S-97
8. Lid hinge assembly
s-33
Page 799 of 1164

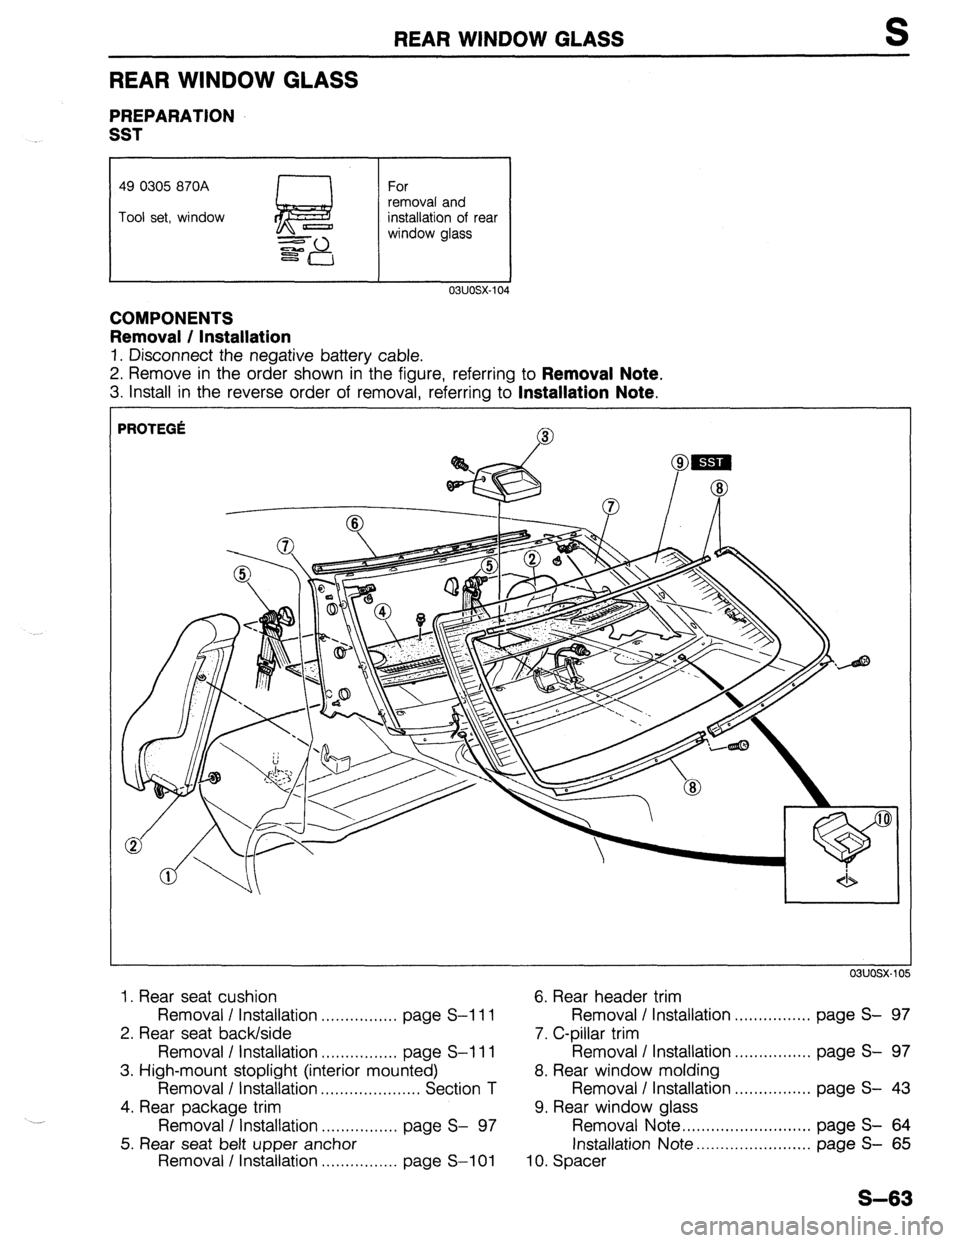
REAR WINDOW GLASS S
REAR WINDOW GLASS
PREPARATION
SST
49 0305 870A
1 For
Tool set, window removal and
installation of rear
window glass
COMPONENTS
Removal / Installation
1. Disconnect the negative battery cable.
2. Remove in the order shown in the figure, referring to
Removal Note.
3. install in the reverse order of removal, referring to Installation Note.
r
I’
PROTEGi:
1. Rear seat cushion
6. Rear header trim
5
Removal I Installation . . . . . . . . . . . . . . . . page S-l 11
Removal / Installation . . . . . . . . . . . . . . . . page S-
97
2. Rear seat back/side
7. C-pillar trim
Removal I Installation . . . . . . . . . . . . . . . . page S-l 11
3. High-mount stoplight (interior mounted)
Removal / Installation . . . . . . . . . . . . . . . . . . . . . Section
T
4. Rear package trim
Removal I Installation . . . . . . . . . . . . . . . . page S-
97
5. Rear seat belt upper anchor
Removal / Installation ..,............. page
S-101
Removal / Installation . . . . . . . . . . . . . . . . page S-
97
8. Rear window molding
Removal I Installation . . . . . . . . . . . . . . . . page S-
43
9. Rear window glass
Removal Note . . . . . . . . . . . . . . . . . . . . . . . . . . .
page S- 64
Installation Note . . . . . . . . . . . . . . . . . . . . . . . . page S-
65
10. Spacer
S-63
Page 825 of 1164
S
HEADLINEF?
COMPONENTS
Removal / Installation
1, Disconnect the negative battery cable.
2. Remove in the order shown in the figure, referring to
Removal Note.
3. Install in the reverse order of removal, referring to Installation Note.
Note
l Remove the surroundina trlm for removal of the headliner. (Refer to pages S-97, 98.)
PROTEGii
(WITH PASSIVE SHOULDER BELT)
R.H. SIDE
1. Assist handle
2. Interior lamp
3. Seaming welt (With sliding
sunroof)
4. Sunvisor
S-89
Page 826 of 1164
S HEADLINER
Y
PROTEGfi
(WITHOUT PASSIVE SHOULDER BELT)
1. Assist handle
2. Interior lamp
3. Seaming welt (With sliding
sunroof)
4. Sunvisor
IJ”“DA-“oC
5. Sunvisor adapter
9. Headliner
6. Rearview mirror Removal Note . . page S-93
7. Overhead console (With slid- Installation Note page S-93
ing sunroof)
IO. Front top bracket
8. Seaming welt (Pillar)
s-90
Page 827 of 1164
HEADLINER S
HATCHBACK
(WITH
PASSIVE SHOULDER BELT)
I
R.H. SIDE I
1. Assist handle 5. Rearview mirror
2. Interior lamp 6. Headliner
3. Sunvisor Removal Note .,.,,.,,.......*........,.*.* page S-93
4. Sunvisor adapter
Installation Note ..,.............*......... page S-93
s-91
Page 828 of 1164
s HEADLINER
HATCHBACK
(WITHOUT PASSIVE SHOULDER BELT)
R.H. SIDE
1. Assist handle
2. Interior lamp
3. Seaming welt (With sliding sunroof)
4. Sunvisor
5. Sunvisor adapter
6. Rearview mirror
13uosx-03
7. Overhead console (With sliding sunroof)
8. Seaming welt (Pillar)
9. Headliner
Removal Note ,..........,,,....,..,....... page S-93
Installation Note . . . . . . . . . . . . . . . . . . . . . . . . . . page S-93
10. Front top bracket ---
S-92
Page 833 of 1164

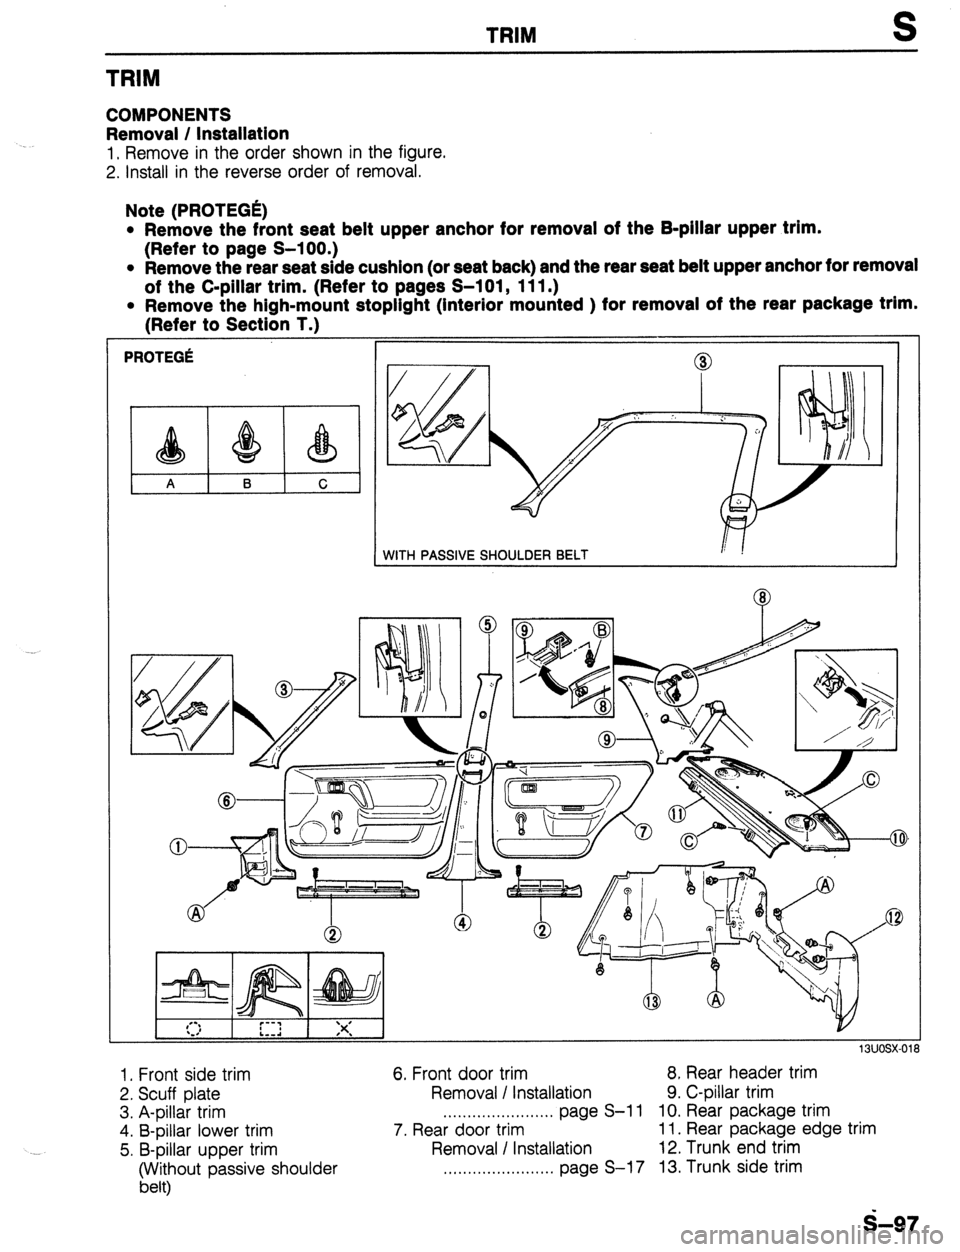
TRIM
TRIM
COMPONENTS
Removal / Installation
1, Remove in the order shown in the figure.
2. install in the reverse order of removal.
Note (PROTEGE)
l Remove the front seat belt upper anchor for removal of the B-pillar upper trim.
(Refer to page S-100.)
l Remove the rear seat side cushion (or seat back) and the rear seat belt upper anchor for removal
of the C-pillar trim. (Refer to pages S-l 01, 111.)
l Remove the high-mount stopllght (Interior mounted ) for removal of the rear package trlm.
(Refer to Section T.)
PROTEGe
WITH PASSIVE SHOULDER BELT
Q
8
I I
, -- ,, , ,--.
*.I r---i ‘Y’ L--d I ST
I
1RI insx-ni
1. Front side trim
2. Scuff plate
3. A-pillar trim
4. B-pillar lower trim
5. B-pillar upper trim
(Without passive shoulder
belt) 6. Front door trim 8. Rear header trim
Removal I Installation 9. C-pillar trim
. . . . . . . . . . . . . . . . . . . . . . . page S-l 1 10. Rear package trim
7. Rear door trim 11. Rear package edge trim
Removal / Installation 12. Trunk end trim
,.,.................... page S-l 7 13. Trunk side trim
s-97