1989 MAZDA 323 bulb
[x] Cancel search: bulbPage 14 of 1164
GI CAUTION
1.4W or 3.4W
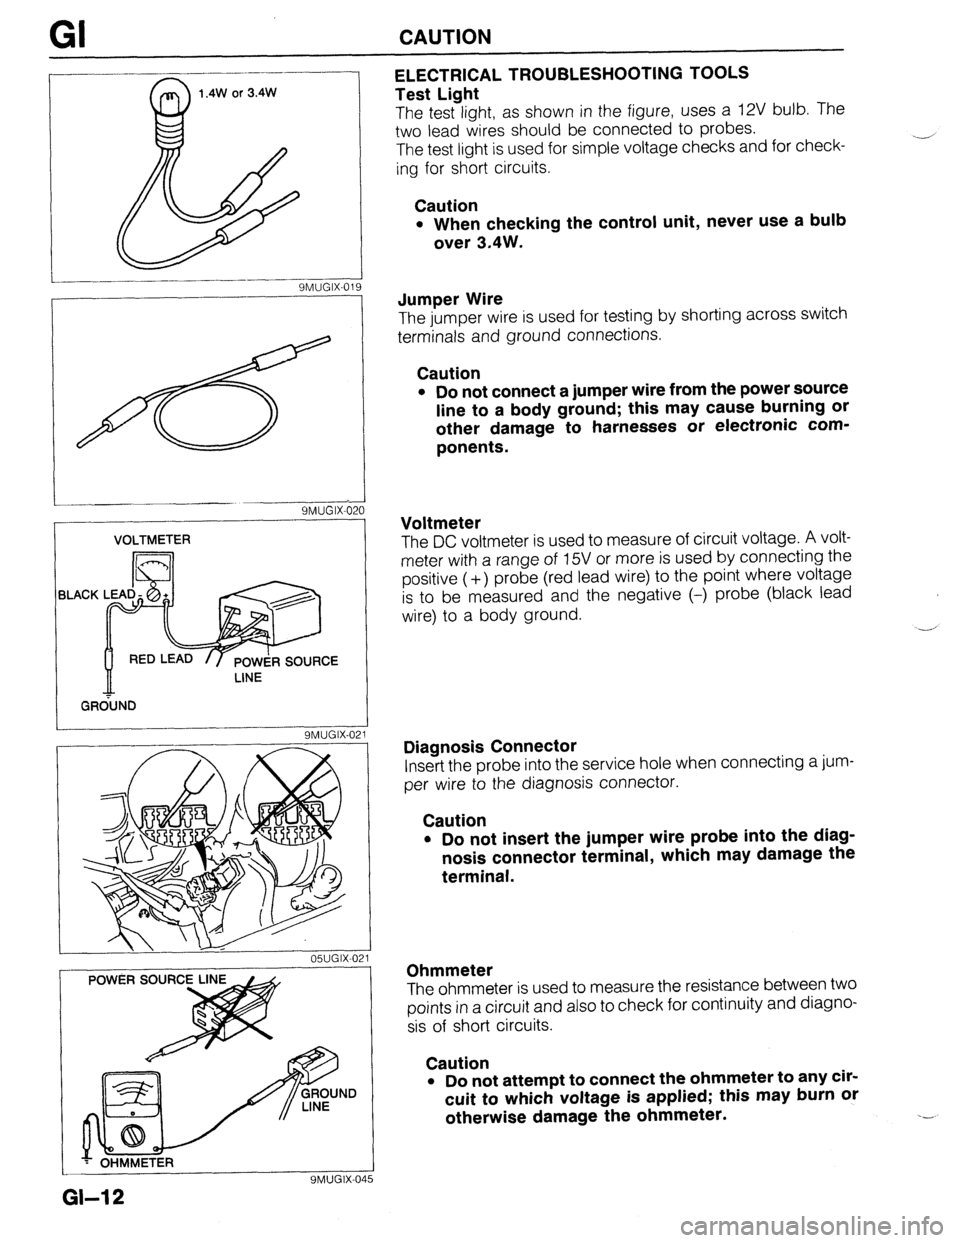
9MUGIX-019 ELECTRICAL TROUBLESHOOTING TOOLS
Test Light
The test light, as shown in the figure, uses a 12V bulb. The
two lead wires should be connected to probes.
The test light is used for simple voltage checks and for check-
ing for short circuits.
Caution
l When checking the control unit, never use a bulb
over 3.4W.
SMUGIX-621
VOLTMETER
BLACK
/ GR&ND
9MUGIX-021
05UGIX-021
YMUGIX-04
Jumper Wire
The jumper wire is used for testing by shorting across switch
terminals and ground connections.
Caution
l Do not connect a jumper wire from the power source
line to a body ground; this may cause burning or
other damage to harnesses or electronic com-
ponents.
Voltmeter
The DC voltmeter is used to measure of circuit voltage. A volt-
meter with a range of 15V or more is used by connecting the
positive (-t-) probe (red lead wire) to the point where voltage
is to be measured and the negative (-) probe (black lead
wire) to a body ground.
-,’
Diagnosis Connector
Insert the probe into the service hole when connecting a jum-
per wire to the diagnosis connector.
Caution
. Do not insert the jumper wire probe into the diag-
nosis connector terminal, which may damage the
terminal.
Ohmmeter
The ohmmeter is used to measure the resistance between two
points in a circuit and also to check for continuity and diagno-
sis of short circuits.
Caution
l Do not attempt to connect the ohmmeter to any cir-
cuit to which voltage is applied; this may burn or
otherwise damage the ohmmeter.
GI-12
Page 343 of 1164
![MAZDA 323 1989 Factory Repair Manual TROUBLESHOOTING GUIDE
27 MIL ALWAYS ON
DESCRIP- *Self-Diagnosis Checker does not indicate Malfunction Code No. but MIL always ON
TION
[TROUBLESHOOTING HINTS]
*Short circuit in wiring harness
l E MAZDA 323 1989 Factory Repair Manual TROUBLESHOOTING GUIDE
27 MIL ALWAYS ON
DESCRIP- *Self-Diagnosis Checker does not indicate Malfunction Code No. but MIL always ON
TION
[TROUBLESHOOTING HINTS]
*Short circuit in wiring harness
l E](/manual-img/28/57053/w960_57053-342.png)
TROUBLESHOOTING GUIDE
27 MIL ALWAYS ON
DESCRIP- *Self-Diagnosis Checker does not indicate Malfunction Code No. but MIL always ON
TION
[TROUBLESHOOTING HINTS]
*Short circuit in wiring harness
l ECU malfunction
iTEF 1
1
-
s
Disconnect (Y/B) wire from ECU and check if
MIL goes off
‘YIB
ATX YIB
INSPECTION ACTION
Yes Replace ECU CT page F-149
No Check for short circuit in wiring be-
tween instrument cluster and ECU
23UOFX-042
28
MIL NEVER ON
IESCRIP- *Self-Diagnosis Checker indicates Malfunction Code No. of input device but MIL never ON
RON *Other indicator and warning lamps OK
:TROUBLESHOOTING HINTS]
b Bulb burned
‘Open circuit in wiring harness
m ECU malfunction
TEP INSPECTION
ACTION
1 Ground (Y/B) wire at ECU with jumper wire and
Yes Check connection of ECU connector
check if MIL comes on
MTX e If OK, replace ECU w page F-149
I- i -!~ !r--~r’:~;-‘;- --~_:- ,
1 i r 1 1 1 ;-.:,~;~$~& {-;&# ,$&]j 4 If not OK, repair ECU connector
! No
Check if bulb is OK
ATX 13 If OK, repair (Y/B) wire between
ECU and instrument cluster
e If not OK, replace bulb CT page T-83
23UOFX-043
29 A/C DOES NOT WORK
DESCRIP- *Blower fan operates but magnet clutch does not operate
TION
[TROUBLESHOOTING HINTS]
*Open or short circuit in wiring harness
*A/C relay, A/C switch, or magnetic clutch malfunction
l ECU malfunction
TEP/ INSPECTION ACTION
1 1 Check ECU
terminal 10 (MTX) 10 (ATX) voltage 1
Yes Check ECU terminal 1 J (MTX) 1 L (ATX)
OK
CT= page F-152
MTX
T7J++!;i”-
L
ATX
No voltage OK
CT page F-152
1-3 If OK, check A/C system
c3- page U-30
~3 If not OK, replace ECU CT page F-149
Check for cause w page F-153
F-77
Page 865 of 1164
OUTLINE
OUTLINE
HOW TO USE THIS SECTION
Information regarding removal and installation of electrical equipment is given in SECTION S.
Understanding will be easier if this section is used in conjunction with the WIRING DIAGRAMS.
9MUOTX-008
1.4W or 3.4W
23UOTX.07 1
61G15X-002
69G15X-00 3
63U 15X-005
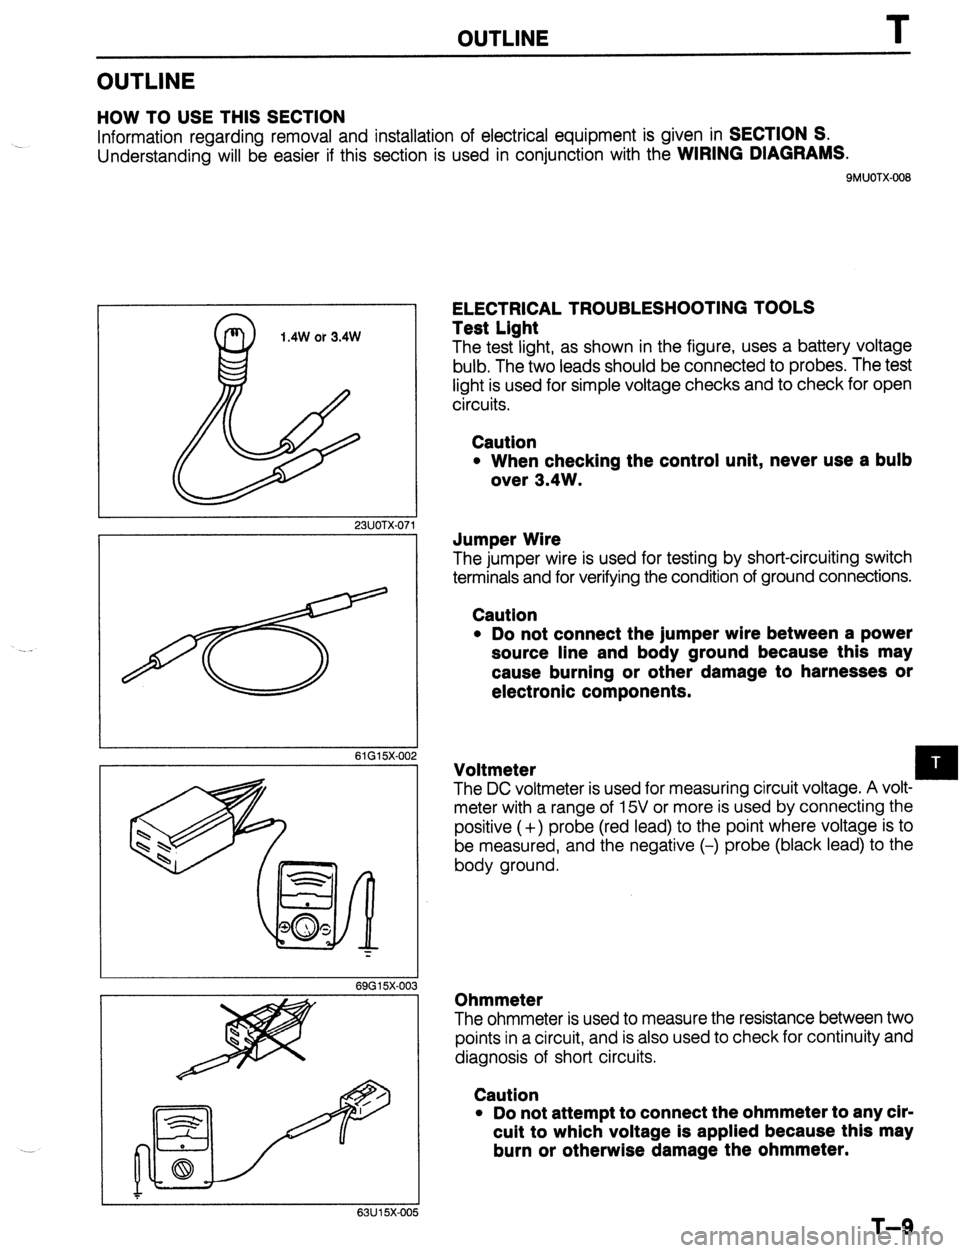
ELECTRICAL TROUBLESHOOTING TOOLS
Test Light
The test light, as shown in the figure, uses a battery voltage
bulb. The two leads should be connected to probes. The test
light is used for simple voltage checks and to check for open
circuits.
Caution
l When checking the control unit, never use a bulb
over 3.4W.
Jumper Wire
The jumper wire is used for testing by short-circuiting switch
terminals and for verifying the condition of ground connections.
Caution
l Do not connect the jumper wire between a power
source line and body ground because this may
cause burning or other damage to harnesses or
electronic components.
The DC voltmeter is used for measuring circuit voltage. A volt- q Voltmeter
meter with a range of 15V or more is used by connecting the
positive (+) probe (red lead) to the point where voltage is to
be measured, and the negative (-) probe (black lead) to the
body ground.
Ohmmeter
The ohmmeter is used to measure the resistance between two
points in a circuit, and is also used to check for continuity and
diagnosis of short circuits.
Caution
l Do not attempt to connect the ohmmeter to any cir-
cuit to which voltage is applied because this may
burn or otherwise damage the ohmmeter.
T-9
Page 886 of 1164
T
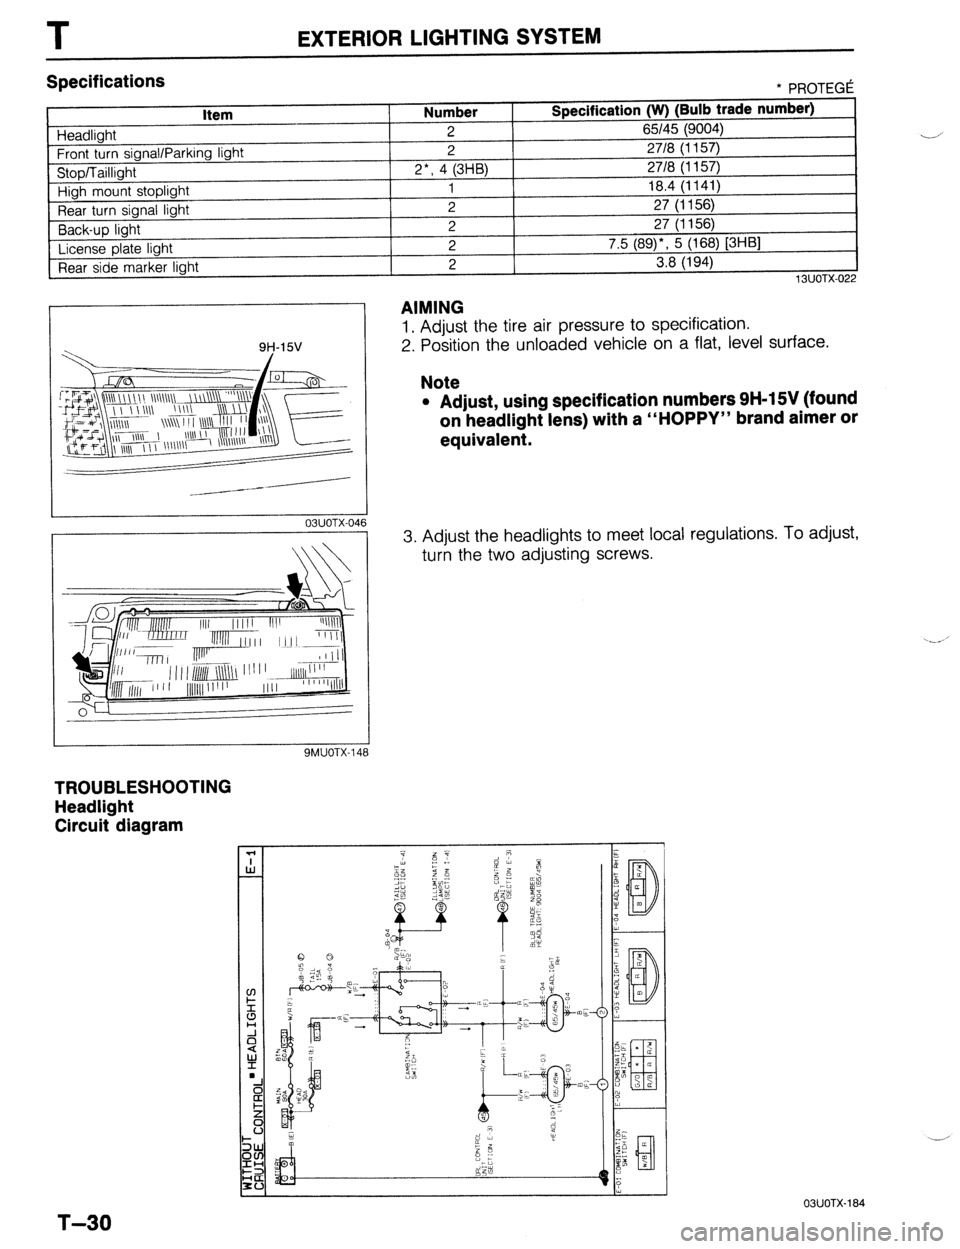
Specifications
Item
Headlight
Front turn signal/Parking light
Stop/Taillight
High mount stoplight
Rear turn signal light
Back-up light
License plate light
Rear side marker light
EXTERIOR LIGHTING SYSTEM
* PROTEGi Number Specification (W) (Bulb trade number)
2 65/45 (9004)
2 27/8 (1157)
2*, 4 (3HB) 27/8 (1157)
1 18.4 (1141)
2 27 (1156)
2 27 (1156)
2 7.5 (89)*, 5 (168) [3HB]
2 3.8 (194)
13lJOTX.022
AIMING
1. Adjust the tire air pressure to specification.
2. Position the unloaded vehicle on a flat, level surface. /----------
03UOTX-046 1 3. Adiust the headlights to meet local regulations. To adjust,
Note
l Adjust, using specification numbers 9H-15V (found
on headlight lens) with a “HOPPY” brand aimer or
equivalent.
I
9MUOTX-148
turk the two adjusting screws.
TROUBLESHOOTING
Headlight
Circuit diagram
T-30
OSUOTX-184
Page 888 of 1164
I
EXTERIOR LIGHTING SYSTEM
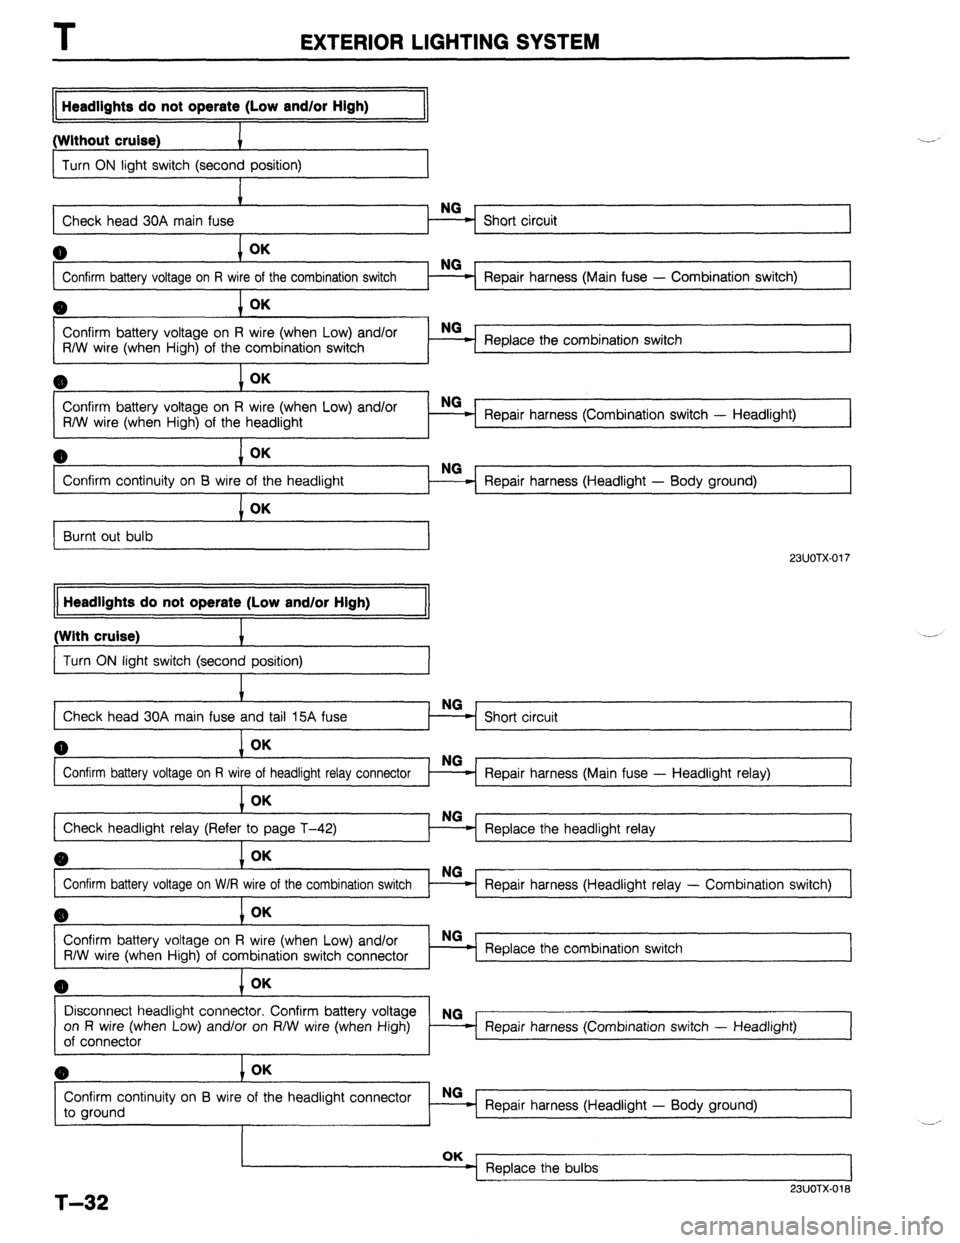
Headlights do not operate (Low and/or High)
(Without cruise)
I
Turn ON light switch (second position)
I
Check head 30A main fuse Short circuit
0
Confirm battery voltage on R w Repair harness (Main fuse - Combination switch) L
I
0 OK
Confirm battery voltage on R wire (when Low) and/or
R/W wire (when High) of the combination switch Replace the combination switch
Confirm battery voltage on R wire (when Low) and/or
R/W wire (when High) of the headlight Repair harness (Combination switch - Headlight)
I
0
Confirm continuity on B wire of the headlight
Repair harness (Headlight - Body ground)
Burnt out bulb
23UOTX-017 Headlights do not operate (Low and/or High)
I
(With cruise)
I
Turn ON light switch (second position)
Short circuit
0 OK
Confirm battery voltage on W/R wire of the combination switch
I
8) C OK Repair harness (Main fuse - Headlight relay)
I
Replace the headlight relay
1
Repair harness (Headlight relay - Combination switch)
Confirm battery voltage on R wire (when Low) and/or
R/W wire (when High) of combination switch connector Replace the combination switch
1
Q 1 OK
Disconnect headlight connector. Confirm battery voltage
on R wire (when Low) and/or on RIW wire (when High)
of connector
,o OK
Repair harness (Combination switch - Headlight)
1
I
Confirm continuity on B wire of the headlight connector
to ground Repair harness (Headlight - Body ground)
I
T-32
OK _ Replace the bulbs
23UOTX-018
Page 889 of 1164
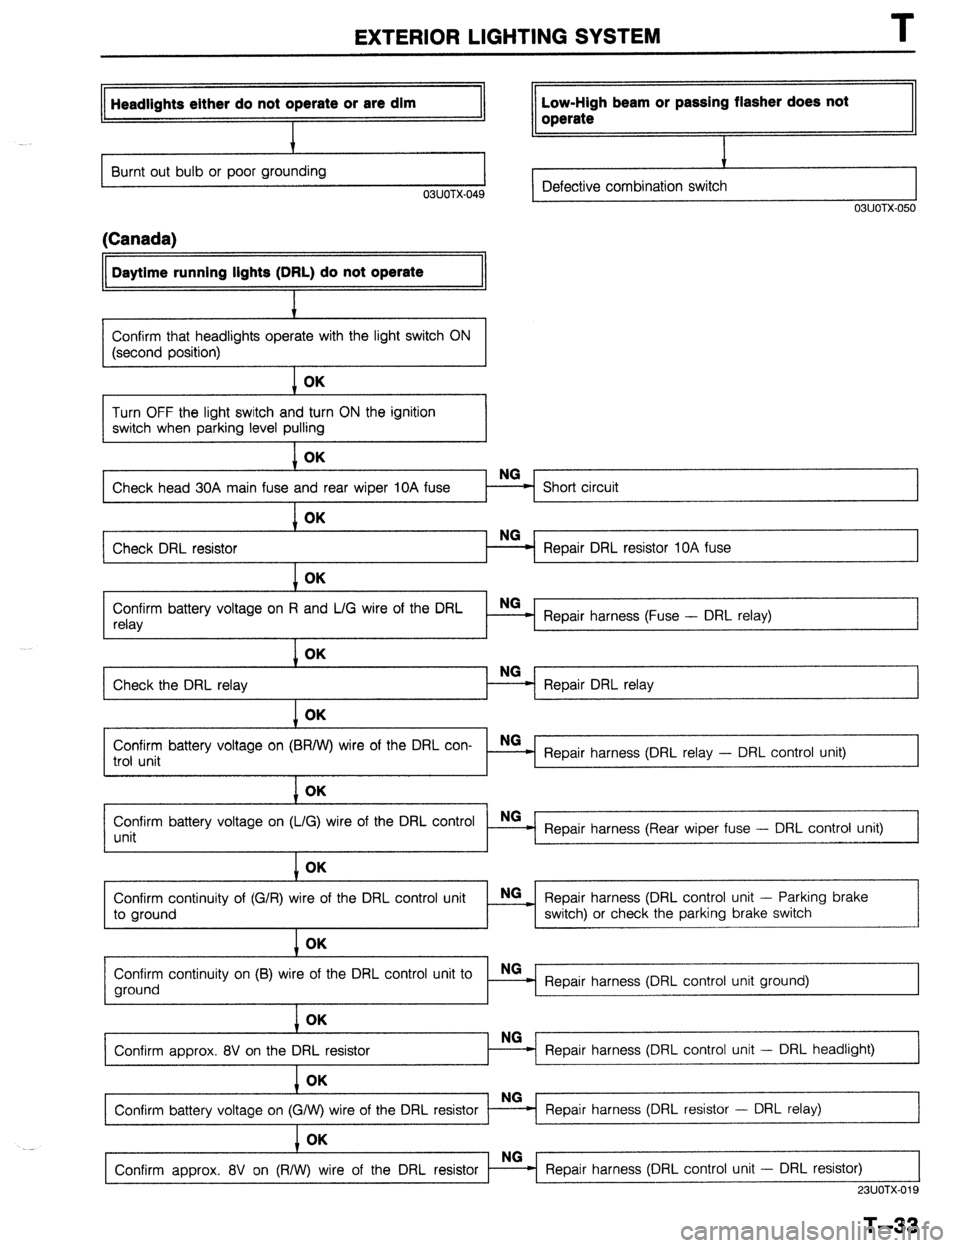
EXTERIOR LIGHTING SYSTEM T
Headlights either do not operate or are dim Low-High beam or passing flasher does not
J operate
Burnt out bulb or poor grounding J
03UOTX-049 Defective combination switch
03UOTX-050
(Canada) Daytime running lights (DRL) do not operate
Confirm that headlights operate with the light switch ON
(second position) OK
Turn OFF the light switch and turn ON the ignition
switch when parking level pulling
I
Check head 30A main fuse OK
Check DRL resistor OK Repair DRL resistor 10A fuse
Confirm battery voltage on R and L/G wire of the DRL NG
relay Repair harness (Fuse - DRL relay)
I
I
Check the DRL relay
Repair DRL relay
1 OK
Confirm battery voltage on (BRNV) wire of the DRL con-
trol unit NG
Repair harness (DRL relay - DRL control unit) OK
Confirm battery voltage on (L/G) wire of the DRL control NG
unit Repair harness (Rear wiper fuse - DRL control unit) OK
Confirm continuity of (G/R) wire of the DRL control unit x Repair harness (DRL control unit - Parking brake
to ground switch) or check the parking brake switch 1 OK
Confirm continuity on (B) wire of the DRL control unit to
NG
ground Repair harness (DRL control unit ground) OK
-1 NG
Confirm approx. 8V on the DRL resistor Repair harness (DRL control unit - DRL headlight)
I
Confirm battery voltage on (
Confirm approx. 8V on (R/W) wire of the DRL resistor Repair harness (DRL resistor - DRL relay)
Repair harness (DRL control unit - DRL resistor)
23UOTX-019
T-33
Page 891 of 1164
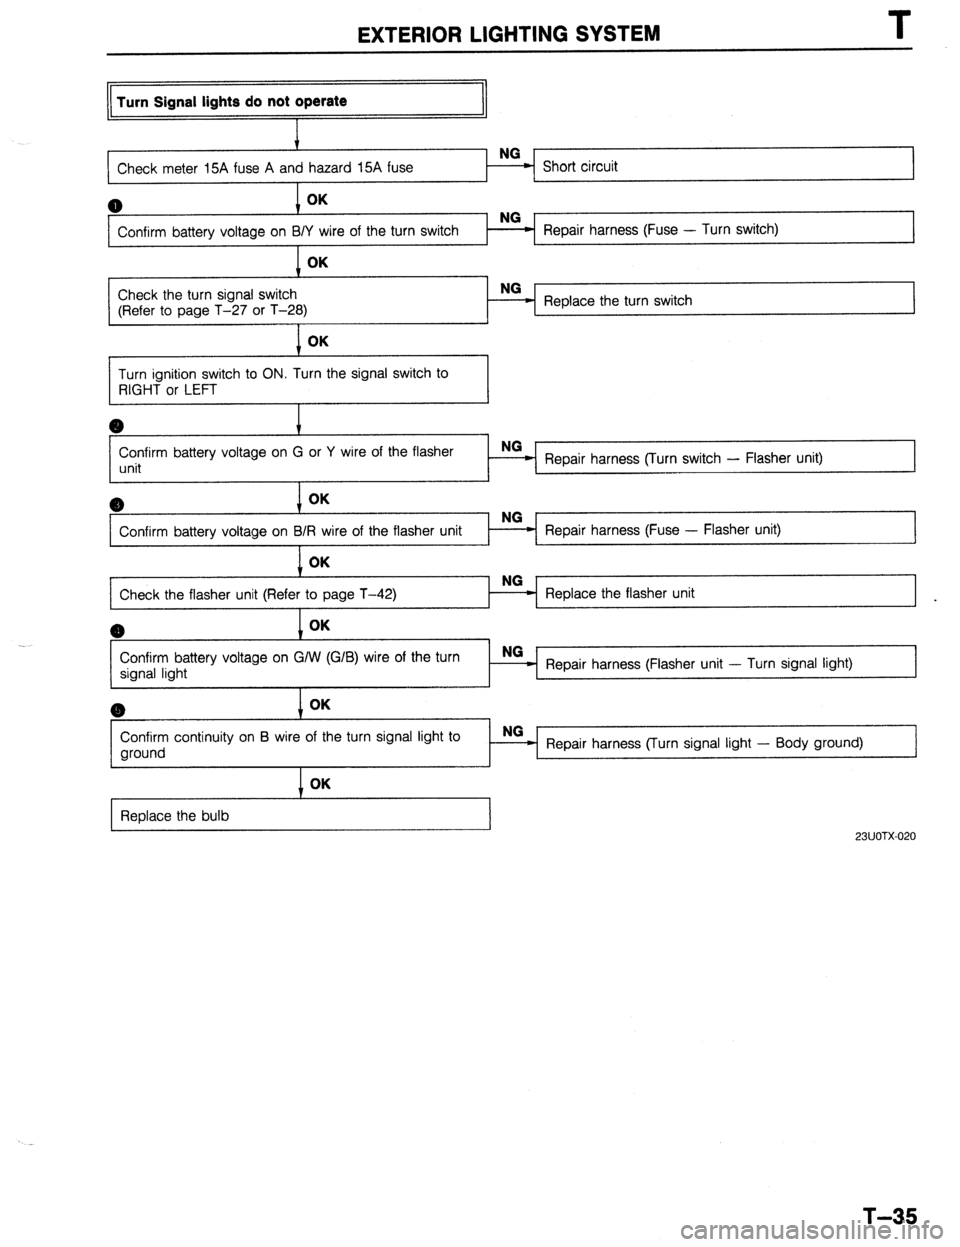
EXTERIOR LIGHTING SYSTEM
Turn Signal lights do not operate
Check meter 15A fuse A an
I
0 OK
Confirm battery voltage on BI Repair harness (Fuse - Turn switch) OK
1 ~,-
Check the turn signal switch NG
(Refer to page T-27 or T-28) Replace the turn switch
1 OK
Turn ignition switch to ON. Turn the signal switch to
RIGHT or LEFT
Confirm battery voltage on G or Y wire of the flasher
unit Repair harness (Turn switch - Flasher unit)
6) OK
Confirm battery voltage on B Repair harness (Fuse - Flasher unit)
1
1 OK
Check the flasher unit (Refe Replace the flasher unit
I
(B OK
Confirm battery voltage on G/W (G/B) wire of the turn
signal light NG _
Repair harness (Flasher unit - Turn signal light) @ OK
Confirm continuity on B wire of the turn signal light to
ground OK
Replace the bulb NG
Repair harness (Turn signal light - Body ground)
23UOTX-020
T-35
Page 892 of 1164
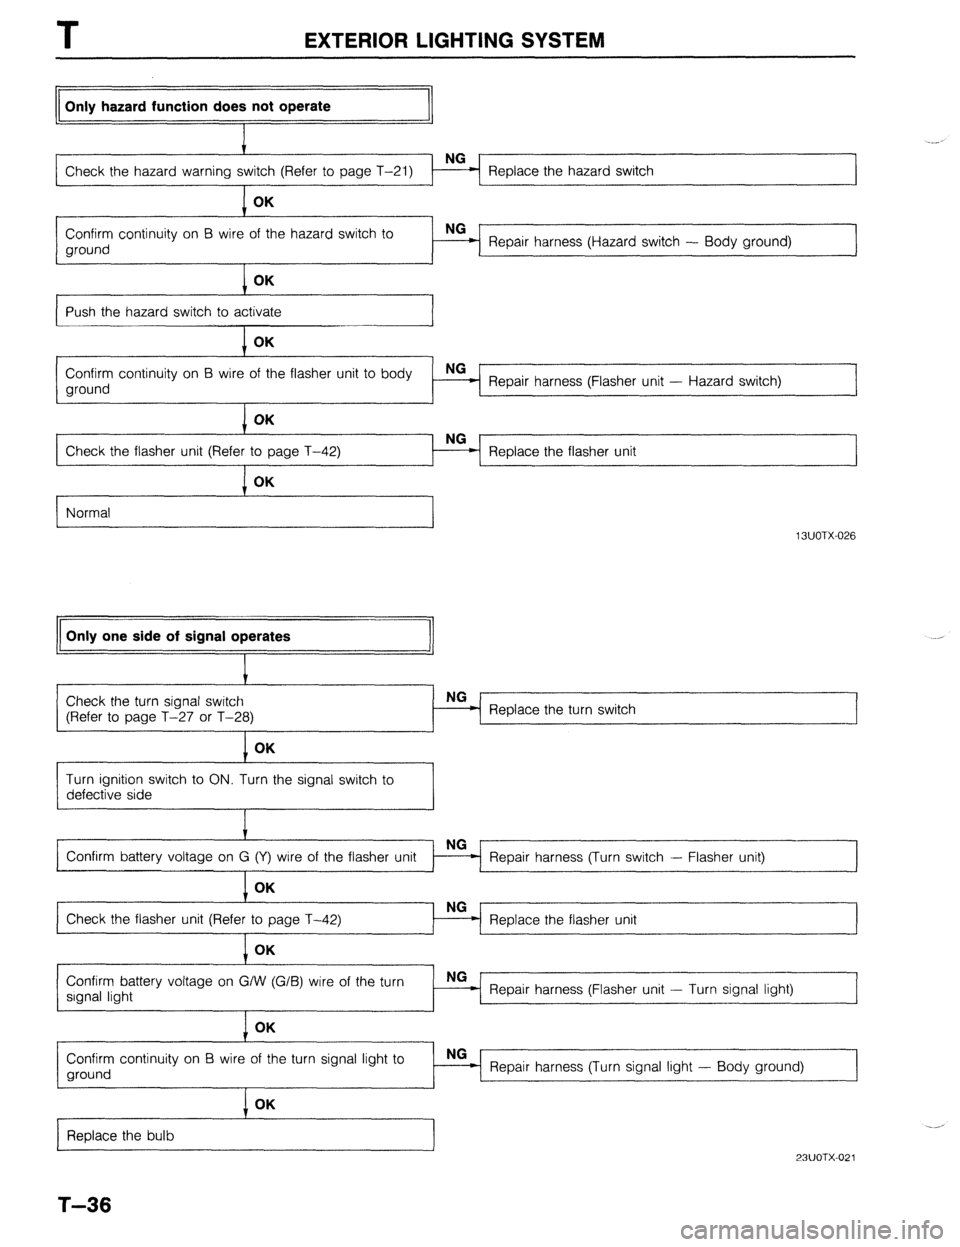
I
EXTERIOR LIGHTING SYSTEM
Only hazard function does not operate
Check the hazard warning Replace the hazard switch
1 I
1 OK
Confirm continuity on B wire of the hazard switch to
ground Repair harness (Hazard switch - Body ground)
OK
I I
Push the hazard switch to activate
OK -2
Confirm continuity on B wire of the flasher unit to body
ground NG
Repair harness (Flasher unit - Hazard switch)
OK
NG
Check the flasher unit (Refer
Replace the flasher unit
Normal
I
Only one side of signal operates
13UOTX-026 .,
Check the turn signal switch
(Refer to page T-27 or T-28)
I Replace the turn switch
1 OK
Turn ignition switch to ON. Turn the signal switch to
defective side
Repair harness (Turn switch - Flasher unit)
Replace the flasher unit
Confirm battery voltage on G/W (G/B) wire of the turn
signal light NG-
- Repair harness (Flasher unit - Turn signal light)
I OK
Confirm continuity on B wire of the turn signal light to
ground NG
Repair harness (Turn signal light - Body ground)
Replace the bulb
T-36
I OK
23UOTX-021