1989 MAZDA 323 brake fluid
[x] Cancel search: brake fluidPage 667 of 1164
P
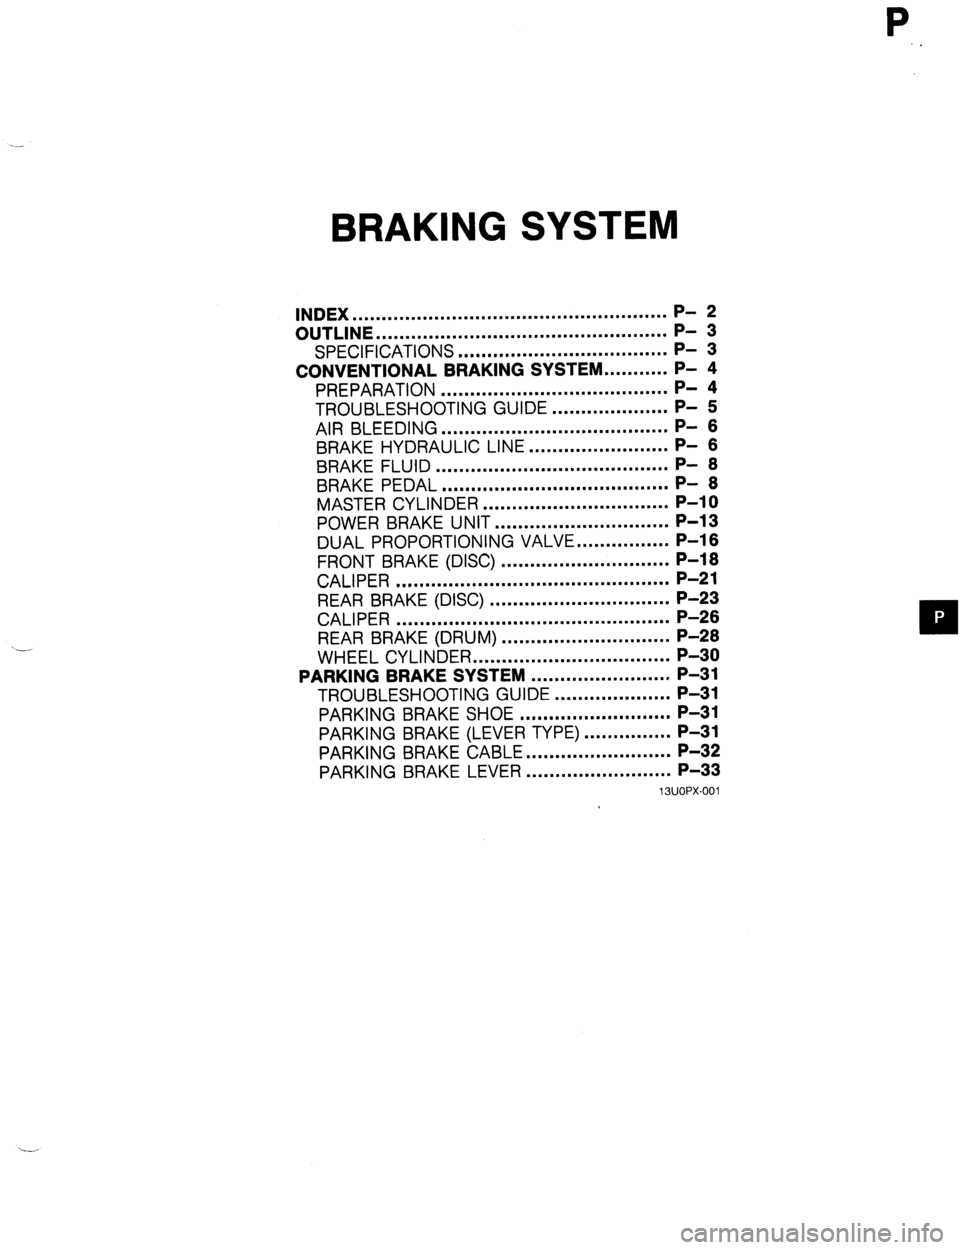
BRAKING SYSTEM
INDEX ......................................................
OUTLINE .................................................. ;I g
SPECIFICATIONS .................................... P- 3
CONVENTIONAL BRAKING SYSTEM.. ......... P- 4
PREPARATION ....................................... P- 4
TROUBLESHOOTING GUIDE .................... P- 5
AIR BLEEDING .......................................
BRAKE HYDRAULIC LINE.. -
...................... F- t
BRAKE FLUID ........................................
BRAKE PEDAL ....................................... ;I ;
MASTER CYLINDER ................................ P-l 0
POWER BRAKE UNIT .............................. P-13
DUAL PROPORTIONING VALVE.. .............. P-l 6
FRONT BRAKE (DISC) ............................. P-16
CALIPER ............................................... P-21
REAR BRAKE (DISC) ............................... P-23
CALIPER ............................................... P-26
REAR BRAKE (DRUM) ............................. P-28
WHEEL CYLINDER .................................. P-30
PARKING BRAKE SYSTEM ........................ P-31
TROUBLESHOOTING GUIDE .................... P-31
PARKING BRAKE SHOE .......................... P-31
PARKING BRAKE (LEVER TYPE) ............... P-31
PARKING BRAKE CABLE.. ....................... P-32
PARKING BRAKE LEVER ......................... P-33
13UOPX-001
Page 669 of 1164
OUTLINE
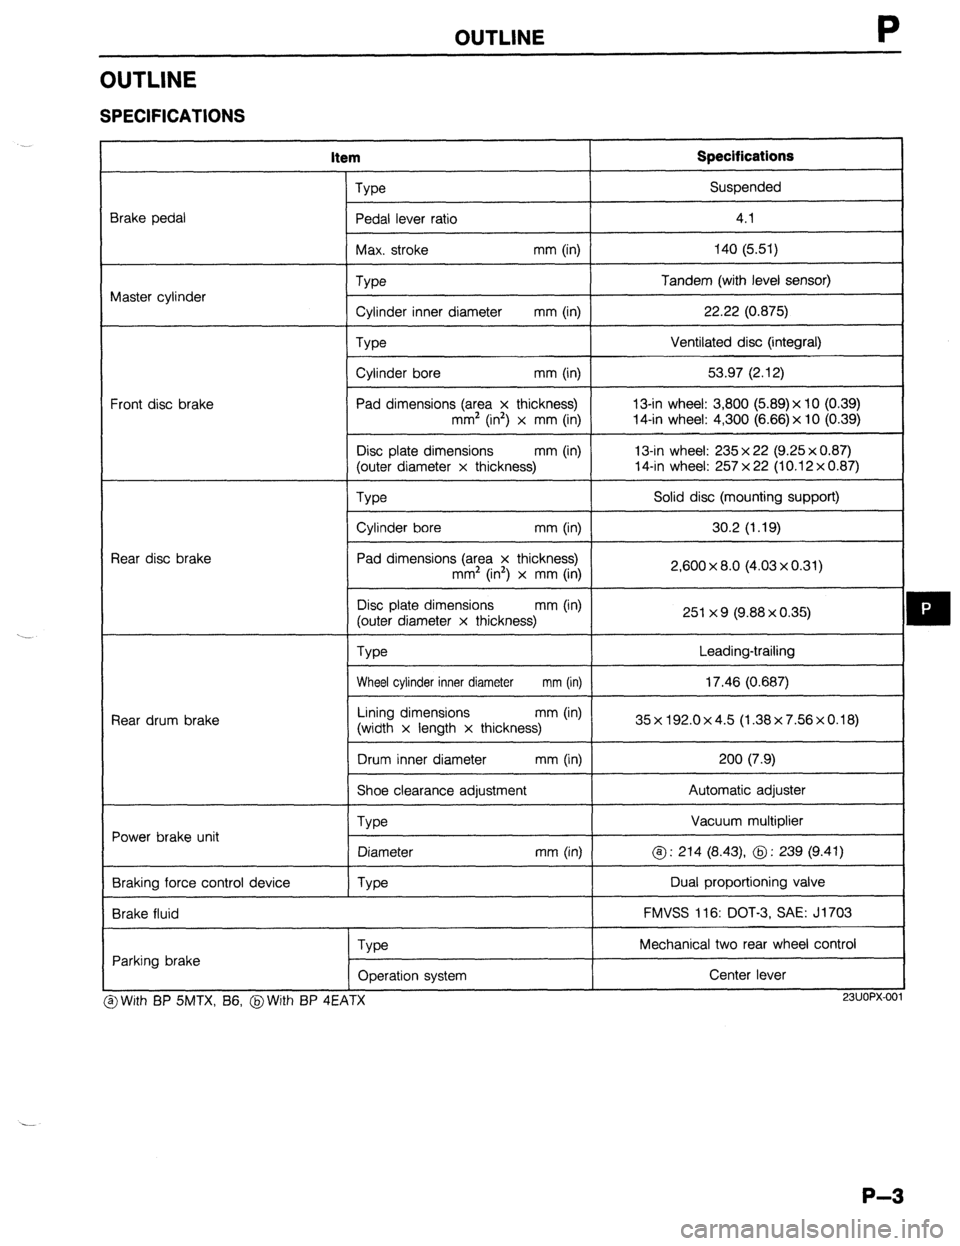
OUTLINE
SPECIFICATIONS
item Specifications
Brake pedal
Master cylinder
Front disc brake
Rear disc brake
Rear drum brake
Power brake unit
Braking force control device
Brake fluid Type Suspended
Pedal lever ratio
I 4.1
I
Max. stroke mm (in) 140 (5.51)
I
Type
Cylinder inner diameter mm (in)
Type
Cylinder bore mm (in)
Pad dimensions (area x thickness)
mm’ (in2) x mm (in)
Disc plate dimensions mm (in)
(outer diameter x thickness) Tandem (with level sensor)
22.22 (0.875)
Ventilated disc (integral)
53.97 (2.12)
13-in wheel: 3,800 (5.89)x 10 (0.39)
14-in wheel: 4,300 (6.66) x 10 (0.39)
13-in wheel: 235 x 22 (9.25 x 0.87)
14-in wheel: 257 x 22 (10.12 x 0.87)
We
I Solid disc (mounting support)
I
Cylinder bore mm (in)
I 30.2 (1.19)
I
Pad dimensions (area x thickness)
mm2 (in’) x mm (in)
Disc plate dimensions mm (in)
(outer diameter x thickness)
Type 2,600 x 8.0 (4.03 x 0.31)
251 x 9 (9.88 x 0.35)
Leading-trailing
Wheel cylinder inner diameter mm (in) 17.46 (0.687)
I
Lining dimensions mm (in)
(width x length x thickness) 35x192.0x4.5 (1.38x7.56x0.18)
I
Drum inner diameter mm (in) 200 (7.9)
I
Shoe clearance adjustment Automatic adjuster
Vacuum multiplier
@ : 214 (8.43) @ : 239 (9.41)
Dual proportioning valve
FMVSS 116: DOT-3, SAE: J1703
Type
Diameter
Type mm (in)
Parking brake
Type
Operation system Mechanical two rear wheel control
Center lever I
3 With BP SMTX, B6, @With BP 4EATX
I I
23UOPX-001
P-3
Page 671 of 1164
CONVENTIONAL BRAKE SYSTEM
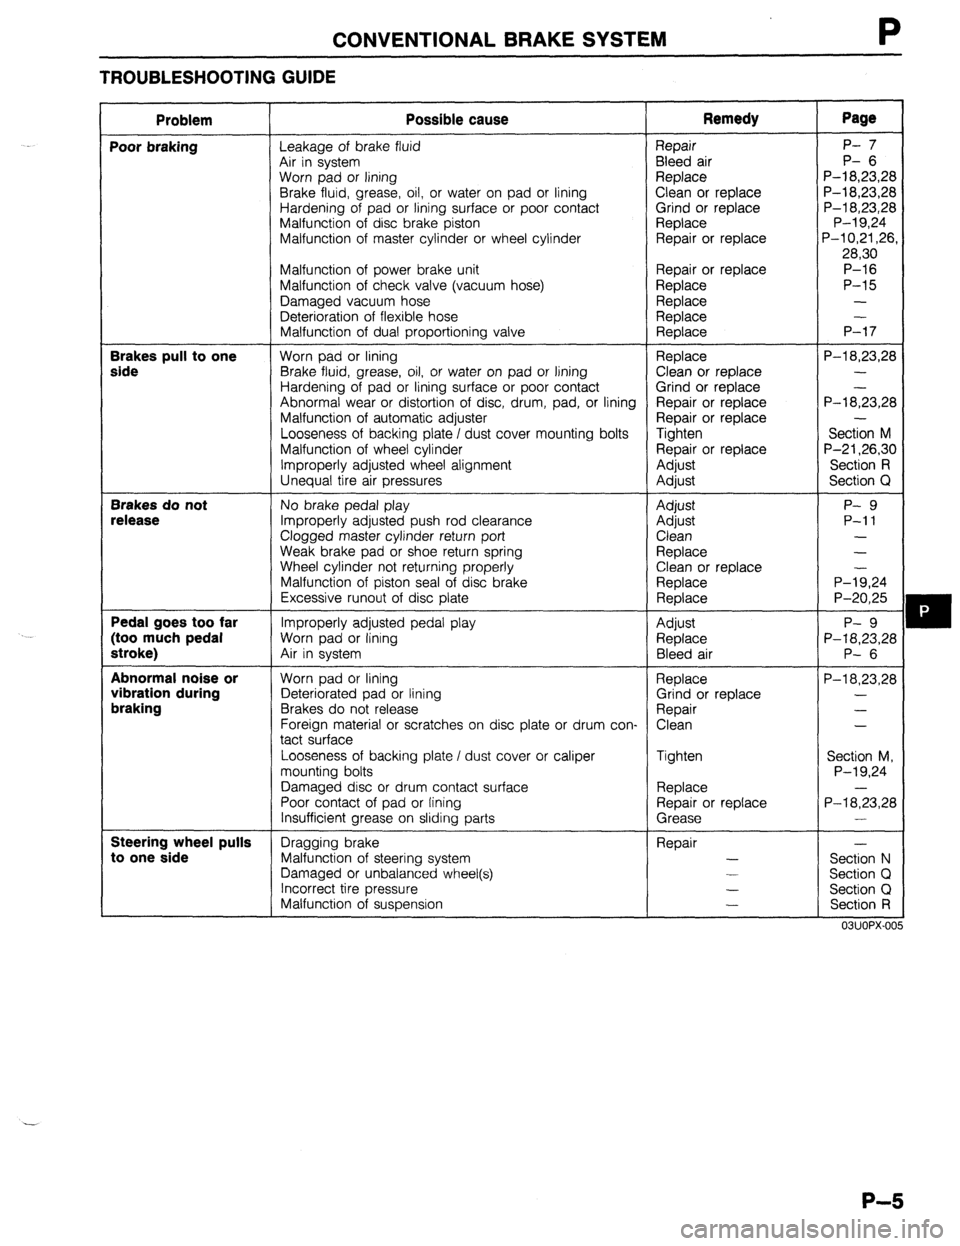
TROUBLESHOOTING GUIDE
Problem Possible cause Remedy Page
Poor braking
Leakage of brake fluid Repair P- 7
Air in system Bleed air P- 6
Worn pad or lining Replace P-l 8,23,28
Brake fluid, grease, oil, or water on pad or lining Clean or replace P-18,23,28
Hardening of pad or lining surface or poor contact Grind or replace P-l 8,23,28
Malfunction of disc brake piston Replace P-l 9,24
Malfunction of master cylinder or wheel cylinder Repair or replace P-l 0,21,26,
28,30
Malfunction of power brake unit Repair or replace P-16
Malfunction of check valve (vacuum hose) Replace P-15
Damaged vacuum hose Replace -
Deterioration of flexible hose Replace -
Malfunction of dual proportioning valve Replace P-17 Brakes pull to one
Worn pad or lining Replace P-l 8,23,28 side Brake fluid, grease, oil, or water on pad or lining Clean or replace -
Hardening of pad or lining surface or poor contact Grind or replace
Abnormal wear or distortion of disc, drum, pad, or lining Repair or replace P-l 8;3,28
Malfunction of automatic adjuster Repair or replace -
Looseness of backing plate I dust cover mounting bolts Tighten Section M
Malfunction of wheel cylinder Repair or replace P-21,26,30
Improperly adjusted wheel alignment Adjust Section R
Unequal tire air pressures
Adjust Section Q Brakes do not
No brake pedal play Adjust P- 9 release Improperly adjusted push rod clearance Adjust P-11
Clogged master cylinder return port Clean -
Weak brake pad or shoe return spring Replace -
Wheel cylinder not returning properly
Clean or replace
Malfunction of piston seal of disc brake Replace P-l;,24
Excessive runout of disc plate
Replace P-20,25 Pedal goes too far
Improperly adjusted pedal play Adjust P- 9 (too much pedal Worn pad or lining
Replace P-18,23,28 stroke) Air in system
Bleed air P- 6 Abnormal noise or
Worn pad or lining
Replace P-18,23,28 vibration during Deteriorated pad or lining Grind or replace - braking Brakes do not release Repair -
Foreign material or scratches on disc plate or drum con- Clean -
tact surface
Looseness of backing plate / dust cover or caliper Tighten
Section M,
mounting bolts P-l 9,24
Damaged disc or drum contact surface Replace -
Poor contact of pad or fining Repair or replace
P-18,23,28
Insufficient grease on sliding parts Grease - Steering wheel pulls
Dragging brake Repair - to one side Malfunction of steering system -
Section N
Damaged or unbalanced wheel(s) -
Section Cl
Incorrect tire pressure -
Section Q
Malfunction of suspension -
Section R
mm> IAn\, ,.e
P-5
Page 672 of 1164
P CONVENTIONAL BRAKE SYSTEM
03UOPX-006
03UOPX-00
03UOPX-00
BRAKE HYDRAULIC LINE AIR BLEEDING
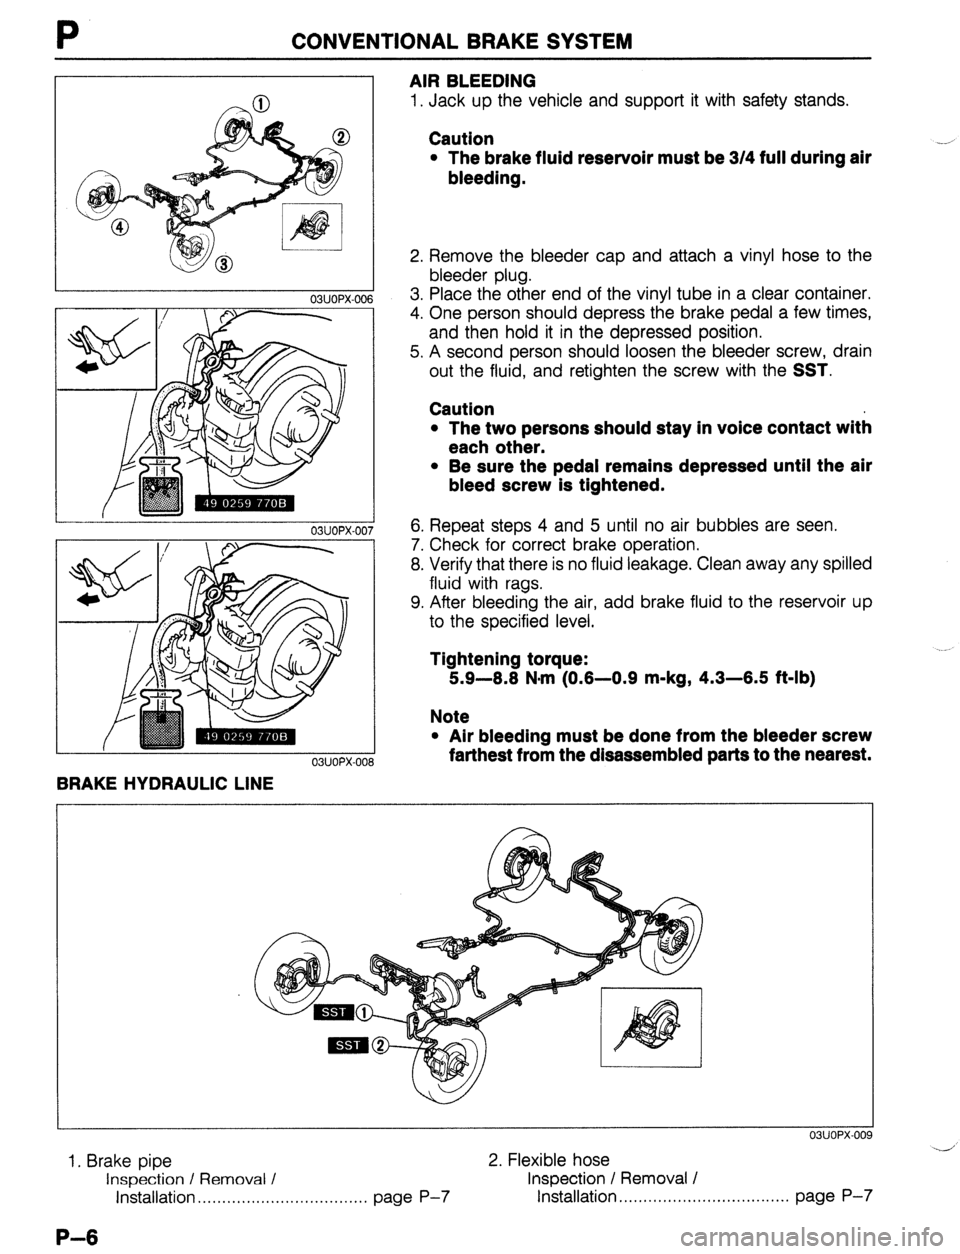
1. Jack up the vehicle and support it with safety stands.
Caution
l The brake fluid reservoir must be 314 full during air
bleeding.
2. Remove the bleeder cap and attach a vinyl hose to the
bleeder plug.
3. Place the other end of the vinyl tube in a clear container.
4. One person should depress the brake pedal a few times,
and then hold it in the depressed position.
5. A second person should loosen the bleeder screw, drain
out the fluid, and retighten the screw with the
SST.
Caution
l The two persons should stay in voice contact with
each other.
l Be sure the pedal remains depressed until the air
bleed screw is tightened.
6. Repeat steps 4 and 5 until no air bubbles are seen.
7. Check for correct brake operation.
8. Verify that there is no fluid leakage. Clean away any spilled
fluid with rags.
9. After bleeding the air, add brake fluid to the reservoir up
to the specified level.
Tightening torque:
5.9-8.8 N-m (0.8-0.9 m-kg, 4.3-8.5 ft-lb)
Note
l Air bleeding must be done from the bleeder screw
farthest from the disassembled parts to the nearest.
03UOPX-00
1. Brake pipe 2. Flexible hose
Inspection / Removal / Inspection / Removal /
Installation . . . . . . . . . . . . . . . . . . . . . . . . . . . . . . . . . . . page P-7 Installation . . . . . . . . . . . . . . . . . . . . . . . . . . . . . . . . . . . page P-7
P-6
Page 674 of 1164
P CONVENTIONAL BRAKE SYSTEM
03UOPX.01
03UOPX-01
03UOPX-01
23UOPX-0
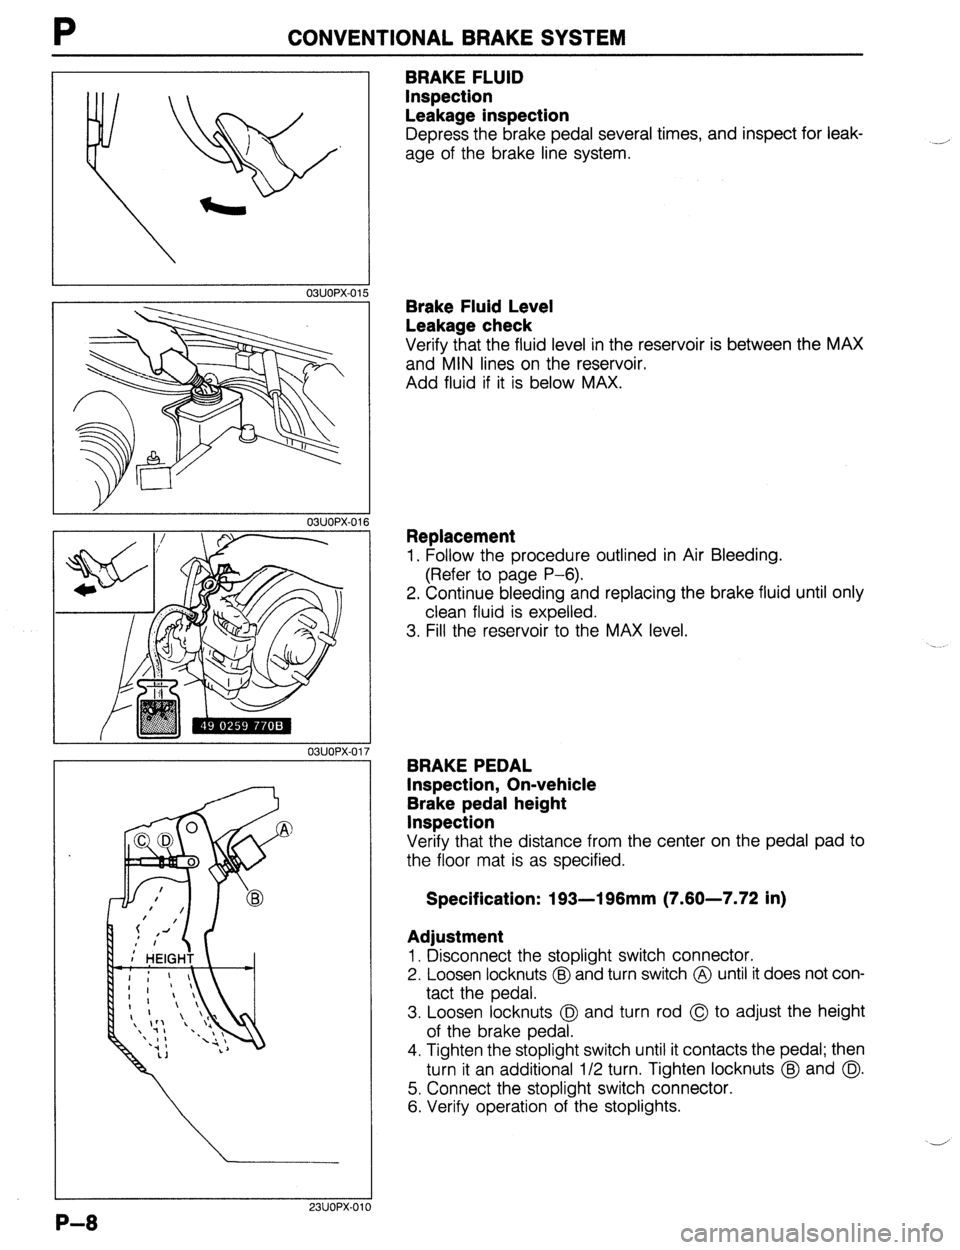
BRAKE FLUID
Inspection
Leakage inspection
Depress the brake pedal several times, and inspect for leak-
age of the brake line system. __,
Brake Fluid Level
Leakage check
Verify that the fluid level in the reservoir is between the MAX
and MIN lines on the reservoir.
Add fluid if it is below MAX.
Replacement
1. Follow the procedure outlined in Air Bleeding.
(Refer to page P-6).
2. Continue bleeding and replacing the brake fluid until only
clean fluid is expelled.
3. Fill the reservoir to the MAX level.
BRAKEPEDAL
Inspection, On-vehicle
Brake pedal height
Inspection
Verify that the distance from the center on the pedal pad to
the floor mat is as specified.
Specification: 193-196mm (7.60-7.72 in)
Adjustment
1. Disconnect the stoplight switch connector.
2. Loosen locknuts @J and turn switch @ until it does not con-
tact the pedal.
3. Loosen locknuts (I?J and turn rod @ to adjust the height
of the brake pedal.
4. Tighten the stoplight switch until it contacts the pedal; then
turn it an additional 112 turn. Tighten locknuts @ and @I.
5. Connect the stoplight switch connector.
6. Verify operation of the stoplights.
P-8
Page 676 of 1164
P CONVENTIONAL BRAKE SYSTEM
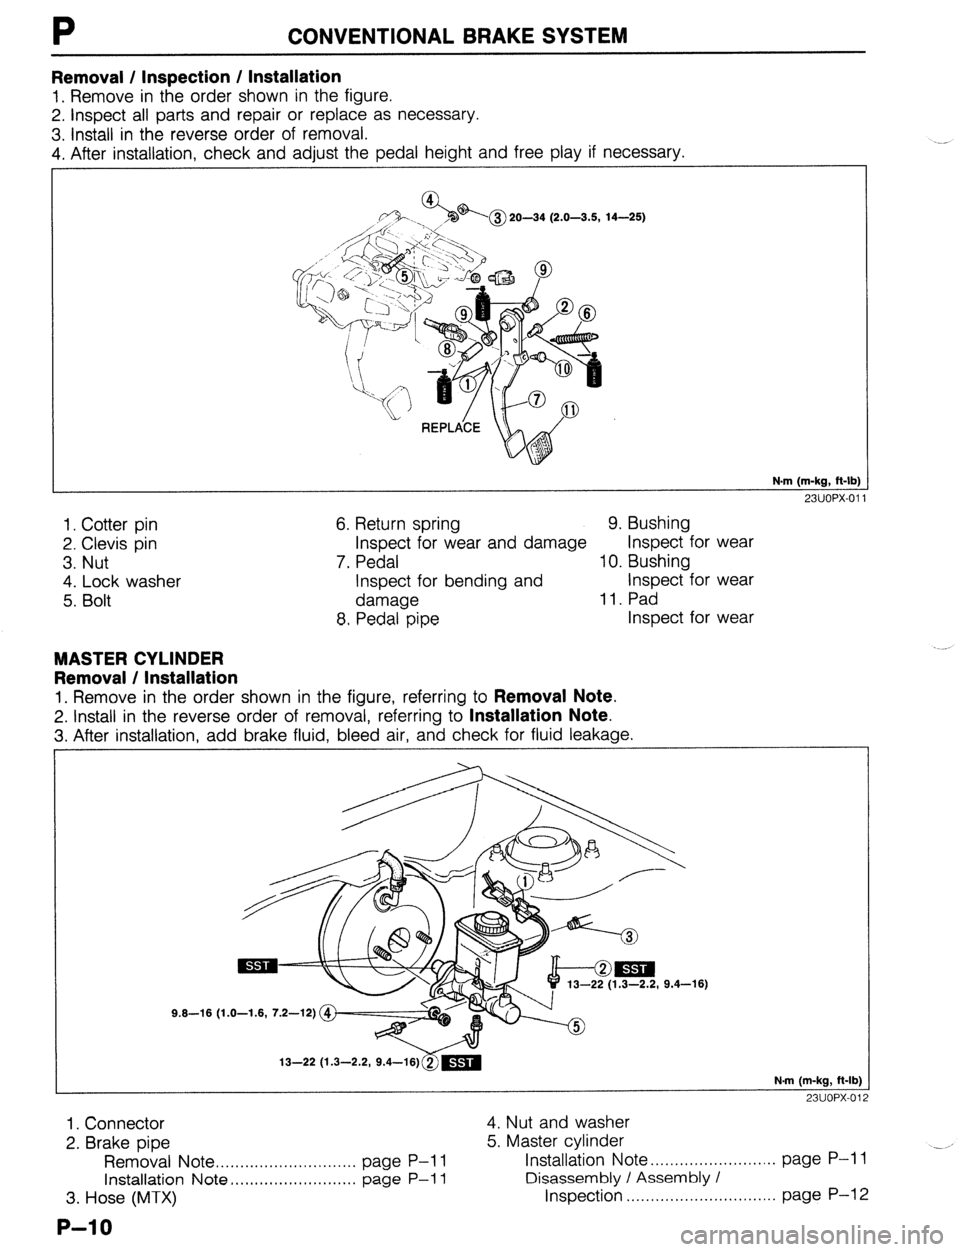
Removal / Inspection / Installation
1. Remove in the order shown in the figure.
2. Inspect all parts and repair or replace as necessary.
3. install in the reverse order of removal.
4. After installation, check and adjust the pedal height and free play if necessary.
r
20-34 (2.0-3.5, 14-25)
N-m (m-kg, ft-lb)
23UOPX-01
1. Cotter pin
2. Clevis pin
3. Nut
4. Lock washer
5. Bolt 6. Return spring 9. Bushing
Inspect for wear and damage Inspect for wear
7. Pedal 10. Bushing
Inspect for bending and Inspect for wear
damage 11. Pad
8, Pedal pipe Inspect for wear
MASTER CYLINDER
Removal / Installation
1. Remove in the order shown in the figure, referring to Removal Note.
2. Install in the reverse order of removal, referring to Installation Note.
3. After installation. add brake fluid. bleed air, and check for fluid leakage.
1.3-2.2, 9.4-16)
9.6-16 (1.0-1.6, 7.2-12)
13-22 (1.3-2.2, 9.4-l
N.m (m-kg, ft-lb)
23UOPX-01
1. Connector 4. Nut and washer
2. Brake pipe 5. Master cylinder
Removal Note . . . . . . . . . . . . . . . . . . . . . . . . . . . . . page P-i 1 Installation Note . . . . . . . . . . . . . . . . . . . . . . . . . . page P-l 1
Installation Note . . . . . . . . . . . . . . . . . . . . . . . . . . page P-l 1 Disassembly / Assembly /
3. Hose (MTX) Inspection . . . . . . . . . . . . . . . . . . . . . . . . . . . . . . . page P-l 2
P-l 0
Page 677 of 1164
CONVENTIONAL BRAKE SYSTEM P
03UOPX-02,
4
ADJUSTING BOLT
‘ ’
I ’ “-
03UOPX-025
r
03UOPX-02
6
ir
23UOPX.OC
OWOPX-028
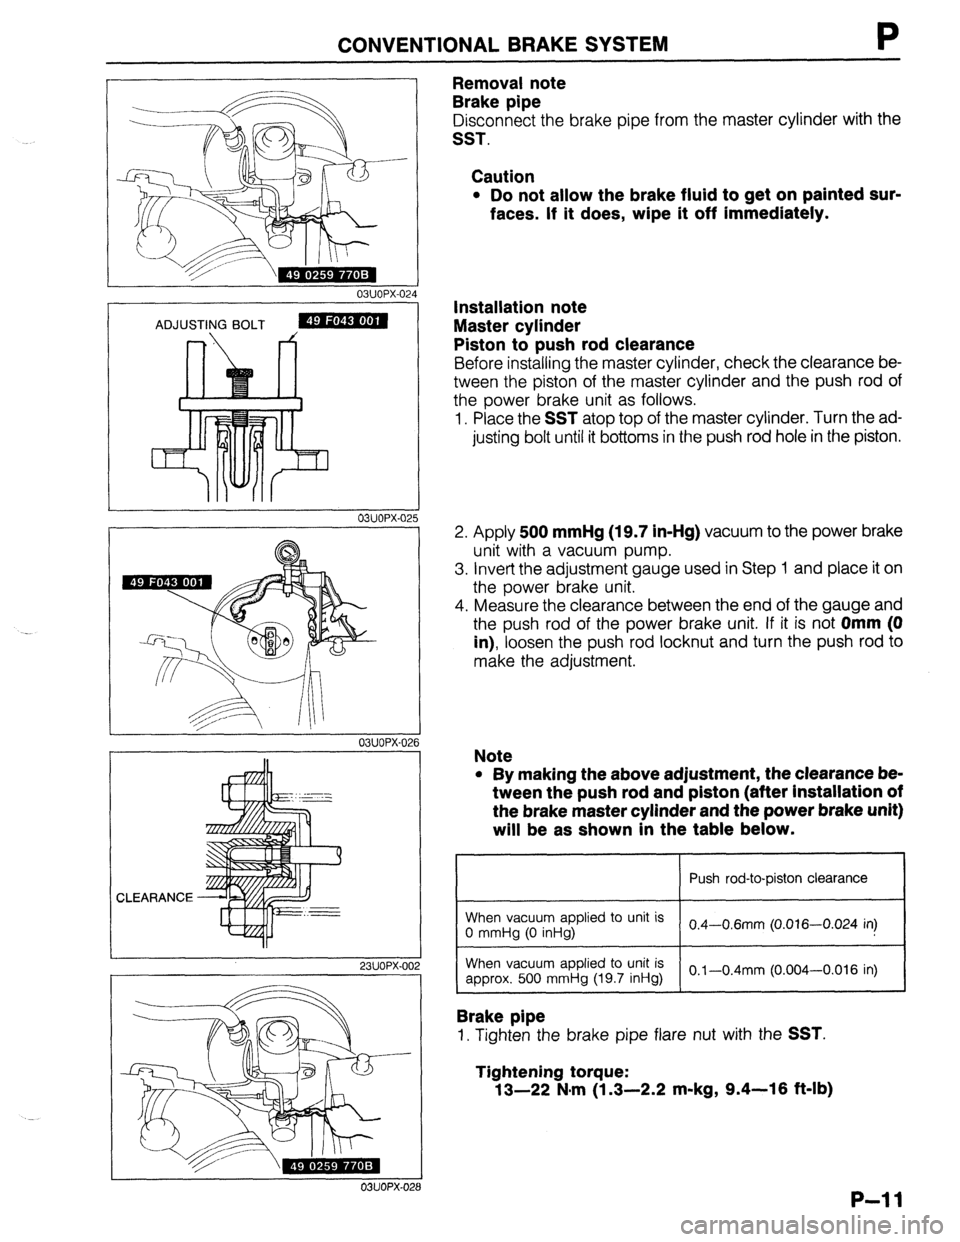
Removal note
Brake pipe
Disconnect the brake pipe from the master cylinder with the
SST.
Caution
l Do not allow the brake fluid to get on painted sur-
faces. If it does, wlpe it off immediately.
Installation note
Master cylinder
Piston to push rod clearance
Before installing the master cylinder, check the clearance be-
tween the piston of the master cylinder and the push rod of
the power brake unit as follows.
1. Place the
SST atop top of the master cylinder. Turn the ad-
justing bolt until it bottoms in the push rod hole in the piston.
2. Apply 500
mmHg (19.7 in-Hg) vacuum to the power brake
unit with a vacuum pump.
3. Invert the adjustment gauge used in Step 1 and place it on
the power brake unit.
4. Measure the clearance between the end of the gauge and
the push rod of the power brake unit. If it is not
Omm (0
in),
loosen the push rod locknut and turn the push rod to
make the adjustment.
Note
l By making the above adjustment, the clearance be-
tween the push rod and piston (after Installation of
the brake master cylinder and the power brake unit)
will be as shown in the table below.
Push rod-to-piston clearance
When vacuum applied to unit is
0 mmHg (0 inHg) 0.4-0.6mm (0.016-0.024 in)
I
When vacuum applied to unit is
approx. 500 mmHg (19.7 inHg)
I O.l-0.4mm (0.004-0.016 in)
Brake pipe
1. Tighten the brake pipe flare nut with the SST.
Tightening torque:
13-22 N,m (1.3-2.2 m-kg, 9.4-16 ft-lb)
P-l 1
Page 678 of 1164
P CONVENTIONAL BRAKE SYSTEM
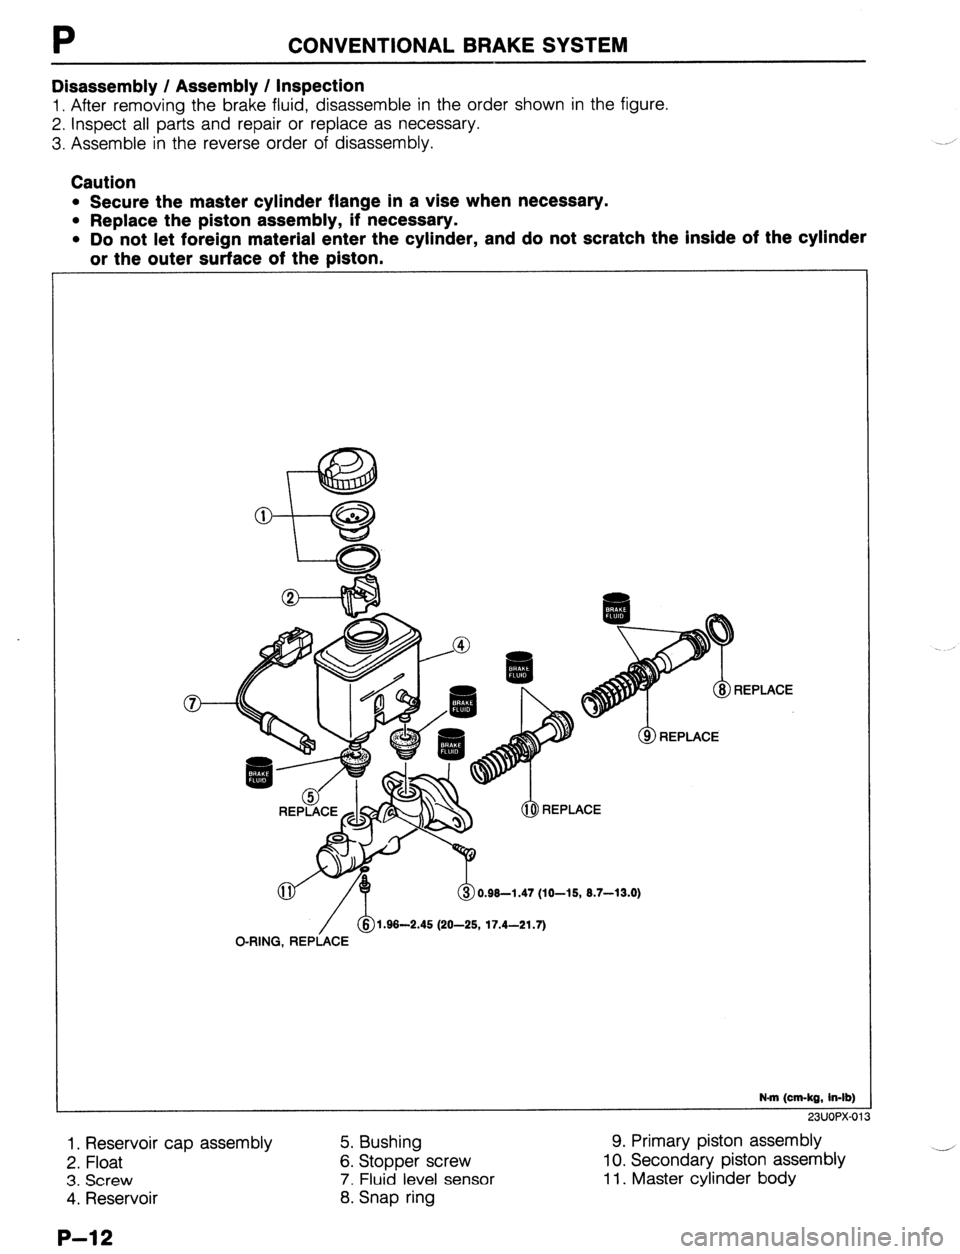
Disassembly / Assembly / Inspection
1. After removing the brake fluid, disassemble in the order shown in the figure.
2. Inspect all parts and repair or replace as necessary.
3. Assemble in the reverse order of disassembly.
Caution
l Secure the master cylinder flange in a vise when necessary.
l Replace the piston assembly, if necessary.
l Do not let foreign material enter the cylinder, and do not scratch the inside of the cylinder
or the outer surface of the piston.
REP1 .ACE
0.98-1.47 (10-15, 8.7-13.0)
o R,NG ,,,dcE @.96-2.45 (20-25, 17.4-21.7)
- 3
N.m (cm-kg, in-lb)
1. Reservoir cap assembly 5. Bushing 9. Primary piston assembly
2. Float 6. Stopper screw 10. Secondary piston assembly
3. Screw 7. Fluid level sensor 11. Master cylinder body
4. Reservoir 8. Snap ring
P-12