1988 OPEL VECTRA light box
[x] Cancel search: light boxPage 5 of 525
10Throttle pedal - removal and
refitting
3
Removal
1Working inside the vehicle, remove the
lower trim panel from the driver’s footwell.
2Slide the cable retainer from the bracket on
the top of the pedal, and disconnect the cable
end from the pedal.
3Extract the circlip from the right-hand end
of the pedal pivot shaft, then slide out the
pivot shaft from the left-hand side of the pivot
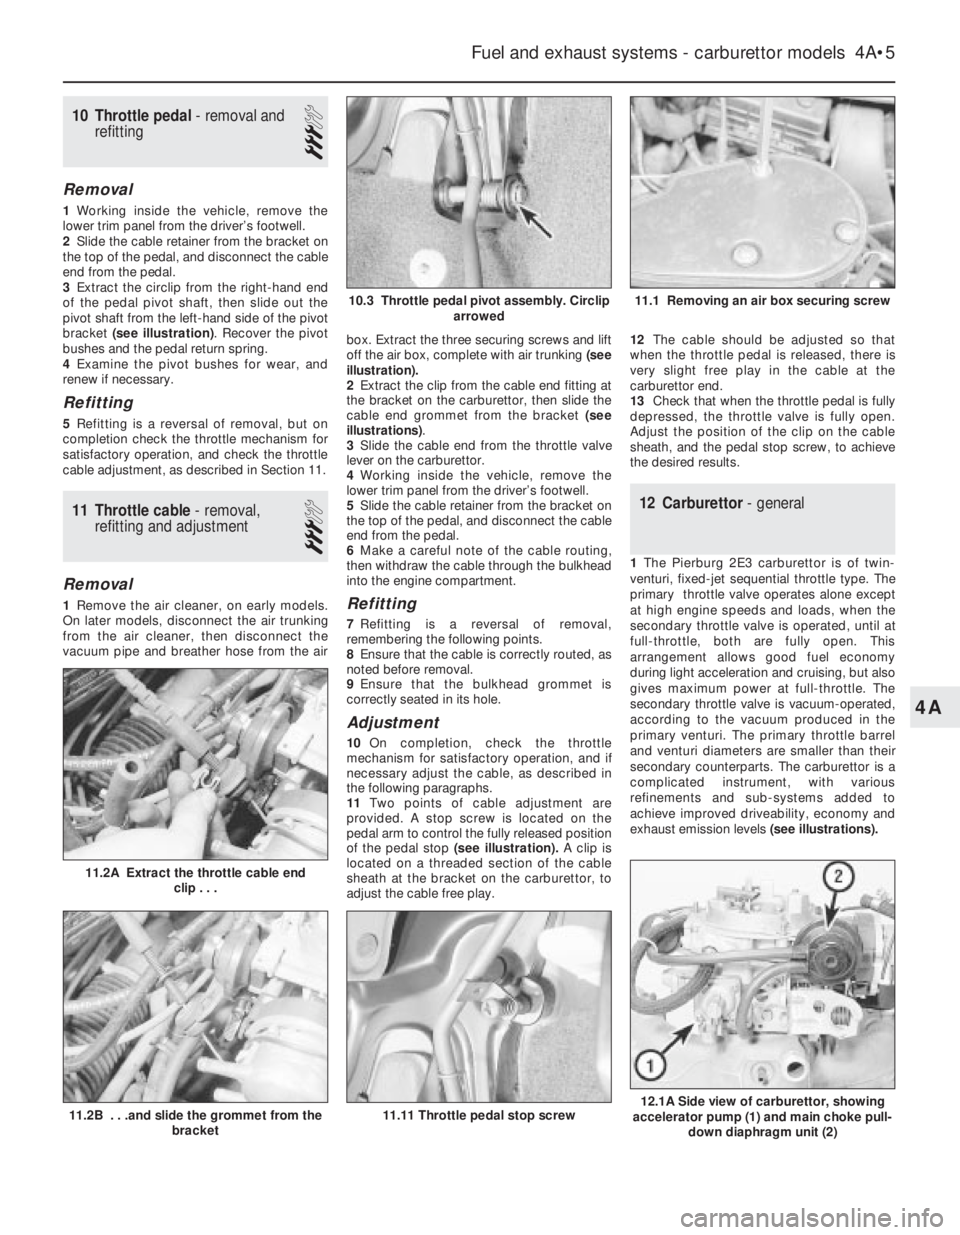
bracket (see illustration). Recover the pivot
bushes and the pedal return spring.
4Examine the pivot bushes for wear, and
renew if necessary.
Refitting
5Refitting is a reversal of removal, but on
completion check the throttle mechanism for
satisfactory operation, and check the throttle
cable adjustment, as described in Section 11.
11Throttle cable - removal,
refitting and adjustment
3
Removal
1Remove the air cleaner, on early models.
On later models, disconnect the air trunking
from the air cleaner, then disconnect the
vacuum pipe and breather hose from the airbox. Extract the three securing screws and lift
off the air box, complete with air trunking(see
illustration).
2Extract the clip from the cable end fitting at
the bracket on the carburettor, then slide the
cable end grommet from the bracket (see
illustrations).
3Slide the cable end from the throttle valve
lever on the carburettor.
4Working inside the vehicle, remove the
lower trim panel from the driver’s footwell.
5Slide the cable retainer from the bracket on
the top of the pedal, and disconnect the cable
end from the pedal.
6Make a careful note of the cable routing,
then withdraw the cable through the bulkhead
into the engine compartment.Refitting
7Refitting is a reversal of removal,
remembering the following points.
8Ensure that the cable is correctly routed, as
noted before removal.
9Ensure that the bulkhead grommet is
correctly seated in its hole.
Adjustment
10On completion, check the throttle
mechanism for satisfactory operation, and if
necessary adjust the cable, as described in
the following paragraphs.
11Two points of cable adjustment are
provided. A stop screw is located on the
pedal arm to control the fully released position
of the pedal stop (see illustration).A clip is
located on a threaded section of the cable
sheath at the bracket on the carburettor, to
adjust the cable free play.12The cable should be adjusted so that
when the throttle pedal is released, there is
very slight free play in the cable at the
carburettor end.
13Check that when the throttle pedal is fully
depressed, the throttle valve is fully open.
Adjust the position of the clip on the cable
sheath, and the pedal stop screw, to achieve
the desired results.
12Carburettor - general
1The Pierburg 2E3 carburettor is of twin-
venturi, fixed-jet sequential throttle type. The
primary throttle valve operates alone except
at high engine speeds and loads, when the
secondary throttle valve is operated, until at
full-throttle, both are fully open. This
arrangement allows good fuel economy
during light acceleration and cruising, but also
gives maximum power at full-throttle. The
secondary throttle valve is vacuum-operated,
according to the vacuum produced in the
primary venturi. The primary throttle barrel
and venturi diameters are smaller than their
secondary counterparts. The carburettor is a
complicated instrument, with various
refinements and sub-systems added to
achieve improved driveability, economy and
exhaust emission levels(see illustrations).
Fuel and exhaust systems - carburettor models 4A•5
11.2A Extract the throttle cable end
clip . . .
12.1A Side view of carburettor, showing
accelerator pump (1) and main choke pull-
down diaphragm unit (2)11.11 Throttle pedal stop screw11.2B . . .and slide the grommet from the
bracket
11.1 Removing an air box securing screw10.3 Throttle pedal pivot assembly. Circlip
arrowed
4A
Page 17 of 525
to-metal contact between components, due
to flexible rubber mountings, etc.
To check whether a component is properly
earthed, disconnect the battery, and connect
one lead of an ohmmeter to a known good
earth point. Connect the other lead to the wire
or earth connection being tested. The
resistance reading should be zero; if not,
check the connection as follows.
If an earth connection is thought to be
faulty, dismantle the connection, and clean
back to bare metal both the bodyshell and the
wire terminal or the component earth
connection mating surface. Be careful to
remove all traces of dirt and corrosion, then
use a knife to trim away any paint, so that a
clean metal-to-metal joint is made. On
reassembly, tighten the joint fasteners
securely; if a wire terminal is being refitted,
use serrated washers between the terminal
and the bodyshell, to ensure a clean and
secure connection. When the connection is
remade, prevent the onset of corrosion in the
future by applying a coat of petroleum jelly or
silicone-based grease.
3Fuses and relays - general
Fuses
1Fuses are designed to break a circuit when
a predetermined current is reached, to protect
the components and wiring which could be
damaged by excessive current flow. Any
excessive current flow will be due to a fault in
the circuit, usually a short-circuit (Section 2).
2The main fuses and relays are located in a
panel at the lower right-hand side of the facia,
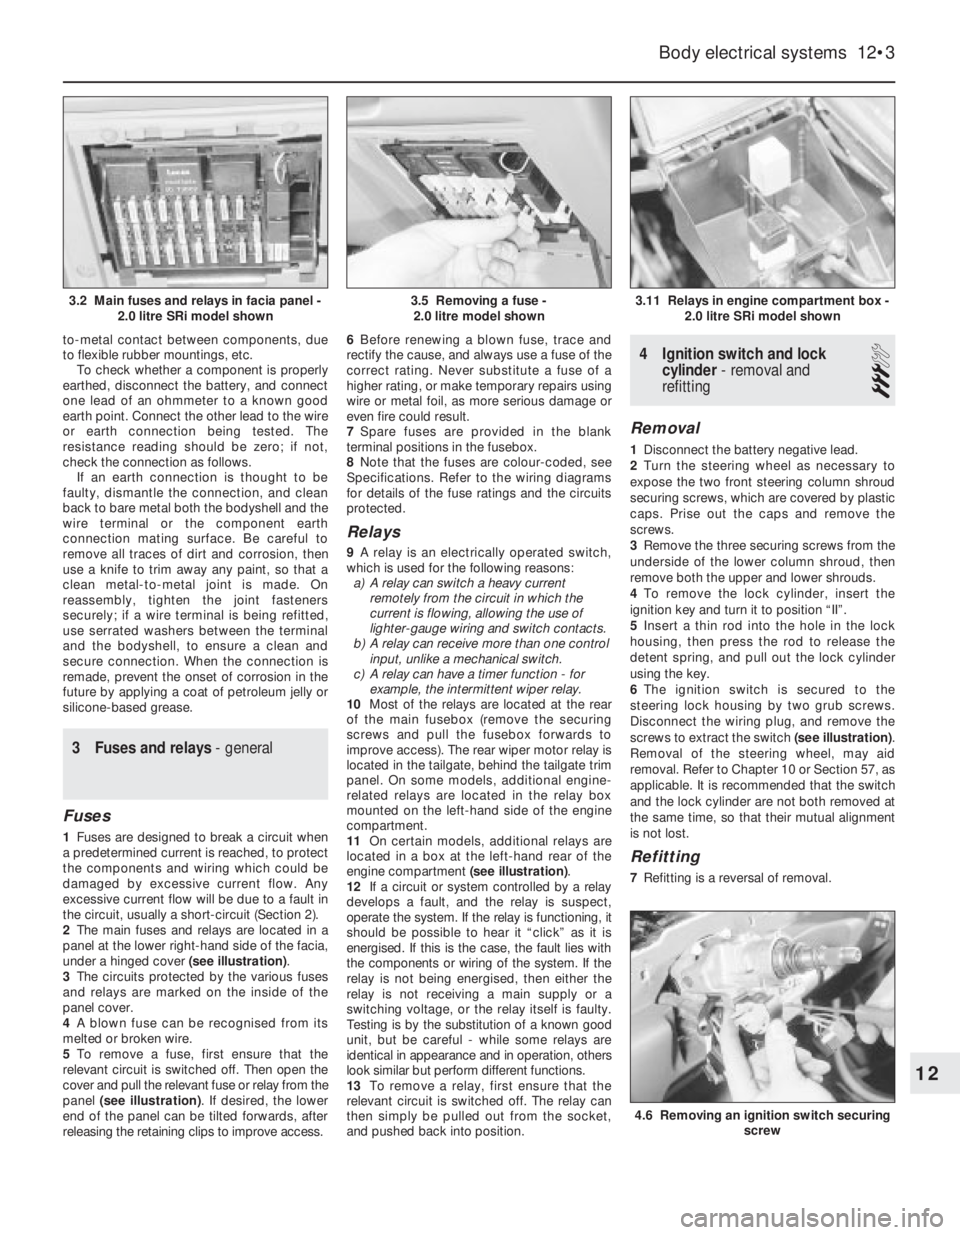
under a hinged cover (see illustration).
3The circuits protected by the various fuses
and relays are marked on the inside of the
panel cover.
4A blown fuse can be recognised from its
melted or broken wire.
5To remove a fuse, first ensure that the
relevant circuit is switched off. Then open the
cover and pull the relevant fuse or relay from the
panel (see illustration). If desired, the lower
end of the panel can be tilted forwards, after
releasing the retaining clips to improve access. 6Before renewing a blown fuse, trace and
rectify the cause, and always use a fuse of the
correct rating. Never substitute a fuse of a
higher rating, or make temporary repairs using
wire or metal foil, as more serious damage or
even fire could result.
7Spare fuses are provided in the blank
terminal positions in the fusebox.
8Note that the fuses are colour-coded, see
Specifications. Refer to the wiring diagrams
for details of the fuse ratings and the circuits
protected.
Relays
9A relay is an electrically operated switch,
which is used for the following reasons:
a)A relay can switch a heavy current
remotely from the circuit in which the
current is flowing, allowing the use of
lighter-gauge wiring and switch contacts.
b)A relay can receive more than one control
input, unlike a mechanical switch.
c)A relay can have a timer function - for
example, the intermittent wiper relay.
10Most of the relays are located at the rear
of the main fusebox (remove the securing
screws and pull the fusebox forwards to
improve access). The rear wiper motor relay is
located in the tailgate, behind the tailgate trim
panel. On some models, additional engine-
related relays are located in the relay box
mounted on the left-hand side of the engine
compartment.
11On certain models, additional relays are
located in a box at the left-hand rear of the
engine compartment (see illustration).
12If a circuit or system controlled by a relay
develops a fault, and the relay is suspect,
operate the system. If the relay is functioning, it
should be possible to hear it “click” as it is
energised. If this is the case, the fault lies with
the components or wiring of the system. If the
relay is not being energised, then either the
relay is not receiving a main supply or a
switching voltage, or the relay itself is faulty.
Testing is by the substitution of a known good
unit, but be careful - while some relays are
identical in appearance and in operation, others
look similar but perform different functions.
13To remove a relay, first ensure that the
relevant circuit is switched off. The relay can
then simply be pulled out from the socket,
and pushed back into position.
4Ignition switch and lock
cylinder - removal and
refitting
3
Removal
1Disconnect the battery negative lead.
2Turn the steering wheel as necessary to
expose the two front steering column shroud
securing screws, which are covered by plastic
caps. Prise out the caps and remove the
screws.
3Remove the three securing screws from the
underside of the lower column shroud, then
remove both the upper and lower shrouds.
4To remove the lock cylinder, insert the
ignition key and turn it to position “II”.
5Insert a thin rod into the hole in the lock
housing, then press the rod to release the
detent spring, and pull out the lock cylinder
using the key.
6The ignition switch is secured to the
steering lock housing by two grub screws.
Disconnect the wiring plug, and remove the
screws to extract the switch (see illustration).
Removal of the steering wheel, may aid
removal. Refer to Chapter 10 or Section 57, as
applicable. It is recommended that the switch
and the lock cylinder are not both removed at
the same time, so that their mutual alignment
is not lost.
Refitting
7Refitting is a reversal of removal.
Body electrical systems 12•3
3.11 Relays in engine compartment box -
2.0 litre SRi model shown
4.6 Removing an ignition switch securing
screw
3.5 Removing a fuse -
2.0 litre model shown3.2 Main fuses and relays in facia panel -
2.0 litre SRi model shown
12
Page 23 of 525
4Remove the courtesy lamp bulbs by
carefully prising it from its location using a
thin-bladed screwdriver. Where applicable,
the map reading lamp bulbs are a push fit in
the bulbholders.
Refitting
5Refitting is a reversal of removal.
Glovebox lamp
Removal
6Using a thin-bladed screwdriver, prise the
lamp from its location and disconnect the
wiring.
7Carefully prise the bulb from the lamp.
Refitting
8Refitting is a reversal of removal.
Luggage compartment,
underbonnet and kerb lamps
Removal
9Using a thin-bladed screwdriver, prise the
lamp from its location; disconnect the wiring.
10Carefully prise the bulb from the lamp
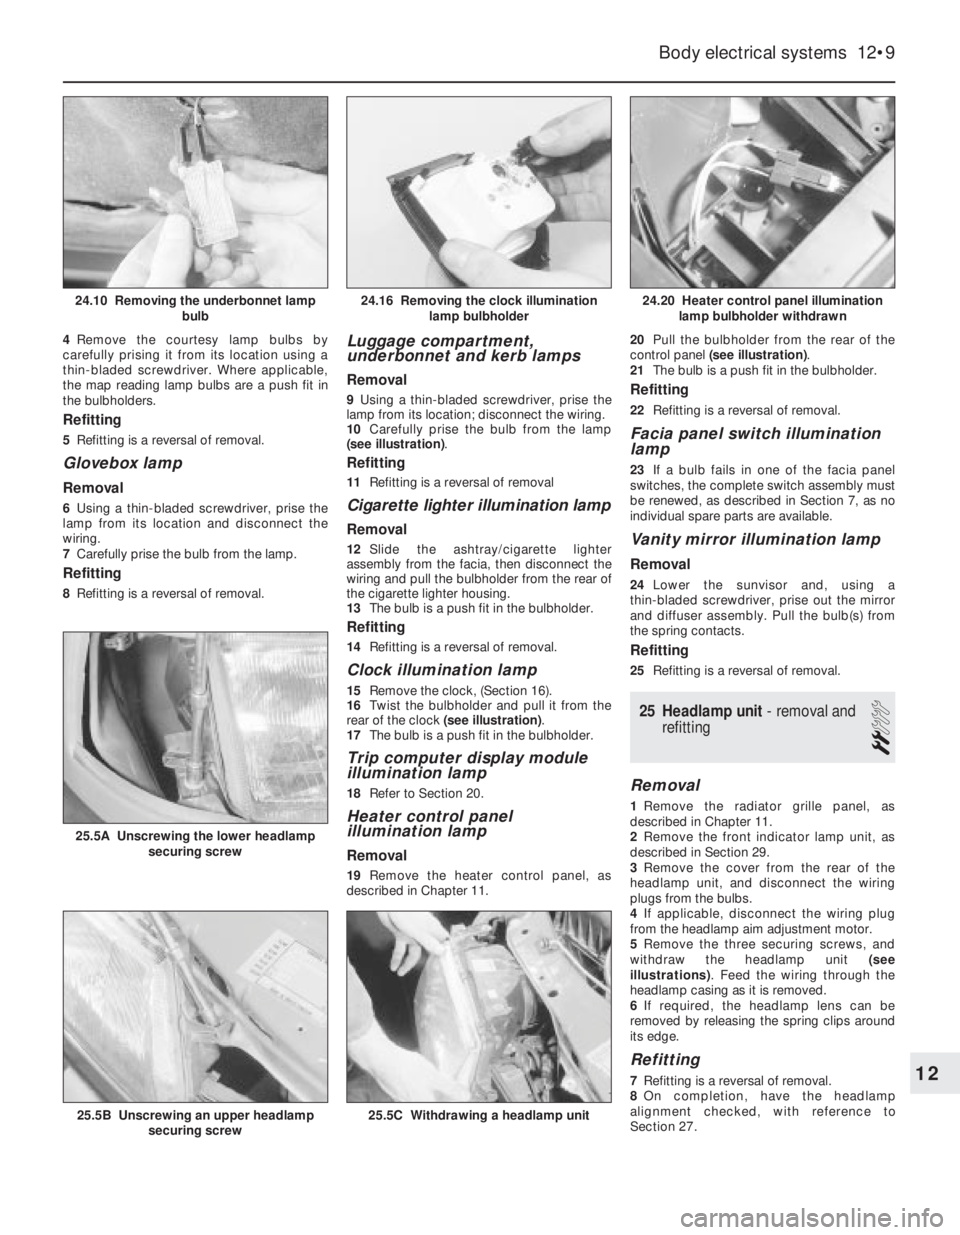
(see illustration).
Refitting
11Refitting is a reversal of removal
Cigarette lighter illumination lamp
Removal
12Slide the ashtray/cigarette lighter
assembly from the facia, then disconnect the
wiring and pull the bulbholder from the rear of
the cigarette lighter housing.
13The bulb is a push fit in the bulbholder.
Refitting
14Refitting is a reversal of removal.
Clock illumination lamp
15Remove the clock, (Section 16).
16Twist the bulbholder and pull it from the
rear of the clock (see illustration).
17The bulb is a push fit in the bulbholder.
Trip computer display module
illumination lamp
18Refer to Section 20.
Heater control panel
illumination lamp
Removal
19Remove the heater control panel, as
described in Chapter 11. 20Pull the bulbholder from the rear of the
control panel (see illustration).
21The bulb is a push fit in the bulbholder.
Refitting
22Refitting is a reversal of removal.
Facia panel switch illumination
lamp
23If a bulb fails in one of the facia panel
switches, the complete switch assembly must
be renewed, as described in Section 7, as no
individual spare parts are available.
Vanity mirror illumination lamp
Removal
24Lower the sunvisor and, using a
thin-bladed screwdriver, prise out the mirror
and diffuser assembly. Pull the bulb(s) from
the spring contacts.
Refitting
25Refitting is a reversal of removal.
25Headlamp unit - removal and
refitting
2
Removal
1Remove the radiator grille panel, as
described in Chapter 11.
2Remove the front indicator lamp unit, as
described in Section 29.
3Remove the cover from the rear of the
headlamp unit, and disconnect the wiring
plugs from the bulbs.
4If applicable, disconnect the wiring plug
from the headlamp aim adjustment motor.
5Remove the three securing screws, and
withdraw the headlamp unit (see
illustrations). Feed the wiring through the
headlamp casing as it is removed.
6If required, the headlamp lens can be
removed by releasing the spring clips around
its edge.
Refitting
7Refitting is a reversal of removal.
8On completion, have the headlamp
alignment checked, with reference to
Section 27.
Body electrical systems 12•9
24.20 Heater control panel illumination
lamp bulbholder withdrawn
25.5C Withdrawing a headlamp unit25.5B Unscrewing an upper headlamp
securing screw
25.5A Unscrewing the lower headlamp
securing screw
24.16 Removing the clock illumination
lamp bulbholder24.10 Removing the underbonnet lamp
bulb
12
Page 24 of 525
27Headlamps -alignment
2
1Correct alignment of the headlamp beams
is most important, not only to ensure good
vision for the driver, but also to protect other
drivers from being dazzled.
2Accurate alignment should be carried out
using optical beam setting equipment.
3In an emergency, adjustments may be
made by turning the adjustment screws
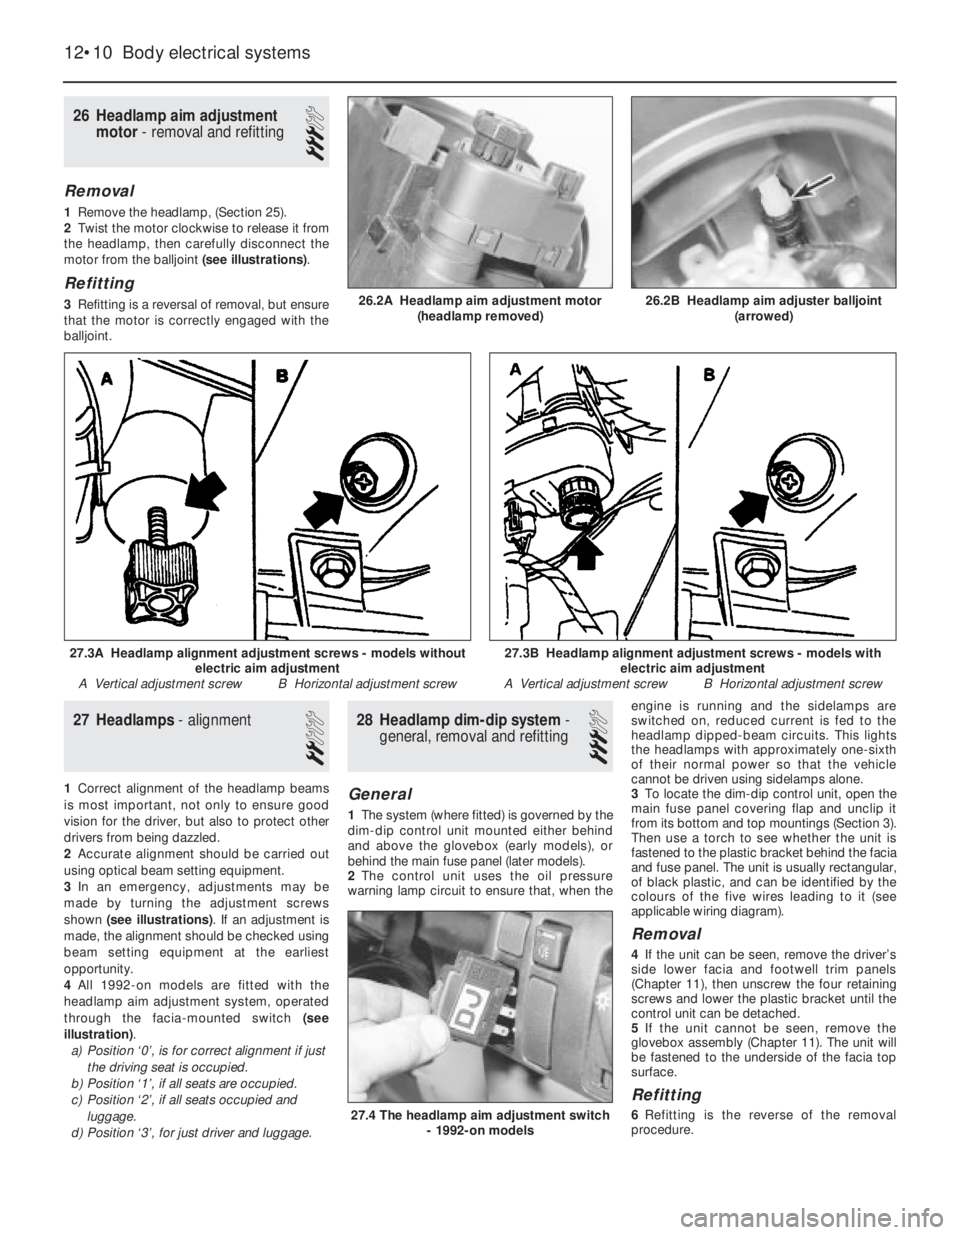
shown (see illustrations). If an adjustment is
made, the alignment should be checked using
beam setting equipment at the earliest
opportunity.
4All 1992-on models are fitted with the
headlamp aim adjustment system, operated
through the facia-mounted switch (see
illustration).
a)Position ‘0’, is for correct alignment if just
the driving seat is occupied.
b)Position ‘1’, if all seats are occupied.
c)Position ‘2’, if all seats occupied and
luggage.
d)Position ‘3’, for just driver and luggage.
28Headlamp dim-dip system -
general, removal and refitting
3
General
1The system (where fitted) is governed by the
dim-dip control unit mounted either behind
and above the glovebox (early models), or
behind the main fuse panel (later models).
2The control unit uses the oil pressure
warning lamp circuit to ensure that, when theengine is running and the sidelamps are
switched on, reduced current is fed to the
headlamp dipped-beam circuits. This lights
the headlamps with approximately one-sixth
of their normal power so that the vehicle
cannot be driven using sidelamps alone.
3To locate the dim-dip control unit, open the
main fuse panel covering flap and unclip it
from its bottom and top mountings (Section 3).
Then use a torch to see whether the unit is
fastened to the plastic bracket behind the facia
and fuse panel. The unit is usually rectangular,
of black plastic, and can be identified by the
colours of the five wires leading to it (see
applicable wiring diagram).
Removal
4If the unit can be seen, remove the driver’s
side lower facia and footwell trim panels
(Chapter 11), then unscrew the four retaining
screws and lower the plastic bracket until the
control unit can be detached.
5If the unit cannot be seen, remove the
glovebox assembly (Chapter 11). The unit will
be fastened to the underside of the facia top
surface.
Refitting
6Refitting is the reverse of the removal
procedure.
26Headlamp aim adjustment
motor - removal and refitting
3
Removal
1Remove the headlamp, (Section 25).
2Twist the motor clockwise to release it from
the headlamp, then carefully disconnect the
motor from the balljoint (see illustrations).
Refitting
3Refitting is a reversal of removal, but ensure
that the motor is correctly engaged with the
balljoint.
12•10Body electrical systems
26.2A Headlamp aim adjustment motor
(headlamp removed)
27.4 The headlamp aim adjustment switch
- 1992-on models
27.3B Headlamp alignment adjustment screws - models with
electric aim adjustment
A Vertical adjustment screw B Horizontal adjustment screw27.3A Headlamp alignment adjustment screws - models without
electric aim adjustment
A Vertical adjustment screw B Horizontal adjustment screw
26.2B Headlamp aim adjuster balljoint
(arrowed)
Page 33 of 525
53Anti-theft alarm - general
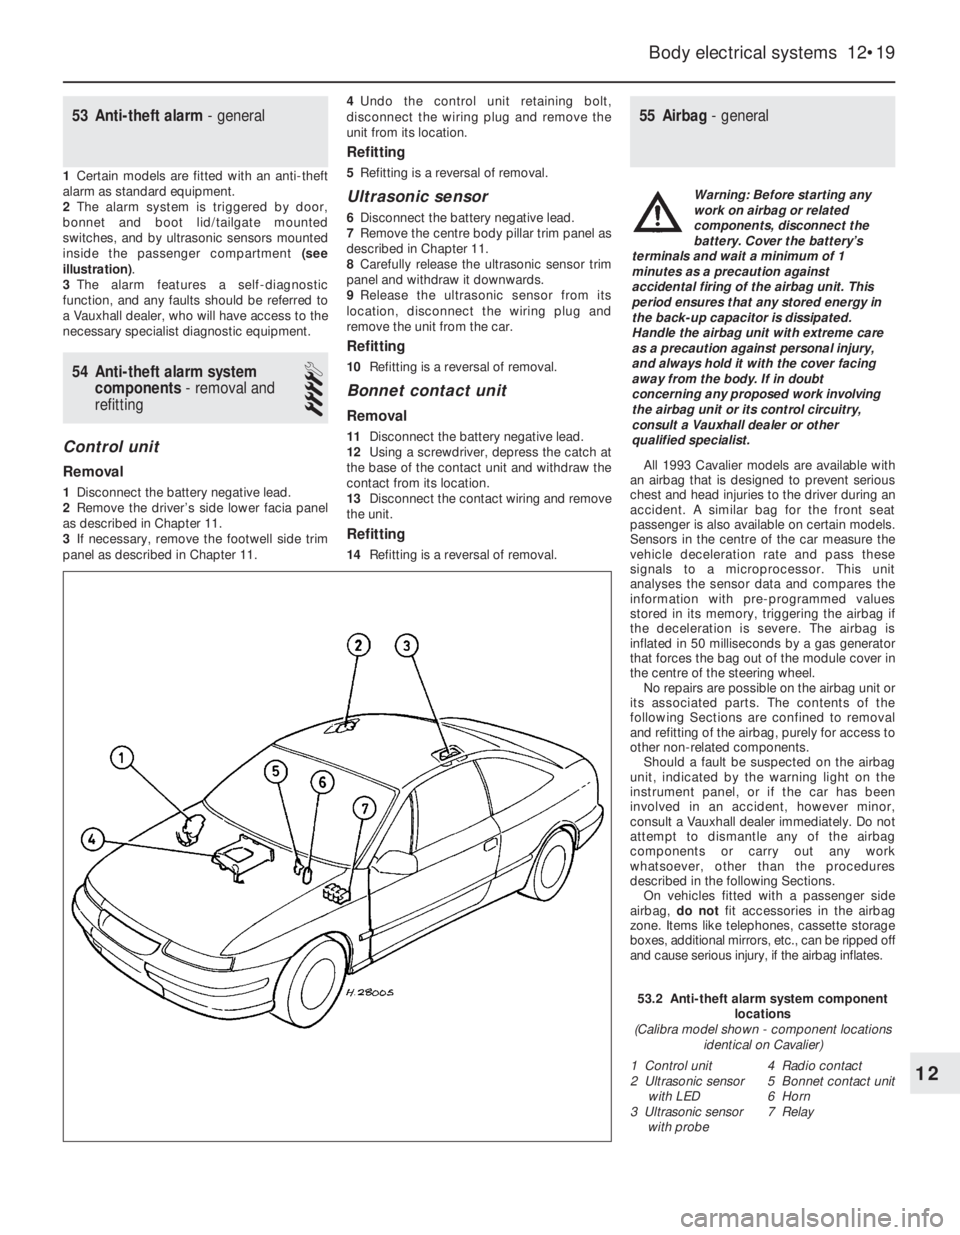
1Certain models are fitted with an anti-theft
alarm as standard equipment.
2The alarm system is triggered by door,
bonnet and boot lid/tailgate mounted
switches, and by ultrasonic sensors mounted
inside the passenger compartment (see
illustration).
3The alarm features a self-diagnostic
function, and any faults should be referred to
a Vauxhall dealer, who will have access to the
necessary specialist diagnostic equipment.
54Anti-theft alarm system
components -removal and
refitting
4
Control unit
Removal
1Disconnect the battery negative lead.
2Remove the driver’s side lower facia panel
as described in Chapter 11.
3If necessary, remove the footwell side trim
panel as described in Chapter 11.4Undo the control unit retaining bolt,
disconnect the wiring plug and remove the
unit from its location.
Refitting
5Refitting is a reversal of removal.
Ultrasonic sensor
6Disconnect the battery negative lead.
7Remove the centre body pillar trim panel as
described in Chapter 11.
8Carefully release the ultrasonic sensor trim
panel and withdraw it downwards.
9Release the ultrasonic sensor from its
location, disconnect the wiring plug and
remove the unit from the car.
Refitting
10Refitting is a reversal of removal.
Bonnet contact unit
Removal
11Disconnect the battery negative lead.
12Using a screwdriver, depress the catch at
the base of the contact unit and withdraw the
contact from its location.
13Disconnect the contact wiring and remove
the unit.
Refitting
14Refitting is a reversal of removal.
55Airbag - general
All 1993 Cavalier models are available with
an airbag that is designed to prevent serious
chest and head injuries to the driver during an
accident. A similar bag for the front seat
passenger is also available on certain models.
Sensors in the centre of the car measure the
vehicle deceleration rate and pass these
signals to a microprocessor. This unit
analyses the sensor data and compares the
information with pre-programmed values
stored in its memory, triggering the airbag if
the deceleration is severe. The airbag is
inflated in 50 milliseconds by a gas generator
that forces the bag out of the module cover in
the centre of the steering wheel.
No repairs are possible on the airbag unit or
its associated parts. The contents of the
following Sections are confined to removal
and refitting of the airbag, purely for access to
other non-related components.
Should a fault be suspected on the airbag
unit, indicated by the warning light on the
instrument panel, or if the car has been
involved in an accident, however minor,
consult a Vauxhall dealer immediately. Do not
attempt to dismantle any of the airbag
components or carry out any work
whatsoever, other than the procedures
described in the following Sections.
On vehicles fitted with a passenger side
airbag, do notfit accessories in the airbag
zone. Items like telephones, cassette storage
boxes, additional mirrors, etc., can be ripped off
and cause serious injury, if the airbag inflates.
Body electrical systems 12•19
12
53.2 Anti-theft alarm system component
locations
(Calibra model shown - component locations
identical on Cavalier)
1 Control unit
2 Ultrasonic sensor
with LED
3 Ultrasonic sensor
with probe4 Radio contact
5 Bonnet contact unit
6 Horn
7 Relay
Warning: Before starting any
work on airbag or related
components, disconnect the
battery. Cover the battery’s
terminals and wait a minimum of 1
minutes as a precaution against
accidental firing of the airbag unit. This
period ensures that any stored energy in
the back-up capacitor is dissipated.
Handle the airbag unit with extreme care
as a precaution against personal injury,
and always hold it with the cover facing
away from the body. If in doubt
concerning any proposed work involving
the airbag unit or its control circuitry,
consult a Vauxhall dealer or other
qualified specialist.
Page 35 of 525
4Disconnect the plug connections.
5Unbolt the six M6 nuts from the two side
brackets.
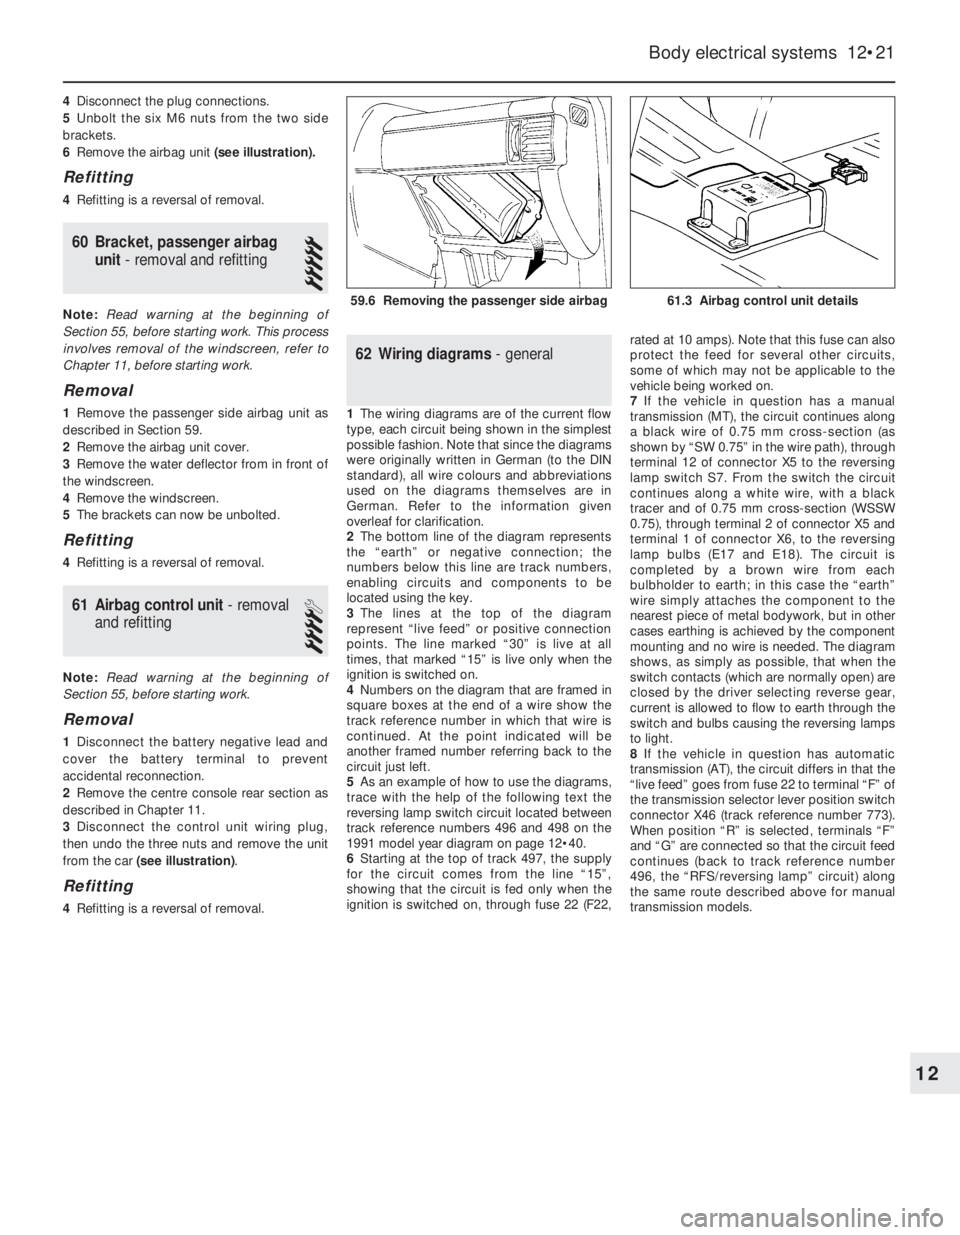
6Remove the airbag unit (see illustration).
Refitting
4Refitting is a reversal of removal.
60Bracket, passenger airbag
unit - removal and refitting
5
Note: Read warning at the beginning of
Section 55, before starting work. This process
involves removal of the windscreen, refer to
Chapter 11, before starting work.
Removal
1Remove the passenger side airbag unit as
described in Section 59.
2Remove the airbag unit cover.
3Remove the water deflector from in front of
the windscreen.
4Remove the windscreen.
5The brackets can now be unbolted.
Refitting
4Refitting is a reversal of removal.
61Airbag control unit - removal
and refitting
4
Note: Read warning at the beginning of
Section 55, before starting work.
Removal
1Disconnect the battery negative lead and
cover the battery terminal to prevent
accidental reconnection.
2Remove the centre console rear section as
described in Chapter 11.
3Disconnect the control unit wiring plug,
then undo the three nuts and remove the unit
from the car (see illustration).
Refitting
4Refitting is a reversal of removal.
62Wiring diagrams -general
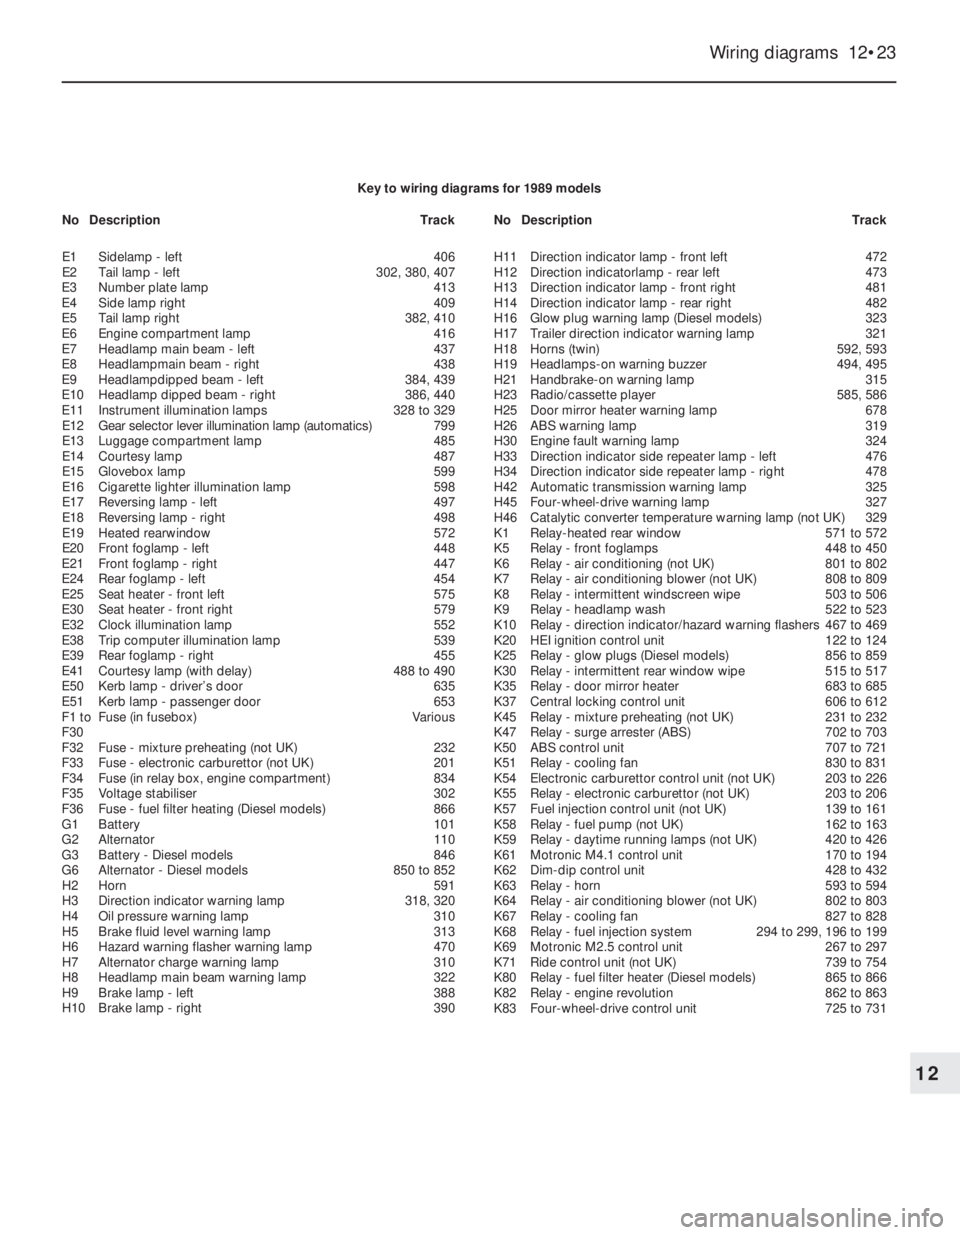
1The wiring diagrams are of the current flow
type, each circuit being shown in the simplest
possible fashion. Note that since the diagrams
were originally written in German (to the DIN
standard), all wire colours and abbreviations
used on the diagrams themselves are in
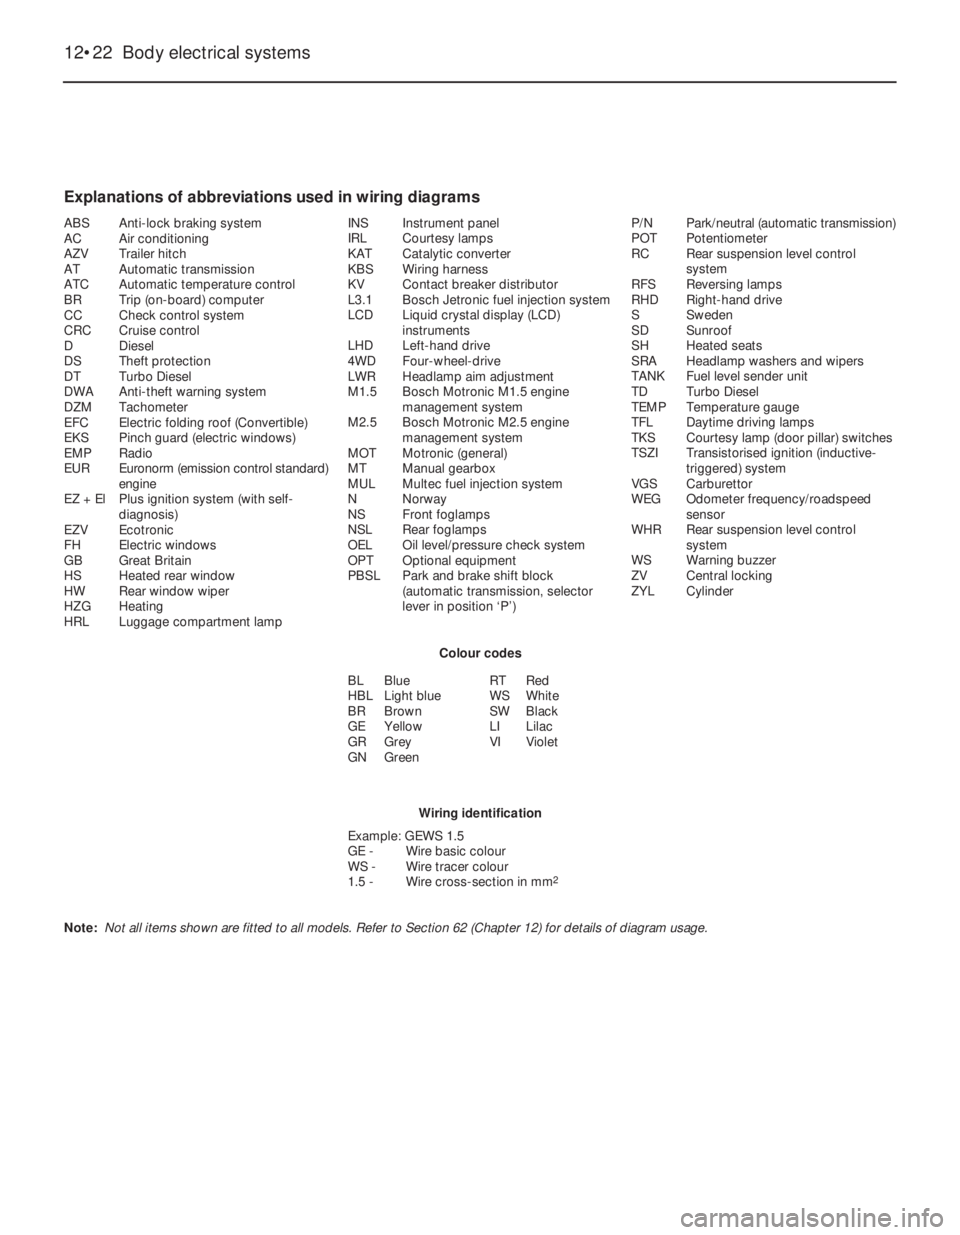
German. Refer to the information given
overleaf for clarification.
2The bottom line of the diagram represents
the “earth” or negative connection; the
numbers below this line are track numbers,
enabling circuits and components to be
located using the key.
3The lines at the top of the diagram
represent “live feed” or positive connection
points. The line marked “30” is live at all
times, that marked “15” is live only when the
ignition is switched on.
4Numbers on the diagram that are framed in
square boxes at the end of a wire show the
track reference number in which that wire is
continued. At the point indicated will be
another framed number referring back to the
circuit just left.
5As an example of how to use the diagrams,
trace with the help of the following text the
reversing lamp switch circuit located between
track reference numbers 496 and 498 on the
1991 model year diagram on page 12•40.
6Starting at the top of track 497, the supply
for the circuit comes from the line “15”,
showing that the circuit is fed only when the
ignition is switched on, through fuse 22 (F22,rated at 10 amps). Note that this fuse can also
protect the feed for several other circuits,
some of which may not be applicable to the
vehicle being worked on.
7If the vehicle in question has a manual
transmission (MT), the circuit continues along
a black wire of 0.75 mm cross-section (as
shown by “SW 0.75” in the wire path), through
terminal 12 of connector X5 to the reversing
lamp switch S7. From the switch the circuit
continues along a white wire, with a black
tracer and of 0.75 mm cross-section (WSSW
0.75), through terminal 2 of connector X5 and
terminal 1 of connector X6, to the reversing
lamp bulbs (E17 and E18). The circuit is
completed by a brown wire from each
bulbholder to earth; in this case the “earth”
wire simply attaches the component to the
nearest piece of metal bodywork, but in other
cases earthing is achieved by the component
mounting and no wire is needed. The diagram
shows, as simply as possible, that when the
switch contacts (which are normally open) are
closed by the driver selecting reverse gear,
current is allowed to flow to earth through the
switch and bulbs causing the reversing lamps
to light.
8If the vehicle in question has automatic
transmission (AT), the circuit differs in that the
“live feed” goes from fuse 22 to terminal “F” of
the transmission selector lever position switch
connector X46 (track reference number 773).
When position “R” is selected, terminals “F”
and “G” are connected so that the circuit feed
continues (back to track reference number
496, the “RFS/reversing lamp” circuit) along
the same route described above for manual
transmission models.
Body electrical systems 12•21
61.3 Airbag control unit details59.6 Removing the passenger side airbag
12
Page 36 of 525
12•22Body electrical systems
Explanations of abbreviations used in wiring diagrams
ABSAnti-lock braking system
ACAir conditioning
AZVTrailer hitch
ATAutomatic transmission
ATCAutomatic temperature control
BRTrip (on-board) computer
CCCheck control system
CRCCruise control
DDiesel
DSTheft protection
DTTurbo Diesel
DWAAnti-theft warning system
DZMTachometer
EFCElectric folding roof (Convertible)
EKSPinch guard (electric windows)
EMPRadio
EUREuronorm (emission control standard)
engine
EZ + ElPlus ignition system (with self-
diagnosis)
EZVEcotronic
FHElectric windows
GBGreat Britain
HSHeated rear window
HWRear window wiper
HZGHeating
HRLLuggage compartment lampINSInstrument panel
IRLCourtesy lamps
KATCatalytic converter
KBSWiring harness
KVContact breaker distributor
L3.1Bosch Jetronic fuel injection system
LCDLiquid crystal display (LCD)
instruments
LHDLeft-hand drive
4WDFour-wheel-drive
LWRHeadlamp aim adjustment
M1.5Bosch Motronic M1.5 engine
management system
M2.5Bosch Motronic M2.5 engine
management system
MOTMotronic (general)
MTManual gearbox
MULMultec fuel injection system
NNorway
NSFront foglamps
NSLRear foglamps
OELOil level/pressure check system
OPTOptional equipment
PBSLPark and brake shift block
(automatic transmission, selector
lever in position ‘P’)P/NPark/neutral (automatic transmission)
POTPotentiometer
RCRear suspension level control
system
RFSReversing lamps
RHDRight-hand drive
SSweden
SDSunroof
SHHeated seats
SRAHeadlamp washers and wipers
TANKFuel level sender unit
TDTurbo Diesel
TEMPTemperature gauge
TFLDaytime driving lamps
TKSCourtesy lamp (door pillar) switches
TSZITransistorised ignition (inductive-
triggered) system
VGSCarburettor
WEGOdometer frequency/roadspeed
sensor
WHRRear suspension level control
system
WSWarning buzzer
ZVCentral locking
ZYLCylinder
Colour codes
BLBlue
HBLLight blue
BRBrown
GEYellow
GRGrey
GNGreenRTRed
WSWhite
SWBlack
LILilac
VIViolet
Wiring identification
Example: GEWS 1.5
GE -Wire basic colour
WS -Wire tracer colour
1.5 -Wire cross-section in mm
2
Note: Not all items shown are fitted to all models. Refer to Section 62 (Chapter 12) for details of diagram usage.
Page 37 of 525
Wiring diagrams 12•23
12
Key to wiring diagrams for 1989 models
E1Sidelamp - left406
E2Tail lamp -left302, 380, 407
E3Number plate lamp413
E4Side lamp right409
E5Tail lamp right382, 410
E6Engine compartment lamp416
E7Headlamp main beam - left437
E8Headlampmain beam - right438
E9Headlampdipped beam - left384, 439
E10Headlamp dipped beam - right386, 440
E11Instrument illumination lamps328 to 329
E12Gear selector lever illumination lamp (automatics)799
E13Luggage compartment lamp485
E14Courtesy lamp487
E15Glovebox lamp599
E16Cigarette lighter illumination lamp598
E17Reversing lamp - left497
E18Reversing lamp - right498
E19Heated rearwindow572
E20Front foglamp -left448
E21Front foglamp - right447
E24Rear foglamp - left454
E25Seat heater -front left575
E30Seat heater - front right579
E32Clock illumination lamp552
E38Trip computer illumination lamp539
E39Rear foglamp - right455
E41Courtesy lamp (with delay)488 to 490
E50Kerb lamp - driver’s door635
E51Kerb lamp - passenger door653
F1 toFuse (in fusebox)Various
F30
F32Fuse - mixture preheating (not UK)232
F33Fuse - electronic carburettor (not UK)201
F34Fuse (in relay box, engine compartment)834
F35Voltage stabiliser302
F36Fuse - fuel filter heating (Diesel models)866
G1Battery101
G2Alternator110
G3Battery - Diesel models846
G6Alternator - Diesel models850 to 852
H2Horn591
H3Direction indicator warning lamp318, 320
H4Oil pressure warning lamp310
H5Brake fluid level warning lamp313
H6Hazard warning flasher warning lamp470
H7Alternator charge warning lamp310
H8Headlamp main beam warning lamp322
H9Brake lamp - left388
H10Brake lamp - right390H11Direction indicator lamp - front left472
H12Direction indicatorlamp - rear left473
H13Direction indicator lamp - front right481
H14Direction indicator lamp - rear right482
H16Glow plug warning lamp (Diesel models)323
H17Trailer direction indicator warning lamp321
H18Horns (twin)592, 593
H19Headlamps-on warning buzzer494, 495
H21Handbrake-on warning lamp315
H23Radio/cassette player585, 586
H25Door mirror heater warning lamp678
H26ABS warning lamp319
H30Engine fault warning lamp324
H33Direction indicator side repeater lamp - left476
H34Direction indicator side repeater lamp - right478
H42Automatic transmission warning lamp325
H45Four-wheel-drive warning lamp327
H46Catalytic converter temperature warning lamp (not UK)329
K1Relay-heated rear window571 to 572
K5Relay - front foglamps448 to 450
K6Relay - air conditioning (not UK)801 to 802
K7Relay - air conditioning blower (not UK)808 to 809
K8Relay - intermittent windscreen wipe503 to 506
K9Relay - headlamp wash522 to 523
K10Relay - direction indicator/hazard warning flashers467 to 469
K20HEI ignition control unit122 to 124
K25Relay - glow plugs (Diesel models)856 to 859
K30Relay - intermittent rear window wipe515 to 517
K35Relay - door mirror heater683 to 685
K37Central locking control unit606 to 612
K45Relay - mixture preheating (not UK)231 to 232
K47Relay - surge arrester (ABS)702 to 703
K50ABS control unit707 to 721
K51Relay - cooling fan830 to 831
K54Electronic carburettor control unit (not UK)203 to 226
K55Relay - electronic carburettor (not UK)203 to 206
K57Fuel injection control unit (not UK)139 to 161
K58Relay -fuel pump (not UK)162 to 163
K59Relay - daytime running lamps (not UK)420 to 426
K61Motronic M4.1 control unit170 to 194
K62Dim-dip control unit428 to 432
K63Relay - horn593 to 594
K64Relay - air conditioning blower (not UK)802 to 803
K67Relay -cooling fan827 to 828
K68Relay -fuel injection system294 to 299, 196 to 199
K69Motronic M2.5 control unit267 to 297
K71Ride control unit (not UK)739 to 754
K80Relay -fuel filter heater (Diesel models)865 to 866
K82Relay - engine revolution862 to 863
K83Four-wheel-drive control unit725 to 731 NoDescriptionTrackNoDescriptionTrack