1988 OPEL CALIBRA wheel bolt torque
[x] Cancel search: wheel bolt torquePage 207 of 525
30With the engine removed, the
transmission can be supported by placing a
length of wood between the bellhousing and
the front suspension subframe. Once the
wooden support is in place, remove the trolley
jack from under the transmission.
Refitting
Note: New left and right-hand
engine/transmission mounting-to-body bolts
must be used on refitting.
31Use an M10 x 1.25 bottoming tap to clean
the threads in the torque converters threaded
bosses and ensure that new bolts are
available for reassembly, where applicable.
32Support the transmission with a trolley
jack and remove the length of wood from
between the bellhousing and the subframe.
33Support the engine with the hoist and
lifting tackle, and gently lower it into position
in the engine compartment.
34Mate the engine and transmission
together, ensuring that the transmission
locates on the dowels in the cylinder block,
then refit the three upper
engine-to-transmission bolts.
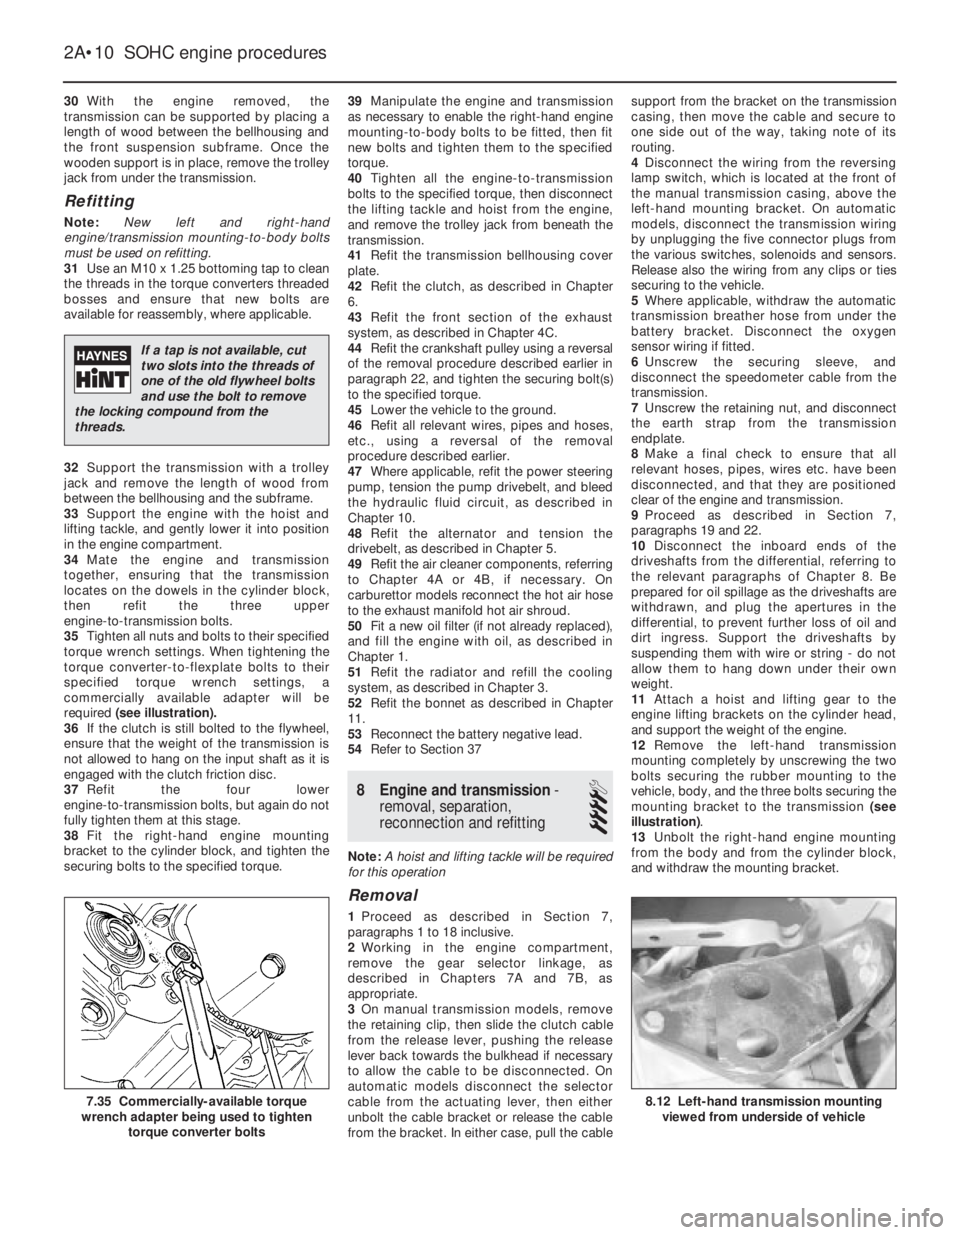
35Tighten all nuts and bolts to their specified
torque wrench settings. When tightening the
torque converter-to-flexplate bolts to their
specified torque wrench settings, a
commercially available adapter will be
required (see illustration).
36If the clutch is still bolted to the flywheel,
ensure that the weight of the transmission is
not allowed to hang on the input shaft as it is
engaged with the clutch friction disc.
37Refit the four lower
engine-to-transmission bolts, but again do not
fully tighten them at this stage.
38Fit the right-hand engine mounting
bracket to the cylinder block, and tighten the
securing bolts to the specified torque.39Manipulate the engine and transmission
as necessary to enable the right-hand engine
mounting-to-body bolts to be fitted, then fit
new bolts and tighten them to the specified
torque.
40Tighten all the engine-to-transmission
bolts to the specified torque, then disconnect
the lifting tackle and hoist from the engine,
and remove the trolley jack from beneath the
transmission.
41Refit the transmission bellhousing cover
plate.
42Refit the clutch, as described in Chapter
6.
43Refit the front section of the exhaust
system, as described in Chapter 4C.
44Refit the crankshaft pulley using a reversal
of the removal procedure described earlier in
paragraph 22, and tighten the securing bolt(s)
to the specified torque.
45Lower the vehicle to the ground.
46Refit all relevant wires, pipes and hoses,
etc., using a reversal of the removal
procedure described earlier.
47Where applicable, refit the power steering
pump, tension the pump drivebelt, and bleed
the hydraulic fluid circuit, as described in
Chapter 10.
48Refit the alternator and tension the
drivebelt, as described in Chapter 5.
49Refit the air cleaner components, referring
to Chapter 4A or 4B, if necessary. On
carburettor models reconnect the hot air hose
to the exhaust manifold hot air shroud.
50Fit a new oil filter (if not already replaced),
and fill the engine with oil, as described in
Chapter 1.
51Refit the radiator and refill the cooling
system, as described in Chapter 3.
52Refit the bonnet as described in Chapter
11.
53Reconnect the battery negative lead.
54Refer to Section 37
8Engine and transmission -
removal, separation,
reconnection and refitting
4
Note: A hoist and lifting tackle will be required
for this operation
Removal
1Proceed as described in Section 7,
paragraphs 1 to 18 inclusive.
2Working in the engine compartment,
remove the gear selector linkage, as
described in Chapters 7A and 7B, as
appropriate.
3On manual transmission models, remove
the retaining clip, then slide the clutch cable
from the release lever, pushing the release
lever back towards the bulkhead if necessary
to allow the cable to be disconnected. On
automatic models disconnect the selector
cable from the actuating lever, then either
unbolt the cable bracket or release the cable
from the bracket. In either case, pull the cablesupport from the bracket on the transmission
casing, then move the cable and secure to
one side out of the way, taking note of its
routing.
4Disconnect the wiring from the reversing
lamp switch, which is located at the front of
the manual transmission casing, above the
left-hand mounting bracket. On automatic
models, disconnect the transmission wiring
by unplugging the five connector plugs from
the various switches, solenoids and sensors.
Release also the wiring from any clips or ties
securing to the vehicle.
5Where applicable, withdraw the automatic
transmission breather hose from under the
battery bracket. Disconnect the oxygen
sensor wiring if fitted.
6Unscrew the securing sleeve, and
disconnect the speedometer cable from the
transmission.
7Unscrew the retaining nut, and disconnect
the earth strap from the transmission
endplate.
8Make a final check to ensure that all
relevant hoses, pipes, wires etc. have been
disconnected, and that they are positioned
clear of the engine and transmission.
9Proceed as described in Section 7,
paragraphs 19 and 22.
10Disconnect the inboard ends of the
driveshafts from the differential, referring to
the relevant paragraphs of Chapter 8. Be
prepared for oil spillage as the driveshafts are
withdrawn, and plug the apertures in the
differential, to prevent further loss of oil and
dirt ingress. Support the driveshafts by
suspending them with wire or string - do not
allow them to hang down under their own
weight.
11Attach a hoist and lifting gear to the
engine lifting brackets on the cylinder head,
and support the weight of the engine.
12Remove the left-hand transmission
mounting completely by unscrewing the two
bolts securing the rubber mounting to the
vehicle, body, and the three bolts securing the
mounting bracket to the transmission (see
illustration).
13Unbolt the right-hand engine mounting
from the body and from the cylinder block,
and withdraw the mounting bracket.
2A•10SOHC engine procedures
8.12 Left-hand transmission mounting
viewed from underside of vehicle7.35 Commercially-available torque
wrench adapter being used to tighten
torque converter bolts
If a tap is not available, cut
two slots into the threads of
one of the old flywheel bolts
and use the bolt to remove
the locking compound from the
threads.
Page 208 of 525
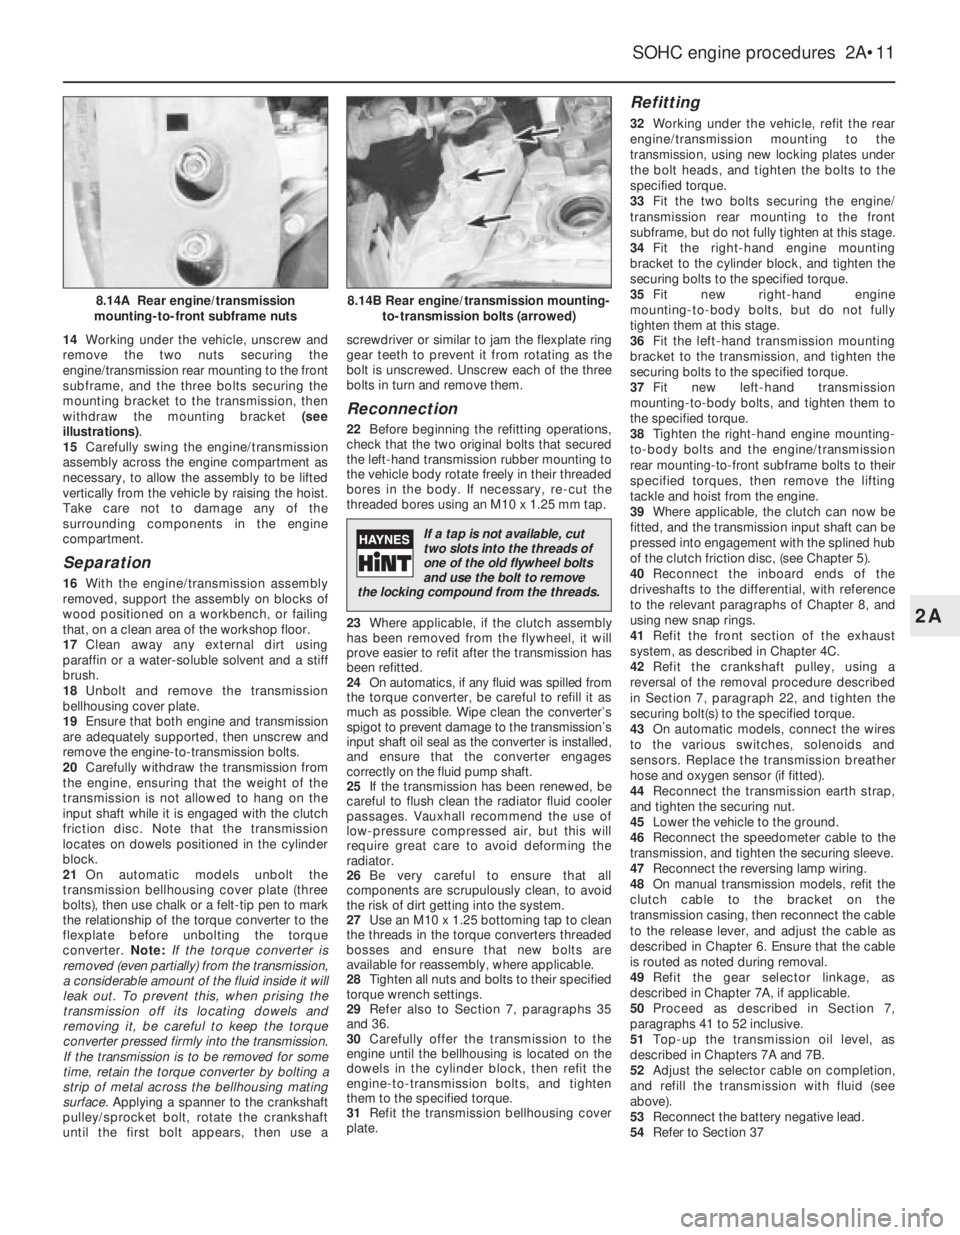
14Working under the vehicle, unscrew and
remove the two nuts securing the
engine/transmission rear mounting to the front
subframe, and the three bolts securing the
mounting bracket to the transmission, then
withdraw the mounting bracket (see
illustrations).
15Carefully swing the engine/transmission
assembly across the engine compartment as
necessary, to allow the assembly to be lifted
vertically from the vehicle by raising the hoist.
Take care not to damage any of the
surrounding components in the engine
compartment.
Separation
16With the engine/transmission assembly
removed, support the assembly on blocks of
wood positioned on a workbench, or failing
that, on a clean area of the workshop floor.
17Clean away any external dirt using
paraffin or a water-soluble solvent and a stiff
brush.
18Unbolt and remove the transmission
bellhousing cover plate.
19Ensure that both engine and transmission
are adequately supported, then unscrew and
remove the engine-to-transmission bolts.
20Carefully withdraw the transmission from
the engine, ensuring that the weight of the
transmission is not allowed to hang on the
input shaft while it is engaged with the clutch
friction disc. Note that the transmission
locates on dowels positioned in the cylinder
block.
21On automatic models unbolt the
transmission bellhousing cover plate (three
bolts), then use chalk or a felt-tip pen to mark
the relationship of the torque converter to the
flexplate before unbolting the torque
converter. Note:If the torque converter is
removed (even partially) from the transmission,
a considerable amount of the fluid inside it will
leak out. To prevent this, when prising the
transmission off its locating dowels and
removing it, be careful to keep the torque
converter pressed firmly into the transmission.
If the transmission is to be removed for some
time, retain the torque converter by bolting a
strip of metal across the bellhousing mating
surface. Applying a spanner to the crankshaft
pulley/sprocket bolt, rotate the crankshaft
until the first bolt appears, then use ascrewdriver or similar to jam the flexplate ring
gear teeth to prevent it from rotating as the
bolt is unscrewed. Unscrew each of the three
bolts in turn and remove them.
Reconnection
22Before beginning the refitting operations,
check that the two original bolts that secured
the left-hand transmission rubber mounting to
the vehicle body rotate freely in their threaded
bores in the body. If necessary, re-cut the
threaded bores using an M10 x 1.25 mm tap.
23Where applicable, if the clutch assembly
has been removed from the flywheel, it will
prove easier to refit after the transmission has
been refitted.
24On automatics, if any fluid was spilled from
the torque converter, be careful to refill it as
much as possible. Wipe clean the converter’s
spigot to prevent damage to the transmission’s
input shaft oil seal as the converter is installed,
and ensure that the converter engages
correctly on the fluid pump shaft.
25If the transmission has been renewed, be
careful to flush clean the radiator fluid cooler
passages. Vauxhall recommend the use of
low-pressure compressed air, but this will
require great care to avoid deforming the
radiator.
26Be very careful to ensure that all
components are scrupulously clean, to avoid
the risk of dirt getting into the system.
27Use an M10 x 1.25 bottoming tap to clean
the threads in the torque converters threaded
bosses and ensure that new bolts are
available for reassembly, where applicable.
28Tighten all nuts and bolts to their specified
torque wrench settings.
29Refer also to Section 7, paragraphs 35
and 36.
30Carefully offer the transmission to the
engine until the bellhousing is located on the
dowels in the cylinder block, then refit the
engine-to-transmission bolts, and tighten
them to the specified torque.
31Refit the transmission bellhousing cover
plate.
Refitting
32Working under the vehicle, refit the rear
engine/transmission mounting to the
transmission, using new locking plates under
the bolt heads, and tighten the bolts to the
specified torque.
33Fit the two bolts securing the engine/
transmission rear mounting to the front
subframe, but do not fully tighten at this stage.
34Fit the right-hand engine mounting
bracket to the cylinder block, and tighten the
securing bolts to the specified torque.
35Fit new right-hand engine
mounting-to-body bolts, but do not fully
tighten them at this stage.
36Fit the left-hand transmission mounting
bracket to the transmission, and tighten the
securing bolts to the specified torque.
37Fit new left-hand transmission
mounting-to-body bolts, and tighten them to
the specified torque.
38Tighten the right-hand engine mounting-
to-body bolts and the engine/transmission
rear mounting-to-front subframe bolts to their
specified torques, then remove the lifting
tackle and hoist from the engine.
39Where applicable, the clutch can now be
fitted, and the transmission input shaft can be
pressed into engagement with the splined hub
of the clutch friction disc, (see Chapter 5).
40Reconnect the inboard ends of the
driveshafts to the differential, with reference
to the relevant paragraphs of Chapter 8, and
using new snap rings.
41Refit the front section of the exhaust
system, as described in Chapter 4C.
42Refit the crankshaft pulley, using a
reversal of the removal procedure described
in Section 7, paragraph 22, and tighten the
securing bolt(s) to the specified torque.
43On automatic models, connect the wires
to the various switches, solenoids and
sensors. Replace the transmission breather
hose and oxygen sensor (if fitted).
44Reconnect the transmission earth strap,
and tighten the securing nut.
45Lower the vehicle to the ground.
46Reconnect the speedometer cable to the
transmission, and tighten the securing sleeve.
47Reconnect the reversing lamp wiring.
48On manual transmission models, refit the
clutch cable to the bracket on the
transmission casing, then reconnect the cable
to the release lever, and adjust the cable as
described in Chapter 6. Ensure that the cable
is routed as noted during removal.
49Refit the gear selector linkage, as
described in Chapter 7A, if applicable.
50Proceed as described in Section 7,
paragraphs 41 to 52 inclusive.
51Top-up the transmission oil level, as
described in Chapters 7A and 7B.
52Adjust the selector cable on completion,
and refill the transmission with fluid (see
above).
53Reconnect the battery negative lead.
54Refer to Section 37
SOHC engine procedures 2A•11
8.14B Rear engine/transmission mounting-
to-transmission bolts (arrowed)8.14A Rear engine/transmission
mounting-to-front subframe nuts
2A
If a tap is not available, cut
two slots into the threads of
one of the old flywheel bolts
and use the bolt to remove
the locking compound from the threads.
Page 209 of 525
9Engine and transmission
mountings - renewal
3
Note: New left and right-hand
engine/transmission mounting-to-body bolts
must be used on refitting
1The engine/transmission assembly is
suspended in the engine compartment on
three mountings, two of which are attached to
the transmission, and one to the engine.
Right-hand mounting
2If not already done, apply the handbrake,
then raise the front of the vehicle, and support
securely on axle stands (see “Jacking and
Vehicle Support”)..
3Attach lifting tackle and a hoist to the
engine lifting brackets on the cylinder head,
and support the weight of the engine.
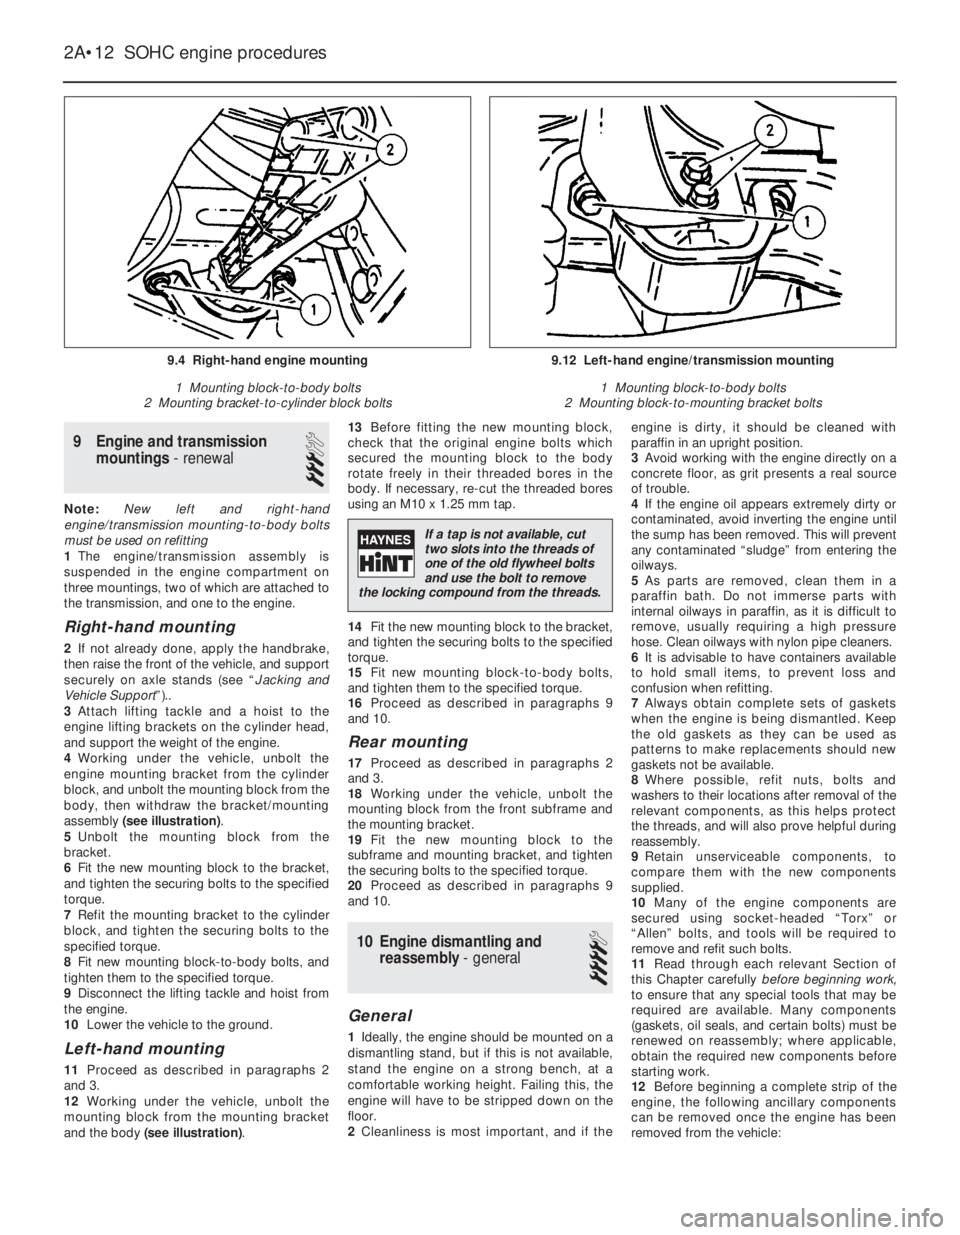
4Working under the vehicle, unbolt the
engine mounting bracket from the cylinder
block, and unbolt the mounting block from the
body, then withdraw the bracket/mounting
assembly (see illustration).
5Unbolt the mounting block from the
bracket.
6Fit the new mounting block to the bracket,
and tighten the securing bolts to the specified
torque.
7Refit the mounting bracket to the cylinder
block, and tighten the securing bolts to the
specified torque.
8Fit new mounting block-to-body bolts, and
tighten them to the specified torque.
9Disconnect the lifting tackle and hoist from
the engine.
10Lower the vehicle to the ground.
Left-hand mounting
11Proceed as described in paragraphs 2
and 3.
12Working under the vehicle, unbolt the
mounting block from the mounting bracket
and the body (see illustration).13Before fitting the new mounting block,
check that the original engine bolts which
secured the mounting block to the body
rotate freely in their threaded bores in the
body. If necessary, re-cut the threaded bores
using an M10 x 1.25 mm tap.
14Fit the new mounting block to the bracket,
and tighten the securing bolts to the specified
torque.
15Fit new mounting block-to-body bolts,
and tighten them to the specified torque.
16Proceed as described in paragraphs 9
and 10.
Rear mounting
17Proceed as described in paragraphs 2
and 3.
18Working under the vehicle, unbolt the
mounting block from the front subframe and
the mounting bracket.
19Fit the new mounting block to the
subframe and mounting bracket, and tighten
the securing bolts to the specified torque.
20Proceed as described in paragraphs 9
and 10.
10Engine dismantling and
reassembly - general
4
General
1Ideally, the engine should be mounted on a
dismantling stand, but if this is not available,
stand the engine on a strong bench, at a
comfortable working height. Failing this, the
engine will have to be stripped down on the
floor.
2Cleanliness is most important, and if theengine is dirty, it should be cleaned with
paraffin in an upright position.
3Avoid working with the engine directly on a
concrete floor, as grit presents a real source
of trouble.
4If the engine oil appears extremely dirty or
contaminated, avoid inverting the engine until
the sump has been removed. This will prevent
any contaminated “sludge” from entering the
oilways.
5As parts are removed, clean them in a
paraffin bath. Do not immerse parts with
internal oilways in paraffin, as it is difficult to
remove, usually requiring a high pressure
hose. Clean oilways with nylon pipe cleaners.
6It is advisable to have containers available
to hold small items, to prevent loss and
confusion when refitting.
7Always obtain complete sets of gaskets
when the engine is being dismantled. Keep
the old gaskets as they can be used as
patterns to make replacements should new
gaskets not be available.
8Where possible, refit nuts, bolts and
washers to their locations after removal of the
relevant components, as this helps protect
the threads, and will also prove helpful during
reassembly.
9Retain unserviceable components, to
compare them with the new components
supplied.
10Many of the engine components are
secured using socket-headed “Torx” or
“Allen” bolts, and tools will be required to
remove and refit such bolts.
11Read through each relevant Section of
this Chapter carefullybeforebeginning work,
to ensure that any special tools that may be
required are available. Many components
(gaskets, oil seals, and certain bolts) must be
renewed on reassembly; where applicable,
obtain the required new components before
starting work.
12Before beginning a complete strip of the
engine, the following ancillary components
can be removed once the engine has been
removed from the vehicle:
2A•12SOHC engine procedures
9.4 Right-hand engine mounting
1 Mounting block-to-body bolts
2 Mounting bracket-to-cylinder block bolts9.12 Left-hand engine/transmission mounting
1 Mounting block-to-body bolts
2 Mounting block-to-mounting bracket bolts
If a tap is not available, cut
two slots into the threads of
one of the old flywheel bolts
and use the bolt to remove
the locking compound from the threads.
Page 210 of 525
a)Inlet and exhaust manifolds (where
applicable)
b)Starter motor
c)Rear coolant gallery and hoses
d)Oil pressure switch
e)Oil temperature switch (where applicable)
f)Oil level sensor (where applicable)
g)Knock sensor (where applicable)
h)TDC sensor (where applicable)
i)Distributor components
j)Fuel pump (where applicable)
k)Thermostat/housing (N 16 NZ2, 1.8 and
2.0 litre models)
l)Power steering pump and mounting
bracket (where applicable)
m)Alternator mounting bracket
n)Engine lifting brackets
o)Dipstick/crankcase breather tube
p)Inlet manifold mounting bracket (where
applicable)
13To ensure maximum life, with minimum
trouble, from a rebuilt engine, not only must
everything be correctly assembled, but it must
also be spotlessly clean. All oilways and
coolant passages must be clear, and all
washers must be fitted in their original
positions. Oil all bearings and other moving
surfaces thoroughly with clean engine oil
during assembly.
14Before assembly begins, renew any bolts
or studs with damaged threads.
15Obtain a torque wrench, an angle-torque
gauge, sockets and bits, an oil can, clean
lint-free rag, and a set of engine gaskets and
oil seals, together with a new oil filter.16If they have been removed, new cylinder
head bolts, flywheel bolts, big-end bearing
cap bolts and main bearing cap bolts will also
be required.
17On completion of reassembly, refit the
applicable ancillary components listed in
paragraph 12.
18Follow procedure shown in Section 37.
11Timing belt and sprockets
(without automatic tensioner) -
removal, refitting and adjustment
3
Note: A two-legged puller may be required to
remove the crankshaft sprocket on N 16 NZ2,
1.8 and 2.0 litre models.Some of the later 1.4
and 1.6 litre engines, identifiable by the
squared-off top surfaces of the timing belt
covers, are fitted with spring-loaded auto-matic timing belt tensioners to ensure correct
belt tensioning on assembly.
Removal
1Disconnect the battery negative lead.
2On models with power steering, remove the
pump drivebelt, see Chapters 1 and 10.
3Remove the alternator drivebelt, as
described in Chapter 5.
4On C 16 NZ2, 1.8 and 2.0 litre models,
disconnect the wiring from the temperature
gauge sender.
5Release the securing clips (or hexagon-
headed screws, if fitted), and remove the main
outer timing belt cover, then unclip the smaller
outer timing belt cover from the coolant pump.
Where applicable, three screws retain the lower
(small) outer cover to the rear cover, the fourth
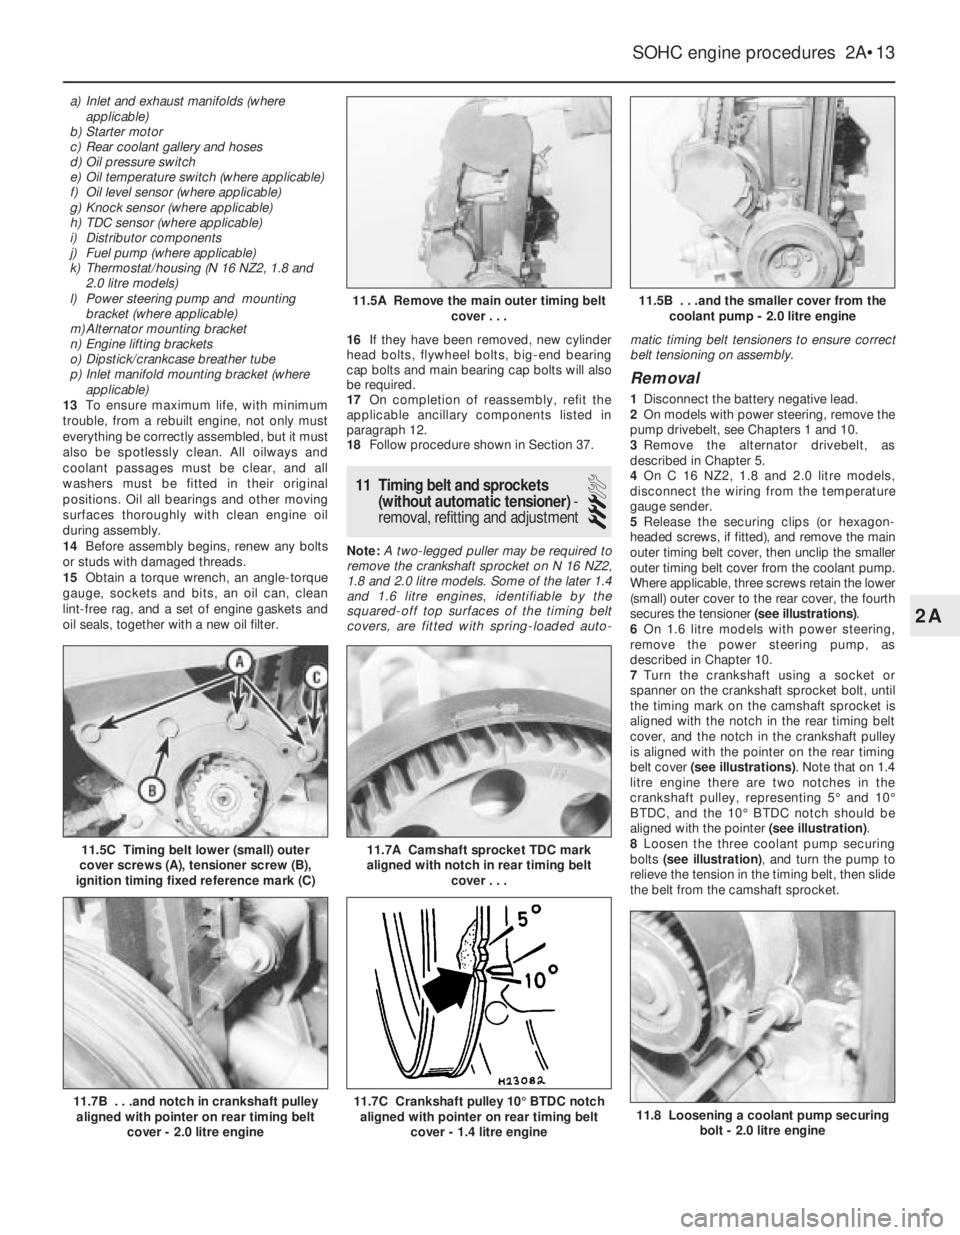
secures the tensioner (see illustrations).
6On 1.6 litre models with power steering,
remove the power steering pump, as
described in Chapter 10.
7Turn the crankshaft using a socket or
spanner on the crankshaft sprocket bolt, until
the timing mark on the camshaft sprocket is
aligned with the notch in the rear timing belt
cover, and the notch in the crankshaft pulley
is aligned with the pointer on the rear timing
belt cover (see illustrations). Note that on 1.4
litre engine there are two notches in the
crankshaft pulley, representing 5°and 10°
BTDC, and the 10°BTDC notch should be
aligned with the pointer (see illustration).
8Loosen the three coolant pump securing
bolts (see illustration), and turn the pump to
relieve the tension in the timing belt, then slide
the belt from the camshaft sprocket.
SOHC engine procedures 2A•13
11.5C Timing belt lower (small) outer
cover screws (A), tensioner screw (B),
ignition timing fixed reference mark (C)
11.8 Loosening a coolant pump securing
bolt - 2.0 litre engine11.7C Crankshaft pulley 10°BTDC notch
aligned with pointer on rear timing belt
cover - 1.4 litre engine11.7B . . .and notch in crankshaft pulley
aligned with pointer on rear timing belt
cover - 2.0 litre engine
11.7A Camshaft sprocket TDC mark
aligned with notch in rear timing belt
cover . . .
11.5B . . .and the smaller cover from the
coolant pump - 2.0 litre engine11.5A Remove the main outer timing belt
cover . . .
2A
Page 211 of 525

9The crankshaft pulley must now be
removed. On 1.4 and 1.6 litre engines (except
C 16 NZ2), the pulley is secured by a single
bolt, which also secures the crankshaft
sprocket. On C 16 NZ2, 1.8 and 2.0 litre
engines, the pulley is secured by four bolts,
which must be unscrewed using an Allen key
or hexagon bit. On manual transmission
models, if the engine is in the vehicle, the
crankshaft can be prevented from turning by
having an assistant engage first gear and
depress the brake pedal. Alternatively, the
flywheel ring gear teeth can be jammed using
a large screwdriver or similar tool.
10With the crankshaft pulley removed, the
timing belt can be withdrawn.
11If desired, the sprockets and the rear
timing belt cover can be removed as follows,
otherwise go on to paragraph 23.
12To remove the camshaft sprocket, firstdisconnect the breather hose(s) from the
camshaft cover, then unscrew the securing
bolts noting the locations of the HT lead
brackets and any other wiring brackets, and
remove the camshaft cover.
13Recover the gasket. Prevent the camshaft
from turning by holding it with a spanner on
the flats provided between No’s 3 and 4
camshaft lobes, and unscrew the camshaft
sprocket bolt.
14Withdraw the sprocket from the end of the
camshaft.
15To remove the crankshaft sprocket on 1.4
and 1.6 litre engines (except C 16 NZ2), if
necessary, remove the lower securing bolts
from the main rear timing belt cover and use
two large screwdrivers behind the cover to
lever off the sprocket. Remove the Woodruff
key if it is loose.
16To remove the crankshaft sprocket on C
16 NZ2, 1.8 and 2.0 litre engines, it will benecessary to prevent the crankshaft from
turning, as described in paragraph 9. Take
care when unscrewing the sprocket bolt, as it
is very tight. If necessary, use a two-legged
puller to remove the sprocket. Recover the
Woodruff key and the thrustwasher from the
end of the crankshaft.
17To remove the main rear timing belt cover
on C 16 NZ2, 1.8 and 2.0 litre models
disconnect the TDC sensor wiring plug and
unclip the wiring from the belt cover. Then
unscrew the two upper securing bolts and the
lower securing bolt(s) (one in the case of C 16
NZ2, 1.8 and 2.0 litre engines, two on other
SOHC engines). Withdraw the cover,
manipulating it from the smaller rear belt
cover on the coolant pump (see illustrations).
18If desired, the smaller rear belt cover can
be removed from the coolant pump, after
unscrewing the securing bolt (see
illustration), by rotating it to disengage it from
the retaining flange on the pump.
Refitting
19Refit the rear timing belt cover(s) using a
reversal of the removal procedure, and
ensuring that the main cover engages correctly
with the smaller cover on the coolant pump.
20On C 16 NZ2, 1.8 and 2.0 litre engines,
refit the thrustwasher and the Woodruff key to
the end of the crankshaft. Then refit the
crankshaft sprocket, and tighten the securing
bolt to the specified torque in the two stages
given in the Specifications. Ensure that the
washer is in place under the bolt head, and
prevent the crankshaft from turning as during
removal (see illustrations).
2A•14SOHC engine procedures
11.17A Loosening the main rear timing
belt cover lower securing bolt -
2.0 litre engine11.18 Unscrewing the coolant pump rear
belt cover securing bolt - 2.0 litre engine
11.20E Tighten the bolt to the specified
torque . . .11.20D . . .and the washer and bolt11.20C . . .the crankshaft sprocket . . .
11.20B . . . the Woodruff key . . .11.20A Refit the thrustwasher . . .
11.17B Main rear timing belt cover lower
securing bolts (arrowed) - 1.6 SV engine
Page 223 of 525
25Flywheel -removal, inspection
and refitting
4
Note: New flywheel securing bolts must he
used on refitting. Certain models are fitted
with a ‘Pot type’ flywheel. Although, it has a
deeply recessed surface for the clutch disc,
the operations below are the same.
Removal
1If not already done, remove the clutch,
(Chapter 6), and the starter motor, (Chapter 5).
2If the engine is in the vehicle, remove the
clutch release bearing and its guide sleeve, as
described in Chapter 6.
3Although the flywheel bolt holes are offset
so that the flywheel can only be fitted in one
position, it will make refitting easier if
alignment marks are made between the
flywheel and the end of the crankshaft.
4Prevent the flywheel from turning by
jamming the ring gear teeth using a large
screwdriver or similar tool. Access is most
easily obtained through the starter motor
aperture if the engine is in the vehicle.
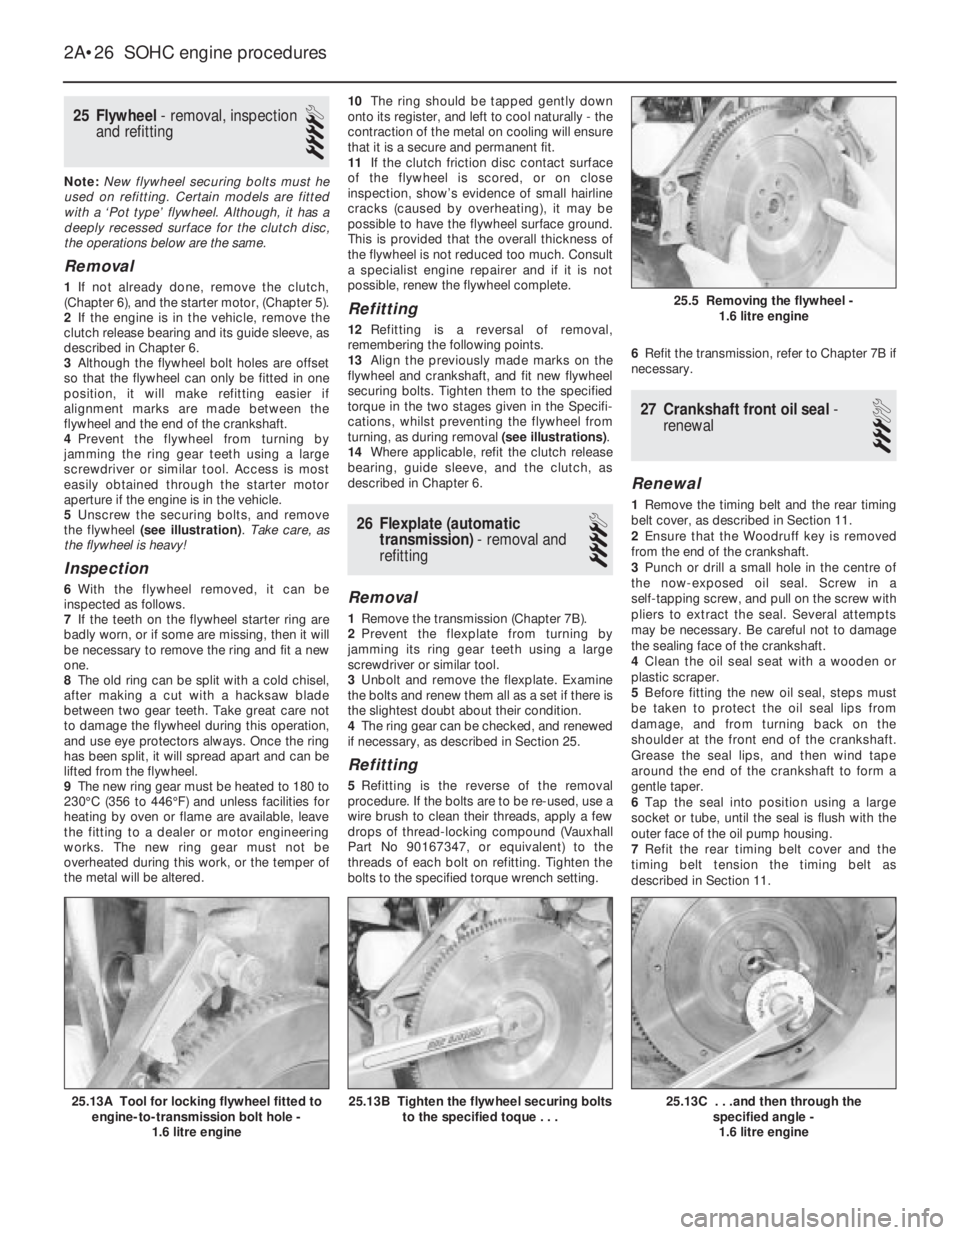
5Unscrew the securing bolts, and remove
the flywheel (see illustration). Take care, as
the flywheel is heavy!
Inspection
6With the flywheel removed, it can be
inspected as follows.
7If the teeth on the flywheel starter ring are
badly worn, or if some are missing, then it will
be necessary to remove the ring and fit a new
one.
8The old ring can be split with a cold chisel,
after making a cut with a hacksaw blade
between two gear teeth. Take great care not
to damage the flywheel during this operation,
and use eye protectors always. Once the ring
has been split, it will spread apart and can be
lifted from the flywheel.
9The new ring gear must be heated to 180 to
230°C (356 to 446°F) and unless facilities for
heating by oven or flame are available, leave
the fitting to a dealer or motor engineering
works. The new ring gear must not be
overheated during this work, or the temper of
the metal will be altered.10The ring should be tapped gently down
onto its register, and left to cool naturally -the
contraction of the metal on cooling will ensure
that it is a secure and permanent fit.
11If the clutch friction disc contact surface
of the flywheel is scored, or on close
inspection, show’s evidence of small hairline
cracks (caused by overheating), it may be
possible to have the flywheel surface ground.
This is provided that the overall thickness of
the flywheel is not reduced too much. Consult
a specialist engine repairer and if it is not
possible, renew the flywheel complete.
Refitting
12Refitting is a reversal of removal,
remembering the following points.
13Align the previously made marks on the
flywheel and crankshaft, and fit new flywheel
securing bolts. Tighten them to the specified
torque in the two stages given in the Specifi-
cations, whilst preventing the flywheel from
turning, as during removal (see illustrations).
14Where applicable, refit the clutch release
bearing, guide sleeve, and the clutch, as
described in Chapter 6.
26Flexplate (automatic
transmission) -removal and
refitting
4
Removal
1Remove the transmission (Chapter 7B).
2Prevent the flexplate from turning by
jamming its ring gear teeth using a large
screwdriver or similar tool.
3Unbolt and remove the flexplate. Examine
the bolts and renew them all as a set if there is
the slightest doubt about their condition.
4The ring gear can be checked, and renewed
if necessary, as described in Section 25.
Refitting
5Refitting is the reverse of the removal
procedure. If the bolts are to be re-used, use a
wire brush to clean their threads, apply a few
drops of thread-locking compound (Vauxhall
Part No 90167347, or equivalent) to the
threads of each bolt on refitting. Tighten the
bolts to the specified torque wrench setting.6Refit the transmission, refer to Chapter 7B if
necessary.
27Crankshaft front oil seal -
renewal
3
Renewal
1Remove the timing belt and the rear timing
belt cover, as described in Section 11.
2Ensure that the Woodruff key is removed
from the end of the crankshaft.
3Punch or drill a small hole in the centre of
the now-exposed oil seal. Screw in a
self-tapping screw, and pull on the screw with
pliers to extract the seal. Several attempts
may be necessary. Be careful not to damage
the sealing face of the crankshaft.
4Clean the oil seal seat with a wooden or
plastic scraper.
5Before fitting the new oil seal, steps must
be taken to protect the oil seal lips from
damage, and from turning back on the
shoulder at the front end of the crankshaft.
Grease the seal lips, and then wind tape
around the end of the crankshaft to form a
gentle taper.
6Tap the seal into position using a large
socket or tube, until the seal is flush with the
outer face of the oil pump housing.
7Refit the rear timing belt cover and the
timing belt tension the timing belt as
described in Section 11.
2A•26SOHC engine procedures
25.13C . . .and then through the
specified angle -
1.6 litre engine25.13B Tighten the flywheel securing bolts
to the specified toque . . .25.13A Tool for locking flywheel fitted to
engine-to-transmission bolt hole -
1.6 litre engine
25.5 Removing the flywheel -
1.6 litre engine
Page 224 of 525
28Crankshaft rear oil seal -
renewal
4
Renewal
1With the engine removed from the vehicle,
remove the flywheel, or flexplate (as
applicable) as described in Sections 25 and
26.
2Punch or drill a small hole in the centre of
the now-exposed oil seal. Screw in a
self-tapping screw, and pull on the screw with
pliers to extract the seal. Several attempts
may be necessary. Be careful not to damage
the sealing face of the crankshaft.
3Clean the oil seal seat with a wooden or
plastic scraper.4Grease the lips of the new seal, then tap the
seal into position using a tube, until flush with
the outer faces of the cylinder block and rear
main bearing cap (see illustration).
5Refit the flywheel or flexplate (if applicable),
as described in Sections 25 or 26.
29Sump - removal and refitting
4
Note: The sump gasket(s) must be renewed
on refitting and sealer will be required for use
on the oil pump and rear main bearing
cap-to-cylinder block joints
Removal
1If the engine is in the vehicle, continue as
follows, otherwise go on to paragraph 9.
2Disconnect the battery negative lead.
3Drain the engine oil, referring to Chapter 1 if
necessary, then refit and tighten the drain
plug.
4Apply the handbrake, then jack up the front
of the vehicle, and support securely on axle
stands (see “Jacking and Vehicle Support”).
5Remove the front section of the exhaust
system, as described in Chapter 4C.
6Where applicable, disconnect the wiring
from the oil level sensor.
7Unscrew the securing bolts and remove the
engine-to-transmission blanking plate from
the bellhousing.8Remove the securing bolts, and withdraw
the sump. Note that on most models, the
sump baffle will probably be pulled away from
the cylinder block with the sump, but cannot
be removed until the oil pick-up pipe has been
removed.
9On 1.6, 1.8 and 2.0 litre models, to remove
the sump baffle, it is necessary to unbolt the
bracket securing the oil pick-up pipe to the
cylinder block. The baffle can then be
manipulated over the oil pick-up pipe. On C
16 NZ2, 1.8 and 2.0 litre models, prise the
rubber gasket from the sump baffle.
10If need be, the oil pick-up pipe can be
removed by unscrewing the single bolt
securing the support bracket to the cylinder
block (if not already done). Then remove the
two bolts securing the end of the pipe to the
oil pump. Recover the O-ring.
11Clean all traces of old gasket and sealing
compound from the mating faces of the
cylinder block, sump baffle (where
applicable), and sump.
Refitting
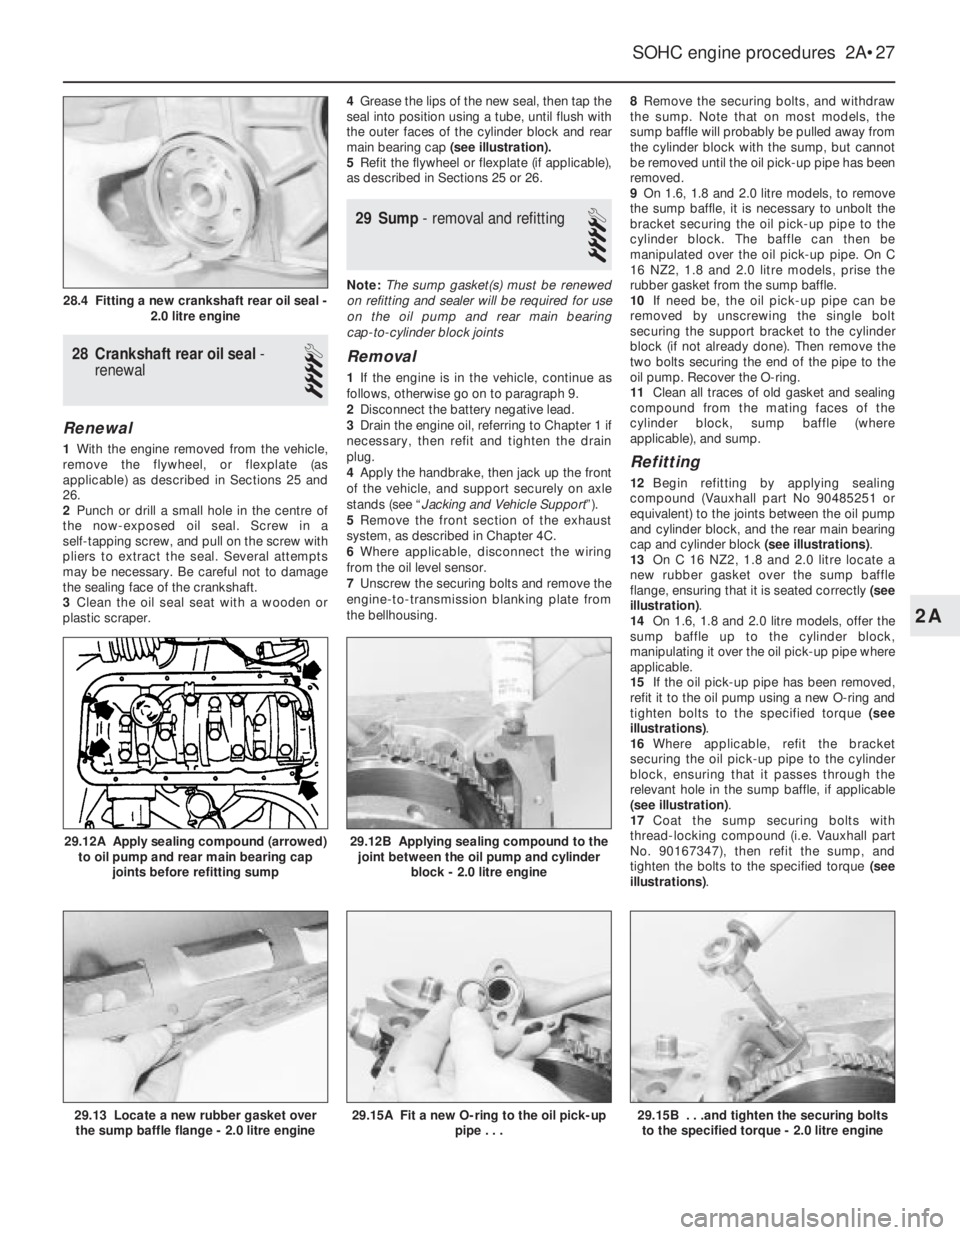
12Begin refitting by applying sealing
compound (Vauxhall part No 90485251 or
equivalent) to the joints between the oil pump
and cylinder block, and the rear main bearing
cap and cylinder block (see illustrations).
13On C 16 NZ2, 1.8 and 2.0 litre locate a
new rubber gasket over the sump baffle
flange, ensuring that it is seated correctly (see
illustration).
14On 1.6, 1.8 and 2.0 litre models, offer the
sump baffle up to the cylinder block,
manipulating it over the oil pick-up pipe where
applicable.
15If the oil pick-up pipe has been removed,
refit it to the oil pump using a new O-ring and
tighten bolts to the specified torque (see
illustrations).
16Where applicable, refit the bracket
securing the oil pick-up pipe to the cylinder
block, ensuring that it passes through the
relevant hole in the sump baffle, if applicable
(see illustration).
17Coat the sump securing bolts with
thread-locking compound (i.e. Vauxhall part
No. 90167347), then refit the sump, and
tighten the bolts to the specified torque (see
illustrations).
SOHC engine procedures 2A•27
29.12B Applying sealing compound to the
joint between the oil pump and cylinder
block - 2.0 litre engine
29.15B . . .and tighten the securing bolts
to the specified torque - 2.0 litre engine29.15A Fit a new O-ring to the oil pick-up
pipe . . .29.13 Locate a new rubber gasket over
the sump baffle flange - 2.0 litre engine
29.12A Apply sealing compound (arrowed)
to oil pump and rear main bearing cap
joints before refitting sump
28.4 Fitting a new crankshaft rear oil seal -
2.0 litre engine
2A
Page 227 of 525
14Insert the rod and piston into the top of
the cylinder bore, so that the base of the
compressor stands on the block. Check that
the connecting rod markings are towards the
side of the engine noted during removal. Note
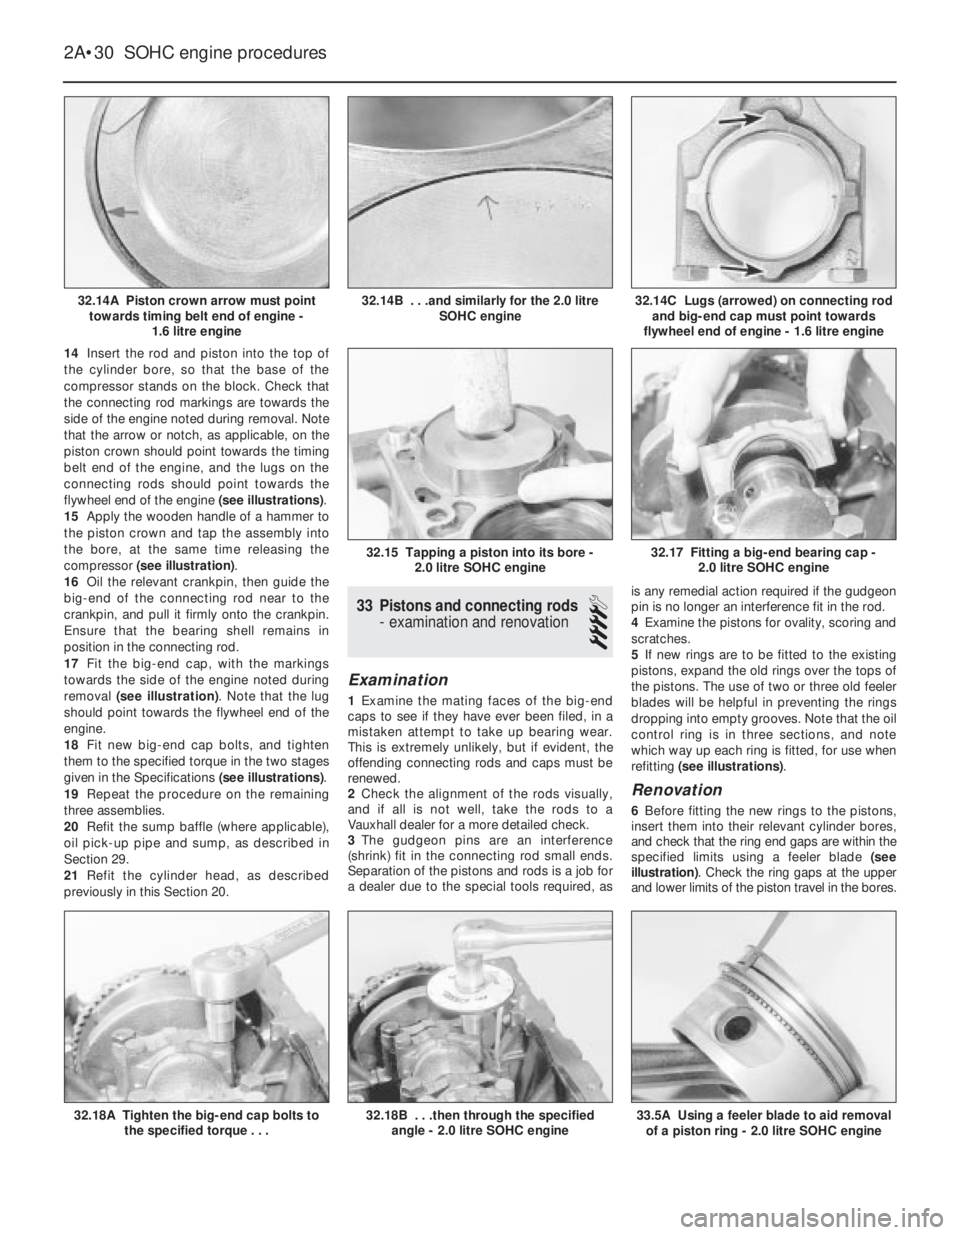
that the arrow or notch, as applicable, on the
piston crown should point towards the timing
belt end of the engine, and the lugs on the
connecting rods should point towards the
flywheel end of the engine (see illustrations).
15Apply the wooden handle of a hammer to
the piston crown and tap the assembly into
the bore, at the same time releasing the
compressor (see illustration).
16Oil the relevant crankpin, then guide the
big-end of the connecting rod near to the
crankpin, and pull it firmly onto the crankpin.
Ensure that the bearing shell remains in
position in the connecting rod.
17Fit the big-end cap, with the markings
towards the side of the engine noted during
removal (see illustration). Note that the lug
should point towards the flywheel end of the
engine.
18Fit new big-end cap bolts, and tighten
them to the specified torque in the two stages
given in the Specifications (see illustrations).
19Repeat the procedure on the remaining
three assemblies.
20Refit the sump baffle (where applicable),
oil pick-up pipe and sump, as described in
Section 29.
21Refit the cylinder head, as described
previously in this Section 20.
33Pistons and connecting rods
-examination and renovation
4
Examination
1Examine the mating faces of the big-end
caps to see if they have ever been filed, in a
mistaken attempt to take up bearing wear.
This is extremely unlikely, but if evident, the
offending connecting rods and caps must be
renewed.
2Check the alignment of the rods visually,
and if all is not well, take the rods to a
Vauxhall dealer for a more detailed check.
3The gudgeon pins are an interference
(shrink) fit in the connecting rod small ends.
Separation of the pistons and rods is a job for
a dealer due to the special tools required, asis any remedial action required if the gudgeon
pin is no longer an interference fit in the rod.
4Examine the pistons for ovality, scoring and
scratches.
5If new rings are to be fitted to the existing
pistons, expand the old rings over the tops of
the pistons. The use of two or three old feeler
blades will be helpful in preventing the rings
dropping into empty grooves. Note that the oil
control ring is in three sections, and note
which way up each ring is fitted, for use when
refitting (see illustrations).
Renovation
6Before fitting the new rings to the pistons,
insert them into their relevant cylinder bores,
and check that the ring end gaps are within the
specified limits using a feeler blade (see
illustration). Check the ring gaps at the upper
and lower limits of the piston travel in the bores.
2A•30SOHC engine procedures
32.14A Piston crown arrow must point
towards timing belt end of engine -
1.6 litre engine32.14C Lugs (arrowed) on connecting rod
and big-end cap must point towards
flywheel end of engine - 1.6 litre engine
33.5A Using a feeler blade to aid removal
of a piston ring - 2.0 litre SOHC engine32.18B . . .then through the specified
angle - 2.0 litre SOHC engine32.18A Tighten the big-end cap bolts to
the specified torque . . .
32.17 Fitting a big-end bearing cap -
2.0 litre SOHC engine32.15 Tapping a piston into its bore -
2.0 litre SOHC engine
32.14B . . .and similarly for the 2.0 litre
SOHC engine